本文主要是介绍Debezium-Flink-Hudi:实时流式CDC,希望对大家解决编程问题提供一定的参考价值,需要的开发者们随着小编来一起学习吧!
目录
1. 什么是Debezium
2. Debezium常规使用架构
3. 部署Debezium
3.1. AWS EKS部署Kafka Connector
4. Flink 消费Debezium 类型消息
5. 写入Hudi表
5.1. 依赖包问题
5.2. Flink 版本问题
6. Flink消费Debezium与写入Hudi测试
7. 验证hudi表
8. 总结
References
1. 什么是Debezium
Debezium是一个开源的分布式平台,用于捕捉变化数据(change data capture)的场景。它可以捕捉数据库中的事件变化(例如表的增、删、改等),并将其转为事件流,使得下游应用可以看到这些变化,并作出指定响应。
2. Debezium常规使用架构
根据Debezium官网[1]提供的常规使用的架构图:
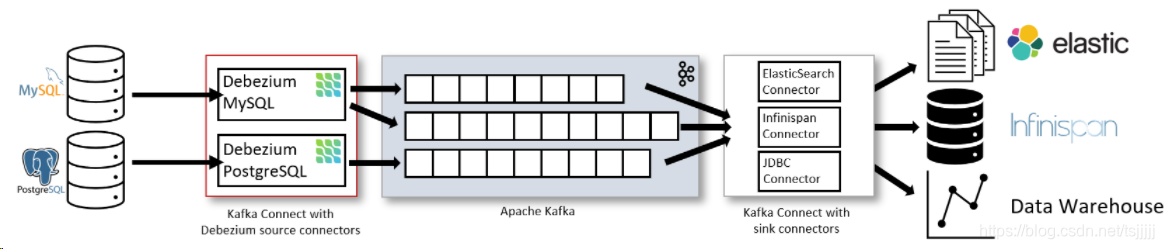
可以看到,在对RMSDB数据源做数据摄入时,使用的是Kafka Connect。Source Connector从数据库中获取记录并发送到Kafka;Sink Connectors将记录从Kafka Topic 传播到其他系统中。
上图中分别对MySQL 与 PostgreSQL部署了connector:
- MySQL connector使用的是一个客户端库访问binlog
- PostgreSQL connector读取的是的一个replication stream
另一种方式是仅部署Debezium Server(不带Kakfa),架构如下图所示:
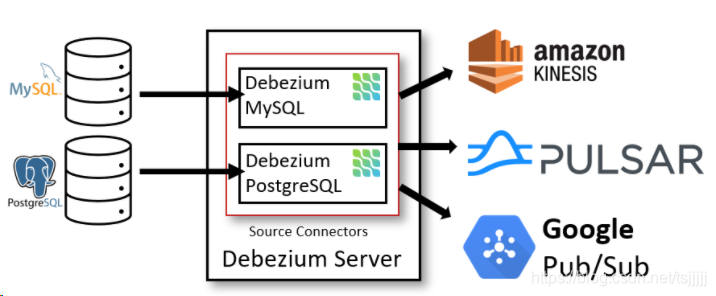
此方式使用的是Debezium自带的Source Connector。数据库端的事件会被序列化为JSON或Apache Avro格式,然后发送到其他消息系统如Kinesis、Apache Pulsar等。
3. 部署Debezium
在此次部署中,我们使用的均为AWS 资源,架构图如下:

此架构说明:
- 使用AWS RDS MySQL作为源端数据库
- 使用AWS EKS 部署Kafka Connector
- 使用AWS MSK 部署Kafka
- Kafka下游为AWS EMR,运行Flink,实现增量载入Hudi表
此处会省去创建AWS RDS、EKS、MSK 以及 EMR的过程,主要介绍搭建过程中的具体使用到的方法。
3.1. AWS EKS部署Kafka Connector
3.1.1. 安装Operator Framework 与 Strimzi Apache Kafka Operator
先安装Operator Framework[2],它是一个用来管理k8s原生应用(Operator)的开源工具。然后安装Kafka可以使用Strimzi Apache Kafka Operator[3]。
安装最新版 operator-framework[4],当前版本为 0.18.1:
| kubectl apply -f https://github.com/operator-framework/operator-lifecycle-manager/releases/download/v0.18.1/crds.yaml
kubectl apply -f https://github.com/operator-framework/operator-lifecycle-manager/releases/download/v0.18.1/olm.yaml
|
安装Strimzi Apache Kafka Operator:
| kubectl apply -f https://operatorhub.io/install/strimzi-kafka-operator.yaml
$ kubectl get csv -n operators NAME DISPLAY VERSION REPLACES PHASE strimzi-cluster-operator.v0.23.0 Strimzi 0.23.0 strimzi-cluster-operator.v0.22.1 Succeeded
|
3.1.2. 打包Debezium的MySQL Kafka Connector
下面部署Debezium 的 MySQL Kafka Connector。
源端数据库为MySQL,所以下载 debezium-connector-mysql,版本为1.5.0.Final:
| wget https://repo1.maven.org/maven2/io/debezium/debezium-connector-mysql/1.5.0.Final /debezium-connector-mysql-1.5.0.Final-plugin.tar.gz
tar -zxvf debezium-connector-mysql-1.5.0.Final-plugin.tar.gz
|
然后我们build一个自定义的debezium-connector-mysql Docker镜像:
创建Dockerfile:
| FROM strimzi/kafka:0.20.1-kafka-2.6.0 USER root:root RUN mkdir -p /opt/kafka/plugins/debezium COPY ./debezium-connector-mysql/ /opt/kafka/plugins/debezium/ USER 1001 |
Bulid镜像并推送:
| # 登录aws ecr > aws ecr get-login --no-include-email
# Build 镜像 > sudo docker build . -t {ECR_Repository}/connect-debezium
# 推送到ECR > sudo docker push {ECR_Repository}/connect-debezium
|
3.1.3. 部署 Debezium MySQL Connector
| $ cat debezium-mysql-connector.yaml apiVersion: kafka.strimzi.io/v1beta2 kind: KafkaConnect metadata: name: debezium-connector namespace: kafka # annotations: # # use-connector-resources configures this KafkaConnect # # to use KafkaConnector resources to avoid # # needing to call the Connect REST API directly # strimzi.io/use-connector-resources: "true" spec: version: 2.8.0 replicas: 1 bootstrapServers: xxxx image: xxxxxx.dkr.ecr.cn-north-1.amazonaws.com.cn/connect-debezium:latest config: group.id: connect-cluster offset.storage.topic: connect-cluster-offsets config.storage.topic: connect-cluster-configs status.storage.topic: connect-cluster-status # -1 means it will use the default replication factor configured in the broker config.storage.replication.factor: -1 offset.storage.replication.factor: -1 status.storage.replication.factor: -1
$ kubectl apply -f debezium-mysql-connector.yaml
$ kubectl get pods -n kafka NAME READY STATUS RESTARTS AGE debezium-connector-connect-69c98cc784-kqvww 1/1 Running 0 5m44s
|
替换其中的bootstrapServers为AWS MSK bootstrapServers;image为3.1.2 步骤中打包的镜像地址。
使用本地代理访问Kafka Connect 服务,并验证可用 Connectors:
| $ kubectl port-forward service/debezium-connector-connect-api 8083:8083 -n kafka
$ curl localhost:8083/connector-plugins [{ "class": "io.debezium.connector.mysql.MySqlConnector", "type": "source", "version": "1.5.0.Final" }, { "class": "org.apache.kafka.connect.file.FileStreamSinkConnector", "type": "sink", "version": "2.6.0" } … ]
|
编写 MySQL Connector 配置文件:
| $ cat mysql-connector-tang.json { "name": "mysql-connector", "config": { "connector.class": "io.debezium.connector.mysql.MySqlConnector", "tasks.max": "1", "database.hostname": "xxxxx", "database.port": "3306", "database.user": "xxxx", "database.password": "xxxx", "database.server.id": "184055", "database.server.name": "mysql-tang", "database.include.list": "tang ", "database.history.kafka.bootstrap.servers": "xxxxx", "database.history.kafka.topic": " changes.tang" } } |
将配置推送到 Kafka Connector:
| $ cat mysql-connector.json | curl -i -X POST -H "Accept:application/json" -H "Content-Type:application/json" localhost:8083/connectors/ -d @- HTTP/1.1 201 Created Date: Fri, 21 May 2021 11:00:25 GMT Location: http://localhost:8083/connectors/mysql-connector-tang Content-Type: application/json Content-Length: 733 Server: Jetty(9.4.24.v20191120)
# 验证已经创建connector $ curl localhost:8083/connectors/ ["mysql-connector-tang"]
|
3.1.4. 验证
部署完成后,在AWS RDS MySQL 中创建库与测试表,并写入测试数据。此时在AWS MSK中未发现对应 events生成。
查看connector 的pod 日志:
| $ kubectl logs debezium-connector-connect-69c98cc784-kqvww -n kafka …. io.debezium.DebeziumException: The MySQL server is not configured to use a ROW binlog_format, which is required for this connector to work properly. Change the MySQL configuration to use a binlog_format=ROW and restart the connector. at io.debezium.connector.mysql.MySqlConnectorTask.validateBinlogConfiguration(MySqlConnectorTask.java:203) at io.debezium.connector.mysql.MySqlConnectorTask.start(MySqlConnectorTask.java:85) at io.debezium.connector.common.BaseSourceTask.start(BaseSourceTask.java:130) |
可以看到MySQLConnector需要MySQL server 配置 binlog_format 为 ROW。
修改此配置后,再次通过进行kafka-console-consumer.sh 进行验证,即可看到测试数据库中的所有事件:
| $ ./kafka-console-consumer.sh --bootstrap-server xxxx --topic schema-changes.inventory --from-beginning … { "source" : { "server" : "mysql-tang" }, "position" : { "ts_sec" : 1621585297, "file" : "mysql-bin-changelog.000015", "pos" : 511, "snapshot" : true }, "databaseName" : "inventory", "ddl" : "CREATE DATABASE `inventory` CHARSET latin1 COLLATE latin1_swedish_ci", "tableChanges" : [ ] } … { "source" : { "server" : "mysql-tang" }, "position" : { "ts_sec" : 1621585297, "file" : "mysql-bin-changelog.000015", "pos" : 511, "snapshot" : true }, "databaseName" : "inventory", "ddl" : "CREATE TABLE `test` (\n `id` int(11) DEFAULT NULL,\n `name` varchar(10) DEFAULT NULL\n) ENGINE=InnoDB DEFAULT CHARSET=latin1", "tableChanges" : [ { "type" : "CREATE", "id" : "\"inventory\".\"test\"", "table" : { "defaultCharsetName" : "latin1", "primaryKeyColumnNames" : [ ], "columns" : [ { "name" : "id", "jdbcType" : 4, "typeName" : "INT", "typeExpression" : "INT", "charsetName" : null, "length" : 11, "position" : 1, "optional" : true, "autoIncremented" : false, "generated" : false }, { "name" : "name", "jdbcType" : 12, "typeName" : "VARCHAR", "typeExpression" : "VARCHAR", "charsetName" : "latin1", "length" : 10, "position" : 2, "optional" : true, "autoIncremented" : false, "generated" : false } ] } } ] } |
4. Flink 消费Debezium 类型消息
RMDB数据经Debezium Connector写入Kafka后,先由Flink进行消费。可以参考Flink官网中对Debezium格式的处理代码[5]:
CREATE TABLE topic_products ( -- schema is totally the same to the MySQL "products" table id BIGINT, name STRING, description STRING, weight DECIMAL(10, 2) ) WITH ( 'connector' = 'kafka', 'topic' = 'products_binlog', 'properties.bootstrap.servers' = 'localhost:9092', 'properties.group.id' = 'testGroup', -- using 'debezium-json' as the format to interpret Debezium JSON messages -- please use 'debezium-avro-confluent' if Debezium encodes messages in Avro format 'format' = 'debezium-json' ) |
5. 写入Hudi表
RMDB数据经Debezium Connector写入Kafka后,接下来通过 Flink 将流式数据写入到一张Hudi表,实现实时数据到Hudi。此部分可以参考Hudi官网对Flink支持的代码[6]:
| CREATE TABLE t1( uuid VARCHAR(20), -- you can use 'PRIMARY KEY NOT ENFORCED' syntax to mark the field as record key name VARCHAR(10), age INT, ts TIMESTAMP(3), `partition` VARCHAR(20) ) PARTITIONED BY (`partition`) WITH ( 'connector' = 'hudi', 'path' = 'table_base_path', 'write.tasks' = '1', -- default is 4 ,required more resource 'compaction.tasks' = '1', -- default is 10 ,required more resource 'table.type' = 'MERGE_ON_READ' -- this creates a MERGE_ON_READ table, by default is COPY_ON_WRITE ); |
5.1. 依赖包问题
在这个过程中,有一点需要注意的是,在使用Hudi官网提到的 hudi-flink-bundle_2.11-0.7.0.jar (或hudi-flink-bundle_2.11-0.8.0.jar) 时,会遇到以下问题:
| Caused by: org.apache.flink.table.api.ValidationException: Could not find any factory for identifier 'hudi' that implements 'org.apache.flink.table.factories.DynamicTableFactory' in the classpath.
|
从报错来看,hudi-flink-bundle_2.11-0.7.0.jar版本并未提供flink 与 hudi 通过 “connector=hudi” 集成的功能。但是在最新版的Hudi tutorial中有提到(当前为hudi 0.9 版本)需要hudi-flink-bundle_2.1?-*.*.*.jar。
于是笔者尝试了手动编译hudi 0.9 版本,build出hudi-flink-bundle_2.11-0.9.0-SNAPSHOT.jar。但是在编译过程中遇到以下问题:
| [ERROR] Failed to execute goal on project hudi-hadoop-mr: Could not resolve dependencies for project org.apache.hudi:hudi-hadoop-mr:jar:0.9.0-SNAPSHOT: Failed to collect dependencies at org.apache.hive:hive-exec:jar:core:2.3.2 -> org.apache.calcite:calcite-core:jar:1.10.0 -> org.pentaho:pentaho-aggdesigner-algorithm:jar:5.1.5-jhyde: Failed to read artifact descriptor for org.pentaho:pentaho-aggdesigner-algorithm:jar:5.1.5-jhyde: Could not transfer artifact org.pentaho:pentaho-aggdesigner-algorithm:pom:5.1.5-jhyde from/to maven-default-http-blocker (http://0.0.0.0/): Blocked mirror for repositories: [nexus-aliyun (http://maven.aliyun.com/nexus/content/groups/public/, default, releases), datanucleus (http://www.datanucleus.org/downloads/maven2, default, releases), glassfish-repository (http://maven.glassfish.org/content/groups/glassfish, default, disabled), glassfish-repo-archive (http://maven.glassfish.org/content/groups/glassfish, default, disabled), apache.snapshots (http://repository.apache.org/snapshots, default, snapshots), central (http://repo.maven.apache.org/maven2, default, releases), conjars (http://conjars.org/repo, default, releases+snapshots)] -> [Help 1] |
此问题说明的是无法从提供的任一maven 源中拉取org.pentaho:pentaho-aggdesigner-algorithm:jar:5.1.5-jhyde 包。
解决此问题的方法是:手动下载此jar包(位置为https://public.nexus.pentaho.org/repository/proxy-public-3rd-party-release/org/pentaho/pentaho-aggdesigner-algorithm/5.1.5-jhyde/pentaho-aggdesigner-algorithm-5.1.5-jhyde.jar
),并install 到本地 maven仓库中,再修改对应编译模块的pom文件,加上此依赖说明即可。
Maven install package的命令如:
| ../apache-maven-3.8.1/bin/mvn install:install-file -DgroupId=org.pentaho -DartifactId=pentaho-aggdesigner-algorithm -Dversion=5.1.5-jhyde -Dpackaging=jar -Dfile=/home/hadoop/.m2/repository/org/pentaho/pentaho-aggdesigner-algorithm/5.15-jhyde/pentaho-aggdesigner-algorithm-5.15-jhyde.jar |
此过程完成后,可以成功解决flink sql 映射 hudi 表的问题。
5.2. Flink 版本问题
在AWS EMR 最新版 emr-5.33.0 下,Flink版本为1.12.1,而hudi 0.9 版本编译所需的Flink版本为1.12.2。
笔者在编译0.9 版本 hudi 的 hudi-flink-bundle_2.11-0.9.0-SNAPSHOT.jar后,在EMR-5.33.0 下使用,遇到版本不一致报出的 NoSuchMethod问题。尝试各种jar包替换后仍未解决。
所以最终使用的是自建Flink 1.12.2 版本集群。
6. Flink消费Debezium与写入Hudi测试
使用简单的测试表进行测试。
MySQL中建表:
| create table customer(id varchar(20), name varchar(10), age int, user_level varchar(10)); |
启动Flink程序,主体代码为:
| package cdc
import org.apache.flink.streaming.api.scala.StreamExecutionEnvironment import org.apache.flink.table.api.{EnvironmentSettings, SqlDialect, TableResult} import org.apache.flink.table.api.bridge.scala.StreamTableEnvironment
object DebeziumHudi {
def main(args: Array[String]): Unit = { // Env settings val senv = StreamExecutionEnvironment.getExecutionEnvironment val blinkStreamSetting = EnvironmentSettings.newInstance().inStreamingMode().useBlinkPlanner().build() val tableEnv = StreamTableEnvironment.create(senv, blinkStreamSetting) tableEnv.getConfig().setSqlDialect(SqlDialect.DEFAULT)
val table_base_path = args(0) val table_type = args(1)
// kafka config val topicName = "my-con.tangdb.customer" val bootstrapServers = "xxxx:9092" val groupID = "group_mysql_tangdb"
// create kafka table val create_kafka_table_sql = "CREATE TABLE customer(\n" + "id VARCHAR(20),\n" + "name VARCHAR(10),\n" + "age int,\n" + "user_level VARCHAR(20) \n" + ") WITH (\n" + " 'connector' = 'kafka',\n" + " 'topic' = '" + topicName + "',\n" + " 'properties.bootstrap.servers' = '" + bootstrapServers + "',\n" + " 'properties.group.id' = '" + groupID + "',\n" + " 'debezium-json.schema-include' = 'true',\n" + " 'format' = 'debezium-json'\n" + ")"
// hudi table config //val table_base_path = "s3://xxx-hudi/customer/" //val table_type = "COPY_ON_WRITE"
// create hudi table val create_hudi_table_sql = "CREATE TABLE customers_hudi(\n" + "id VARCHAR(20) PRIMARY KEY NOT ENFORCED,\n" + "name VARCHAR(10),\n" + "age INT,\n" + "ts TIMESTAMP(3), \n" + "`user_level` VARCHAR(20) ) \n" + "PARTITIONED BY (user_level) \n" + "WITH (\n" + " 'connector' = 'hudi',\n" + " 'path' = '" + table_base_path +"',\n" + " 'table.type' = '" + table_type + "',\n" + " 'read.tasks' = '1',\n" + " 'write.tasks' = '1',\n" + " 'compaction.tasks' = '1',\n" + " 'write.batch.size' = '8',\n" + " 'compaction.delta_commits' = '2',\n" + " 'compaction.delta_seconds' = '10' " + ")"
// do sql query tableEnv.executeSql(create_kafka_table_sql) tableEnv.executeSql(create_hudi_table_sql) tableEnv.executeSql("insert into customers_hudi (id, name, age, ts, user_level) select id, name, age, current_timestamp, user_level from customer")
}
} |
提交Flink程序后正常运行:
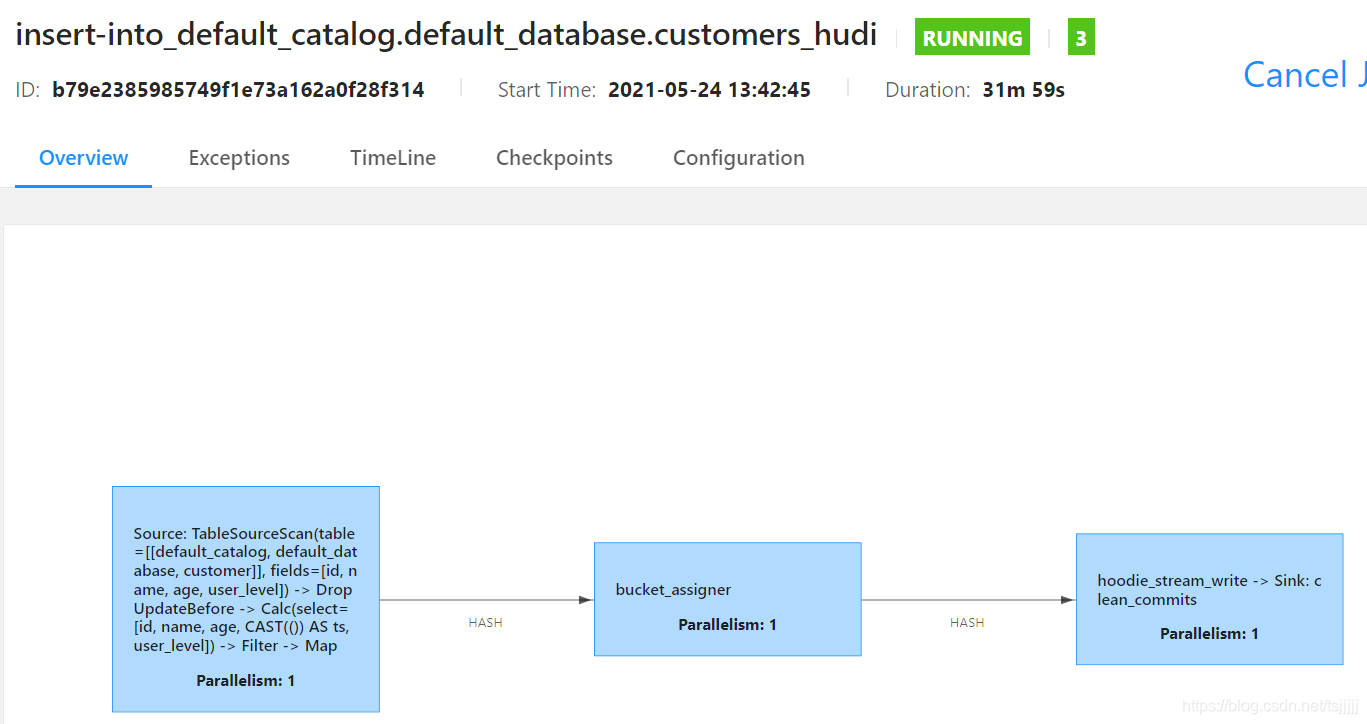
使用MySQL procedure 不断向customer 表中写入数据。可以观察到hudi路径下出现对应分区路径,并出现结果文件:
| $ hdfs dfs -ls s3://xxx-hudi/customer/ Found 3 items drwxrwxrwx - hadoop hadoop 0 1970-01-01 00:00 s3://tang-hudi/customer/.hoodie drwxrwxrwx - hadoop hadoop 0 1970-01-01 00:00 s3://tang-hudi/customer/lv2 drwxrwxrwx - hadoop hadoop 0 1970-01-01 00:00 s3://tang-hudi/customer/lv3
$ hdfs dfs -ls s3://xxx-hudi/customer/lv2/ Found 2 items -rw-rw-rw- 1 hadoop hadoop 93 2021-05-24 13:52 s3://tang-hudi/customer/lv2/.hoodie_partition_metadata -rw-rw-rw- 1 hadoop hadoop 2092019 2021-05-24 14:00 s3://tang-hudi/customer/lv2/e8195cc8-aae4-4462-8605-7f4eceac90ce_0-1-0_20210524134250.parquet |
7. 验证hudi表
首先使用 AWS S3 Select 查询目标parquet文件,可以拿到正确结果:

但是,而后分别使用了 SparkSQL与 Hive对Hudi表地址进行映射并执行读取操作,结果均失败。暂未得出失败原因。
初步判断可能与包环境依赖有关。由于最新版AWS EMR emr-5.33.0 下,Flink版本为1.12.1,而hudi 0.9 版本编译所需的Flink版本为1.12.2。所以笔者使用了自建的Flink集群,当时仅考虑了Flink与Hudi版本保持一致,但未将Spark与Hive版本纳入考虑范围内,所以可能导致了此原因。
8. 总结
总体来看,Debezium是一个非常方便部署使用的CDC工具,可以有效地将RMSDB数据抽取到消息系统中,供不同的下游应用消费。而Flink直接对接Debezium与Hudi的功能,极大方便了数据湖场景下的实时数据ingestion。
References
[1] https://debezium.io/documentation/reference/1.5/architecture.html
[2] https://operatorhub.io
[3] https://operatorhub.io/operator/strimzi-kafka-operator
[4] https://github.com/operator-framework/operator-lifecycle-manager/releases/
[5] https://ci.apache.org/projects/flink/flink-docs-release-1.13/docs/connectors/table/formats/debezium/
[6] https://hudi.apache.org/docs/flink-quick-start-guide.html
这篇关于Debezium-Flink-Hudi:实时流式CDC的文章就介绍到这儿,希望我们推荐的文章对编程师们有所帮助!


