本文主要是介绍基于CNN+数据增强+残差网络Resnet50的少样本高准确度猫咪种类识别—深度学习算法应用(含全部工程源码)+数据集+模型(四),希望对大家解决编程问题提供一定的参考价值,需要的开发者们随着小编来一起学习吧!
系列文章目录
基于CNN+数据增强+残差网络Resnet50的少样本高准确度猫咪种类识别—深度学习算法应用(含全部工程源码)+数据集+模型(一)
基于CNN+数据增强+残差网络Resnet50的少样本高准确度猫咪种类识别—深度学习算法应用(含全部工程源码)+数据集+模型(二)
基于CNN+数据增强+残差网络Resnet50的少样本高准确度猫咪种类识别—深度学习算法应用(含全部工程源码)+数据集+模型(三)
基于CNN+数据增强+残差网络Resnet50的少样本高准确度猫咪种类识别—深度学习算法应用(含全部工程源码)+数据集+模型(四)
基于CNN+数据增强+残差网络Resnet50的少样本高准确度猫咪种类识别—深度学习算法应用(含全部工程源码)+数据集+模型(五)
基于CNN+数据增强+残差网络Resnet50的少样本高准确度猫咪种类识别—深度学习算法应用(含全部工程源码)+数据集+模型(六)
目录
- 系列文章目录
- 前言
- 总体设计
- 系统整体结构图
- 系统流程图
- 运行环境
- 模块实现
- 1. 数据预处理
- 2. 数据增强
- 3. 普通CNN模型
- 1)模型结构
- 2)模型优化
- 3)模型训练
- 4)模型保存
- 4. 残差网络模型
- 1)残差网络的介绍
- 2)模型结构
- 3)模型训练
- 4)模型保存
- 其他相关博客
- 工程源代码下载
- 其它资料下载

前言
本项目以卷积神经网络(CNN)模型为基础,对收集到的猫咪图像数据进行训练。通过采用数据增强技术和结合残差网络的方法,旨在提高模型的性能,以实现对不同猫的种类进行准确识别。
首先,项目利用CNN模型,这是一种专门用于图像识别任务的深度学习模型。该模型通过多个卷积和池化层,能够有效地捕捉图像中的特征,为猫的种类识别提供强大的学习能力。
其次,通过对收集到的数据进行训练,本项目致力于建立一个能够准确辨识猫的种类的模型。包括各种猫的图像,以确保模型能够泛化到不同的种类和场景。
为了进一步提高模型性能,采用了数据增强技术。数据增强通过对训练集中的图像进行旋转、翻转、缩放等操作,生成更多的变体,有助于模型更好地适应不同的视角和条件。
同时,引入残差网络的思想,有助于解决深层网络训练中的梯度消失问题,提高模型的训练效果。这种结合方法使得模型更具鲁棒性和准确性。
最终,通过本项目,实现了对猫的种类进行精准识别的目标。这对于宠物领域、动物学研究等方面都具有实际应用的潜力,为相关领域提供了一种高效而可靠的工具。
总体设计
本部分包括系统整体结构图和系统流程图。
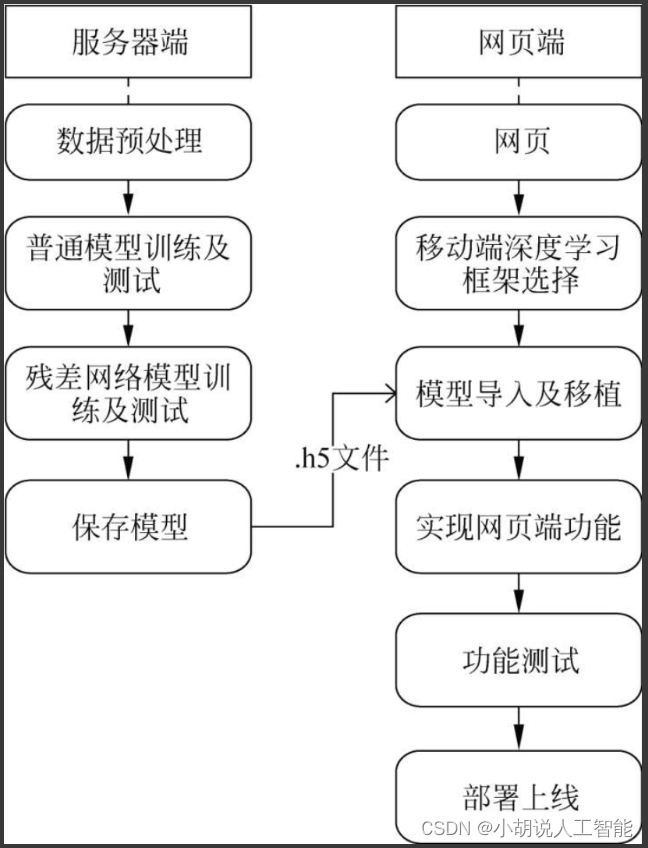
系统整体结构图
系统整体结构如图所示。
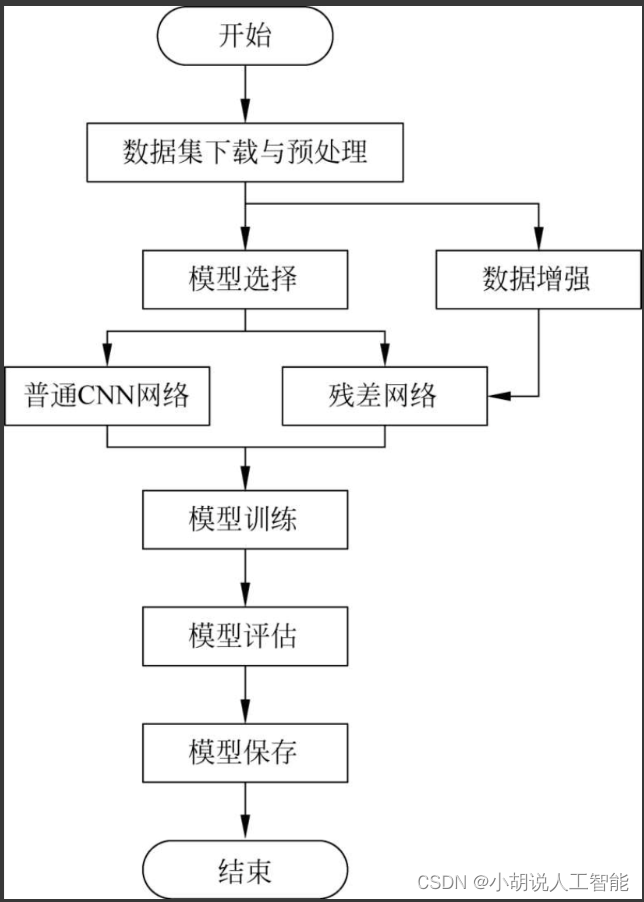
系统流程图
系统流程如图所示。
运行环境
本部分包括计算型云服务器、Python环境、TensorFlow环境和MySQL环境。
详见博客。
模块实现
本项目包括5个模块:数据预处理、数据增强、普通CNN模型、残差网络模型、模型生成。下面分别给出各模块的功能介绍及相关代码。
1. 数据预处理
打开浏览器,分别搜索布偶猫、孟买猫、暹罗猫和英国短毛猫的图片。用批量下载器下载图片,筛选出特征明显的图片作为数据集。使用的图片包含101张布偶猫、97张孟买猫、101张逼罗猫以及85张英国短毛猫,共计384张图片。(其中在工程代码中/cat_kind_model/cat_data_100与/cat_kind_model/cat_data_224也可下载)
详见博客。
2. 数据增强
所谓数据增强,是通过翻转、旋转、比例缩放、随机裁剪、移位、添加噪声等操作对现有数据集进行拓展。本项目中数据量较小,无法提取图片的深层特征,使用深层的残差网络时易造成模型过拟合。
详见博客。
3. 普通CNN模型
处理图片数据格式后,转换为数组作为模型的输入,并根据文件名提取标签,定义模型结构、优化器、损失函数和性能指标。本项目使用Keras提供类似VGG的卷积神经网络。
1)模型结构
详见博客。
2)模型优化
详见博客。
3)模型训练
详见博客。
4)模型保存
详见博客。
4. 残差网络模型
本部分包括残差网络的介绍、模型结构以及模型训练。
1)残差网络的介绍
网络深度对模型性能至关重要,增加网络层数,可以进行更加复杂的特征提取。但是,深层网络会出现退化问题,即随着网络层数的增加,训练集的损失逐渐下降,然后趋于饱和,当网络深度继续增加时,训练集损失反而会增大。残差网络的思想是把当前层的全部信息映射到下一层,可以有效解决退化问题,优化网络性能。残差网络由一系列残差块组成,残差块分为直接映射部分和残差剖部分。
2)模型结构
模型结构导入相应库的操作如下:
from __future__ import print_function
import numpy as np
import warnings
from keras.layers import Input
from keras import layers
from keras.layers import Dense
from keras.layers import Activation
from keras.layers import Flatten
from keras.layers import Conv2D
from keras.layers import MaxPooling2D
from keras.layers import GlobalMaxPooling2D
from keras.layers import ZeroPadding2D
from keras.layers import AveragePooling2D
from keras.layers import GlobalAveragePooling2D
from keras.layers import BatchNormalization
from keras.models import Model
from keras.preprocessing import image
import keras.backend as K
from keras.utils import layer_utils
from keras.utils.data_utils import get_file
from keras.applications.imagenet_utils import decode_predictions
from keras.applications.imagenet_utils import preprocess_input
import platform  #用于平台检测
if platform.system() == "Windows":from keras_applications.imagenet_utils import _obtain_input_shape
elif platform.system() == "Linux":from keras_applications.imagenet_utils import _obtain_input_shape
from keras.engine.topology import get_source_inputs
残差网络模型由identity_block和conv_block组成,identity_block与普通的网络相同,包含三个卷积层,相关代码如下:
def identity_block(input_tensor, kernel_size, filters, stage, block):filters1, filters2, filters3 = filtersif K.image_data_format() == 'channels_last':bn_axis = 3else:bn_axis = 1conv_name_base = 'res' + str(stage) + block + '_branch'bn_name_base = 'bn' + str(stage) + block + '_branch'#包含三个卷积层x = Conv2D(filters1, (1, 1), name=conv_name_base + '2a')(input_tensor)x = BatchNormalization(axis=bn_axis, name=bn_name_base + '2a')(x)x = Activation('relu')(x)x = Conv2D(filters2, kernel_size, padding='same', name=conv_name_base + '2b')(x)x = BatchNormalization(axis=bn_axis, name=bn_name_base + '2b')(x)x = Activation('relu')(x)x = Conv2D(filters3, (1, 1), name=conv_name_base + '2c')(x)x = BatchNormalization(axis=bn_axis, name=bn_name_base + '2c')(x)x = layers.add([x, input_tensor])x = Activation('relu')(x)
return x
conv_block包含三个卷积层和一个直连,相关代码如下:
	def conv_block(input_tensor, kernel_size, filters, stage, block, strides=(2, 2)):  #定义卷积块filters1, filters2, filters3 = filtersif K.image_data_format() == 'channels_last':bn_axis = 3else:bn_axis = 1conv_name_base = 'res' + str(stage) + block + '_branch'bn_name_base = 'bn' + str(stage) + block + '_branch'x = Conv2D(filters1, (1, 1), strides=strides, name=conv_name_base + '2a')(input_tensor)x = BatchNormalization(axis=bn_axis, name=bn_name_base + '2a')(x)x = Activation('relu')(x)x = Conv2D(filters2, kernel_size, padding='same', name=conv_name_base + '2b')(x)x = BatchNormalization(axis=bn_axis, name=bn_name_base + '2b')(x)x = Activation('relu')(x)x = Conv2D(filters3, (1, 1), name=conv_name_base + '2c')(x)
x = BatchNormalization(axis=bn_axis, name=bn_name_base + '2c')(x)
#把输入层的全部信息直接合并到输出shortcut = Conv2D(filters3, (1, 1), strides=strides,name=conv_name_base + '1')(input_tensor)shortcut = BatchNormalization(axis=bn_axis, name=bn_name_base + '1')(shortcut)x = layers.add([x, shortcut])x = Activation('relu')(x)
return x
定义好两个模块后开始搭建残差网络模型。相关代码如下:
def ResNet50(include_top=True, weights='imagenet',   #定义残差网络input_tensor=None, input_shape=None,pooling=None,classes=1000):if weights not in {'imagenet', 'cat_kind', None}:raise ValueError('The `weights` argument should be either ''`None` (random initialization) or `cat_kind` or `imagenet` ''(pre-training on ImageNet).')if weights == 'imagenet' and include_top:classes = 1000if weights == 'cat_kind':classes = 4#如果在imagenet上面微调,并且包含了全连接层,那么类别必须是1000if weights == 'imagenet' and include_top and classes != 1000:raise ValueError('If using `weights` as imagenet with `include_top`'' as true, `classes` should be 1000')#确定合适的输入格式input_shape = _obtain_input_shape(input_shape,default_size=224,min_size=197,data_format=K.image_data_format(),#include_top=include_top)require_flatten=include_top)if input_tensor is None:img_input = Input(shape=input_shape)else:if not K.is_keras_tensor(input_tensor):img_input = Input(tensor=input_tensor, shape=input_shape)else:img_input = input_tensorif K.image_data_format() == 'channels_last':bn_axis = 3else:bn_axis = 1#构建模型结构x = ZeroPadding2D((3, 3))(img_input)x = Conv2D(64, (7, 7), strides=(2, 2), name='conv1')(x)x = BatchNormalization(axis=bn_axis, name='bn_conv1')(x)x = Activation('relu')(x)x = MaxPooling2D((3, 3), strides=(2, 2))(x)x = conv_block(x, 3, [64, 64, 256], stage=2, block='a', strides=(1, 1))x = identity_block(x, 3, [64, 64, 256], stage=2, block='b')x = identity_block(x, 3, [64, 64, 256], stage=2, block='c')x = conv_block(x, 3, [128, 128, 512], stage=3, block='a')x = identity_block(x, 3, [128, 128, 512], stage=3, block='b')x = identity_block(x, 3, [128, 128, 512], stage=3, block='c')x = identity_block(x, 3, [128, 128, 512], stage=3, block='d')x = conv_block(x, 3, [256, 256, 1024], stage=4, block='a')x = identity_block(x, 3, [256, 256, 1024], stage=4, block='b')x = identity_block(x, 3, [256, 256, 1024], stage=4, block='c')x = identity_block(x, 3, [256, 256, 1024], stage=4, block='d')x = identity_block(x, 3, [256, 256, 1024], stage=4, block='e')x = identity_block(x, 3, [256, 256, 1024], stage=4, block='f')x = conv_block(x, 3, [512, 512, 2048], stage=5, block='a')x = identity_block(x, 3, [512, 512, 2048], stage=5, block='b')x = identity_block(x, 3, [512, 512, 2048], stage=5, block='c')x = AveragePooling2D((7, 7), name='avg_pool')(x)if include_top:x = Flatten()(x)x = Dense(classes, activation='softmax', name='fc1000')(x)else:if pooling == 'avg':x = GlobalAveragePooling2D()(x)elif pooling == 'max':x = GlobalMaxPooling2D()(x)#确保模型考虑了input_tensor的任何潜在预处理if input_tensor is not None:inputs = get_source_inputs(input_tensor)else:inputs = img_input#创建模型model = Model(inputs, x, name='resnet50')#加载权重if weights == 'imagenet':if include_top:#调用模型下载,这里本地提供,所以将其注释#weights_path = get_file('resnet50_weights_tf_dim_ordering_tf_kernels.h5',#WEIGHTS_PATH,#cache_subdir='models',md5_hash='a7b3fe01876f51b976af0dea6bc144eb')weights_path = WEIGHTS_PATH_else:#调用模型下载,这里本地提供,所以将其注释#weights_path = get_file('resnet50_weights_tf_dim_ordering_tf_kernels_notop.h5',#WEIGHTS_PATH_NO_TOP,#cache_subdir='models',
md5_hash='a268eb855778b3df3c7506639542a6af')weights_path = WEIGHTS_PATH_NO_TOPmodel.load_weights(weights_path)if K.backend() == 'theano':layer_utils.convert_all_kernels_in_model(modelif K.image_data_format() == 'channels_first':if include_top:maxpool = model.get_layer(name='avg_pool')shape = maxpool.output_shape[1:]dense = model.get_layer(name='fc1000')layer_utils.convert_dense_weights_data_format(dense, shape, 'channels_first')if K.backend() == 'tensorflow':warnings.warn('You are using the TensorFlow backend, yet you '                              'are using the Theano ''image data format convention ''(`image_data_format="channels_first"`). ''For best performance, set ''`image_data_format="channels_last"` in ''your Keras config ''at ~/.keras/keras.json.')#加载猫种类的权重if weights == 'cat_kind':WEIGHTS_PATH = '../models/cat_weight_resNet50.h5'model.load_weights(WEIGHTS_PATH)return model
3)模型训练
用残差网络模型训练数据。相关代码如下:
import os   #导入各种模块
from PIL import Image
import numpy as np
from keras.utils import np_utils
from keras.optimizers import SGD, RMSprop, Adam
import argparse
from resnet_example.resnet50 import ResNet50
def convert_image_array(filename, src_dir):  #定义转换图像数组img = Image.open(os.path.join(src_dir, filename)).convert('RGB')return np.array(img)
def prepare_data(train_or_test_dir):x_train_test = []#将训练或者测试集图片转换为数组ima1 = os.listdir(train_or_test_dir)for i in ima1:x_train_test.append(convert_image_array(i, train_or_test_dir))x_train_test = np.array(x_train_test)#根据文件名提取标签y_train_test = []for filename in ima1:y_train_test.append(int(filename.split('_')[0]))y_train_test = np.array(y_train_test)#将标签转换格式y_train_test = np_utils.to_categorical(y_train_test)# 将特征点从0~255转换成0~1提高特征提取精度x_train_test = x_train_test.astype('float32')x_train_test /= 255#返回训练和测试数据return x_train_test, y_train_test
def main_args():  #定义函数参数解析parser = argparse.ArgumentParser()parser.add_argument('--train_dir', type=str, default='../cat_data_224/train',help="the path to the training imgs")parser.add_argument('--test_dir', type=str, default='../cat_data_224/test', help='the path to the testing imgs')parser.add_argument("--save_model", type=str, default='../models/cat_weight_res.h5', help='the path and the model name')parser.add_argument("--batch_size", type=int, default=10, help='the training batch size of data')parser.add_argument("--epochs", type=int, default=64, help='the training epochs')options = parser.parse_args()return options
if __name__ == "__main__":#调用函数获取用户参数options = main_args()#搭建卷积神经网络#输入大小必须至少197x197;model = ResNet50(weights=None, classes=4)#选择在imagenet上进行微调#model = ResNet50(include_top=False, weights='imagenet', classes=4)sgd = SGD(lr=0.01, decay=1e-6, momentum=0.9, nesterov=True)model.compile(loss='categorical_crossentropy', optimizer=sgd, metrics=['accuracy'])#调用函数获取训练数据和标签x_train, y_train = prepare_data(options.train_dir)x_test, y_test = prepare_data(options.test_dir)model.fit(x_train, y_train, shuffle=True, batch_size=options.batch_size,epochs=options.epochs, validation_data=(x_test, y_test))
4)模型保存
模型保存的相关代码如下:
save_model_path = os.path.dirname(options.save_model)
if not os.path.exists(save_model_path):os.mkdir(save_model_path)
#保存模型
model.save_weights(options.save_model, overwrite=True)
score = model.evaluate(x_test, y_test, batch_size=options.batch_size)
print("Testing loss:{0},Testing acc:{1}".format(score[0], score[1]))
其他相关博客
基于CNN+数据增强+残差网络Resnet50的少样本高准确度猫咪种类识别—深度学习算法应用(含全部工程源码)+数据集+模型(一)
基于CNN+数据增强+残差网络Resnet50的少样本高准确度猫咪种类识别—深度学习算法应用(含全部工程源码)+数据集+模型(二)
基于CNN+数据增强+残差网络Resnet50的少样本高准确度猫咪种类识别—深度学习算法应用(含全部工程源码)+数据集+模型(三)
基于CNN+数据增强+残差网络Resnet50的少样本高准确度猫咪种类识别—深度学习算法应用(含全部工程源码)+数据集+模型(五)
基于CNN+数据增强+残差网络Resnet50的少样本高准确度猫咪种类识别—深度学习算法应用(含全部工程源码)+数据集+模型(六)
工程源代码下载
详见本人博客资源下载页
其它资料下载
如果大家想继续了解人工智能相关学习路线和知识体系,欢迎大家翻阅我的另外一篇博客《重磅 | 完备的人工智能AI 学习——基础知识学习路线,所有资料免关注免套路直接网盘下载》
这篇博客参考了Github知名开源平台,AI技术平台以及相关领域专家:Datawhale,ApacheCN,AI有道和黄海广博士等约有近100G相关资料,希望能帮助到所有小伙伴们。
这篇关于基于CNN+数据增强+残差网络Resnet50的少样本高准确度猫咪种类识别—深度学习算法应用(含全部工程源码)+数据集+模型(四)的文章就介绍到这儿,希望我们推荐的文章对编程师们有所帮助!


