本文主要是介绍手写数字识别(分别用svm、决策树算法、朴素贝叶斯算法、KNN对MINIST数据进行分类),希望对大家解决编程问题提供一定的参考价值,需要的开发者们随着小编来一起学习吧!
实验四、手写数字识别
一、实验目的
- 学会用分类算法解决实际问题
二、实验工具
- Anaconda
- sklearn
- matplotlib
- pandas
三、实验简介
概念介绍
图像识别(Image Recognition)是指利用计算机对图像进行处理、分析和理解,以识别各种不同模式的目标和对像的技术。
图像识别的发展经历了三个阶段:文字识别、数字图像处理与识别、物体识别。机器学习领域一般将此类识别问题转化为分类问题。
手写识别是常见的图像识别任务。计算机通过手写体图片来识别出图片中的字,与印刷字体不同的是,不同人的手写体风格迥异,大小不一, 造成了计算机对手写识别任务的一些困难。
数字手写体识别由于其有限的类别(0~9共10个数字)成为了相对简单 的手写识别任务。DBRHD和MNIST是常用的两个数字手写识别数据集
数据介绍
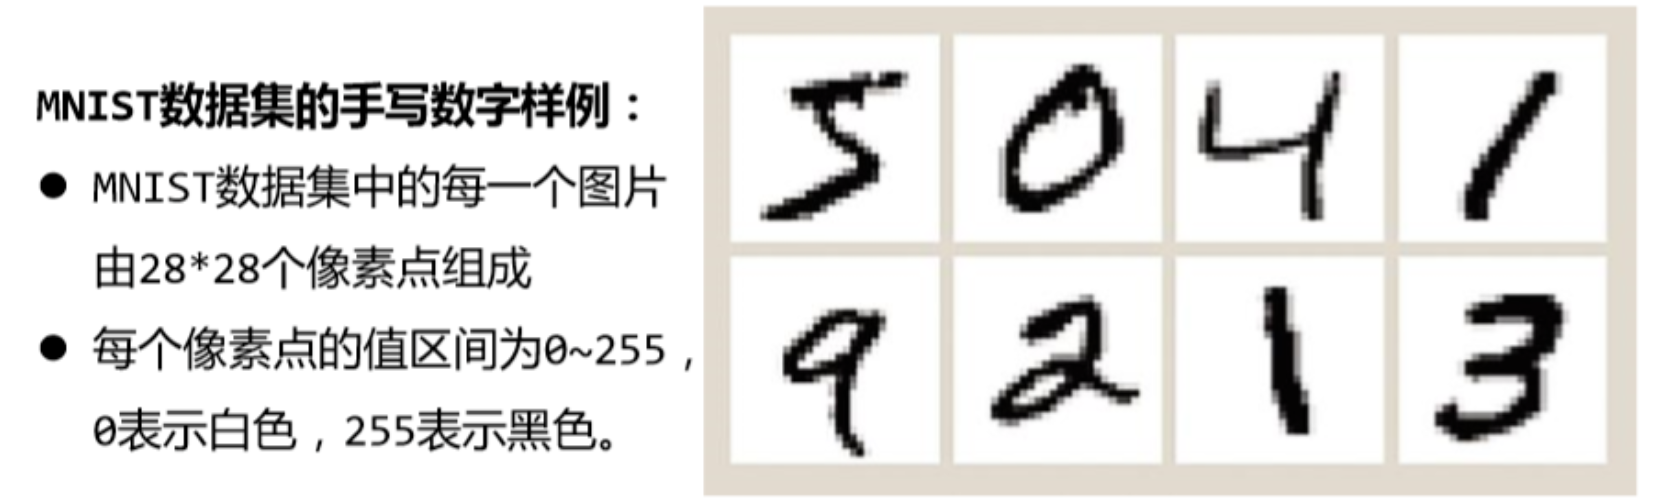
MNIST是一个包含数字0~9的手写体图片数据集,图片已归一化为以手写数 字为中心的28*28规格的图片。
MNIST由训练集与测试集两个部分组成,各部分 规模如下:
训练集:60,000个手写体图片及对应标签
测试集:10,000个手写体图片及对应标签
四、实验内容
1. 采用SVM算法实现手写数字识别。
例如,采用SVM对MINIST数据集进行分类。
import numpy as np
from sklearn import svm
from sklearn.datasets  import load_digits
from sklearn.model_selection  import train_test_split
import _pickle as pickleif __name__ == '__main__':mnist = load_digits()x,test_x,y,test_y = train_test_split(mnist.data,mnist.target,test_size=0.25,random_state=40)model = svm.LinearSVC()model.fit(x, y)z = model.predict(test_x)print('准确率:',np.sum(z==test_y)/z.size)with open('./model.pkl','wb') as file:pickle.dump(model,file)
SVM算法手写数字识别准确率0.94
import numpy as np
from sklearn import svm
from sklearn.datasets import load_digits
from sklearn.model_selection import train_test_split
import _pickle as pickle
import matplotlib.pyplot as plt
mnist = load_digits()
x,test_x,y,test_y = train_test_split(mnist.data,mnist.target,test_size=0.25,random_state=40)
model = svm.LinearSVC()
model.fit(x,y)
z=model.predict(test_x)
print('准确率:',np.sum(z==test_y)/z.size)
with open('D:/shujukexue/model.pkl','wb') as file:pickle.dump(model,file)
#学习后识别520到525六张图片并给出预测
model.predict(mnist.data[520:526])
#实际的520到525代表的数
mnist.target[520:526]
#显示520到525数字图片
plt.subplot(321)
plt.imshow(mnist.images[520],cmap=plt.cm.gray_r,interpolation='nearest')
plt.subplot(322)
plt.imshow(mnist.images[521],cmap=plt.cm.gray_r,interpolation='nearest')
plt.subplot(323)
plt.imshow(mnist.images[522],cmap=plt.cm.gray_r,interpolation='nearest')
plt.subplot(324)
plt.imshow(mnist.images[523],cmap=plt.cm.gray_r,interpolation='nearest')
plt.subplot(325)
plt.imshow(mnist.images[524],cmap=plt.cm.gray_r,interpolation='nearest')
plt.subplot(326)
plt.imshow(mnist.images[525],cmap=plt.cm.gray_r,interpolation='nearest')

2. 参考以上程序,分别采用决策树算法、朴素贝叶斯算法、KNN对MINIST数据进行分类,并对比其性能好坏。
决策树算法手写数字识别,准确率:0.8466666666666667
import numpy as np
from sklearn.datasets import load_digits
from sklearn.model_selection import train_test_split
import _pickle as pickle
import matplotlib.pyplot as plt
mnist = load_digits()
x,test_x,y,test_y = train_test_split(mnist.data,mnist.target,test_size=0.25,random_state=40)
from sklearn.tree import DecisionTreeClassifier, export_graphviz
model = DecisionTreeClassifier(criterion="entropy")
model.fit(x,y)
z=model.predict(test_x)
print('准确率:',np.sum(z==test_y)/z.size)
#学习后识别99到105六张图片并给出预测
model.predict(mnist.data[99:105])
#实际的99到105代表的数
mnist.target[99:105]
#显示99到105数字图片
plt.subplot(321)
plt.imshow(mnist.images[99],cmap=plt.cm.gray_r,interpolation='nearest')
plt.subplot(322)
plt.imshow(mnist.images[100],cmap=plt.cm.gray_r,interpolation='nearest')
plt.subplot(323)
plt.imshow(mnist.images[101],cmap=plt.cm.gray_r,interpolation='nearest')
plt.subplot(324)
plt.imshow(mnist.images[102],cmap=plt.cm.gray_r,interpolation='nearest')
plt.subplot(325)
plt.imshow(mnist.images[103],cmap=plt.cm.gray_r,interpolation='nearest')
plt.subplot(326)
plt.imshow(mnist.images[104],cmap=plt.cm.gray_r,interpolation='nearest')
from six import StringIO
import pandas as pd
x = pd.DataFrame(x)
with open("D:/shujukexue/JueCetree.dot", 'w') as f:f = export_graphviz(model, feature_names = x.columns, out_file = f)

按照上次实验所学导出pdf、png

图片太大,选择其中一部分放大如图:

朴素贝叶斯算法:准确率:0.86
import numpy as np
from sklearn.datasets import load_digits
from sklearn.model_selection import train_test_split
import _pickle as pickle
import matplotlib.pyplot as plt
mnist = load_digits()
x,test_x,y,test_y = train_test_split(mnist.data,mnist.target,test_size=0.25,random_state=40)
from sklearn.naive_bayes import MultinomialNB
model = MultinomialNB()
model.fit(x,y)
z=model.predict(test_x)
print('准确率:',np.sum(z==test_y)/z.size)
#学习后识别1000到1006六张图片并给出预测
model.predict(mnist.data[1000:1006])
#实际的1000到1006代表的数
mnist.target[1000:1006]
#显示1000到1006数字图片
plt.subplot(321)
plt.imshow(mnist.images[1000],cmap=plt.cm.gray_r,interpolation='nearest')
plt.subplot(322)
plt.imshow(mnist.images[1001],cmap=plt.cm.gray_r,interpolation='nearest')
plt.subplot(323)
plt.imshow(mnist.images[1002],cmap=plt.cm.gray_r,interpolation='nearest')
plt.subplot(324)
plt.imshow(mnist.images[1003],cmap=plt.cm.gray_r,interpolation='nearest')
plt.subplot(325)
plt.imshow(mnist.images[1004],cmap=plt.cm.gray_r,interpolation='nearest')
plt.subplot(326)
plt.imshow(mnist.images[1005],cmap=plt.cm.gray_r,interpolation='nearest')

Knn算法手写数字识别,准确率:0.9822222222222222
import numpy as np
from sklearn.datasets import load_digits
from sklearn.model_selection import train_test_split
import _pickle as pickle
import matplotlib.pyplot as plt
mnist = load_digits()
x,test_x,y,test_y = train_test_split(mnist.data,mnist.target,test_size=0.25,random_state=40)
from sklearn.neighbors import KNeighborsClassifier
model = KNeighborsClassifier(n_neighbors=3)
model.fit(x,y)
z=model.predict(test_x)
print('准确率:',np.sum(z==test_y)/z.size)
#学习后识别1660到1666六张图片并给出预测
model.predict(mnist.data[1660:1666])
#实际的1660到1666代表的数
mnist.target[1660:1666]
#显示1660到1666数字图片
plt.subplot(321)
plt.imshow(mnist.images[1660],cmap=plt.cm.gray_r,interpolation='nearest')
plt.subplot(322)
plt.imshow(mnist.images[1661],cmap=plt.cm.gray_r,interpolation='nearest')
plt.subplot(323)
plt.imshow(mnist.images[1662],cmap=plt.cm.gray_r,interpolation='nearest')
plt.subplot(324)
plt.imshow(mnist.images[1663],cmap=plt.cm.gray_r,interpolation='nearest')
plt.subplot(325)
plt.imshow(mnist.images[1664],cmap=plt.cm.gray_r,interpolation='nearest')
plt.subplot(326)
plt.imshow(mnist.images[1665],cmap=plt.cm.gray_r,interpolation='nearest')

五、实验总结(写出本次实验的收获,遇到的问题等)
遇到的问题及收获:
一开始直接把老师实验报告里给的SVM手写数字识别的代码打上,运行出了结果,得到了准确率,但是对代码完全不了解,导致用决策树算法、朴素贝叶斯算法、Knn算法对数据进行分类,实现手写数字识别完全没有思路,实验课上在网上查找手写数字识别的实现方法,一律追求结果,将一些博主给的代码复制到程序中运行,想先看看结果能不能出来,结果一直报错,本次实验课的两节课就这样被浪费了。
实验课后,依旧完全没有思路,不知道如何下手,这次实验就这样被搁置了一个星期,在一个下午,想到可以从老师所给SVM算法实现手写数字识别入手,一步步的分析代码的作用,就开始对代码一行行的过,不懂的就百度,看了很多博客,通过博客SVC估计器对Digits数据集的学习与预测对Digits数据集有了深层次的理解(在本次实验的不同算法中都用到了此博客的预测数字显示、实际数字显示与图片显示)最后终于对算法有了深的认识。然后开始深一步了解决策树算法、朴素贝叶斯算法、Knn算法,一开始一个个的查找的资料,最后意外发现了一个博客AI学习—分类算法[K-近邻 + 朴素贝叶斯 + 决策树 + 随机森林] ,个人觉得这篇博客写的巨好,对我的本次实验帮助巨大!
在用决策树算法完成手写数字识别求得准确率之后,又借用了上节课的知识生成了.dot文件然后据此生成了pdf和png,图片巨大,下面是对局部的放大

通过本次实验学得要沉下心,一步步来,不能急于求成,学会学以致用!
这篇关于手写数字识别(分别用svm、决策树算法、朴素贝叶斯算法、KNN对MINIST数据进行分类)的文章就介绍到这儿,希望我们推荐的文章对编程师们有所帮助!


