ChuanhuChatGPT集成百川大模型

2024-04-27 08:28

本文主要是介绍ChuanhuChatGPT集成百川大模型,希望对大家解决编程问题提供一定的参考价值,需要的开发者们随着小编来一起学习吧!

搭建步骤:

  1. 拷贝本地模型,把下载好的Baichuan2-7B-Chat拷贝到models目录下
  2. 修改modules\models\base_model.py文件,class ModelType增加Baichuan

    Baichuan = 16

    elif "baichuan" in model_name_lower:

       model_type = ModelType.Baichuan

  3. 修改modules\models\models.py文件,get_model方法增加ModelType.Baichuan

    elif model_type == ModelType.Baichuan:

        from .Baichuan import Baichuan_Client

        model = Baichuan_Client(model_name, user_name=user_name)

  4. 增加modules\models\Baichuan.py文件

    1

    2

    3

    4

    5

    6

    7

    8

    9

    10

    11

    12

    13

    14

    15

    16

    17

    18

    19

    20

    21

    22

    23

    24

    25

    26

    27

    28

    29

    30

    31

    32

    33

    34

    35

    36

    37

    38

    39

    40

    41

    42

    43

    44

    45

    46

    47

    48

    49

    50

    51

    52

    53

    54

    55

    56

    57

    58

    59

    60

    61

    62

    63

    64

    65

    66

    67

    68

    69

    70

    71

    72

    73

    74

    75

    76

    77

    78

    79

    80

    81

    from modelscope import snapshot_download, AutoModelForCausalLM, AutoTokenizer,GenerationConfig

    from transformers import AutoModelForCausalLM, AutoTokenizer

    from transformers.generation import GenerationConfig

    import logging

    import colorama

    from ..index_func import *

    from ..presets import *

    from ..utils import *

    from .base_model import BaseLLMModel

    from ..presets import MODEL_METADATA

    from datetime import datetime

    class Baichuan_Client(BaseLLMModel):

        def __init__(self, model_name, user_name="") -None:

            super().__init__(model_name=model_name, user=user_name)

            import torch

            from transformers import AutoModel, AutoTokenizer

            global CHATGLM_TOKENIZER, CHATGLM_MODEL

            print("__init__ Baichuan_Client")

            if CHATGLM_TOKENIZER is None or CHATGLM_MODEL is None:

                model_path = None

                if os.path.exists("models"):

                    model_dirs = os.listdir("models")

                    if model_name in model_dirs:

                        model_path = f"models/{model_name}"

                if model_path is not None:

                    model_source = model_path

                else:

                    model_source = snapshot_download(f"baichuan-inc/{model_name}", revision='v1.0.4')

                CHATGLM_TOKENIZER = AutoTokenizer.from_pretrained(

                    model_source, device_map="auto", trust_remote_code=True, torch_dtype=torch.float16

                )

                quantified = False

                if "int4" in model_name:

                    quantified = True

                model = AutoModelForCausalLM.from_pretrained(

                    model_source, device_map="auto", trust_remote_code=True, torch_dtype=torch.float16

                )

                model.generation_config = GenerationConfig.from_pretrained(model_source)

                model = model.eval()

                CHATGLM_MODEL = model

        def _get_glm_style_input(self):

            print("_get_glm_style_input")

            print(f"the history is: {self.history}")

            history = [x["content"for in self.history]

            query = history.pop()

            print(f"the message is: {query}")

            return history, query

        def get_answer_at_once(self):

            print("get_answer_at_once")

            history,query = self._get_glm_style_input()

            messages = []

            messages.append({'role''user''content': query})

            now = datetime.now()

            print("get_answer_at_once start"+"++++++++"+ now.strftime("%Y-%m-%d %H:%M:%S"))

            response = CHATGLM_MODEL.chat(

                CHATGLM_TOKENIZER, messages)

            now = datetime.now()

            print("get_answer_at_once end"+"++++++++"+ now.strftime("%Y-%m-%d %H:%M:%S"))

            print(f"the response is: {response}")

            return response, len(response)

        def get_answer_stream_iter(self):

            history,query = self._get_glm_style_input()

            messages = []

            messages.append({'role''user''content': query})

            result = ""

            now = datetime.now()

            print("get_answer_stream_iter start"+"++++++++"+ now.strftime("%Y-%m-%d %H:%M:%S"))

            for response in CHATGLM_MODEL.chat(

                CHATGLM_TOKENIZER,

                messages

            ):

                print(f"the response is: {response}")

                result += response

                yield result

            now = datetime.now()

            print("get_answer_stream_iter end"+"++++++++"+ now.strftime("%Y-%m-%d %H:%M:%S"))

  5. 答案回调开关控制get_answer_at_once、get_answer_stream_iter方法调用选择
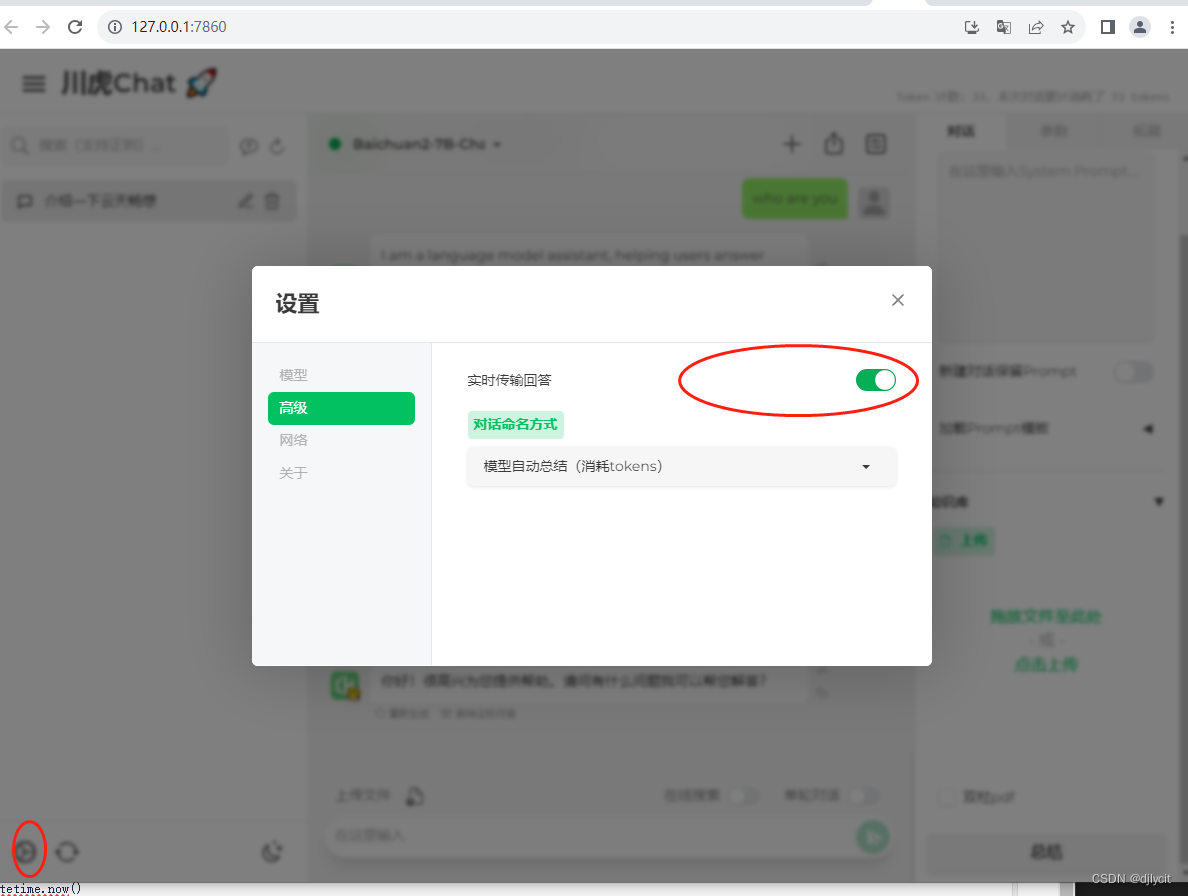
  6. 执行效果

这篇关于ChuanhuChatGPT集成百川大模型的文章就介绍到这儿,希望我们推荐的文章对编程师们有所帮助!


原文地址:
本文来自互联网用户投稿,该文观点仅代表作者本人,不代表本站立场。本站仅提供信息存储空间服务,不拥有所有权,不承担相关法律责任。如若转载,请注明出处:http://www.chinasem.cn/article/939991

相关文章

Maven项目中集成数据库文档生成工具的操作步骤

《Maven项目中集成数据库文档生成工具的操作步骤》在Maven项目中,可以通过集成数据库文档生成工具来自动生成数据库文档,本文为大家整理了使用screw-maven-plugin(推荐)的完... 目录1. 添加插件配置到 pom.XML2. 配置数据库信息3. 执行生成命令4. 高级配置选项5. 注意事

SpringBoot整合Sa-Token实现RBAC权限模型的过程解析

《SpringBoot整合Sa-Token实现RBAC权限模型的过程解析》:本文主要介绍SpringBoot整合Sa-Token实现RBAC权限模型的过程解析,本文给大家介绍的非常详细,对大家的学... 目录前言一、基础概念1.1 RBAC模型核心概念1.2 Sa-Token核心功能1.3 环境准备二、表结

Java集成Onlyoffice的示例代码及场景分析

《Java集成Onlyoffice的示例代码及场景分析》:本文主要介绍Java集成Onlyoffice的示例代码及场景分析,本文给大家介绍的非常详细,对大家的学习或工作具有一定的参考借鉴价值,需要... 需求场景:实现文档的在线编辑,团队协作总结:两个接口 + 前端页面 + 配置项接口1:一个接口,将o

Swagger2与Springdoc集成与使用详解

《Swagger2与Springdoc集成与使用详解》:本文主要介绍Swagger2与Springdoc集成与使用方式,具有很好的参考价值,希望对大家有所帮助,如有错误或未考虑完全的地方,望不吝赐... 目录1. 依赖配置2. 基础配置2.1 启用 Springdoc2.2 自定义 OpenAPI 信息3.

Spring AI 实现 STDIO和SSE MCP Server的过程详解

《SpringAI实现STDIO和SSEMCPServer的过程详解》STDIO方式是基于进程间通信,MCPClient和MCPServer运行在同一主机,主要用于本地集成、命令行工具等场景... 目录Spring AI 实现 STDIO和SSE MCP Server1.新建Spring Boot项目2.a

Spring Boot 集成 Solr 的详细示例

《SpringBoot集成Solr的详细示例》:本文主要介绍SpringBoot集成Solr的详细示例,本文通过实例代码给大家介绍的非常详细,感兴趣的朋友一起看看吧... 目录环境准备添加依赖配置 Solr 连接定义实体类编写 Repository 接口创建 Service 与 Controller示例运行

Spring Boot集成SLF4j从基础到高级实践(最新推荐)

《SpringBoot集成SLF4j从基础到高级实践(最新推荐)》SLF4j(SimpleLoggingFacadeforJava)是一个日志门面(Facade),不是具体的日志实现,这篇文章主要介... 目录一、日志框架概述与SLF4j简介1.1 为什么需要日志框架1.2 主流日志框架对比1.3 SLF4

Spring Boot集成Logback终极指南之从基础到高级配置实战指南

《SpringBoot集成Logback终极指南之从基础到高级配置实战指南》Logback是一个可靠、通用且快速的Java日志框架,作为Log4j的继承者,由Log4j创始人设计,:本文主要介绍... 目录一、Logback简介与Spring Boot集成基础1.1 Logback是什么?1.2 Sprin

springboot集成Lucene的详细指南

《springboot集成Lucene的详细指南》这篇文章主要为大家详细介绍了springboot集成Lucene的详细指南,文中的示例代码讲解详细,具有一定的借鉴价值,感兴趣的小伙伴可以跟随小编一起... 目录添加依赖创建配置类创建实体类创建索引服务类创建搜索服务类创建控制器类使用示例以下是 Spring

Spring Boot 集成 Quartz并使用Cron 表达式实现定时任务

《SpringBoot集成Quartz并使用Cron表达式实现定时任务》本篇文章介绍了如何在SpringBoot中集成Quartz进行定时任务调度,并通过Cron表达式控制任务... 目录前言1. 添加 Quartz 依赖2. 创建 Quartz 任务3. 配置 Quartz 任务调度4. 启动 Sprin