本文主要是介绍C#仿OutLook的特色窗体设计,希望对大家解决编程问题提供一定的参考价值,需要的开发者们随着小编来一起学习吧!
目录
1. 资源图片准备
2. 设计流程:
(1)用MenuStrip控件设计菜单栏
(2)用ToolStrip控件设计工具栏
(3)用StatusStrip控件设计状态栏
(4)ImageList组件装载树节点图标
(5)用TreeView控件和ImageList组件设计模型树
3.示例
(1)Form1.cs
(2)Form1.Designer.cs
(3)Resources.Designer.cs
(4)效果图
用MenuStrip控件、ToolStrip控件、StatusStrip控件、TreeView控件、ImageList组件设计模仿OutLook风格的特色窗体。
1. 资源图片准备
设计之前,先准备好资源图片,根据工具栏的按钮数量准备图片,根据模型树里节点的数量准备相应数量的图标文件。
资源图片和图标的加载到项目中的方法,详见本文作者的其他文章:C#手动改变自制窗体的大小-CSDN博客 https://wenchm.blog.csdn.net/article/details/137027140
资源图片和图标要分别加载。
2. 设计流程:
(1)用MenuStrip控件设计菜单栏
通过加载MenuStrip控件,按照提示生成toolStripMenuItem1、toolStripMenuItem2、toolStripMenuItem3。依次修改其Text属性为“打开”、“设置”、“编辑”。
menuStrip1 = new MenuStrip();
toolStripMenuItem1 = new ToolStripMenuItem();
toolStripMenuItem2 = new ToolStripMenuItem();
toolStripMenuItem3 = new ToolStripMenuItem();
//
toolStripMenuItem1.Text = "打开";
//
toolStripMenuItem2.Text = "设置";
//
toolStripMenuItem3.Text = "编辑";
(2)用ToolStrip控件设计工具栏
通过加载ToolStrip控件,按照提示生成toolStripButton1、toolStripButton2、toolStripButton3、toolStripComboBox1。依次修改其Text属性为“打开”、“设置”、“编辑”,依次修改其Image属性为资源文件的“打开1”、“设置1”、“编辑1”。
toolStrip1 = new ToolStrip();
toolStripButton1 = new ToolStripButton();
toolStripButton2 = new ToolStripButton();
toolStripButton3 = new ToolStripButton();
toolStripComboBox1 = new ToolStripComboBox();
//
toolStripButton1.Image = Properties.Resources.打开1;
toolStripButton1.Text = "打开";
//
toolStripButton2.Image = Properties.Resources.设置1;
toolStripButton2.Text = "设置";
//
toolStripButton3.Image = Properties.Resources.编辑1;
toolStripButton3.Text = "编辑";
(3)用StatusStrip控件设计状态栏
通过加载ToolStrip控件,按照提示生成状态标签toolStripStatusLabel1,并修改其Text属性为“操作员***”。
toolStripStatusLabel1.Name = "toolStripStatusLabel1";toolStripStatusLabel1.Text = "操作员***";(4)ImageList组件装载树节点图标
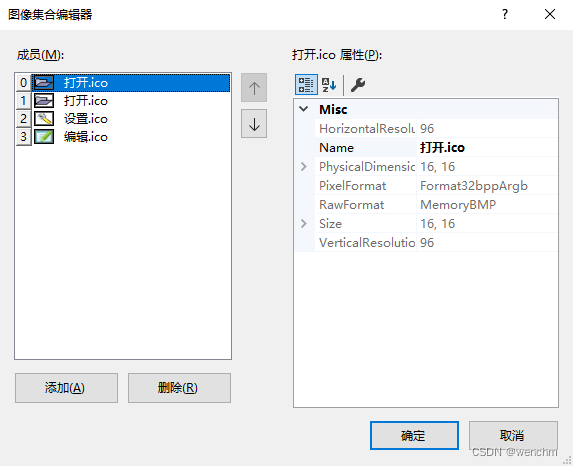
通过加载ImageList组件装在项目需要的图标,生成文件文件imageList1,鼠标点中该组件,右侧属性,选择图像开始装在图片,图片按Tag自动索引。或者鼠标点中该组件,该组件的右上角显示实心的箭头,点击箭头,开始选择图片,这里为根节点、子节点选择项目准备好的图标文件。
(5)用TreeView控件和ImageList组件设计模型树
通过加载TreeView控件为项目创建模型树,鼠标点中TreeView控件,在该空间的右上角出现一个箭头,点击箭头,为该控件装载图标文件imageList1。或者鼠标点中TreeView控件,右侧属性,修改其Image属性为imageList1。然后,选择“编辑节点”,为项目创建根节点和各个子节点。给节点更名和配图。

3.示例
(1)Form1.cs
// Form1.cs
namespace _175
{public partial class Form1 : Form{public Form1(){InitializeComponent();}}
}
(2)Form1.Designer.cs
// 仿OutLook的特色窗体
namespace _175
{partial class Form1{/// <summary>///  Required designer variable./// </summary>private System.ComponentModel.IContainer components = null;/// <summary>///  Clean up any resources being used./// </summary>/// <param name="disposing">true if managed resources should be disposed; otherwise, false.</param>protected override void Dispose(bool disposing){if (disposing && (components != null)){components.Dispose();}base.Dispose(disposing);}#region Windows Form Designer generated code/// <summary>///  Required method for Designer support - do not modify///  the contents of this method with the code editor./// </summary>private void InitializeComponent(){components = new System.ComponentModel.Container();System.ComponentModel.ComponentResourceManager resources = new System.ComponentModel.ComponentResourceManager(typeof(Form1));TreeNode treeNode1 = new TreeNode("打开");TreeNode treeNode2 = new TreeNode("设置");TreeNode treeNode3 = new TreeNode("编辑");TreeNode treeNode4 = new TreeNode("菜单项", new TreeNode[] { treeNode1, treeNode2, treeNode3 });menuStrip1 = new MenuStrip();toolStripMenuItem1 = new ToolStripMenuItem();toolStripMenuItem2 = new ToolStripMenuItem();toolStripMenuItem3 = new ToolStripMenuItem();toolStrip1 = new ToolStrip();toolStripButton1 = new ToolStripButton();toolStripButton2 = new ToolStripButton();toolStripButton3 = new ToolStripButton();toolStripComboBox1 = new ToolStripComboBox();statusStrip1 = new StatusStrip();toolStripStatusLabel1 = new ToolStripStatusLabel();imageList1 = new ImageList(components);treeView1 = new TreeView();menuStrip1.SuspendLayout();toolStrip1.SuspendLayout();statusStrip1.SuspendLayout();SuspendLayout();// // menuStrip1// menuStrip1.Items.AddRange(new ToolStripItem[] { toolStripMenuItem1, toolStripMenuItem2, toolStripMenuItem3 });menuStrip1.Location = new Point(0, 0);menuStrip1.Name = "menuStrip1";menuStrip1.Size = new Size(309, 25);menuStrip1.TabIndex = 0;menuStrip1.Text = "menuStrip1";// // toolStripMenuItem1// toolStripMenuItem1.Name = "toolStripMenuItem1";toolStripMenuItem1.Size = new Size(44, 21);toolStripMenuItem1.Text = "打开";// // toolStripMenuItem2// toolStripMenuItem2.Name = "toolStripMenuItem2";toolStripMenuItem2.Size = new Size(44, 21);toolStripMenuItem2.Text = "设置";// // toolStripMenuItem3// toolStripMenuItem3.Name = "toolStripMenuItem3";toolStripMenuItem3.Size = new Size(44, 21);toolStripMenuItem3.Text = "编辑";// // toolStrip1// toolStrip1.Items.AddRange(new ToolStripItem[] { toolStripButton1, toolStripButton2, toolStripButton3, toolStripComboBox1 });toolStrip1.Location = new Point(0, 25);toolStrip1.Name = "toolStrip1";toolStrip1.Size = new Size(309, 25);toolStrip1.TabIndex = 1;toolStrip1.Text = "toolStrip1";// // toolStripButton1// toolStripButton1.Image = Properties.Resources.打开1;toolStripButton1.ImageTransparentColor = Color.Magenta;toolStripButton1.Name = "toolStripButton1";toolStripButton1.Size = new Size(52, 22);toolStripButton1.Text = "打开";// // toolStripButton2// toolStripButton2.Image = Properties.Resources.设置1;toolStripButton2.ImageTransparentColor = Color.Magenta;toolStripButton2.Name = "toolStripButton2";toolStripButton2.Size = new Size(52, 22);toolStripButton2.Text = "设置";// // toolStripButton3// toolStripButton3.Image = Properties.Resources.编辑1;toolStripButton3.ImageTransparentColor = Color.Magenta;toolStripButton3.Name = "toolStripButton3";toolStripButton3.Size = new Size(52, 22);toolStripButton3.Text = "编辑";// // toolStripComboBox1// toolStripComboBox1.Name = "toolStripComboBox1";toolStripComboBox1.Size = new Size(121, 25);// // statusStrip1// statusStrip1.Items.AddRange(new ToolStripItem[] { toolStripStatusLabel1 });statusStrip1.Location = new Point(0, 169);statusStrip1.Name = "statusStrip1";statusStrip1.Size = new Size(309, 22);statusStrip1.TabIndex = 2;statusStrip1.Text = "statusStrip1";// // toolStripStatusLabel1// toolStripStatusLabel1.Name = "toolStripStatusLabel1";toolStripStatusLabel1.Size = new Size(59, 17);toolStripStatusLabel1.Text = "操作员***";// // imageList1// imageList1.ColorDepth = ColorDepth.Depth32Bit;imageList1.ImageStream = (ImageListStreamer)resources.GetObject("imageList1.ImageStream");imageList1.TransparentColor = Color.Transparent;imageList1.Images.SetKeyName(0, "打开.ico");imageList1.Images.SetKeyName(1, "打开.ico");imageList1.Images.SetKeyName(2, "设置.ico");imageList1.Images.SetKeyName(3, "编辑.ico");// // treeView1// treeView1.ImageIndex = 0;treeView1.ImageList = imageList1;treeView1.Location = new Point(2, 52);treeView1.Name = "treeView1";treeNode1.ImageIndex = 1;treeNode1.Name = "节点1";treeNode1.Text = "打开";treeNode2.ImageIndex = 2;treeNode2.Name = "节点2";treeNode2.Text = "设置";treeNode3.ImageIndex = 3;treeNode3.Name = "节点3";treeNode3.Text = "编辑";treeNode4.ImageIndex = 0;treeNode4.Name = "节点0";treeNode4.Text = "菜单项";treeView1.Nodes.AddRange(new TreeNode[] { treeNode4 });treeView1.SelectedImageIndex = 0;treeView1.Size = new Size(307, 114);treeView1.TabIndex = 3;// // Form1// AutoScaleDimensions = new SizeF(7F, 17F);AutoScaleMode = AutoScaleMode.Font;ClientSize = new Size(309, 191);Controls.Add(treeView1);Controls.Add(statusStrip1);Controls.Add(toolStrip1);Controls.Add(menuStrip1);FormBorderStyle = FormBorderStyle.Fixed3D;MainMenuStrip = menuStrip1;Name = "Form1";StartPosition = FormStartPosition.CenterScreen;Text = "Form1";menuStrip1.ResumeLayout(false);menuStrip1.PerformLayout();toolStrip1.ResumeLayout(false);toolStrip1.PerformLayout();statusStrip1.ResumeLayout(false);statusStrip1.PerformLayout();ResumeLayout(false);PerformLayout();}#endregionprivate MenuStrip menuStrip1;private ToolStrip toolStrip1;private StatusStrip statusStrip1;private ImageList imageList1;private TreeView treeView1;private ToolStripMenuItem toolStripMenuItem1;private ToolStripMenuItem toolStripMenuItem2;private ToolStripMenuItem toolStripMenuItem3;private ToolStripButton toolStripButton1;private ToolStripButton toolStripButton2;private ToolStripButton toolStripButton3;private ToolStripStatusLabel toolStripStatusLabel1;private ToolStripComboBox toolStripComboBox1;}
}
(3)Resources.Designer.cs
//------------------------------------------------------------------------------
// <auto-generated>
//     此代码由工具生成。
//     运行时版本:4.0.30319.42000
//
//     对此文件的更改可能会导致不正确的行为,并且如果
//     重新生成代码,这些更改将会丢失。
// </auto-generated>
//------------------------------------------------------------------------------namespace _175.Properties {using System;/// <summary>///   一个强类型的资源类,用于查找本地化的字符串等。/// </summary>// 此类是由 StronglyTypedResourceBuilder// 类通过类似于 ResGen 或 Visual Studio 的工具自动生成的。// 若要添加或移除成员,请编辑 .ResX 文件,然后重新运行 ResGen// (以 /str 作为命令选项),或重新生成 VS 项目。[global::System.CodeDom.Compiler.GeneratedCodeAttribute("System.Resources.Tools.StronglyTypedResourceBuilder", "17.0.0.0")][global::System.Diagnostics.DebuggerNonUserCodeAttribute()][global::System.Runtime.CompilerServices.CompilerGeneratedAttribute()]internal class Resources {private static global::System.Resources.ResourceManager resourceMan;private static global::System.Globalization.CultureInfo resourceCulture;[global::System.Diagnostics.CodeAnalysis.SuppressMessageAttribute("Microsoft.Performance", "CA1811:AvoidUncalledPrivateCode")]internal Resources() {}/// <summary>///   返回此类使用的缓存的 ResourceManager 实例。/// </summary>[global::System.ComponentModel.EditorBrowsableAttribute(global::System.ComponentModel.EditorBrowsableState.Advanced)]internal static global::System.Resources.ResourceManager ResourceManager {get {if (object.ReferenceEquals(resourceMan, null)) {global::System.Resources.ResourceManager temp = new global::System.Resources.ResourceManager("_175.Properties.Resources", typeof(Resources).Assembly);resourceMan = temp;}return resourceMan;}}/// <summary>///   重写当前线程的 CurrentUICulture 属性,对///   使用此强类型资源类的所有资源查找执行重写。/// </summary>[global::System.ComponentModel.EditorBrowsableAttribute(global::System.ComponentModel.EditorBrowsableState.Advanced)]internal static global::System.Globalization.CultureInfo Culture {get {return resourceCulture;}set {resourceCulture = value;}}/// <summary>///   查找类似于 (图标) 的 System.Drawing.Icon 类型的本地化资源。/// </summary>internal static System.Drawing.Icon 打开 {get {object obj = ResourceManager.GetObject("打开", resourceCulture);return ((System.Drawing.Icon)(obj));}}internal static System.Drawing.Bitmap 打开1{get{object obj = ResourceManager.GetObject("打开1", resourceCulture);return ((System.Drawing.Bitmap)(obj));}}/// <summary>///   查找类似于 (图标) 的 System.Drawing.Icon 类型的本地化资源。/// </summary>internal static System.Drawing.Icon 编辑 {get {object obj = ResourceManager.GetObject("编辑", resourceCulture);return ((System.Drawing.Icon)(obj));}}internal static System.Drawing.Bitmap 编辑1{get{object obj = ResourceManager.GetObject("编辑1", resourceCulture);return ((System.Drawing.Bitmap)(obj));}}/// <summary>///   查找类似于 (图标) 的 System.Drawing.Icon 类型的本地化资源。/// </summary>internal static System.Drawing.Icon 设置 {get {object obj = ResourceManager.GetObject("设置", resourceCulture);return ((System.Drawing.Icon)(obj));}}internal static System.Drawing.Bitmap 设置1{get{object obj = ResourceManager.GetObject("设置1", resourceCulture);return ((System.Drawing.Bitmap)(obj));}}}
}
(4)效果图

这篇关于C#仿OutLook的特色窗体设计的文章就介绍到这儿,希望我们推荐的文章对编程师们有所帮助!


