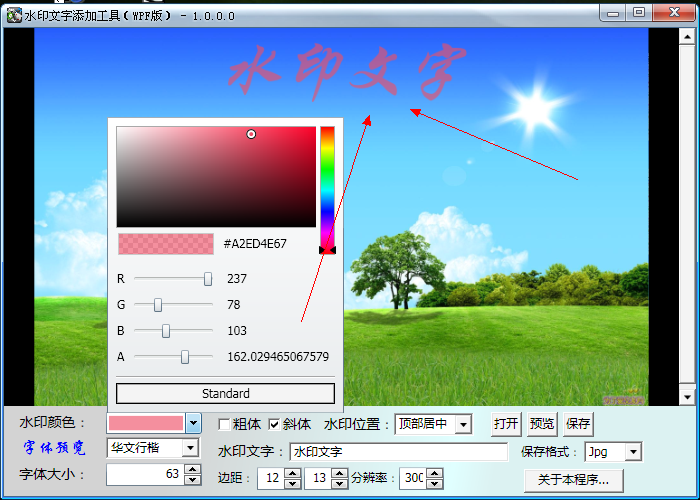
本文主要是介绍龙年新作:水印文字添加工具源码摘要,希望对大家解决编程问题提供一定的参考价值,需要的开发者们随着小编来一起学习吧!
using System;
using System.Collections.Generic;
using System.Text;
using System.Windows;
using System.Windows.Media;
using System.Windows.Media.Imaging;
namespace ImageProc
{
public class WaterText
{
/// <summary>
/// 生成添加水印后的图象。
/// </summary>
/// <param name="src">用于在其上添加水印的源图象,一个ImageSource的子类的对象。</param>
/// <param name="rect">一个Rect结构,表示要生成的图象的大小。</param>
/// <param name="test">水印文本。</param>
/// <param name="fontFamily">使用的字体名称,如宋体等。</param>
/// <param name="fontSize">字体大小。</param>
/// <param name="DpiX">要生成的图象的水平分辨率(建议96以上)。</param>
/// <param name="DpiY">要生成的图象的垂直分辨率(建议96以上)。</param>
/// <param name="PaddingH">水平边距。</param>
/// <param name="PaddingV">垂直边距。</param>
/// <param name="loca">水印在图象中的位置,一个WaterLocation枚举。</param>
/// <param name="wcolor">水印文字的颜色。</param>
/// <param name="IsBold">水印文字是否加粗。</param>
/// <param name="IsItalic">水印文是否倾斜。</param>
/// <returns>一个ImageSource实例,表示处理后的图象。</returns>
public BitmapSource BuildIamge(BitmapSource src, Rect rect, string test, string fontFamily, double fontSize,
double DpiX, double DpiY, double PaddingH, double PaddingV, WaterLocation loca, Color wcolor,
bool IsBold, bool IsItalic)
{
DrawingVisual drv = new DrawingVisual();
// 通过DrawingVisual的RenderOpen方法返回一个DrawingContext
using (DrawingContext dc = drv.RenderOpen())
{
// 绘制图象
dc.DrawImage(src, rect);
// 设置文字
FontFamily fontf = new FontFamily(fontFamily);
FontStyle MyFontStyle = IsItalic == true ? FontStyles.Italic : FontStyles.Normal;
FontWeight MyFontWeight = IsBold == true ? FontWeights.Bold : FontWeights.Normal;
Typeface tface = new Typeface(fontf, MyFontStyle, MyFontWeight, FontStretches.Normal);
SolidColorBrush cb = new SolidColorBrush(wcolor);
FormattedText ft = new FormattedText(
test,
System.Globalization.CultureInfo.CurrentCulture,
FlowDirection.LeftToRight,
tface,
fontSize,
cb);
// 确定文本的位置
double newX = 0, newY = 0;
TextAlignment MyAlignment = TextAlignment.Left;
switch (loca)
{
case WaterLocation.TopLeft:
newX = PaddingH;
newY = PaddingV;
MyAlignment = TextAlignment.Left;
break;
case WaterLocation.TopCenter:
newX = PaddingH;
newY = PaddingV;
MyAlignment = TextAlignment.Center;
break;
case WaterLocation.TopRight:
newX = PaddingH;
newY = PaddingV;
MyAlignment = TextAlignment.Right;
break;
case WaterLocation.MidLeft:
newX = PaddingH;
newY = ((rect.Height - PaddingV * 2) - ft.Height) / 2;
MyAlignment = TextAlignment.Left;
break;
case WaterLocation.MidCenter:
newX = PaddingH;
newY = ((rect.Height - PaddingV * 2) - ft.Height) / 2;
MyAlignment = TextAlignment.Center;
break;
case WaterLocation.MidRight:
newX = PaddingH;
newY = ((rect.Height - PaddingV * 2) - ft.Height) / 2;
MyAlignment = TextAlignment.Right;
break;
case WaterLocation.BottomLeft:
newX = PaddingH;
newY = rect.Height - PaddingV - ft.Height;
MyAlignment = TextAlignment.Left;
break;
case WaterLocation.BottomCenter:
newX = PaddingH;
newY = rect.Height - PaddingV - ft.Height;
MyAlignment = TextAlignment.Center;
break;
case WaterLocation.BottomRight:
newX = PaddingH;
newY = rect.Height - PaddingV - ft.Height;
MyAlignment = TextAlignment.Right;
break;
default:
break;
}
ft.MaxTextWidth = rect.Width - 2 * PaddingH;
ft.TextAlignment = MyAlignment;
// 绘制文字
dc.DrawText(ft, new Point(newX, newY));
}
RenderTargetBitmap rdb = new RenderTargetBitmap(
src.PixelWidth,
src.PixelHeight,
DpiX, DpiY, PixelFormats.Default);
// 通过该方法呈现可视化对象。
rdb.Render(drv);
return rdb;
}
}
/// <summary>
/// 水印的位置
/// </summary>
public enum WaterLocation
{
/// <summary>
/// 左上角
/// </summary>
TopLeft,
/// <summary>
/// 顶部居中
/// </summary>
TopCenter,
/// <summary>
/// 右上角
/// </summary>
TopRight,
/// <summary>
/// 中部居左
/// </summary>
MidLeft,
/// <summary>
/// 中部居中
/// </summary>
MidCenter,
/// <summary>
/// 中部居右
/// </summary>
MidRight,
/// <summary>
/// 左下角
/// </summary>
BottomLeft,
/// <summary>
/// 底部居中
/// </summary>
BottomCenter,
/// <summary>
/// 右下角
/// </summary>
BottomRight
}
}
源码要点1:初始屏幕中的按钮,在打开图片前显示,存在已打开图片后隐藏,类似QQ影音。
这里自定义了一个转换器,如果Image的Source属性为null,则按钮的Visibility属性为Visible,否则为Collapsed。
     /// <summary>
/// 类型转换器
/// </summary>
[ValueConversion(typeof(ImageSource), typeof(Visibility))]
public class VisibleConvert : IValueConverter
{
public object Convert(object value, Type targetType, object parameter, System.Globalization.CultureInfo culture)
{
if (value == null)
{
return Visibility.Visible;
}
else
{
return Visibility.Collapsed;
}
}
public object ConvertBack(object value, Type targetType, object parameter, System.Globalization.CultureInfo culture)
{
return null;
}
}
接着,把这个转换器用到Binding中,对按钮进行绑定。
            Binding myBinding = new Binding();
myBinding.Path = new PropertyPath(Image.SourceProperty);
myBinding.Converter = new VisibleConvert();
myBinding.Source = this.img;
myBinding.Mode = BindingMode.OneWay;
BindingOperations.SetBinding(btnOpenBig, Button.VisibilityProperty, myBinding);
源码要点2:“打开”和“保存”对话框。
WPF中没有这些对话框组件,但是,我们不要忘了,在WinForm里面,有OpenFileDialog类和SaveFileDialog类。
但是,System.Windows.Forms命名空间下,个别类型的名字与System.Windows命名空间下的类型名字相同,也就是说,WinForm中用到的许多类和WPF中的类名字相同,但它们是不同逻辑的,所以,在引入命名空间的时候,应当使用别名,这样在代码中使用的时候就不会发生冲突了。
using DW = System.Drawing;
using WF = System.Windows.Forms;
using IO = System.IO;
所以,在保存文件的时候,我们可以这样写代码。
            WF.SaveFileDialog saveDlg = new WF.SaveFileDialog();
int MyIndex = this.cmbFormat.SelectedIndex;
saveDlg.Title = "保存文件";
BitmapEncoder MyEncoder = null;
switch (MyIndex)
{
case 0:
saveDlg.FileName = @"outPut.jpg";
MyEncoder = new JpegBitmapEncoder();
break;
case 1:
saveDlg.FileName = @"outPut.bmp";
MyEncoder = new BmpBitmapEncoder();
break;
case 2:
saveDlg.FileName = @"outPut.png";
MyEncoder = new PngBitmapEncoder();
break;
default:
saveDlg.FileName = @"outPut.jpg";
MyEncoder = new JpegBitmapEncoder();
break;
}
if (saveDlg.ShowDialog() == WF.DialogResult.OK)
{
string fileName = saveDlg.FileName;
try
{
using (IO.FileStream fs = IO.File.Open(fileName, IO.FileMode.OpenOrCreate, IO.FileAccess.Write))
{
MyEncoder.Frames.Add(BitmapFrame.Create((BitmapSource)this.img.Source));
MyEncoder.Save(fs);
fs.Close();
}
MessageBox.Show("保存成功。", "提示", MessageBoxButton.OK, MessageBoxImage.Information);
}
catch (Exception ex)
{
MessageBox.Show(ex.Message, "提示", MessageBoxButton.OK, MessageBoxImage.Warning);
}
}
源码要点3:如何取得程序标题和版本号。
程序标题栏上的文字是在运行后动态生成的,可以通过反射技术,在窗口类构造函数中设置。
我们先为窗口类定义两个公共属性,分别用来取得程序标题和版本号。
         /// <summary>
/// 程序标题
/// </summary>
public string TitleText
{
get
{
object[] objs = Assembly.GetExecutingAssembly().GetCustomAttributes(typeof(AssemblyTitleAttribute), false);
if (objs.Length > 0)
{
AssemblyTitleAttribute attr = (AssemblyTitleAttribute)objs[0];
return attr.Title;
}
return string.Empty;
}
}
/// <summary>
/// 返回程序版本
/// </summary>
public string AppVersion
{
get
{
string ver = Assembly.GetExecutingAssembly().GetName().Version.ToString();
if (ver != "")
{
return ver;
}
return string.Empty;
}
}

这篇关于龙年新作:水印文字添加工具源码摘要的文章就介绍到这儿,希望我们推荐的文章对编程师们有所帮助!


