本文主要是介绍分布式ID生成算法|雪花算法 Snowflake | Go实现,希望对大家解决编程问题提供一定的参考价值,需要的开发者们随着小编来一起学习吧!
写在前面
在分布式领域中,不可避免的需要生成一个全局唯一ID。而在近几年的发展中有许多分布式ID生成算法,比较经典的就是 Twitter 的雪花算法(Snowflake Algorithm)。当然国内也有美团的基于snowflake改进的Leaf算法。那么今天我们就来介绍一下雪花算法。
雪花算法
算法来源: 世界上没有完全相同的两片雪花 。所以!雪崩的时候,没有任何一片雪花是相同的!
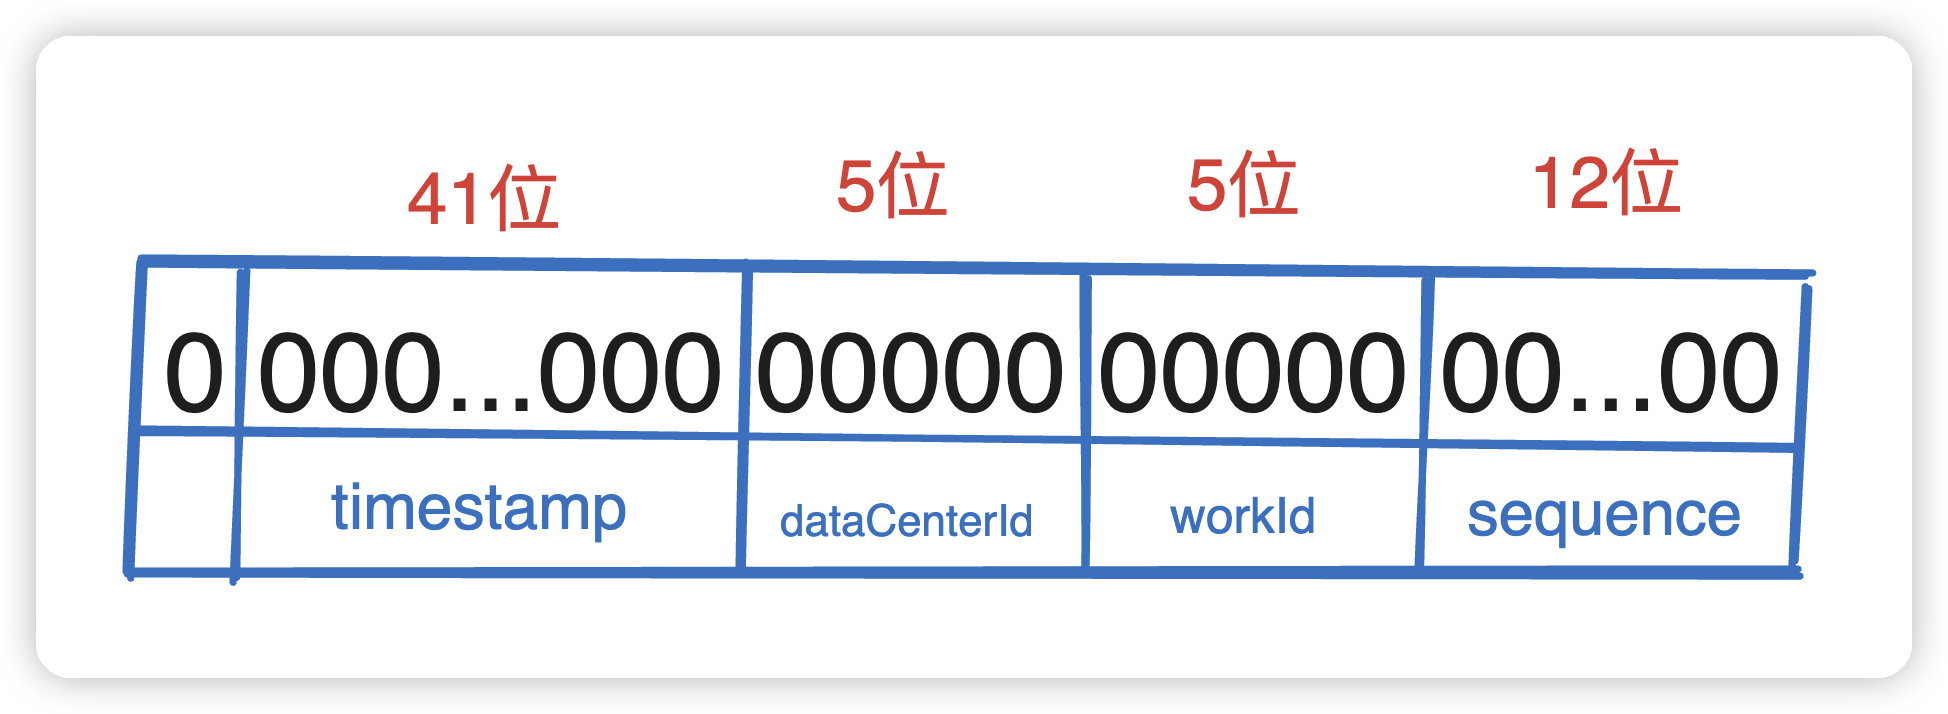
雪花算法的本质是生成一个64位的 long int 类型的id,可以拆分成一下几个部分:
- 最高位固定位0。因为第一位为
符号位,如果是1那么就是负数了。 - 接下来的
41 位存储毫秒级时间戳,2^41 大概可以使用69年。 - 再接来就是10位存储机器码,包括
5 位dataCenterId 和 5 位 workerId。最多可以部署2^10=1024台机器。 - 最后12位存储序列号。统一毫秒时间戳时,通过这个递增的序列号来区分。
即对于同一台机器而言,同一毫秒时间戳下可以生成 2^12=4096 个不重复id。
雪花算法其实是强依赖于时间戳的,因为我们看上面生成的几个数字,我们唯一不可控的就是时间,如果发生了时钟回拨有可能会发生id生成一样了。
所以雪花算法适合那些与时间有强关联的业务 ,比如订单,交易之类的,需要有时间强相关的业务。
生成 ID 流程图
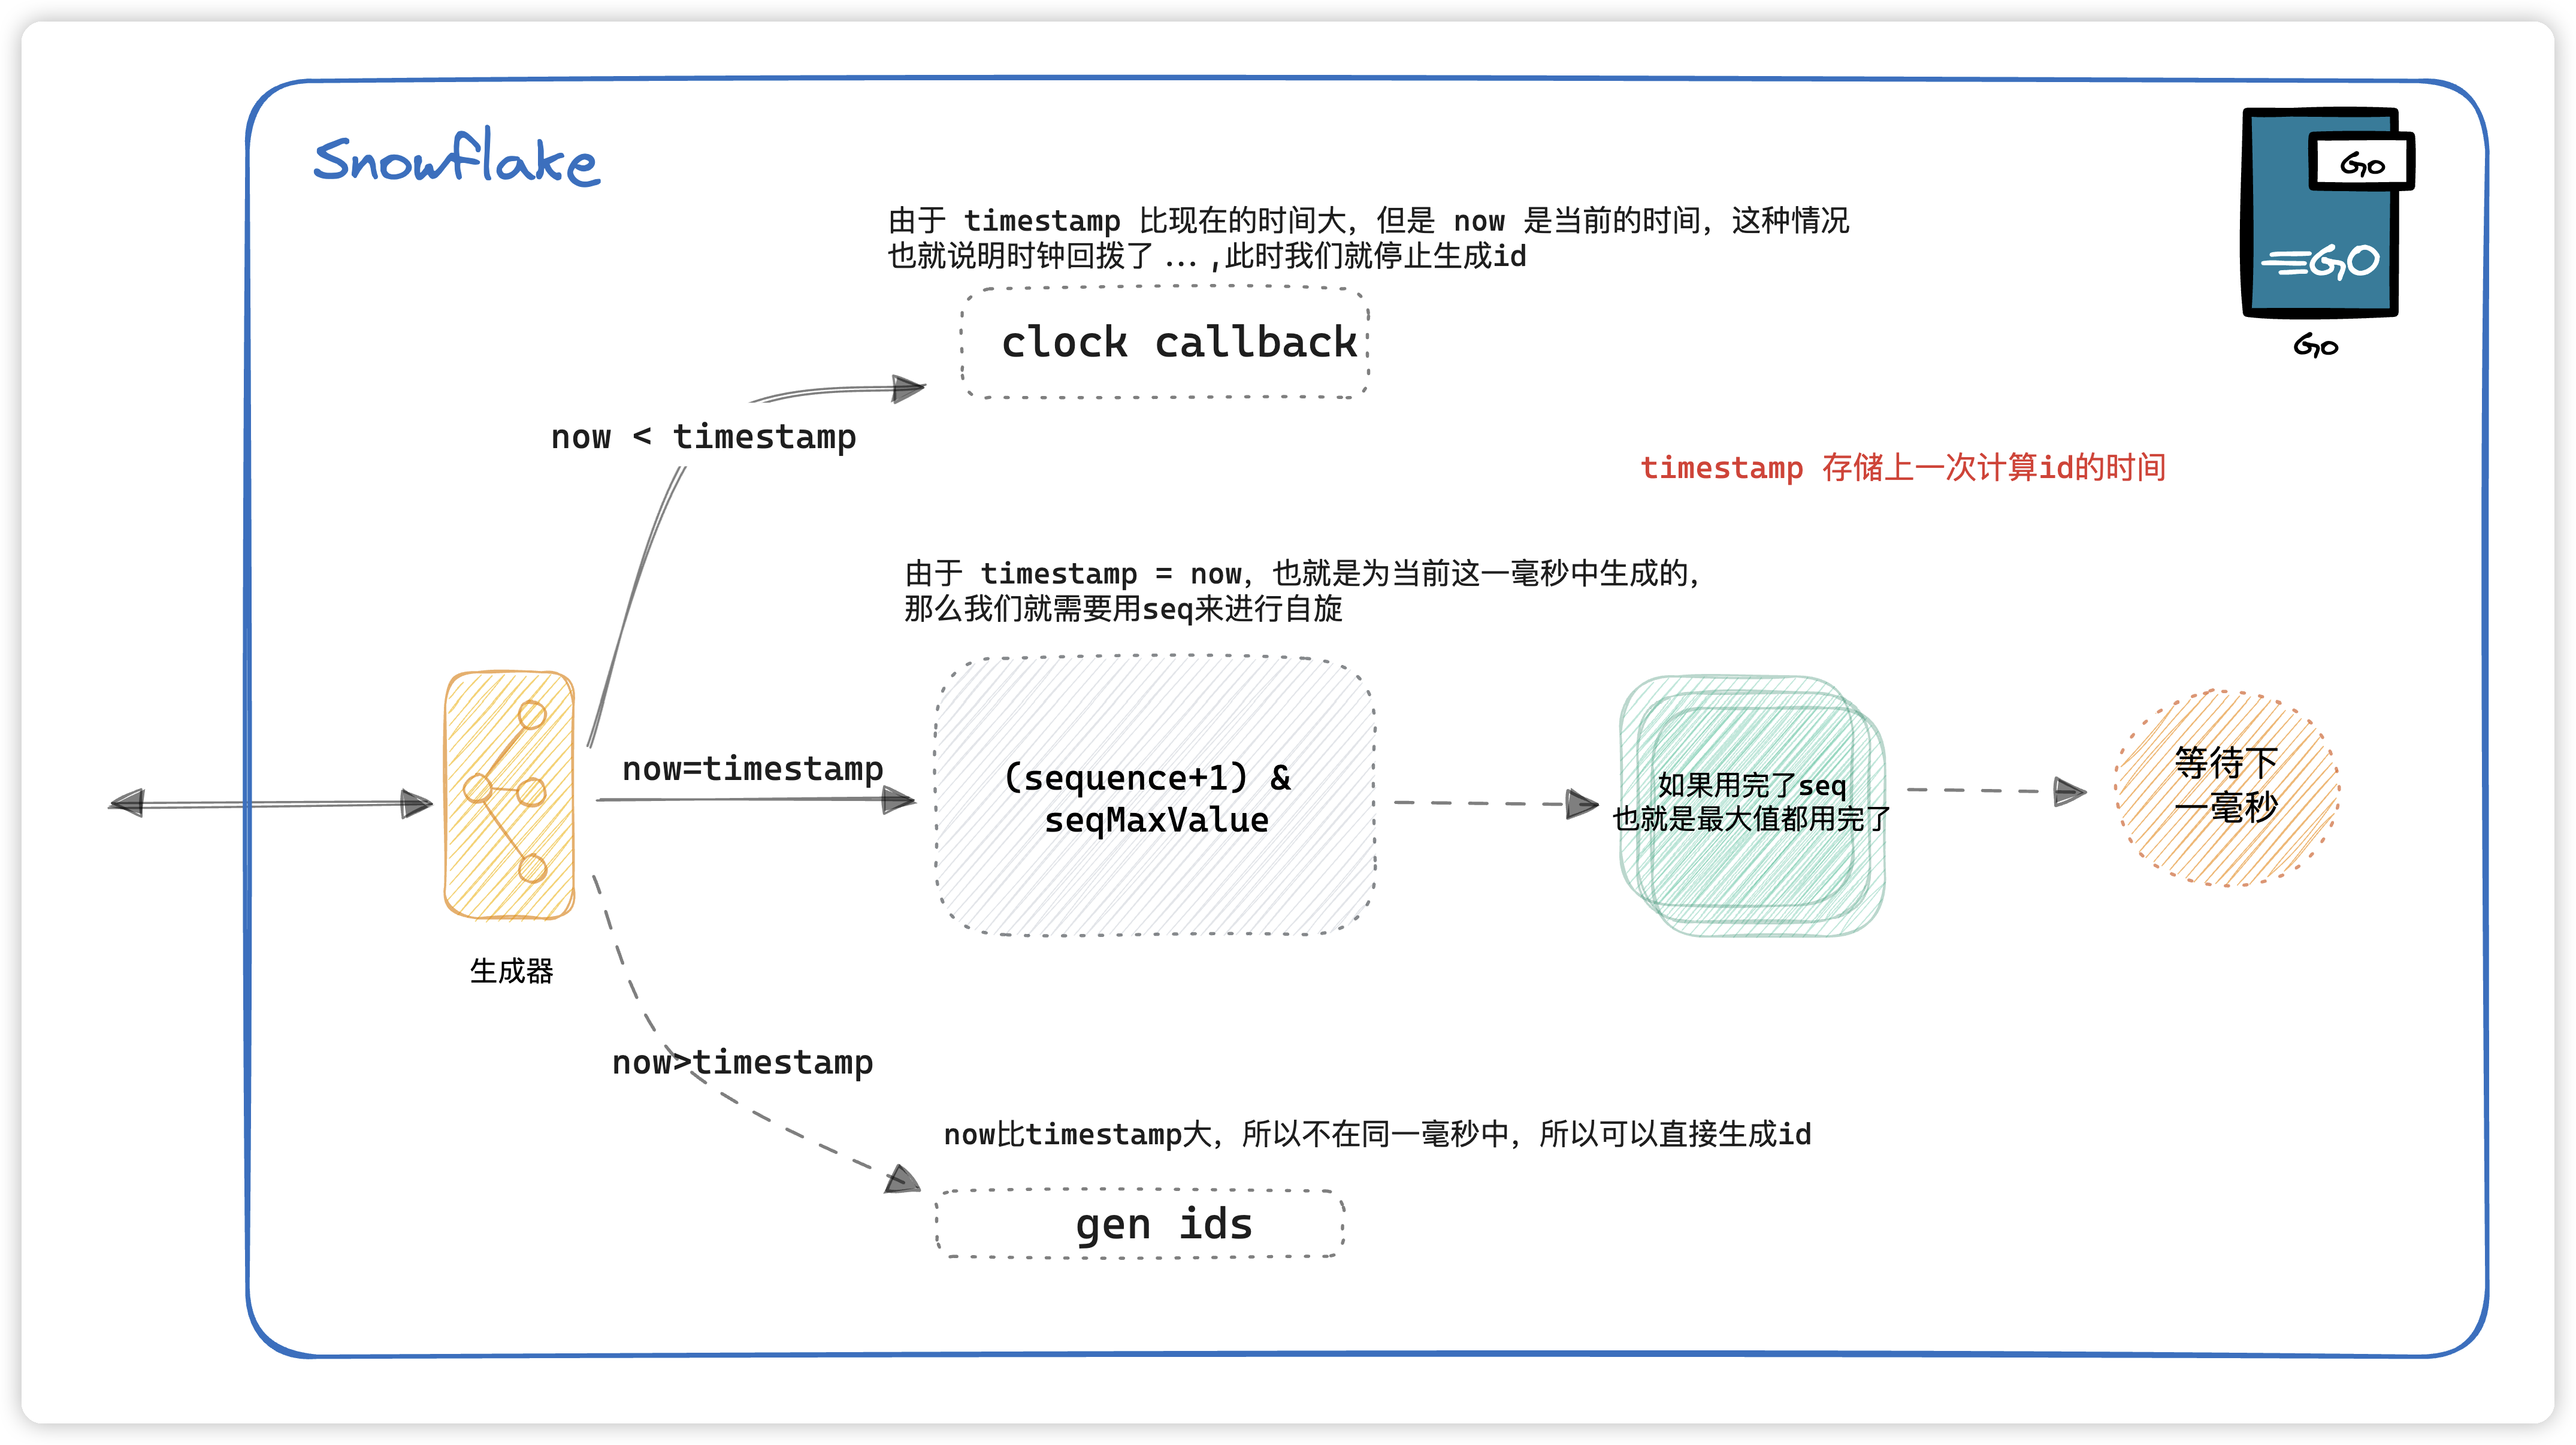
下面会结合代码讲述详细讲述这张图
代码实现
前置工作
既然是由上述的几个部分组成,那么我们可以先定义几个常量
// 时间戳的 占用位数
timestampBits = 41
// dataCenterId 的占用位数
dataCenterIdBits = 5
// workerId 的占用位数
workerIdBits = 5
// sequence 的占用位数
seqBits = 12
并且定义各个字段的最大值,防止越界
// timestamp 最大值, 相当于 2^41-1 = 2199023255551
timestampMaxValue = -1 ^ (-1 << timestampBits)
// dataCenterId 最大值, 相当于 2^5-1 = 31
dataCenterIdMaxValue = -1 ^ (-1 << dataCenterIdBits)
// workId 最大值, 相当于 2^5-1 = 31
workerIdMaxValue = -1 ^ (-1 << workerIdBits)
// sequence 最大值, 相当于 2^12-1 = 4095
seqMaxValue = -1 ^ (-1 << seqBits)
移动位数
// workId 向左移动12位(seqBits占用位数)因为这12位是sequence占的
workIdShift = 12
// dataCenterId 向左移动17位 (seqBits占用位数 + workId占用位数)
dataCenterIdShift = 17
// timestamp 向左移动22位 (seqBits占用位数 + workId占用位数 + dataCenterId占用位数)
timestampShift = 22
定义雪花生成器的对象,定义上面我们介绍的几个字段即可
type SnowflakeSeqGenerator struct {mu           *sync.Mutextimestamp    int64dataCenterId int64workerId     int64sequence     int64
}
func NewSnowflakeSeqGenerator(dataCenterId, workId int64) (r *SnowflakeSeqGenerator, err error) {if dataCenterId < 0 || dataCenterId > dataCenterIdMaxValue {err = fmt.Errorf("dataCenterId should between 0 and %d", dataCenterIdMaxValue-1)return}if workId < 0 || workId > workerIdMaxValue {err = fmt.Errorf("workId should between 0 and %d", dataCenterIdMaxValue-1)return}return &SnowflakeSeqGenerator{mu:           new(sync.Mutex),timestamp:    defaultInitValue - 1,dataCenterId: dataCenterId,workerId:     workId,sequence:     defaultInitValue,}, nil
}
具体算法
timestamp存储的是上一次的计算时间,如果当前的时间比上一次的时间还要小,那么说明发生了时钟回拨,那么此时我们不进行生产id,并且记录错误日志。
now := time.Now().UnixMilli()
if S.timestamp > now { // Clock callbacklog.Errorf("Clock moved backwards. Refusing to generate ID, last timestamp is %d, now is %d", S.timestamp, now)return ""
}
如果时间相等的话,那就说明这是在 同一毫秒时间戳内生成的 ,那么就进行seq的自旋,在这同一毫秒内最多生成 4095 个。如果超过4095的话,就等下一毫秒。
if S.timestamp == now {
// generate multiple IDs in the same millisecond, incrementing the sequence number to prevent conflictsS.sequence = (S.sequence + 1) & seqMaxValueif S.sequence == 0 {// sequence overflow, waiting for next millisecondfor now <= S.timestamp {now = time.Now().UnixMilli()}}
}
那么如果是不在同一毫秒内的话,seq直接用初始值就好了
else {// initialized sequences are used directly at different millisecond timestampsS.sequence = defaultInitValue
}
如果超过了69年,也就是时间戳超过了69年,也不能再继续生成了
tmp := now - epoch
if tmp > timestampMaxValue {log.Errorf("epoch should between 0 and %d", timestampMaxValue-1)return ""
}
记录这一次的计算时间,这样就可以和下一次的生成的时间做对比了。
S.timestamp = now
将 timestamp + dataCenterId + workId + sequence 拼凑一起,注意一点是我们最好用字符串输出,因为前端js中的number类型超过53位会溢出的。
// combine the parts to generate the final ID and convert the 64-bit binary to decimal digits.
r := (tmp)<<timestampShift |(S.dataCenterId << dataCenterIdShift) |(S.workerId << workIdShift) |(S.sequence)return fmt.Sprintf("%d", r)
完整代码 & 测试文件
package sequenceimport ("fmt""sync""time""github.com/seata/seata-go/pkg/util/log"
)// SnowflakeSeqGenerator snowflake gen ids
// ref: https://en.wikipedia.org/wiki/Snowflake_IDvar (// set the beginning timeepoch = time.Date(2024, time.January, 01, 00, 00, 00, 00, time.UTC).UnixMilli()
)const (// timestamp occupancy bitstimestampBits = 41// dataCenterId occupancy bitsdataCenterIdBits = 5// workerId occupancy bitsworkerIdBits = 5// sequence occupancy bitsseqBits = 12// timestamp max value, just like 2^41-1 = 2199023255551timestampMaxValue = -1 ^ (-1 << timestampBits)// dataCenterId max value, just like 2^5-1 = 31dataCenterIdMaxValue = -1 ^ (-1 << dataCenterIdBits)// workId max value, just like 2^5-1 = 31workerIdMaxValue = -1 ^ (-1 << workerIdBits)// sequence max value, just like 2^12-1 = 4095seqMaxValue = -1 ^ (-1 << seqBits)// number of workId offsets (seqBits)workIdShift = 12// number of dataCenterId offsets (seqBits + workerIdBits)dataCenterIdShift = 17// number of timestamp offsets (seqBits + workerIdBits + dataCenterIdBits)timestampShift = 22defaultInitValue = 0
)type SnowflakeSeqGenerator struct {mu           *sync.Mutextimestamp    int64dataCenterId int64workerId     int64sequence     int64
}// NewSnowflakeSeqGenerator initiates the snowflake generator
func NewSnowflakeSeqGenerator(dataCenterId, workId int64) (r *SnowflakeSeqGenerator, err error) {if dataCenterId < 0 || dataCenterId > dataCenterIdMaxValue {err = fmt.Errorf("dataCenterId should between 0 and %d", dataCenterIdMaxValue-1)return}if workId < 0 || workId > workerIdMaxValue {err = fmt.Errorf("workId should between 0 and %d", dataCenterIdMaxValue-1)return}return &SnowflakeSeqGenerator{mu:           new(sync.Mutex),timestamp:    defaultInitValue - 1,dataCenterId: dataCenterId,workerId:     workId,sequence:     defaultInitValue,}, nil
}// GenerateId timestamp + dataCenterId + workId + sequence
func (S *SnowflakeSeqGenerator) GenerateId(entity string, ruleName string) string {S.mu.Lock()defer S.mu.Unlock()now := time.Now().UnixMilli()if S.timestamp > now { // Clock callbacklog.Errorf("Clock moved backwards. Refusing to generate ID, last timestamp is %d, now is %d", S.timestamp, now)return ""}if S.timestamp == now {// generate multiple IDs in the same millisecond, incrementing the sequence number to prevent conflictsS.sequence = (S.sequence + 1) & seqMaxValueif S.sequence == 0 {// sequence overflow, waiting for next millisecondfor now <= S.timestamp {now = time.Now().UnixMilli()}}} else {// initialized sequences are used directly at different millisecond timestampsS.sequence = defaultInitValue}tmp := now - epochif tmp > timestampMaxValue {log.Errorf("epoch should between 0 and %d", timestampMaxValue-1)return ""}S.timestamp = now// combine the parts to generate the final ID and convert the 64-bit binary to decimal digits.r := (tmp)<<timestampShift |(S.dataCenterId << dataCenterIdShift) |(S.workerId << workIdShift) |(S.sequence)return fmt.Sprintf("%d", r)
}
测试文件
func TestSnowflakeSeqGenerator_GenerateId(t *testing.T) {var dataCenterId, workId int64 = 1, 1generator, err := NewSnowflakeSeqGenerator(dataCenterId, workId)if err != nil {t.Error(err)return}var x, y stringfor i := 0; i < 100; i++ {y = generator.GenerateId("", "")if x == y {t.Errorf("x(%s) & y(%s) are the same", x, y)}x = y}
}
这篇关于分布式ID生成算法|雪花算法 Snowflake | Go实现的文章就介绍到这儿,希望我们推荐的文章对编程师们有所帮助!


