本文主要是介绍自定义gym环境并使用RL训练--寻找宝石,希望对大家解决编程问题提供一定的参考价值,需要的开发者们随着小编来一起学习吧!
完整代码已上传到 github
最近有项目需要用到RL相关的一些东西,于是就开始尝试自己搭建一个自定义的gym环境,并使用入门的DQN网络对这个环境进行训练,这个是我入门的第一个项目,可能有一些地方理解的不够的或者有问题的,希望见谅并能指正。
其中环境的自定义部分参考了csdn extremebingo的文章,模型建立与训练过程参考了: pytorch official tutorials,训练结果的展示参考了:tensorflow org tutorials
寻找宝石游戏
绿色的小圆圈代表机器人,红色圈圈表示火坑,蓝色圆圈表示宝石,褐色圈圈表示石柱,其中环境每次重置机器人便会出生在任意一个空白的格子中,机器人需要找到含有宝石的格子获得奖励结束游戏。在寻找的过程中如果踩入火坑游戏结束获得负奖励,机器人无法移动到石柱所在的格子中。
自定义gym环境
自定义gym环境模块主要参考了csdn extremebingo的文章,可以直接点击查看自定义的具体流程介绍,也可以参考github Readme 的gym Env set up模块介绍中的操作流程。这里就不再赘述,下面主要介绍下使用这个流程中可能有的坑:
-
将自定义的文件拷贝到环境中可能不生效,可以尝试在这个路径同样进行一遍操作:
C:\Users\xxx\AppData\Roaming\Python\Python37\site-packages\gym\envs -
extremebingo 构建的环境中有部分代码存在一些笔误还有一些bug,这里进行了一些修改,修改后的环境代码
模型构建与训练
数据收集
训练数据主要有:(state, action, next_state, reward)
- state 当前环境的状态
- action 当前状态时,机器人执行的动作
- next_state 执行该动作后的状态
- reward 执行该动作后获得的激励
(这里用环境render的图表示state 见get_screen,actions = ['n', 'e', 's', 'w'] 含意为:n 上 s下 w左 e 右 reward 找到宝石+1,踩到火坑-1,增加步数在训练的过程中进行适度的惩罚)
数据收集过程中的action 根据当前训练的状态按照概率选择使用模型结果或者随机选择动作执行下一步操作
这个概率值由EPS_END EPS_STAR EPS_DECAY 还有steps_done 共同控制 结果按照指数进行衰减
这里我使用的值为:
EPS_START = 0.9EPS_END = 0.05EPS_DECAY = 20000
选择随机策略的概率随着训练次数steps_done 的变化如下图所示:
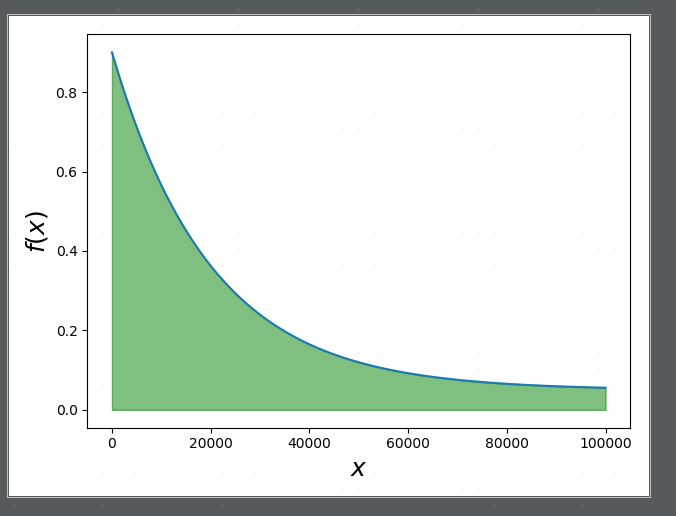
这里eps_decay 改为了20000而不是torch offical tutorials里的200,主要是因为这个环境比小车的稍微复杂,因此前期需要更多的随机策略的样本训练,offical turorials 里概率的变化曲线如下:
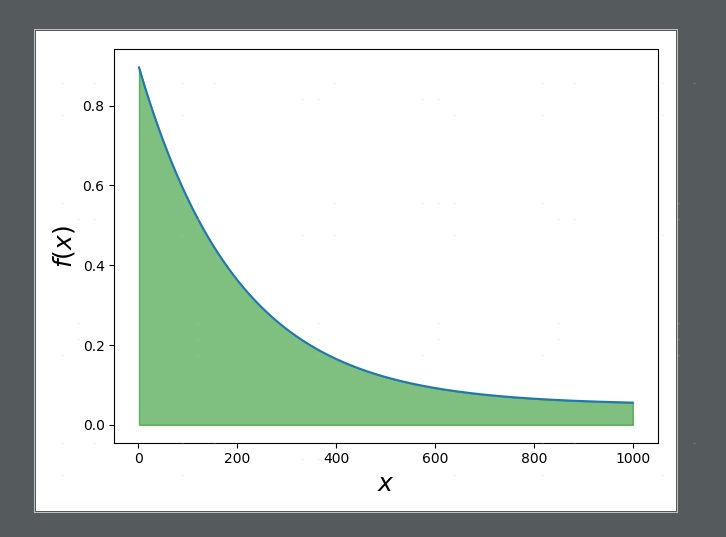
,当我们在test模型时,主要应选取模型的输出作为下一个action 因此 我在代码中增加了eval时eps_threshold=0.001:
def select_action(state, eval=False):global steps_donesample = random.random()eps_threshold = EPS_END + (EPS_START - EPS_END) * \math.exp(-1. * steps_done / EPS_DECAY)if eval:eps_threshold = 0.001print("eps_threshold:{} ,steps_done:{}".format(eps_threshold, steps_done))steps_done += 1if sample > eps_threshold:print("select Model")with torch.no_grad():# t.max(1) will return largest column value of each row.# second column on max result is index of where max element was# found, so we pick action with the larger expected reward.if eval:return target_net(state).max(1)[1].view(1, 1)return policy_net(state).max(1)[1].view(1, 1)else:print("select random")return torch.tensor([[random.randrange(n_actions)]], device=device, dtype=torch.long)
运行过程中生产的数据放到一个存储类中,每次随机采样batchSize条数据训练:
class ReplayMemory(object):def __init__(self, capacity):self.capacity = capacityself.memory = []self.position = 0def push(self, *args):"""Saves a transition."""if len(self.memory) < self.capacity:self.memory.append(None)self.memory[self.position] = Transition(*args)self.position = (self.position + 1) % self.capacitydef sample(self, batch_size):return random.sample(self.memory, batch_size)def __len__(self):return len(self.memory)
get_screen 函数主要获取环境状态改变时的图像
def get_screen():# Returned screen requested by gym is 400x600x3, but is sometimes larger# such as 800x1200x3. Transpose it into torch order (CHW).screen = env.render(mode='rgb_array').transpose((2, 0, 1))# Cart is in the lower half, so strip off the top and bottom of the screen_, screen_height, screen_width = screen.shape# print("screen_height {}, screen_width {}".format(screen_height,screen_width))screen = screen[:, int(screen_height * 0):int(screen_height * 0.9)]view_width = int(screen_width * 0.6)# Strip off the edges, so that we have a square image centered on a cart# screen = screen[:, :, slice_range]# Convert to float, rescale, convert to torch tensor# (this doesn't require a copy)screen = np.ascontiguousarray(screen, dtype=np.float32) / 255screen = torch.from_numpy(screen)# Resize, and add a batch dimension (BCHW)return resize(screen).unsqueeze(0).to(device)
模型构建
DQN 网络使用三层卷积,根据状态 预测下一步采取各个行动的收益
class DQN(nn.Module):def __init__(self, h, w, outputs):super(DQN, self).__init__()self.conv1 = nn.Conv2d(3, 16, kernel_size=5, stride=2)self.bn1 = nn.BatchNorm2d(16)self.conv2 = nn.Conv2d(16, 32, kernel_size=5, stride=2)self.bn2 = nn.BatchNorm2d(32)self.conv3 = nn.Conv2d(32, 32, kernel_size=5, stride=2)self.bn3 = nn.BatchNorm2d(32)# Number of Linear input connections depends on output of conv2d layers# and therefore the input image size, so compute it.def conv2d_size_out(size, kernel_size=5, stride=2):return (size - (kernel_size - 1) - 1) // stride + 1convw = conv2d_size_out(conv2d_size_out(conv2d_size_out(w)))convh = conv2d_size_out(conv2d_size_out(conv2d_size_out(h)))linear_input_size = convw * convh * 32self.head = nn.Linear(linear_input_size, outputs)# Called with either one element to determine next action, or a batch# during optimization. Returns tensor([[left0exp,right0exp]...]).def forward(self, x):x = F.relu(self.bn1(self.conv1(x)))x = F.relu(self.bn2(self.conv2(x)))x = F.relu(self.bn3(self.conv3(x)))return self.head(x.view(x.size(0), -1))
训练过程模型参数更新
通过policy_net (参数实时更新的net)根据batch数据中的state信息预测下一步采取的每个行动的收益,生成bx4(action 可选择的个数4)的矩阵,根据batch 中 的action 的index 选择 这一action 模型预测的值(Q(s_t, a) - model computes Q(s_t)):
state_action_values = policy_net(state_batch).gather(1, action_batch)
使用target_net (参数更新copy from policy net延迟的net) 使用next state信息(过滤掉 状态为none)预测最大收益的行动:next_state_values
当前状态的收益期望值 = 下一状态预测的行动最大收益(next_state_values)*GAMMA + 当前状态行为的实际收益 reward_batch 如下所示:
expected_state_action_values = (next_state_values * GAMMA) + reward_batch
根据当前网络预测的动作收益 state_action_values 与实际期望的收益的误差作为模型的loss 更新整个策略网络
loss = F.smooth_l1_loss(state_action_values, expected_state_action_values.unsqueeze(1))print("loss:{}".format(loss.item()))# Optimize the modeloptimizer.zero_grad() loss.backward()for param in policy_net.parameters():param.grad.data.clamp_(-1, 1)optimizer.step()该函数optimize_model完整代码如下:
def optimize_model():if len(memory) < BATCH_SIZE:returntransitions = memory.sample(BATCH_SIZE)# Transpose the batch (see https://stackoverflow.com/a/19343/3343043 for# detailed explanation). This converts batch-array of Transitions# to Transition of batch-arrays.batch = Transition(*zip(*transitions))# Compute a mask of non-final states and concatenate the batch elements# (a final state would've been the one after which simulation ended)non_final_mask = torch.tensor(tuple(map(lambda s: s is not None,batch.next_state)), device=device, dtype=torch.bool)non_final_next_states = torch.cat([s for s in batch.next_stateif s is not None])state_batch = torch.cat(batch.state)action_batch = torch.cat(batch.action)reward_batch = torch.cat(batch.reward)# Compute Q(s_t, a) - the model computes Q(s_t), then we select the# columns of actions taken. These are the actions which would've been taken# for each batch state according to policy_netstate_action_values = policy_net(state_batch).gather(1, action_batch)# Compute V(s_{t+1}) for all next states.# Expected values of actions for non_final_next_states are computed based# on the "older" target_net; selecting their best reward with max(1)[0].# This is merged based on the mask, such that we'll have either the expected# state value or 0 in case the state was final.next_state_values = torch.zeros(BATCH_SIZE, device=device)next_state_values[non_final_mask] = target_net(non_final_next_states).max(1)[0].detach()# Compute the expected Q valuesexpected_state_action_values = (next_state_values * GAMMA) + reward_batch# Compute Huber lossloss = F.smooth_l1_loss(state_action_values, expected_state_action_values.unsqueeze(1))print("loss:{}".format(loss.item()))# Optimize the modeloptimizer.zero_grad()loss.backward()for param in policy_net.parameters():param.grad.data.clamp_(-1, 1)optimizer.step()
这篇关于自定义gym环境并使用RL训练--寻找宝石的文章就介绍到这儿,希望我们推荐的文章对编程师们有所帮助!


