本文主要是介绍ubuntu22.04@laptop OpenCV Get Started: 010_blob_detection,希望对大家解决编程问题提供一定的参考价值,需要的开发者们随着小编来一起学习吧!
ubuntu22.04@laptop OpenCV Get Started: 010_blob_detection
- 1. 源由
- 2. blob应用Demo
- 2.1 C++应用Demo
- 2.2 Python应用Demo
- 3. 重点分析
- 3.1 Threshold
- 3.2 Area
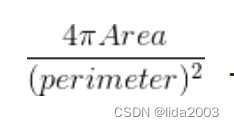
- 3.3 Circularity
- 3.4 Convexity
- 3.5 Inertia Ratio
- 4. 总结
- 5. 参考资料
- 6. 补充
1. 源由
Blob是图像中的一组连接像素,它们共享一些共同特性(例如灰度值)。
在下图中,暗连接区域是斑点,斑点检测旨在识别和标记这些区域。

OpenCV提供了一种基于不同特征检测和过滤斑点的简单方法。
2. blob应用Demo
010_blob_detection是OpenCV通过设置blob参数过滤图像的示例程序。
2.1 C++应用Demo
C++应用Demo工程结构:
010_blob_detection/CPP$ tree . -L 1
.
├── blob.cpp
├── blob.jpg
└── CMakeLists.txt0 directories, 3 files
确认OpenCV安装路径:
$ find /home/daniel/ -name "OpenCVConfig.cmake"
/home/daniel/OpenCV/installation/opencv-4.9.0/lib/cmake/opencv4/
/home/daniel/OpenCV/opencv/build/OpenCVConfig.cmake
/home/daniel/OpenCV/opencv/build/unix-install/OpenCVConfig.cmake$ export OpenCV_DIR=/home/daniel/OpenCV/installation/opencv-4.9.0/lib/cmake/opencv4/
C++应用Demo工程编译执行:
$ mkdir build
$ cd build
$ cmake ..
$ cmake --build . --config Release
$ cd ..
$ ./build/blob
2.2 Python应用Demo
Python应用Demo工程结构:
010_blob_detection/Python$ tree . -L 1
.
├── blob.jpg
└── blob.py0 directories, 2 files
Python应用Demo工程执行:
$ workoncv-4.9.0
$ python blob.py
3. 重点分析
下面是通过params过滤以后,显示blob的代码:
C++:
	// Storage for blobsvector<KeyPoint> keypoints;#if CV_MAJOR_VERSION < 3   // If you are using OpenCV 2// Set up detector with paramsSimpleBlobDetector detector(params);// Detect blobsdetector.detect( im, keypoints);
#else // Set up detector with paramsPtr<SimpleBlobDetector> detector = SimpleBlobDetector::create(params);   // Detect blobsdetector->detect( im, keypoints);
#endif // Draw detected blobs as red circles.// DrawMatchesFlags::DRAW_RICH_KEYPOINTS flag ensures// the size of the circle corresponds to the size of blobMat im_with_keypoints;drawKeypoints( im, keypoints, im_with_keypoints, Scalar(0,0,255), DrawMatchesFlags::DRAW_RICH_KEYPOINTS );// Show blobsimshow("keypoints", im_with_keypoints );
Python:
# Create a detector with the parameters
ver = (cv2.__version__).split('.')
if int(ver[0]) < 3 :detector = cv2.SimpleBlobDetector(params)
else : detector = cv2.SimpleBlobDetector_create(params)# Detect blobs.
keypoints = detector.detect(im)# Draw detected blobs as red circles.
# cv2.DRAW_MATCHES_FLAGS_DRAW_RICH_KEYPOINTS ensures
# the size of the circle corresponds to the size of blobim_with_keypoints = cv2.drawKeypoints(im, keypoints, np.array([]), (0,0,255), cv2.DRAW_MATCHES_FLAGS_DRAW_RICH_KEYPOINTS)# Show blobs
cv2.imshow("Keypoints", im_with_keypoints)
3.1 Threshold
采样值阈值过滤,在[minThreshold, maxThreshold]之间采用thresholdStep步进方式过滤。
C++:
// Change thresholds
params.minThreshold = 10;
params.maxThreshold = 200;
Python:
# Change thresholds
params.minThreshold = 10
params.maxThreshold = 200
3.2 Area
面积过滤,小于当前面积时,被过滤掉。
C++:
// Filter by Area.
params.filterByArea = true;
params.minArea = 1500;
Python:
# Filter by Area.
params.filterByArea = True
params.minArea = 1500
3.3 Circularity
圆形度过滤,低于阈值被过滤掉(越接近圆的时候,为1)。

C++:
// Filter by Circularity
params.filterByCircularity = true;
params.minCircularity = 0.1;
Python:
# Filter by Circularity
params.filterByCircularity = True
params.minCircularity = 0.1
3.4 Convexity
blob面积和凸包的面积之比(不凹陷的图形该值为1),因此,凸包越厉害越接近0。
C++:
// Filter by Convexity
params.filterByConvexity = true;
params.minConvexity = 0.87;
Python:
# Filter by Convexity
params.filterByConvexity = True
params.minConvexity = 0.87
3.5 Inertia Ratio
惯性率,通常圆(1),椭圆(0, 1),过滤惯性率小于该值的物体。
C++:
// Filter by Inertia
params.filterByInertia = true;
params.minInertiaRatio = 0.01;
Python:
# Filter by Inertia
params.filterByInertia = True
params.minInertiaRatio = 0.01
4. 总结
本文通过对图像进行SimpleBlobDetector操作,从而对blob物体进行过滤,主要目的是理解该对象(SimpleBlobDetector)参数的含义。
- detect(images,keypoints))
- images Image set.
- keypoints The detected keypoints. In the second variant of the method keypoints[i] is a set of keypoints detected in images[i] .
5. 参考资料
【1】ubuntu22.04@laptop OpenCV Get Started
【2】ubuntu22.04@laptop OpenCV安装
【3】ubuntu22.04@laptop OpenCV定制化安装
6. 补充
学习是一种过程,对于前面章节学习讨论过的,就不在文中重复了。
有兴趣了解更多的朋友,请从《ubuntu22.04@laptop OpenCV Get Started》开始,一个章节一个章节的了解,循序渐进。
这篇关于ubuntu22.04@laptop OpenCV Get Started: 010_blob_detection的文章就介绍到这儿,希望我们推荐的文章对编程师们有所帮助!


