使用Matplotlib子图展示卷积神经网络中间特征图层

本文主要是介绍使用Matplotlib子图展示卷积神经网络中间特征图层,希望对大家解决编程问题提供一定的参考价值,需要的开发者们随着小编来一起学习吧!

以下拿 fashion_mninst 来举例

import tensorflow as tf
import matplotlib as plt
from tensorflow.keras.datasets import fashion_mnist(x_train, y_train), (x_test, y_test) = fashion_mnist.load_data()
# 预处理函数
def data_scale(x, y):x = tf.cast(x, tf.float32)x = x / 255.0x = tf.reshape(x, (x.shape[0], x.shape[1], 1))x = tf.image.resize_with_pad(image=x, target_height=224,target_width=224)return x, y
# 获取 fashion_mnist 数据集
train_db = tf.data.Dataset.from_tensor_slices((x_train,y_train)).shuffle(20).map(data_scale).batch(128)# 获取一组数据
X = next(iter(train_db))[0][0]
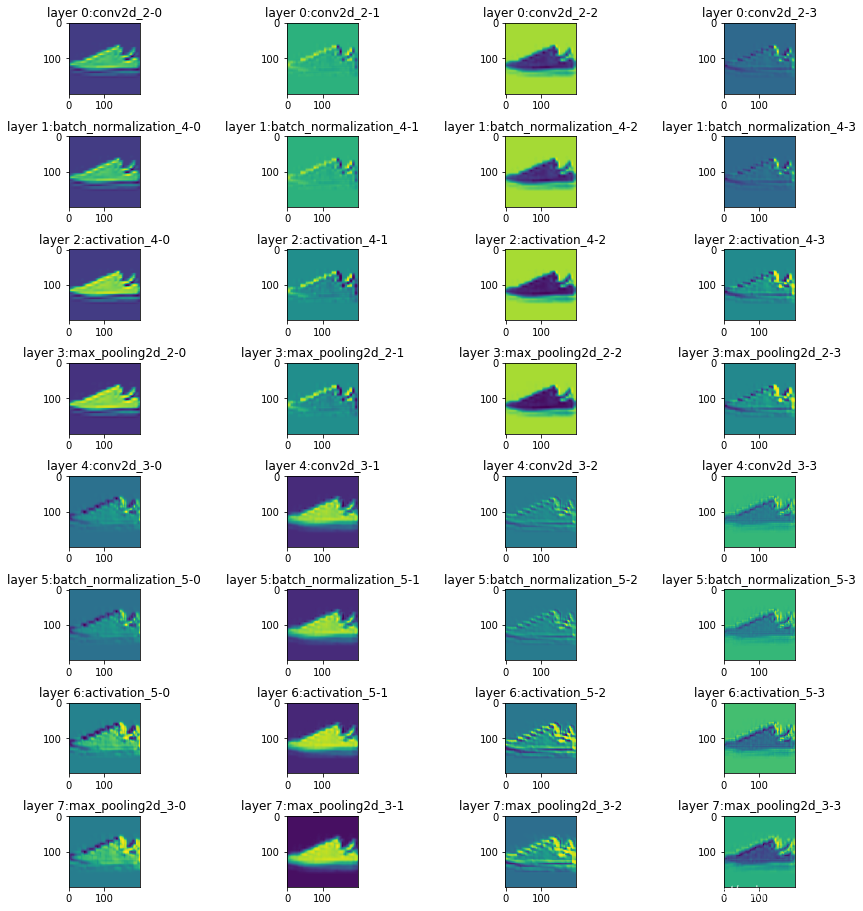
# 将这组数据输入训练好的模型,并打印中间层特征图def show(X, k,i, name):print(X.shape)X = tf.expand_dims(X, axis=-1)# 将每个图转换为 200 * 200的像素,但这个不是图大小X = tf.image.resize(X,  [200,200], method='bilinear')X_ = tf.squeeze(X)t = plt.subplot(8, 4,  4*k + i + 1)# 添加子图的标题t.title.set_text('layer %s:'%k + name + '-' + str(i))plt.imshow(X_)X = tf.expand_dims(X, axis=0)# 设置图纸大小
plt.figure(figsize=(15, 15))
# 打印前 8 层的部分特征图
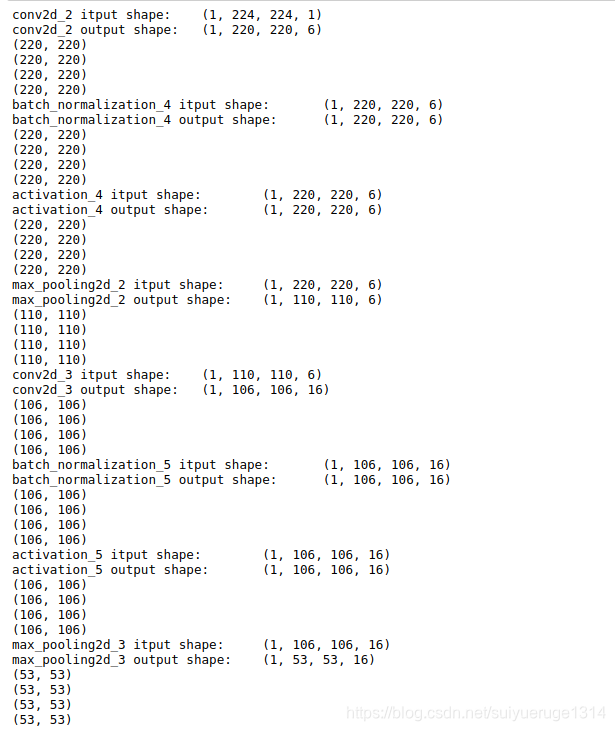
for k,blk in enumerate(net.layers[0:8]):print(blk.name,'itput shape:\t',X.shape)
#     show(X[0,:,:,0])X = blk(X)print(blk.name, 'output shape:\t', X.shape)# 选择其中的四个通道for i in range(4):show(X[0,:,:,i], k, i, blk.name)
# 调整子图的间隔
left  = 0.125  # the left side of the subplots of the figure
right = 0.9    # the right side of the subplots of the figure
bottom = 0.1   # the bottom of the subplots of the figure
top = 0.9      # the top of the subplots of the figure
wspace = 0.2   # the amount of width reserved for blank space between subplots,# expressed as a fraction of the average axis width
hspace = 0.6   # the amount of height reserved for white space between subplots,# expressed as a fraction of the average axis heightplt.subplots_adjust(left=left, bottom=bottom, right=right, top=top,wspace=wspace, hspace=hspace)plt.show()

效果如下:
在这里插入图片描述
在这里插入图片描述

这篇关于使用Matplotlib子图展示卷积神经网络中间特征图层的文章就介绍到这儿,希望我们推荐的文章对编程师们有所帮助!


http://www.chinasem.cn/article/701760

相关文章

Python数据验证神器Pydantic库的使用和实践中的避坑指南

《Python数据验证神器Pydantic库的使用和实践中的避坑指南》Pydantic是一个用于数据验证和设置的库,可以显著简化API接口开发,文章通过一个实际案例,展示了Pydantic如何在生产环... 目录1️⃣ 崩溃时刻:当你的API接口又双叒崩了!2️⃣ 神兵天降:3行代码解决验证难题3️⃣ 深度

Linux内核定时器使用及说明

《Linux内核定时器使用及说明》文章详细介绍了Linux内核定时器的特性、核心数据结构、时间相关转换函数以及操作API,通过示例展示了如何编写和使用定时器,包括按键消抖的应用... 目录1.linux内核定时器特征2.Linux内核定时器核心数据结构3.Linux内核时间相关转换函数4.Linux内核定时

python中的flask_sqlalchemy的使用及示例详解

《python中的flask_sqlalchemy的使用及示例详解》文章主要介绍了在使用SQLAlchemy创建模型实例时,通过元类动态创建实例的方式,并说明了如何在实例化时执行__init__方法,... 目录@orm.reconstructorSQLAlchemy的回滚关联其他模型数据库基本操作将数据添

Spring配置扩展之JavaConfig的使用小结

《Spring配置扩展之JavaConfig的使用小结》JavaConfig是Spring框架中基于纯Java代码的配置方式,用于替代传统的XML配置,通过注解(如@Bean)定义Spring容器的组... 目录JavaConfig 的概念什么是JavaConfig?为什么使用 JavaConfig?Jav

Java使用Spire.Doc for Java实现Word自动化插入图片

《Java使用Spire.DocforJava实现Word自动化插入图片》在日常工作中,Word文档是不可或缺的工具,而图片作为信息传达的重要载体,其在文档中的插入与布局显得尤为关键,下面我们就来... 目录1. Spire.Doc for Java库介绍与安装2. 使用特定的环绕方式插入图片3. 在指定位

Springboot3 ResponseEntity 完全使用案例

《Springboot3ResponseEntity完全使用案例》ResponseEntity是SpringBoot中控制HTTP响应的核心工具——它能让你精准定义响应状态码、响应头、响应体,相比... 目录Spring Boot 3 ResponseEntity 完全使用教程前置准备1. 项目基础依赖(M

Java使用Spire.Barcode for Java实现条形码生成与识别

《Java使用Spire.BarcodeforJava实现条形码生成与识别》在现代商业和技术领域,条形码无处不在,本教程将引导您深入了解如何在您的Java项目中利用Spire.Barcodefor... 目录1. Spire.Barcode for Java 简介与环境配置2. 使用 Spire.Barco

Android使用java实现网络连通性检查详解

《Android使用java实现网络连通性检查详解》这篇文章主要为大家详细介绍了Android使用java实现网络连通性检查的相关知识,文中的示例代码讲解详细,感兴趣的小伙伴可以跟随小编一起学习一下... 目录NetCheck.Java(可直接拷贝)使用示例(Activity/Fragment 内)权限要求

C# 预处理指令(# 指令)的具体使用

《C#预处理指令(#指令)的具体使用》本文主要介绍了C#预处理指令(#指令)的具体使用,文中通过示例代码介绍的非常详细,对大家的学习或者工作具有一定的参考学习价值,需要的朋友们下面随着小编来一起学... 目录1、预处理指令的本质2、条件编译指令2.1 #define 和 #undef2.2 #if, #el

C#中Trace.Assert的使用小结

《C#中Trace.Assert的使用小结》Trace.Assert是.NET中的运行时断言检查工具,用于验证代码中的关键条件,下面就来详细的介绍一下Trace.Assert的使用,具有一定的参考价值... 目录1、 什么是 Trace.Assert?1.1 最简单的比喻1.2 基本语法2、⚡ 工作原理3