本文主要是介绍UDP套接字的通信(实现英汉互译/程序替换/多线程聊天室/Windows与Linux通信),希望对大家解决编程问题提供一定的参考价值,需要的开发者们随着小编来一起学习吧!
实现英汉互译
思路
我们在客户端发英文,服务端做翻译工作,让翻译好的中文再次发给我们的客户端,然后打印出来。
服务端代码
翻译的操作
创建一个txt文件里面包含英汉互译的数据
dict.txt
banana:香蕉
apple:苹果
pig:猪
beef:牛肉
hello:你好
对txt中的数据进行操作
分割函数
将英汉通过冒号分开。
// 分割函数
static bool cutString(const string &target, string *s1, string *s2, const string &sep)
{// apple:苹果auto pos = target.find(sep);if (pos == string::npos){return false;}*s1 = target.substr(0, pos);*s2 = target.substr(pos + sep.size());return true;
}
将文件数据插入map里面
// 按行将文件里面的数据给插入到map里面
static void initDict()
{dict.clear();ifstream in(dictTxt, std::ios::binary);if (!in.is_open()){std::cerr << "open file " << dictTxt << " error" << endl;exit(OPEN_ERR);}string line;std::string key, value;while (getline(in, line)){// cout << line << endl;if (cutString(line, &key, &value, ":")){dict.insert(make_pair(key, value));}}in.close();cout << "load dict success" << endl;
}
重新加载文件
通过捕捉2号(ctrl c)信号来进行重新加载文件。
void reload(int signo)
{(void)signo;initDict();
}// ./udpClient server_ip server_port
int main(int argc, char *argv[])
{signal(2, reload); // 通过发2号信号来使dict.txt中的数据进行更新}
网络通信的操作
将翻译后的数据发送给客户端
void handlerMessage(int sockfd, string message, uint16_t clientport, string clientip)
{// 就可以对message进行特定的业务处理,而不关心message怎么来的 --- server通信和业务逻辑解耦!// 婴儿版的业务逻辑string response_message;auto iter = dict.find(message);if (iter == dict.end())response_message = "unknown";elseresponse_message = iter->second;// 开始返回struct sockaddr_in client;bzero(&client, sizeof(client));client.sin_family = AF_INET;client.sin_port = htons(clientport);client.sin_addr.s_addr = inet_addr(clientip.c_str());// 在服务端收到客户端数据的时候我们获取到了客户端的端口号和ip,因此回调到了这个函数中,// 此时我们就可以使用客户端的端口号和ip来给客户端发送翻译后的信息sendto(sockfd, response_message.c_str(), response_message.size(), 0, (struct sockaddr *)&client, sizeof(client));
}
客户端代码
创建socket
void initClient()
{// 1. 创建socket_sockfd = socket(AF_INET, SOCK_DGRAM, 0);if (_sockfd == -1){cerr << "socket error: " << errno << " : " << strerror(errno) << endl;exit(2);}cout << "socket success: " << _sockfd << endl;// 2. client要不要bind[不需要的]  , client要不要显示的bind,需不需要程序员自己bind? 不需要// 写服务器的一家公司,写客户端是无数家公司 -- 因此让OS自动形成端口进行bind! -- OS在什么时候,如何bind
}
数据处理
将用户输入的数据发送给服务端,并且接受服务端翻译后的数据并进行打印。
void run()
{struct sockaddr_in server;memset(&server, 0, sizeof(server));server.sin_family = AF_INET;server.sin_addr.s_addr = inet_addr(_serverip.c_str());server.sin_port = htons(_serverport);string message;char buffer[1024];while (!_quit){// fprintf(stderr, "Please Enter# ");// fflush(stderr);// fgets(buffer, sizeof(buffer), stdin);cout << "Please Enter# ";cin >> message;// buffer[strlen(buffer) - 1] = 0;// message = buffer;sendto(_sockfd, message.c_str(), message.size(), 0, (struct sockaddr *)&server, sizeof(server));char recv_buffer[1024];// 接受翻译后的信息struct sockaddr_in peer;socklen_t len = sizeof(peer);//ssize_t s = recvfrom(_sockfd, recv_buffer, sizeof(recv_buffer) - 1, 0, (struct sockaddr *)&peer, &len);if (s > 0){// 读取数据buffer[s] = 0;}cout << "服务器翻译成# " << recv_buffer << endl;// recv_buffer[0] = 0;memset(recv_buffer, 0, sizeof(buffer)); // 清空缓冲区}
}
成果展示

程序替换
思路
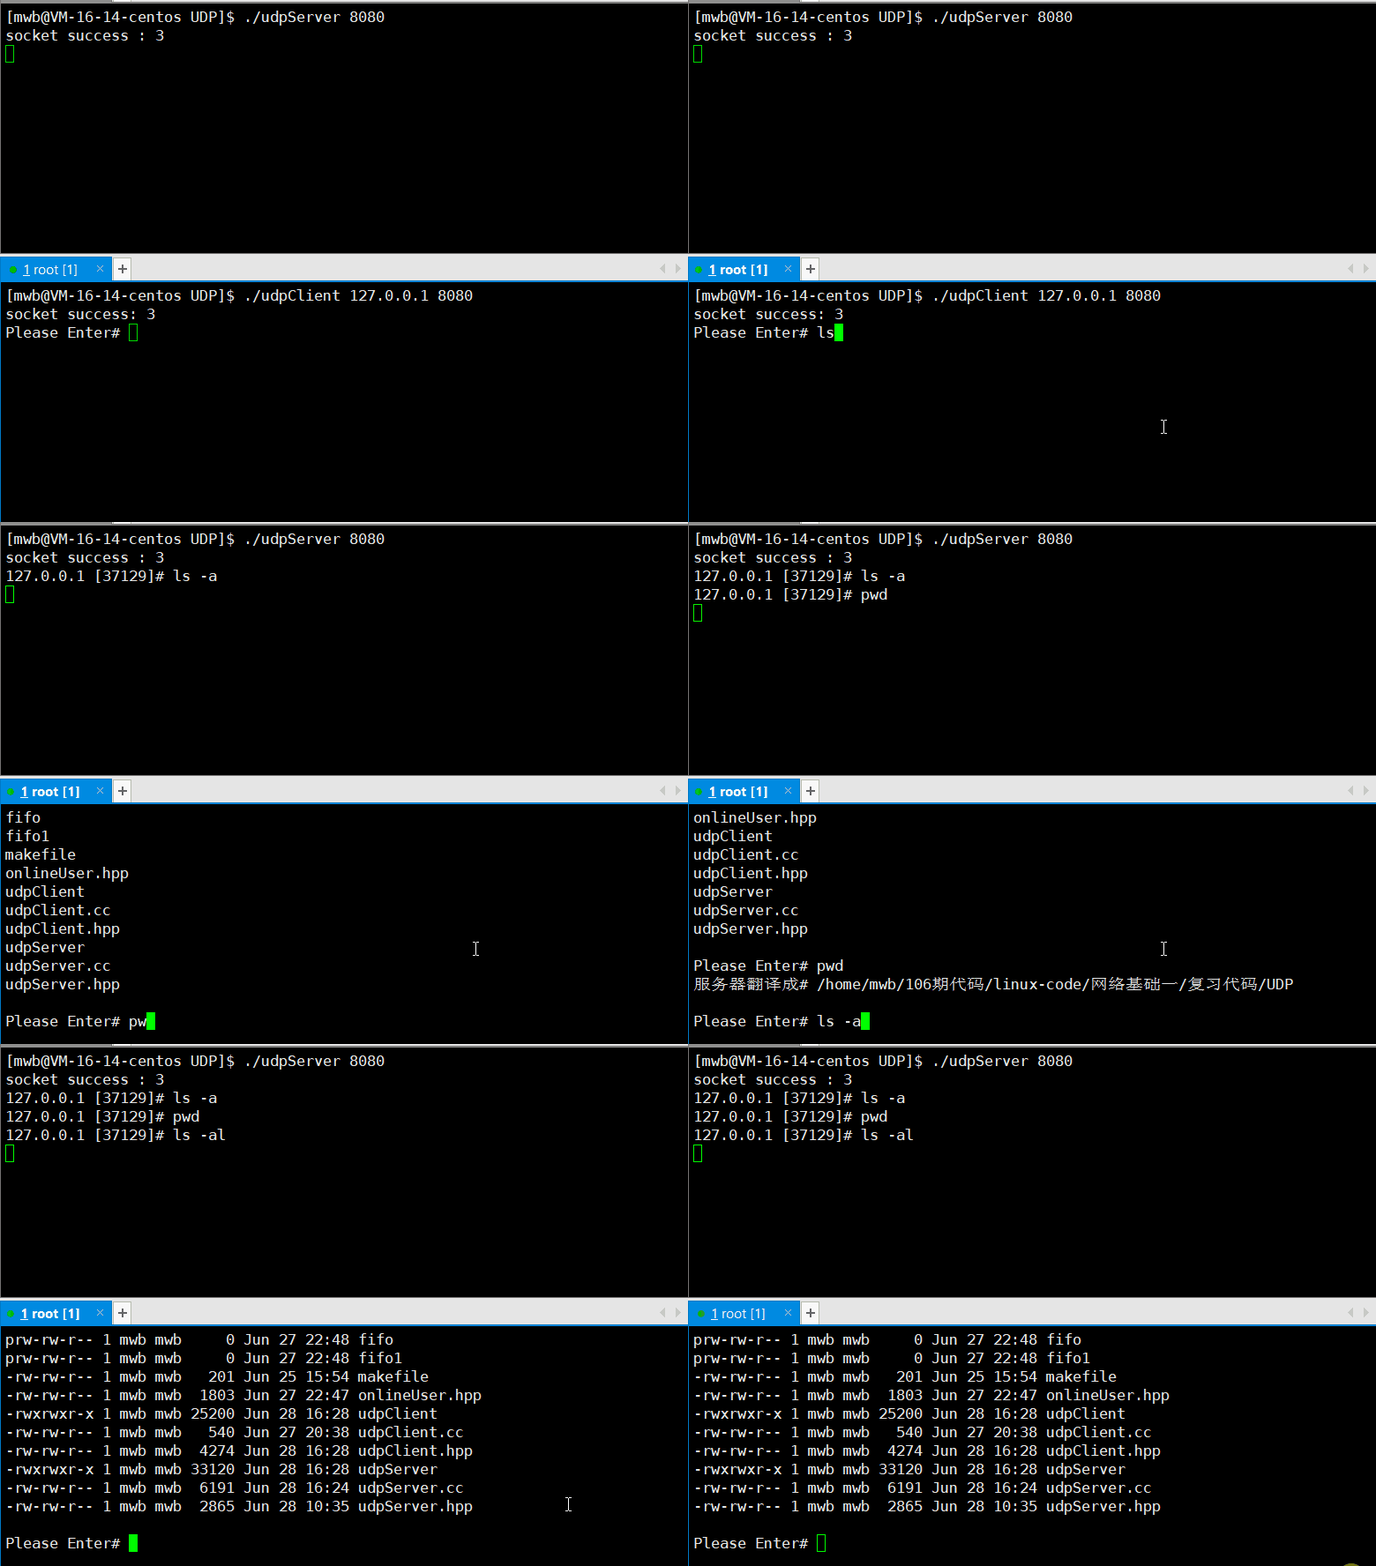
主要使用popen接口同时实现管道+创建子进程+程序替换的功能。将我们客户端输入的命令信息发送给服务端。服务端将该命令经过popen接口让它执行命令运行出来的结果放在一个文件中,然后在将文件中的内容读取出来发送给客户端。
popen接口
#include <stdio.h>FILE *popen(const char *command,const char *type); // 相当于pipe+fork+exec* int pclose(FILE *stream);
参数
const char *command
未来要执行的命令字符串:
ls -a -l 等 可以将这些命令执行的结果返回到一个文件当中
const char *type
对文件的操作方式"r" "w" "a" 等
返回值
返回 nullptr 说明执行失败了
服务端代码
void execCommand(int sockfd, string cmd, uint16_t clientport, string clientip)
{// 1. com解析,ls -a -l// 2. 如果必要,可能需要fork,exec*if (cmd.find("rm") != string::npos || cmd.find("mv") != string::npos || cmd.find("remdir") != string::npos){cerr << clientip << " : " << clientport << " 正在做一个非法的操作: " << cmd << endl;return;}string response;FILE *fp = popen(cmd.c_str(), "r");if (fp == nullptr)response = cmd + " exec failed";char line[1024];// 按行读取while (fgets(line, sizeof(line), fp)){response += line;}pclose(fp);// 开始返回struct sockaddr_in client;bzero(&client, sizeof(client));client.sin_family = AF_INET;client.sin_port = htons(clientport);client.sin_addr.s_addr = inet_addr(clientip.c_str());// 在服务端收到客户端数据的时候我们获取到了客户端的端口号和ip,因此回调到了这个函数中,// 此时我们就可以使用客户端的端口号和ip来给客户端发送翻译后的信息sendto(sockfd, response.c_str(), response.size(), 0, (struct sockaddr *)&client, sizeof(client));
}
成果展示

多线程聊天室
思路
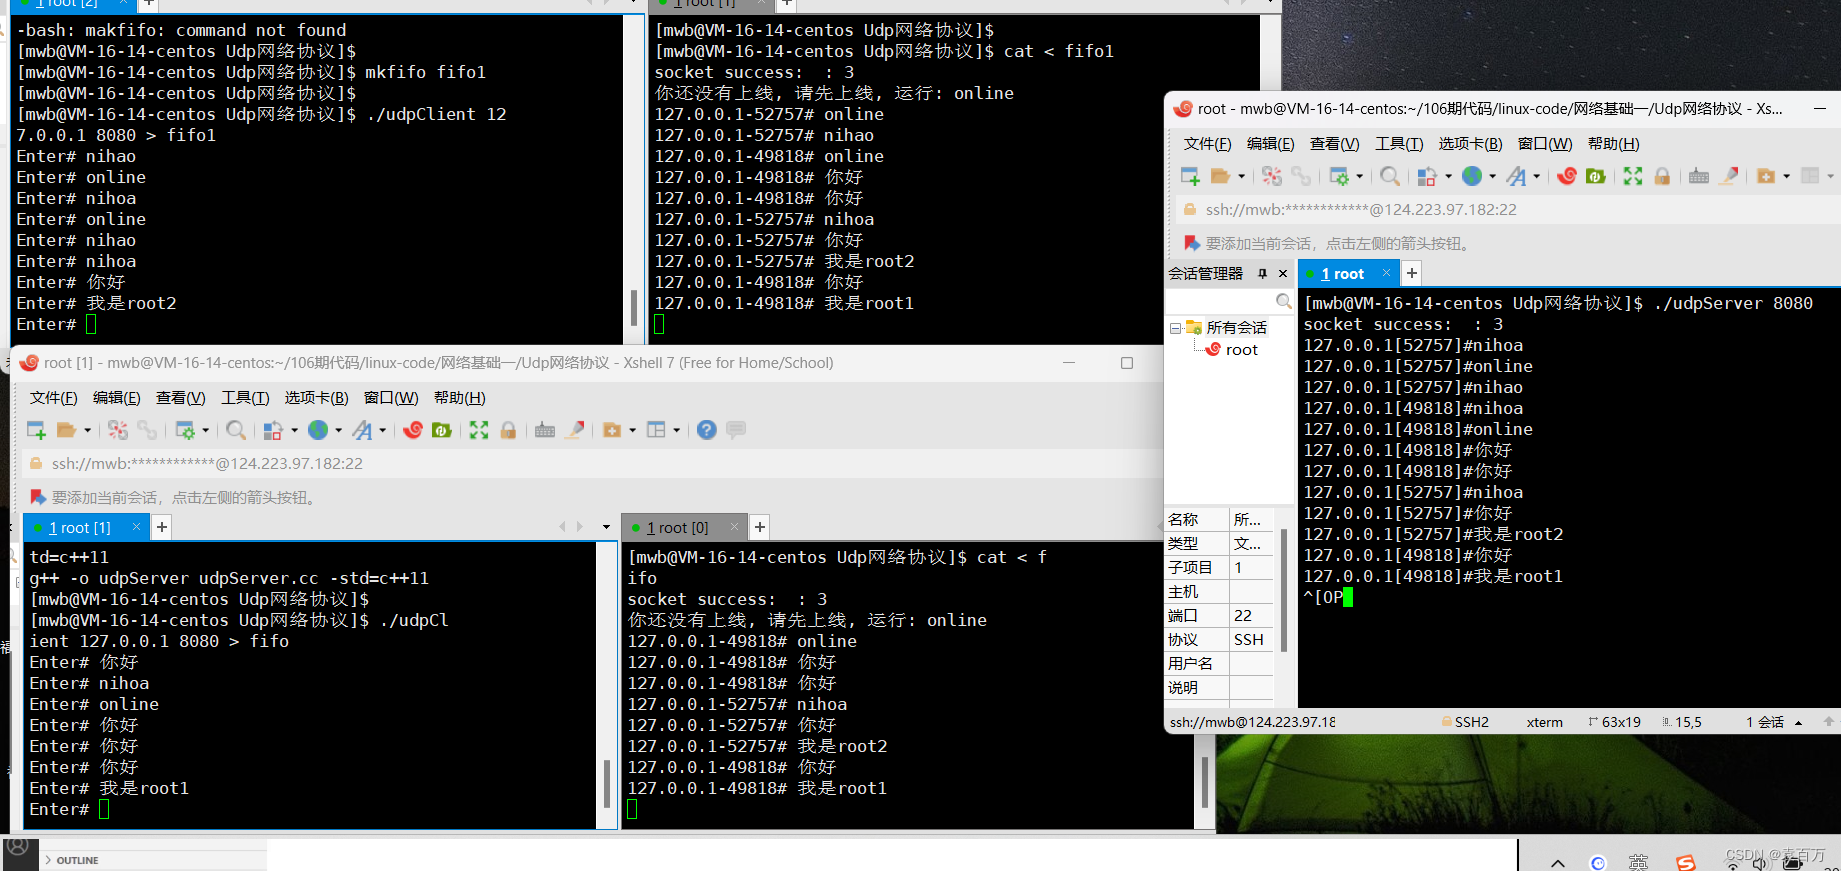
通过在客户端的角度创建多线程,一个线程进行发消息,一个线程进行读消息。这样我们就能让多个线程(用户)一起聊天。
让用户的id(ip + "-" + port)作为key值,User作为value值。来形成一个个unordered_map类型的容器。如果用户上线了就将该对象添加到unordered_map容器里面,下线就从unordered_map容器删除。
通过输入"online"来将该用户添加到unordered_map容器里面,意味上线。
通过输入"offline"来将该用户从unordered_map容器里面删除,意味下线。
我们服务端收到客户端发来的数据的时候通过isOnline函数来判断该用户是否在unordered_map容器里面,如果在就将该信息发送给客户端并且客户端接受后打印出来,如果不在直接打印"未上线"。
用户信息代码代码 onlineUser.hpp
#pragma once#include <iostream>
#include <string>
#include <unordered_map>
#include <netinet/in.h>
#include <string.h>
#include <unistd.h>
#include <sys/types.h>
#include <sys/socket.h>
#include <arpa/inet.h>using namespace std;class User
{
public:User(const string &ip, const uint16_t &port): _ip(ip), _port(port){}~User(){}string ip(){return _ip;}uint16_t port(){return _port;}private:string _ip;uint16_t _port;
};class OnlineUser
{
public:OnlineUser() {}~OnlineUser() {}void addUser(const string &ip, const uint16_t &port){string id = ip + "-" + to_string(port);users.insert(make_pair(id, User(ip, port)));}void delUser(const string &ip, const uint16_t &port){string id = ip + "-" + to_string(port);users.erase(id);}bool isOnline(const string &ip, const uint16_t &port){string id = ip + "-" + to_string(port);return users.find(id) == users.end() ? false : true;}void broadcastMessage(int sockfd, const string &ip, const uint16_t &port, const string &message){for (auto &user : users){// 开始返回struct sockaddr_in client;bzero(&client, sizeof(client));client.sin_family = AF_INET;client.sin_port = htons(user.second.port());client.sin_addr.s_addr = inet_addr(user.second.ip().c_str());// 将用户id也加入string s = ip + "-" + to_string(port) + "# ";s += message;sendto(sockfd, s.c_str(), s.size(), 0, (struct sockaddr *)&client, sizeof(client));}}private:unordered_map<string, User> users;
};
服务端代码
// demo 3
void routeMessage(int sockfd, string message, uint16_t clientport, string clientip)
{// 判断是否上线// 上线就将该用户添加到onlineuserif (message == "online")onlineuser.addUser(clientip, clientport);// 下线就将该用户在onlineuser中删除if ((message == "offline"))onlineuser.delUser(clientip, clientport);// 如果以下if为真 那么说明用户已经上线,因此需要将用户发的信息进行路由if (onlineuser.isOnline(clientip, clientport)){// 消息的路由onlineuser.broadcastMessage(sockfd, clientip, clientport, message);}else{// 开始返回struct sockaddr_in client;bzero(&client, sizeof(client));client.sin_family = AF_INET;client.sin_port = htons(clientport);client.sin_addr.s_addr = inet_addr(clientip.c_str());string response_message = "你还没有上线,请先上线,运行: online";sendto(sockfd, response_message.c_str(), response_message.size(), 0, (struct sockaddr *)&client, sizeof(client));}
客户端代码(多线程)
static void *readMessage(void *args)
{int sockfd = *(static_cast<int *>(args));pthread_detach(pthread_self());while (true){char buffer_recv[1024];struct sockaddr_in peer;socklen_t len = sizeof(peer);ssize_t s = recvfrom(sockfd, buffer_recv, sizeof(buffer_recv) - 1, 0, (struct sockaddr *)&peer, &len);if (s >= 0)buffer_recv[s] = 0;cout << buffer_recv << endl;}return nullptr;
}
void run()
{pthread_create(&_reader, nullptr, readMessage, (void *)&_sockfd);struct sockaddr_in server;memset(&server, 0, sizeof(server));server.sin_family = AF_INET;server.sin_addr.s_addr = inet_addr(_serverip.c_str());server.sin_port = htons(_serverport);string message;char buffer[1024];while (!_quit){fprintf(stderr, "Please Enter# ");fflush(stderr);fgets(buffer, sizeof(buffer), stdin);buffer[strlen(buffer) - 1] = 0;message = buffer;sendto(_sockfd, message.c_str(), message.size(), 0, (struct sockaddr *)&server, sizeof(server));}
成果展示

Windows与Linux通信
思路
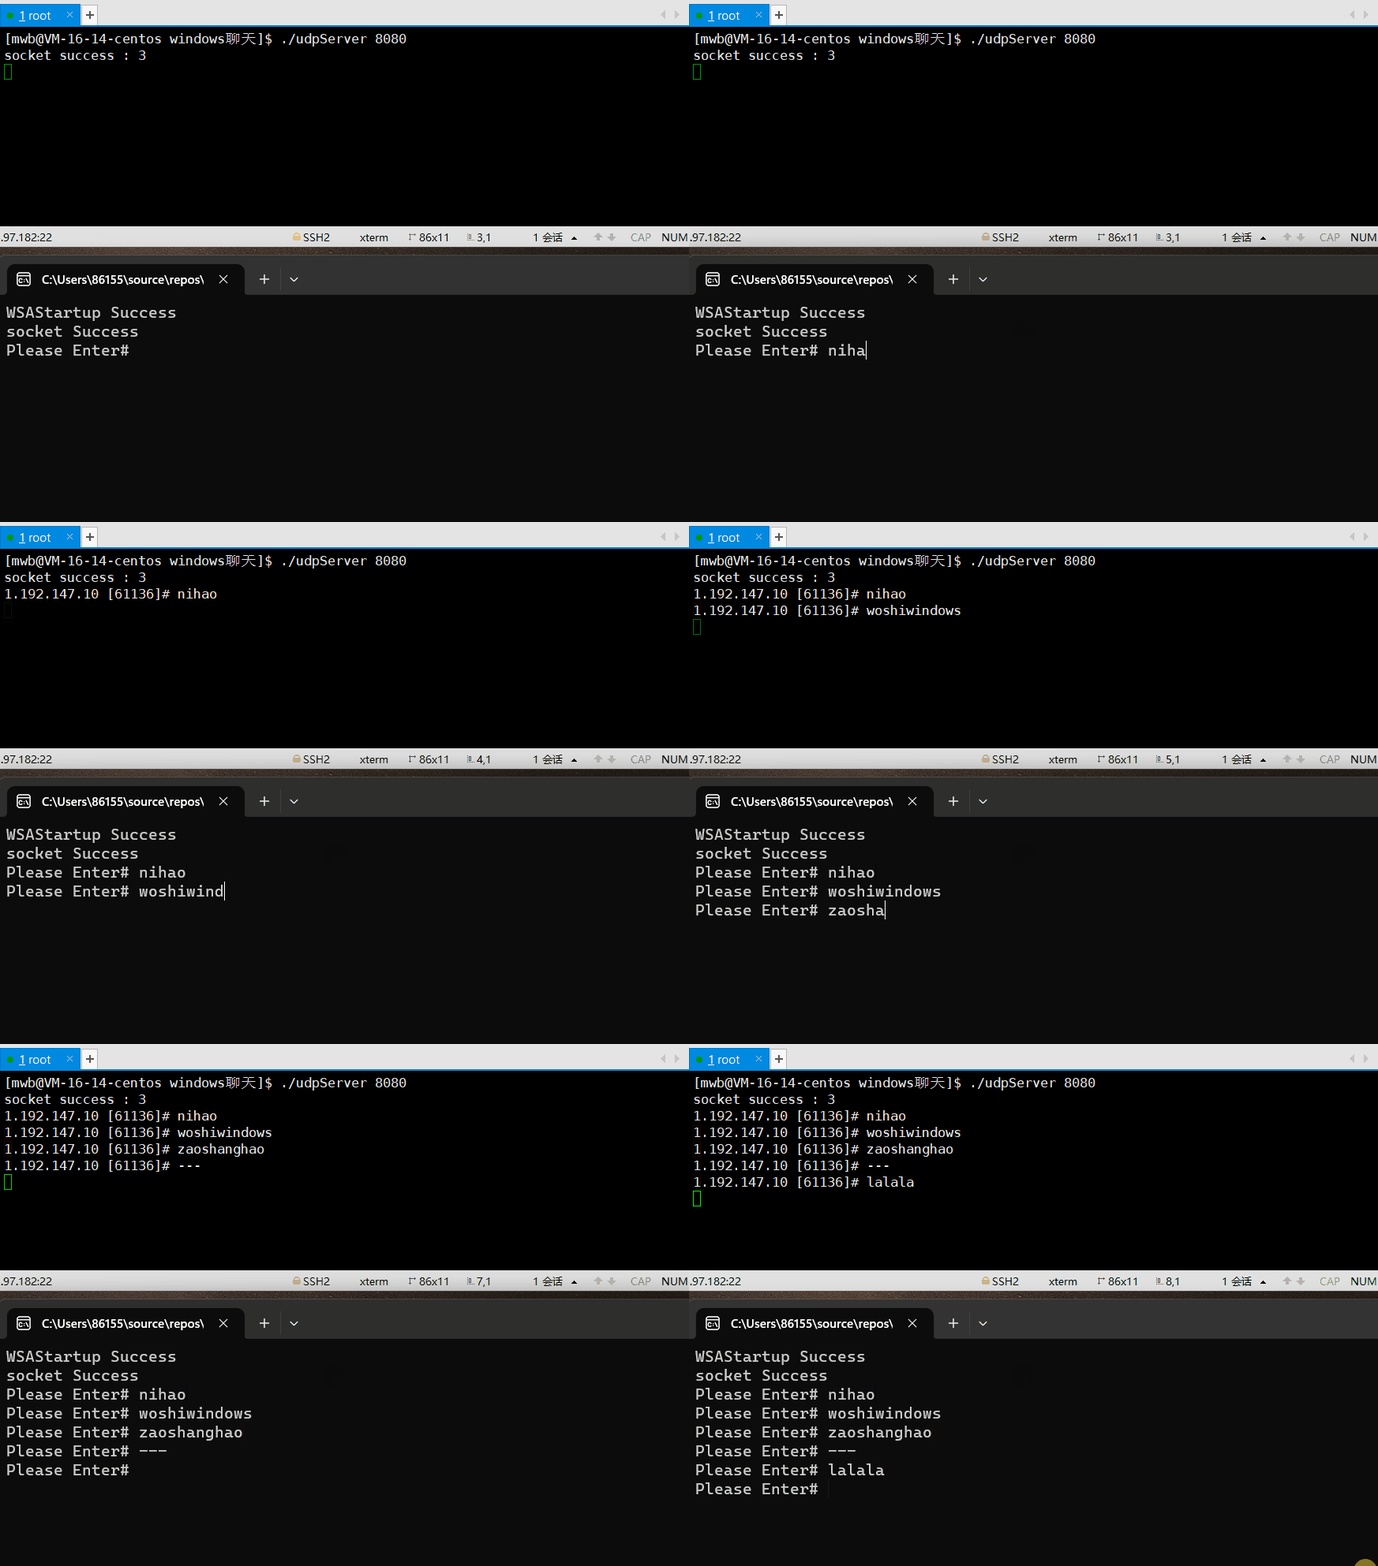
让Linux当服务端,Windows当客户端。让Windows与Linux通信,主要用到了一些Windows系统的socket创建的接口和sendto等接口,这些接口与Linux是及其相似的不做过多赘述。
Windows代码
windows_client.cpp
#define _WINSOCK_DEPRECATED_NO_WARNINGS
#include<iostream>
#include<cstring>
#include<string>
#include<WinSock2.h>#pragma comment(lib,"ws2_32.lib") // 将ws2_32.lib的库using namespace std;// 显示的定义并且初始化ip和port
uint16_t serverport = 8080;
string  serverip = "124.223.97.182";int main()
{WSAData wsd;//启动Winsock//查看库的版本是否正确if (WSAStartup(MAKEWORD(2, 2), &wsd) != 0){cout << "WSAStartup Error = " << WSAGetLastError() << endl;return 0;}else  cout << "WSAStartup Success" << endl;//创建套接字const SOCKET csock = socket(AF_INET, SOCK_DGRAM, 0);if (csock == SOCKET_ERROR){cout << "sock Error = " << WSAGetLastError() << endl;return 1;}else  cout << "socket Success" << endl;//定义一个 struct sockaddr_in类型的结构体struct sockaddr_in server;memset(&server, 0, sizeof(server));server.sin_family = AF_INET;server.sin_port = htons(serverport);// 主机转网络server.sin_addr.s_addr = inet_addr(serverip.c_str()); // 主机转网络 字符串转整型#define NUM 1024char inbuffer[NUM];string line;while (true){//发送逻辑cout << "Please Enter# ";getline(cin, line);int n = sendto(csock, line.c_str(), line.size(), 0, (struct sockaddr*)&server, sizeof(server));if (n < 0){cerr << "sendto error!" << endl;break;}struct sockaddr_in peer;int peerlen = sizeof(peer);//收取数据inbuffer[0] = 0; // C风格的清空n = recvfrom(csock, inbuffer, sizeof(inbuffer) - 1, 0, (struct sockaddr*)&peer, &peerlen);if (n > 0){/*inbuffer[n] = 0;cout << "serever 返回的消息是# " << inbuffer << endl;*/}else break;}closesocket(csock);// 释放资源WSACleanup();return 0;
}
Linux代码
makefile
cc=g++udpServer:udpServer.cc$(cc) -o $@ $^ -std=c++11.PHONY:clean
clean:rm -f udpServer
udpServer.hpp
#include <iostream>
#include <string>
#include <cerrno>
#include <cstring>
#include <cstdlib>
#include <strings.h>
#include <functional>#include <netinet/in.h>
#include <unistd.h>
#include <sys/types.h>
#include <sys/socket.h>
#include <arpa/inet.h>using namespace std;namespace Server
{enum{SOCKET_ERR = 1,BIND_ERR,OPEN_ERR};const int NUM = 1024;static const string defaultIp = "0.0.0.0";typedef function<void(int, string, uint16_t, string)> func_t;class udpServer{public:udpServer(const func_t &cb, const uint16_t &port, const string ip = defaultIp): _callback(cb), _serverport(port), _serverip(defaultIp), _sockfd(-1){// cout << "拷贝构造" << endl;}void initServer(){// 1. 套接字的创建_sockfd = socket(AF_INET, SOCK_DGRAM, 0);if (_sockfd == -1){cerr << "socket error :" << errno << " : " << strerror(errno) << endl;exit(SOCKET_ERR);}cout << "socket success : " << _sockfd << endl;// 2. bindstruct sockaddr_in local;bzero(&local, sizeof(local)); // 初始化locallocal.sin_family = AF_INET;// 1. 主机转网络 点分十进制转intlocal.sin_addr.s_addr = inet_addr(_serverip.c_str());// local.sin_addr.s_addr = INADDR_ANY;local.sin_port = htons(_serverport);int n = bind(_sockfd, (struct sockaddr *)&local, sizeof(local));if (n == -1){cerr << "bind error: " << errno << " : " << strerror(errno) << endl;exit(BIND_ERR);}}void start(){char buffer[NUM];for (;;){struct sockaddr_in peer;socklen_t len = sizeof(peer);//ssize_t s = recvfrom(_sockfd, buffer, sizeof(buffer) - 1, 0, (struct sockaddr *)&peer, &len);if (s > 0){// 读取数据buffer[s] = 0;uint16_t clientport = ntohs(peer.sin_port);string clientip = inet_ntoa(peer.sin_addr);string message = buffer;cout << clientip << " [" << clientport << "]# " << message << endl;// 回调 文件描述符和客户端的端口号和ip_callback(_sockfd,message,clientport,clientip);}}}~udpServer(){}private:int _sockfd;uint16_t _serverport;string _serverip;func_t _callback;};
} // udpServer
udpServer.cc
#include "udpServer.hpp"
#include <memory>
#include <fstream>
#include <unordered_map>
#include <signal.h>using namespace Server;
using namespace std;
static void Usage(string proc)
{cout << "\nUsage:\n\t" << proc << " local_port\n\n";
}void handlerMessage(int sockfd, string message, uint16_t clientport, string clientip)
{string response_message = message;response_message += " [server echo]";// 开始返回struct sockaddr_in client;bzero(&client, sizeof(client));client.sin_family = AF_INET;client.sin_port = htons(clientport);client.sin_addr.s_addr = inet_addr(clientip.c_str());sendto(sockfd, response_message.c_str(), response_message.size(), 0, (struct sockaddr *)&client, sizeof(client));
}// ./udpClient server_ip server_port
int main(int argc, char *argv[])
{if (argc != 2){Usage(argv[0]);exit(1);}uint16_t port = atoi(argv[1]); // 字符串转整数unique_ptr<udpServer> usvr(new udpServer(handlerMessage, port));usvr->initServer();usvr->start();return 0;
}
成果展示
这篇关于UDP套接字的通信(实现英汉互译/程序替换/多线程聊天室/Windows与Linux通信)的文章就介绍到这儿,希望我们推荐的文章对编程师们有所帮助!


