本文主要是介绍在AMD GPU上加速大型语言模型的Flash Attention,希望对大家解决编程问题提供一定的参考价值,需要的开发者们随着小编来一起学习吧!
Accelerating Large Language Models with Flash Attention on AMD GPUs — ROCm Blogs
引言
在这篇博客文章中,我们将指导您如何在AMD GPU上安装Flash Attention,并提供与在PyTorch中标准SDPA比较其性能的基准测试。我们还将测量Hugging Face中多个大型语言模型(LLM)的端到端预填充延迟。
为了理解Flash Attention及其基准测试结果的重要性,让我们首先深入了解一下推动了变压器架构成功的注意力机制。这种机制是编码器和解码器块的关键组成部分,使得变压器在包括自然语言处理、计算机视觉和音频任务在内的广泛AI领埄中出类拔萃。
尺度点积注意力(Scaled Dot-Product Attention)
Transformer模型中使用的注意力机制被称为尺度点积注意力(SDPA)。SDPA的公式如下,其中_Q_、_K_和_V_是查询、键和值矩阈,_dₖ_是键向量的尺寸:
SDPA使得模型在生成输出的每个元素时都能够关注输入的不同部分,使模型能够捕获长距离依赖关系并处理长度不等的序列。
SDPA的成本
尽管SDPA已证明其效用,但它在对较长序列(例如整本书或长视频)进行建模时面临挑战,由于其时间和内存复杂度是二次方的 —— 以输入序列长度 N 的 _O(N²)_。例如,如果你将序列长度加倍,计算所需的时间将增加四倍,并且需要四倍的高带宽内存(HBM)读写次数。由于SDPA的巨大计算成本,其在处理长上下文任务时的适用性受到限制。
针对精简注意力机制计算成本的研究工作相当多,涵盖了采用稀疏和低秩技术来逼近注意力。稀疏注意力技术消除了注意力矩阵中某些条目,而低秩方法将注意力矩阵分解为更小的低秩组件。尽管这些方法可以将计算需求降低至接近线性时间,但由于质量上的折中和与标准SDPA相比实际时钟速度提升有限,它们没有得到广泛采用。
内存瓶颈
近似注意力算法有限的时钟速度提升的主要原因是重点在于减少浮点运算(FLOPs)而不是解决内存访问开销。有趣的是,如果您在GPU上对SDPA进行分析,您会发现大部分时间被丢弃、softmax和掩蔽操作消耗,而不是计算密集型的矩阵乘法。这一意外结果可以通过变压器被内存带宽而不是计算速度所限制来解释。数据移动是您所需的一切揭示了像矩阵乘法这样的计算密集型操作构成了总FLOPs的99.8%以上,但只占总运行时间的61%。出人意料的是,内存密集型操作(如统计归一化和元素级函数,例如丢弃和掩蔽)消耗了变压器模型运行时间剩余的40%。这些内存密集型操作只占总FLOPs的0.02%。
简而言之,读写内存花费的时间比实际计算要多。这些结果突显了在基于变压器的模型中解决内存瓶颈的重要性。
Flash Attention
为了解决这些内存瓶颈问题,Tri Dao提出了Flash Attention,这是一种计算精确关注度的硬件感知关注算法。它通过减少对GPU存储器的关注矩阵的读写次数,并尽可能多地在芯片上进行计算,以解决内存瓶颈。这需要在没有完整输入的情况下计算softmax,并且不存储来自前向传播的关注矩阵。Flash Attention通过将输入分成块,并使用分块在芯片上逐步计算块softmax来实现这一目标。此外,它采用重计算通过仅存储来自前向传播的softmax归一化因子来快速重新计算注意力。所有这些操作都合并到单个GPU内核中,从而实现显著的加速和减少内存使用。深入了解Flash Attention,我们推荐阅读原始论文:Flash Attention:高速且内存高效的精确注意力计算,具备输入输出意识。您可以在GitHub 仓库中找到本博客文章中使用的所有文件和脚本。
先决条件
要运行这篇博客,您需要以下条件:
• Linux:请见支持的Linux发行版
• ROCm 5.7+:请见安装说明
• PyTorch 2.3+:请见安装说明
• 支持的AMD GPU:请见兼容GPU列表
起步
在这篇博客中,我们将使用rocm/pytorch-nightly Docker镜像并在容器中构建Flash Attention。为了开始,让我们拉取它。
docker pull rocm/pytorch-nightly:latestdocker run -it --network=host --group-add=video \--ipc=host --cap-add=SYS_PTRACE \--security-opt seccomp=unconfined \--device /dev/kfd --device /dev/dri \rocm/pytorch-nightly:latest接下来安装我们需要的库。
pip install -q transformers accelerate matplotlib要安装带有ROCm支持的Flash Attention,我们不能简单地运行pip install flash-attn,因为它安装的版本与AMD GPU不兼容。相反,我们需要克隆AMD的`flash-attention`仓库并从源码构建它。
git clone --recursive https://github.com/ROCm/flash-attention.git
cd flash-attention
MAX_JOBS=$((`nproc` - 1)) pip install -v .
接下来,导入我们需要的库。
import torch
import numpy as np
from tqdm import tqdm
import torch.nn.functional as F
from matplotlib import pyplot as plt
from transformers import AutoTokenizer, AutoModelForCausalLM
基准测试注意力
随着ROCm为PyTorch 2.3发布,Flash Attention现已直接集成到F.scaled_dot_product_attention功能中。默认情况下,当调用`F.scaled_dot_product_attention`并传入查询、键和值矩阵时,它现在将使用Flash Attention计算注意力分数。
为了准确基准测试PyTorch的Flash Attention,我们首先创建一个原始的`scaled_dot_product_attention`函数,以急切模式计算注意力分数。值得注意的是,`F.scaled_dot_product_attention`中找到的其他尺度点积注意力变种在不同程度上融合了注意力操作,而我们在这里有意避免了这一点,以符合原始Flash Attention论文的方法论。
def scaled_dot_product_attention(query, key, value, attn_mask=None, is_causal=False, dropout_p=0.0, scale=None):"""Computes the scaled dot product attention between query, key, and value tensors in PyTorch eager mode.Args:query (torch.Tensor): The query tensor of shape (batch_size, n_heads, seq_len, hidden_dim).key (torch.Tensor): The key tensor of shape (batch_size, n_heads, seq_len, hidden_dim).value (torch.Tensor): The value tensor of shape (batch_size, n_heads, seq_len, hidden_dim).attn_mask (torch.Tensor, optional): The attention mask tensor of shape (batch_size, n_heads, seq_len, seq_len). Defaults to None.is_causal (bool, optional): Whether to apply a causal attention mask. Defaults to False.dropout_p (float, optional): The dropout probability. Defaults to 0.scale (float, optional): The scale factor for the dot product. Defaults to None.Returns:torch.Tensor: The output tensor of shape (batch_size, n_heads, seq_len, hidden_dim)."""# Calculate the scale factorscale_factor = 1 / np.sqrt(query.size(-1)) if scale is None else scaleattn_weight = (query @ key.transpose(-2, -1) * scale_factor)# Create the attention maskattn_mask = torch.ones(query.shape[0], query.shape[1], query.shape[2], query.shape[2], dtype=torch.bool, device=device).tril(diagonal=0) if is_causal else attn_maskattn_weight = attn_weight.masked_fill_(~attn_mask, -torch.inf) if attn_mask is not None else attn_weight# Compute the scaled dot product attentionattn_weight = torch.softmax(attn_weight, dim=-1)attn_weight = torch.dropout(attn_weight, dropout_p, train=False)return attn_weight @ value为了测试`scaled_dot_product_attention`函数并将其与Flash Attention进行基准测试,我们首先定义一些关键参数。具体来说,我们设置注意力头数为32,嵌入头维度为128。这些设置被选中以匹配常见的7B个因果变压器模型。根据这些关键参数,我们创建查询、键和值矩阵,以测试我们的`scaled_dot_product_attention`计算的注意力分数是否与PyTorch的`F.scaled_dot_product_attention`计算的分数匹配。
batch_size = 1
seq_len = 64
num_heads = 32
embed_dim = 128
dtype = torch.float16
device = torch.device("cuda")query = torch.rand(batch_size, num_heads, seq_len, embed_dim, device=device, dtype=dtype)
key = torch.rand(batch_size, num_heads, seq_len, embed_dim, device=device, dtype=dtype)
value = torch.rand(batch_size, num_heads, seq_len, embed_dim, device=device, dtype=dtype)
eager = scaled_dot_product_attention(query, key, value, is_causal=True)
flash = F.scaled_dot_product_attention(query, key, value, is_causal=True)
assert torch.allclose(eager, flash, rtol=1e-03,atol=1e-03)
我们自己编写的简化版`scaled_dot_product_attention`函数的输出与PyTorch的输出相匹配。现在我们定义了一个名为`bench_attention`的函数,用来测量计算给定序列长度的多头注意力所需的平均时间。
def bench_attention(seq_len, flash=False, num_repeats=256):"""Measures the average time (in ms) required to compute multi-head attention for sequences of a given length.Args:seq_len (int): The length of the input sequence.flash (bool, optional): Whether to use the FlashAttention algorithm. Defaults to False.num_repeats (int, optional): The number of times to repeat the attention computation for timing purposes. Defaults to 256.Returns:float: The average time (in ms) required to compute multi-head attention for sequences of length seq_len."""if flash:mha = F.scaled_dot_product_attentionelse:mha = scaled_dot_product_attentionquery = torch.rand(batch_size, num_heads, seq_len, embed_dim, device=device, dtype=dtype)key = torch.rand(batch_size, num_heads, seq_len, embed_dim, device=device, dtype=dtype)value = torch.rand(batch_size, num_heads, seq_len, embed_dim, device=device, dtype=dtype)start = torch.cuda.Event(enable_timing=True)end = torch.cuda.Event(enable_timing=True)# Warmupfor _ in range(4):_ = mha(query, key, value, is_causal=True)start.record()for _ in range(num_repeats):_ = mha(query, key, value, is_causal=True) end.record()torch.cuda.synchronize()return start.elapsed_time(end) / num_repeats现在,让我们来为范围在256至4096(包含端点)的序列长度基准测试Flash Attention与未融合SDPA实现的性能。
context_len = np.arange(256,4096,64)
flash = np.zeros(context_len.shape)
standard = np.zeros(context_len.shape)for i,l in enumerate(tqdm(context_len)):flash[i] = bench_attention(l,flash=True)standard[i] = bench_attention(l,flash=False)
绘制结果。
plt.plot(context_len, standard/flash)
plt.xlabel('Sequence length')
plt.ylabel('Speedup')
plt.title('Flash Attention vs. Standard Attention, head_size=128, n_heads=32, bs=1')
plt.show()
图表显示,与原始的注意力实现相比,PyTorch中的Flash Attention提供了显著的速度提升,最高达到了2-8倍。值得注意的是,这种加速与原始Flash Attention实现中观察到的加速相匹配。此外,随着序列长度的增加,加速比也随之增加,因为简单的SDPA对序列长度的复杂度是二次方的。
这段代码展示了如何使用自定义的注意力基准测试函数来对比Flash Attention和普通的SDPA实现。最后,通过绘制图表,我们可以可视化Flash Attention相对于标准注意力实现在不同序列长度下的加速比。这显示了Flash Attention显著减少了多头注意力计算的时间,这对于处理大型数据集尤其重要。
基准测试大型语言模型(LLMs)
现在,让我们比较在Hugging Face中启用和禁用Flash Attention时多个大型语言模型的端到端预填充(prefill)延迟。参考
[Hugging Face的文档](https://huggingface.co/docs/transformers/en/perf_infer_gpu_one)
来检查你的模型是否支持Flash Attention。如果支持,可以通过在调用`from_pretrained`时设置`attn_implementation="flash_attention_2"来启用它。值得注意的是,Hugging Face当前使用的是原始的flash_attn`库,而不是PyTorch的Flash Attention。我们将检查结果,看看Flash Attention对整体性能的影响。
首先,我们需要创建一个名为`bench_llm`的函数来测量在Hugging Face中指定的因果语言模型的端到端延迟,给定一个序列长度。
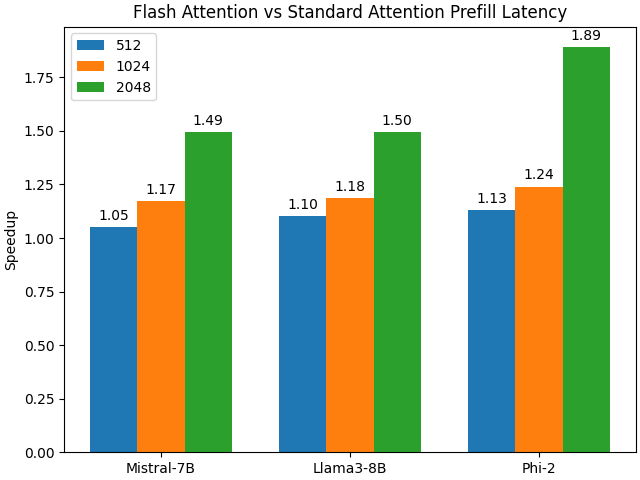
def bench_llm(seq_len, model_name, max_new_tokens=128, flash=False, num_repeats=256):"""Benchmark the end-to-end latency of a large language model (LLM) in Hugging Face, with Flash Attention enabled or disabled.Args:seq_len (int): Length of the input sequence.model_name (str): Name of the pre-trained LLM to use.max_new_tokens (int, optional): Maximum number of new tokens to generate. Defaults to 128.flash (bool, optional):Whether to use flash attention mechanism (if supported by the model).num_repeats (int, optional):Number of times to repeat the inference for averaging. Defaults to 256.Returns:float: The average end-to-end latency in seconds."""if flash:mech = "flash_attention_2"else:mech = "eager"model = AutoModelForCausalLM.from_pretrained(model_name, torch_dtype=torch.bfloat16, attn_implementation=mech,device_map="cuda",)token_ids = {'input_ids': torch.randint(1, 10000, size=(1, seq_len), device='cuda'),'attention_mask': torch.ones(1, seq_len, device='cuda')}start = torch.cuda.Event(enable_timing=True)end = torch.cuda.Event(enable_timing=True)pad_token_id = model.config.eos_token_id# Warmupfor _ in range(4):_ = model.generate(**token_ids, max_new_tokens=max_new_tokens, pad_token_id=pad_token_id)torch.cuda.synchronize()start.record()for _ in range(num_repeats):_ = model.generate(**token_ids, max_new_tokens=max_new_tokens, pad_token_id=pad_token_id) end.record()torch.cuda.synchronize()return start.elapsed_time(end) / num_repeats现在我们准备好了,可以对Hugging Face中的Mistral-7B、Llama-3-8B和Phi-2等模型进行端到端延迟基准测试,比较启用和禁用Flash Attention的性能。我们将测量序列长度为512、1024和2048的性能,以评估Flash Attention随序列长度增加的影响。如果你想评估更多或更少的LLMs,只需要添加或修改模型名即可。
seq_lens = np.array([512, 1024, 2048])
model_names = ['mistralai/Mistral-7B-v0.1', 'NousResearch/Meta-Llama-3-8B', 'microsoft/phi-2']
prefill_flash = np.zeros((len(model_names),len(seq_lens)))
prefill_standard = np.zeros((len(model_names),len(seq_lens)))
for j, model_name in enumerate(tqdm(model_names)):for i, seq_len in enumerate(seq_lens):prefill_flash[j,i] = bench_llm(seq_len, model_name=model_name, max_new_tokens=1, flash=True)prefill_standard[j,i] = bench_llm(seq_len, model_name=model_name, max_new_tokens=1, flash=False)
现在让我们来绘制结果。
speedup_prefill = prefill_standard/prefill_flashmodels = ["Mistral-7B", "Llama3-8B", "Phi-2"]
avg_speedup = {'512': speedup_prefill.T[0],'1024': speedup_prefill.T[1],'2048': speedup_prefill.T[2],
}x = np.arange(len(avg_speedup))
width = 0.25
multiplier = 0fig, ax = plt.subplots(layout='constrained')for attribute, measurement in avg_speedup.items():offset = width * multiplierrects = ax.bar(x + offset, measurement, width, label=attribute)ax.bar_label(rects, fmt='%.2f', padding=3)multiplier += 1ax.legend(loc='upper left', ncols=1)
ax.set_xticks(x + width, models)
ax.set_ylabel('Speedup')
ax.set_title('Flash Attention vs Standard Attention Prefill Latency')
plt.savefig('benchmark-llm.png')
plt.show()
Flash Attention在与标准SDPA相比,显著降低了所有测试的大型语言模型(LLMs)的预填充(prefill)延迟。对于某些LLM,延迟的减少更为明显。此外,随着序列长度的增加,加速效果变得更加显著,这与我们在基准测试注意力模块时观察到的趋势相呼应。
总结
Flash Attention是一种快速且内存效率高的自注意力实现方式,精确且对硬件有意识。在本文中,我们演示了如何安装支持ROCm的Flash Attention,并以两种方式对其性能进行了基凌测试:
1. 作为一个独立模块,来测量Flash Attention算法相对于SDPA的速度提升。
2. 在Hugging Face中对多个LLMs的端到端预填充延迟进行评估,来衡量Flash Attention对模型整体预填充延迟的影响。
我们的结果表明,尤其是对于长序列,在AMD GPU上,Flash Attention提供了与原始注意力实现相比的显著速度提升。
这篇关于在AMD GPU上加速大型语言模型的Flash Attention的文章就介绍到这儿,希望我们推荐的文章对编程师们有所帮助!


