本文主要是介绍手写数据集minist基于pytorch分类学习,希望对大家解决编程问题提供一定的参考价值,需要的开发者们随着小编来一起学习吧!
1.Mnist数据集介绍
1.1 基本介绍
Mnist数据集可以算是学习深度学习最常用到的了。这个数据集包含70000张手写数字图片,分别是60000张训练图片和10000张测试图片,训练集由来自250个不同人手写的数字构成,一般来自高中生,一半来自工作人员,测试集(test set)也是同样比例的手写数字数据,并且保证了测试集和训练集的作者不同。每个图片都是2828个像素点,数据集会把一张图片的数据转成一个2828=784的一维向量存储起来。
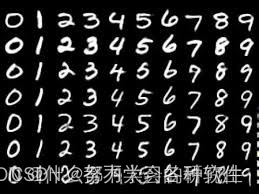
里面的图片数据如下所示,每张图是0-9的手写数字黑底白字的图片,存储时,黑色用0表示,白色用0-1的浮点数表示。
1.2 数据集下载
1)官网下载
Mnist数据集的下载地址如下:http://yann.lecun.com/exdb/mnist/
打开后会有四个文件:

训练数据集:train-images-idx3-ubyte.gz
训练数据集标签:train-labels-idx1-ubyte.gz
测试数据集:t10k-images-idx3-ubyte.gz
测试数据集标签:t10k-labels-idx1-ubyte.gz
将这四个文件下载后放置到需要用的文件夹下即可不要解压!下载后是什么就怎么放!
2)代码导入
文件夹下运行下面的代码,即可自动检测数据集是否存在,若没有会自动进行下载,下载后在这一路径:

下载数据集:
# 下载数据集
from torchvision import datasets, transformstrain_set = datasets.MNIST("data",train=True,download=True, transform=transforms.ToTensor(),)
test_set = datasets.MNIST("data",train=False,download=True, transform=transforms.ToTensor(),)
参数解释:
datasets.MNIST:是Pytorch的内置函数torchvision.datasets.MNIST,可以导入数据集
train=True :读入的数据作为训练集
transform:读入我们自己定义的数据预处理操作
download=True:当我们的根目录(root)下没有数据集时,便自动下载
如果这时候我们通过联网自动下载方式download我们的数据后,它的文件路径是以下形式:原文件夹/data/MNIST/raw
14轮左右,模型识别准确率达到98%以上

加载数据集
import os.path
import matplotlib.pyplot as plt
import torch
from torchvision.datasets import MNIST
from PIL import Image
from torch.utils.data import Dataset,DataLoader
from torchvision import datasets, transforms
# 下载数据集
from torchvision import datasets, transformstransform = transforms.Compose([transforms.ToTensor(), # 将灰度图片像素值(0~255)转为Tensor(0~1),方便后续处理transforms.Normalize((0.1307,),(0.3081,))# 归一化,均值0,方差1;mean:各通道的均值std:各通道的标准差inplace:是否原地操作
])train_data = MNIST(root='./minist_data',train=True,download=False,transform=transform)
train_loader = DataLoader(dataset=train_data,shuffle=True,batch_size=64)
test_data = MNIST(root='./minist_data',train=False,download=False,transform=transform)
test_loader = DataLoader(dataset=test_data,shuffle=True,batch_size=64)# train_data返回的是很多张图,每一张图是一个元组,包含图片和对应的数字
# print(test_data[0])
# print(train_data[0][0].show())train_data_size = len(train_data)
test_data_size = len(test_data)
print("训练数据集的长度:{}".format(train_data_size))
print("测试数据集的长度:{}".format(test_data_size))
构建模型,模型主要由两个卷积层,两个池化层,以及一个全连接层构成,激活函数使用relu.
class Model(torch.nn.Module):def __init__(self):super(Model,self).__init__()self.conv1 = torch.nn.Conv2d(in_channels=1,out_channels=10,stride=1,kernel_size=5,padding=0)self.maxpool1 = torch.nn.MaxPool2d(2)self.conv2 = torch.nn.Conv2d(in_channels=10,out_channels=20,kernel_size=5,stride=1,padding=0)self.maxpool2 = torch.nn.MaxPool2d(2)self.linear = torch.nn.Linear(320,10)def forward(self,x):x = torch.relu(self.conv1(x))x = self.maxpool1(x)x = torch.relu(self.conv2(x))x = self.maxpool2(x)x = x.view(x.size(0),-1)x = self.linear(x)return x
model = Model()criterion = torch.nn.CrossEntropyLoss()
optimizer = torch.optim.SGD(model.parameters(),lr=0.14)# 交叉熵损失,相当于Softmax+Log+NllLoss
# 线性多分类模型Softmax,给出最终预测值对于10个类别出现的概率,Log:将乘法转换为加法,减少计算量,保证函数的单调性
# NLLLoss:计算损失,此过程不需要手动one-hot编码,NLLLoss会自动完成
# SGD,优化器,梯度下降算法e
模型训练
每次训练完成后会自动保存参数到pkl模型中,如果路径中有Pkl文件,下次运行会自动加载上一次的模型参数,在这个基础上继续训练,第一次运行时没有模型参数,结束后会自动生成。
# 模型训练
def train():# index = 0for index, data in enumerate(train_loader):  # 获取训练数据以及对应标签# for data in train_loader:input, target = data  # input为输入数据,target为标签y_predict = model(input)  # 模型预测loss = criterion(y_predict, target)optimizer.zero_grad()  # 梯度清零loss.backward()  # loss值反向传播optimizer.step()  # 更新参数# index += 1if index % 100 == 0:  # 每一百次保存一次模型,打印损失torch.save(model.state_dict(), "model.pkl")  # 保存模型torch.save(optimizer.state_dict(), "optimizer.pkl")print("训练次数为:{},损失值为:{}".format(index, loss.item()))
加载模型
第一次运行这里需要一个空的model文件夹
if os.path.exists('model.pkl'):model.load_state_dict(torch.load("model.pkl"))模型测试
def test():correct = 0total = 0with torch.no_grad():for index,data in enumerate(test_loader):inputs,target = dataoutput = model(inputs)probability,predict = torch.max(input=output.data, dim=1)total += target.size(0) # target是形状为(batch_size,1)的矩阵,使用size(0)取出该批的大小correct += (predict == target).sum().item() # predict 和target均为(batch_size,1)的矩阵,sum求出相等的个数print("测试准确率为:%.6f" % (correct / total))自己手写数字图片识别函数(可选用)
这部分主要是加载训练好的pkl模型测试自己的数据,因此在进行自己手写图的测试时,需要有训练好的pkl文件,并且就不要调用train()函数和test()函数啦注意:这个图片像素也要说黑底白字,28*28像素,否则无法识别
def test_mydata():image = Image.open('5fd4e4c2c99a24e3e27eb9b2ee3b053c.jpg') # 读取自定义手写图片image = image.resize((28, 28)) # 裁剪尺寸为28*28image = image.convert('L') # 转换为灰度图像transform = transforms.ToTensor()image = transform(image)image = image.resize(1, 1, 28, 28)output = model(image)probability, predict = torch.max(output.data, dim=1)print("此手写图片值为:%d,其最大概率为:%.2f " % (predict[0], probability))plt.title("此手写图片值为:{}".format((int(predict))), fontname='SimHei')plt.imshow(image.squeeze())plt.show()MNIST中的数据识别测试数据
训练过程中的打印信息我进行了修改,这里设置的训练轮数是15轮,每次训练生成的pkl模型参数也是会更新的,想要更多训练信息可以查看对应的教程哦~
if __name__ == '__main__':# 训练与测试for i in range(15): # 训练和测试进行5轮print({"————————第{}轮测试开始——————".format(i + 1)})train()test()test_mydata()
完整代码:
import os.path
import matplotlib.pyplot as plt
import torch
from torchvision.datasets import MNIST
from PIL import Image
from torch.utils.data import Dataset,DataLoader
from torchvision import datasets, transforms
# 下载数据集
from torchvision import datasets, transformstransform = transforms.Compose([transforms.ToTensor(), # 将灰度图片像素值(0~255)转为Tensor(0~1),方便后续处理transforms.Normalize((0.1307,),(0.3081,))# 归一化,均值0,方差1;mean:各通道的均值std:各通道的标准差inplace:是否原地操作
])train_data = MNIST(root='./minist_data',train=True,download=False,transform=transform)
train_loader = DataLoader(dataset=train_data,shuffle=True,batch_size=64)
test_data = MNIST(root='./minist_data',train=False,download=False,transform=transform)
test_loader = DataLoader(dataset=test_data,shuffle=True,batch_size=64)# train_data返回的是很多张图,每一张图是一个元组,包含图片和对应的数字
# print(test_data[0])
# print(train_data[0][0].show())train_data_size = len(train_data)
test_data_size = len(test_data)
print("训练数据集的长度:{}".format(train_data_size))
print("测试数据集的长度:{}".format(test_data_size))class Model(torch.nn.Module):def __init__(self):super(Model,self).__init__()self.conv1 = torch.nn.Conv2d(in_channels=1,out_channels=10,stride=1,kernel_size=5,padding=0)self.maxpool1 = torch.nn.MaxPool2d(2)self.conv2 = torch.nn.Conv2d(in_channels=10,out_channels=20,kernel_size=5,stride=1,padding=0)self.maxpool2 = torch.nn.MaxPool2d(2)self.linear = torch.nn.Linear(320,10)def forward(self,x):x = torch.relu(self.conv1(x))x = self.maxpool1(x)x = torch.relu(self.conv2(x))x = self.maxpool2(x)x = x.view(x.size(0),-1)x = self.linear(x)return x
model = Model()criterion = torch.nn.CrossEntropyLoss()
optimizer = torch.optim.SGD(model.parameters(),lr=0.14)# 交叉熵损失,相当于Softmax+Log+NllLoss
# 线性多分类模型Softmax,给出最终预测值对于10个类别出现的概率,Log:将乘法转换为加法,减少计算量,保证函数的单调性
# NLLLoss:计算损失,此过程不需要手动one-hot编码,NLLLoss会自动完成
# SGD,优化器,梯度下降算法e# 模型训练
def train():# index = 0for index, data in enumerate(train_loader):  # 获取训练数据以及对应标签# for data in train_loader:input, target = data  # input为输入数据,target为标签y_predict = model(input)  # 模型预测loss = criterion(y_predict, target)optimizer.zero_grad()  # 梯度清零loss.backward()  # loss值反向传播optimizer.step()  # 更新参数# index += 1if index % 100 == 0:  # 每一百次保存一次模型,打印损失torch.save(model.state_dict(), "model.pkl")  # 保存模型torch.save(optimizer.state_dict(), "optimizer.pkl")print("训练次数为:{},损失值为:{}".format(index, loss.item()))if os.path.exists('model.pkl'):model.load_state_dict(torch.load("model.pkl"))def test():correct = 0total = 0with torch.no_grad():for index,data in enumerate(test_loader):inputs,target = dataoutput = model(inputs)probability,predict = torch.max(input=output.data, dim=1)total += target.size(0)  # target是形状为(batch_size,1)的矩阵,使用size(0)取出该批的大小correct += (predict == target).sum().item()  # predict 和target均为(batch_size,1)的矩阵,sum求出相等的个数print("测试准确率为:%.6f" % (correct / total))def test_mydata():image = Image.open('5fd4e4c2c99a24e3e27eb9b2ee3b053c.jpg')  # 读取自定义手写图片image = image.resize((28, 28))  # 裁剪尺寸为28*28image = image.convert('L')  # 转换为灰度图像transform = transforms.ToTensor()image = transform(image)image = image.resize(1, 1, 28, 28)output = model(image)probability, predict = torch.max(output.data, dim=1)print("此手写图片值为:%d,其最大概率为:%.2f " % (predict[0], probability))plt.title("此手写图片值为:{}".format((int(predict))), fontname='SimHei')plt.imshow(image.squeeze())plt.show()if __name__ == '__main__':# 训练与测试for i in range(15):  # 训练和测试进行5轮print({"————————第{}轮测试开始——————".format(i + 1)})train()test()test_mydata()
这篇关于手写数据集minist基于pytorch分类学习的文章就介绍到这儿,希望我们推荐的文章对编程师们有所帮助!


