本文主要是介绍vue 水印组件 水印在最上层,不影响按钮操作,希望对大家解决编程问题提供一定的参考价值,需要的开发者们随着小编来一起学习吧!
需求
最近项目需要加水印,但是加入的水印必须在最上层,不能影响水印下层的功能正常使用,通过查询找到了一个比较好的水印组件,并按需求优化,记录一下。
效果
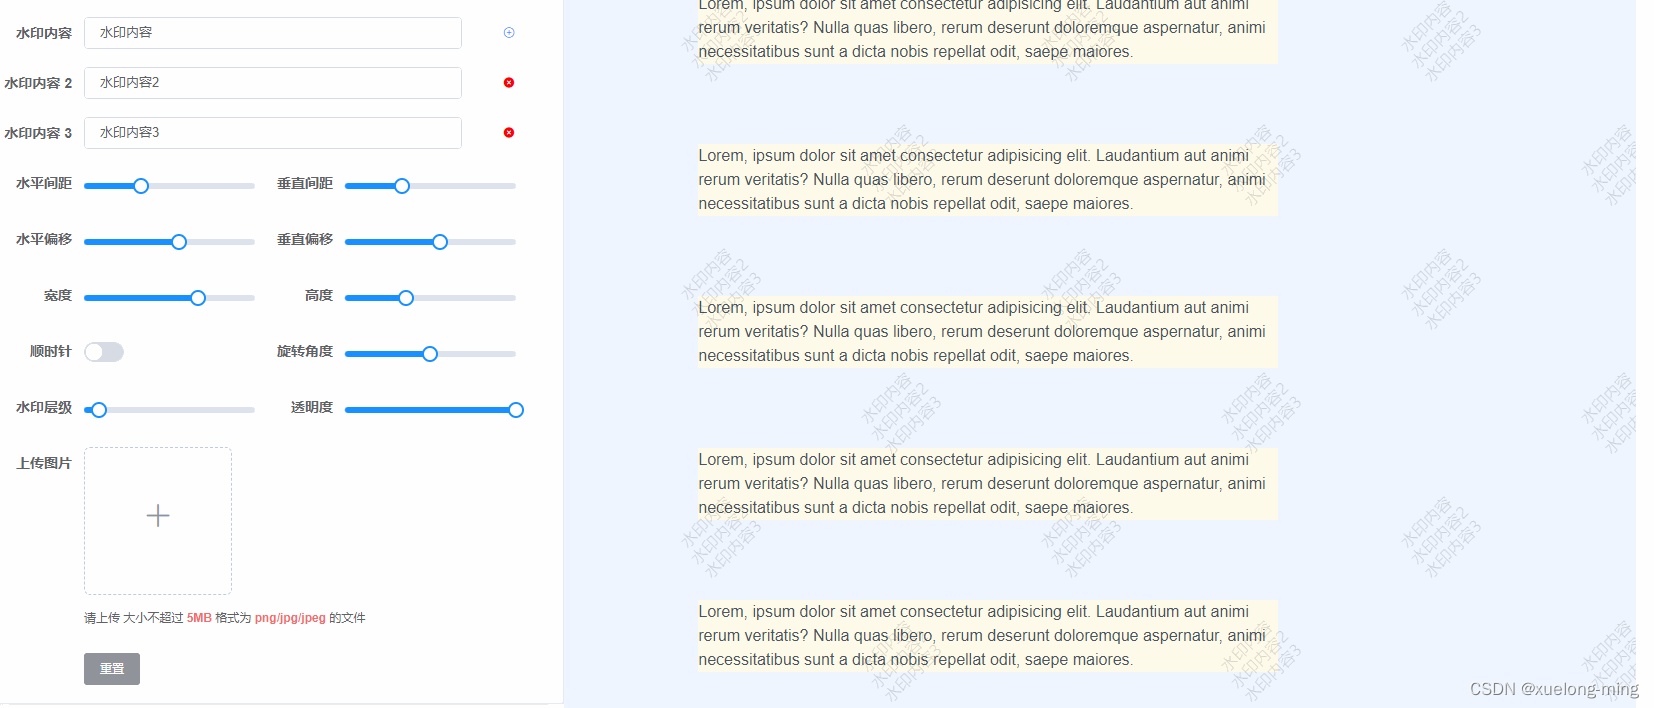
解决方法
因为水印要在最上层,不影响下次功能的正常使用,所有需要使用css样式 pointer-events: none;。
.watermark-container {position: absolute;top: 0;left: 0;width: 100%;height: 100%;pointer-events: none;
}
代码
index.vue
<template><div><Watermark v-if="WatermarkDisplay" :content="WatermarkContent"></Watermark></div>
</template>
<script>
import Watermark from './watermark.vue'
export default {components: {Watermark},data() {return {WatermarkDisplay: true, // 水印状态WatermarkContent: '管理员', // 水印内容}}
}
</script>
watermark.vue
<template><div class="watermark-container"/>
</template><script>
const rate = 350
let lastClick = Date.now() - rate
const BaseSize = 2
const FontGap = 3
const getPixelRatio = () => window.devicePixelRatio || 1
const toLowercaseSeparator = (key) => key.replace(/([A-Z])/g, '-$1').toLowerCase()
const getStyleStr = (style) =>Object.keys(style).map((key) => `${toLowercaseSeparator(key)}: ${style[key]};`).join(' ')function reRendering(mutation, watermarkElement) {let flag = false// 是否删除水印节点if (mutation.removedNodes.length) {flag = Array.from(mutation.removedNodes).some((node) => node === watermarkElement)}// 是否修改过水印dom属性值if (mutation.type === 'attributes' && mutation.target === watermarkElement) {flag = true}return flag
}
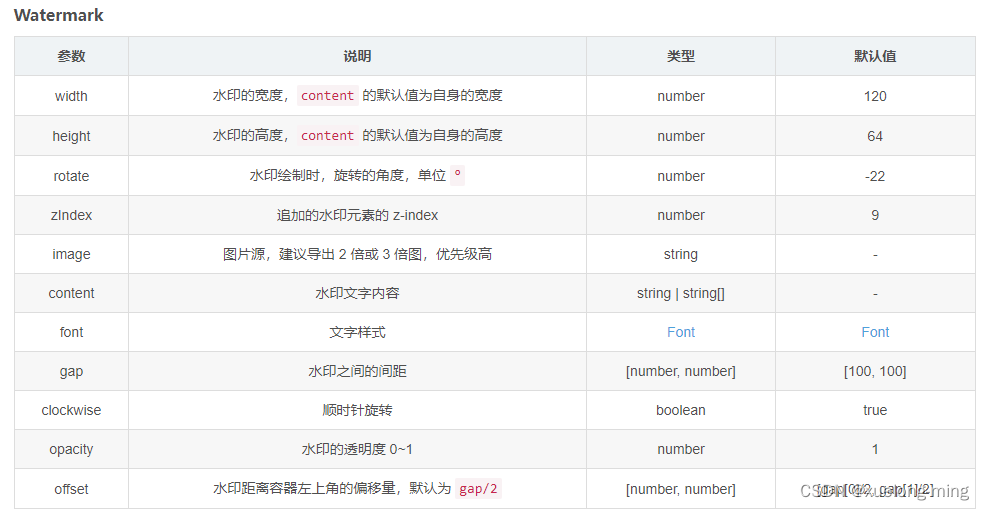
export default {name: 'Watermark',data() {return {watermarkRef: null,stopObservation: false,observe: null}},props: {zIndex: { type: Number, default: 9 },rotate: { type: Number, default: 45 },width: { type: [String, Number], default: 120 },height: { type: [String, Number], default: 64 },image: { type: String, default: '' },content: { type: [String, Array], default: '' },font: {type: Object,default: () => ({fontSize: 12,fontFamily: '思源黑体',fontStyle: 'normal',fontWeight: 'normal',color: 'rgba(0, 0, 0, 0.15)'})},clockwise: { type: Boolean, default: false },opacity: { type: Number, default: 1 },rootClassName: null,gap: { type: Array, default: () => [100, 100] },offset: { type: Array, default: () => [100, 50] }},computed: {markStyle() {const props = this.$propsconst [gapX, gapY] = props.gapconst [offsetX, offsetY] = props.offsetconst gapXCenter = gapX / 2const gapYCenter = gapY / 2const offsetTop = offsetY || gapYCenterconst offsetLeft = offsetX || gapXCenterconst markStyle = {zIndex: this.zIndex,opacity: this.opacity,position: 'absolute',left: 0,top: 0,width: '100%',height: '100%',pointerEvents: 'none',backgroundRepeat: 'repeat'}let positionLeft = offsetLeft - gapXCenterlet positionTop = offsetTop - gapYCenterif (positionLeft > 0) {markStyle.left = `${positionLeft}px`markStyle.width = `calc(100% - ${positionLeft}px)`positionLeft = 0}if (positionTop > 0) {markStyle.top = `${positionTop}px`markStyle.height = `calc(100% - ${positionTop}px)`positionTop = 0}markStyle.backgroundPosition = `${positionLeft}px ${positionTop}px`return markStyle}},watch: {$props: {handler() {if (Date.now() - lastClick >= rate) {this.stopObservation = truethis.renderWatermark()// 延迟执行setTimeout(() => {this.stopObservation = falselastClick = Date.now()})}},deep: true}},beforeDestroy() {this.destroyWatermark()this.observe.disconnect()this.observe = null},mounted() {this.renderWatermark()this.$nextTick(() => {this.observe = this.useMutationObserver(this.$el, this.onMutate, { attributes: true, childList: true, subtree: true })})},methods: {onMutate(records) {if (this.stopObservation) returnrecords.forEach((mutation) => {if (!reRendering(mutation, this.watermarkRef)) returnthis.destroyWatermark()this.renderWatermark()})},useMutationObserver(target, callback, options) {const isSupported = typeof MutationObserver !== 'undefined'if (!isSupported) return falseconst observe = new MutationObserver(callback)observe.observe(target, options)return observe},getMarkSize(ctx) {const props = this.$propsconst { fontSize, fontFamily } = props.fontlet defaultWidthlet defaultHeightconst content = props.contentconst image = props.imageconst width = props.widthconst height = props.heightif (!image && ctx.measureText) {ctx.font = `${Number(fontSize)}px ${fontFamily}`const contents = Array.isArray(content) ? content : [content]const widths = contents.map((item) => ctx.measureText(item).width)defaultWidth = Math.ceil(Math.max(...widths))defaultHeight = Number(fontSize.value) * contents.length + (contents.length - 1) * FontGap}return [width ?? defaultWidth, height ?? defaultHeight]},rotateWatermark(ctx, rotateX, rotateY, rotate) {const direction = this.$props.clockwise ? 1 : -1ctx.translate(rotateX, rotateY)ctx.rotate((Math.PI / 180) * Number(rotate) * direction)ctx.translate(-rotateX, -rotateY)},fillTexts(ctx, drawX, drawY, drawWidth, drawHeight) {const props = this.$propsconst { fontSize, fontFamily, fontStyle, fontWeight, color } = props.fontconst ratio = getPixelRatio()const content = props.contentconst mergedFontSize = Number(fontSize) * ratioctx.font = `${fontStyle} normal ${fontWeight} ${mergedFontSize}px/${drawHeight}px ${fontFamily}`ctx.fillStyle = colorctx.textAlign = 'center'ctx.textBaseline = 'top'ctx.translate(drawWidth / 2, 0)const contents = Array.isArray(content) ? content : [content]contents?.forEach((item, index) => {ctx.fillText(item ?? '', drawX, drawY + index * (mergedFontSize + FontGap * ratio))})},appendWatermark(base64Url, markWidth) {if (!this.watermarkRef) returnconst props = this.$propsconst [gapX, gapY] = props.gapthis.stopObservation = trueconst attrs = getStyleStr({ ...this.markStyle, backgroundImage: `url('${base64Url}')`, backgroundSize: `${(gapX + markWidth) * BaseSize}px` })this.watermarkRef.setAttribute('style', attrs)this.$el.append(this.watermarkRef)// 延迟执行setTimeout(() => {this.stopObservation = false})},renderWatermark() {const props = this.$propsconst [gapX, gapY] = props.gapconst canvas = document.createElement('canvas')const ctx = canvas.getContext('2d')const image = props.imageconst rotate = props.rotateif (!ctx) return falseif (!this.watermarkRef) {this.watermarkRef = document.createElement('div')}const ratio = getPixelRatio()const [markWidth, markHeight] = this.getMarkSize(ctx)const canvasWidth = (gapX + markWidth) * ratioconst canvasHeight = (gapY + markHeight) * ratiocanvas.setAttribute('width', `${canvasWidth * BaseSize}px`)canvas.setAttribute('height', `${canvasHeight * BaseSize}px`)const drawX = (gapX * ratio) / 2const drawY = (gapY * ratio) / 2const drawWidth = markWidth * ratioconst drawHeight = markHeight * ratioconst rotateX = (drawWidth + gapX * ratio) / 2const rotateY = (drawHeight + gapY * ratio) / 2/** 备选绘图参数 */const alternateDrawX = drawX + canvasWidthconst alternateDrawY = drawY + canvasHeightconst alternateRotateX = rotateX + canvasWidthconst alternateRotateY = rotateY + canvasHeightctx.save()this.rotateWatermark(ctx, rotateX, rotateY, rotate)if (image) {const img = new Image()img.onload = () => {ctx.drawImage(img, drawX, drawY, drawWidth, drawHeight)/** 旋转后绘制交错图 */ctx.restore()this.rotateWatermark(ctx, alternateRotateX, alternateRotateY, rotate)ctx.drawImage(img, alternateDrawX, alternateDrawY, drawWidth, drawHeight)this.appendWatermark(canvas.toDataURL(), markWidth)}img.crossOrigin = 'anonymous'img.referrerPolicy = 'no-referrer'img.src = image} else {this.fillTexts(ctx, drawX, drawY, drawWidth, drawHeight)/*** 旋转后填充交错的文本* */ctx.restore()this.rotateWatermark(ctx, alternateRotateX, alternateRotateY, rotate)this.fillTexts(ctx, alternateDrawX, alternateDrawY, drawWidth, drawHeight)this.appendWatermark(canvas.toDataURL(), markWidth)}},destroyWatermark() {if (!this.watermarkRef) returnthis.watermarkRef.remove()this.watermarkRef = undefined}}// End
}
</script><style lang="scss" scoped>
.watermark-container {position: absolute;top: 0;left: 0;width: 100%;height: 100%;pointer-events: none;
}
</style>参考
借鉴与vue 水印组件
具体参数可以参考

这篇关于vue 水印组件 水印在最上层,不影响按钮操作的文章就介绍到这儿,希望我们推荐的文章对编程师们有所帮助!


