本文主要是介绍教程 | 如何使用Keras、Redis、Flask和Apache把深度学习模型部署到生产环境?,希望对大家解决编程问题提供一定的参考价值,需要的开发者们随着小编来一起学习吧!
本文介绍了如何使用 Keras、Redis、Flask 和 Apache 将自己的深度学习模型迁移到生产环境。文中的大多数工具可以互换,比如 Keras 可替换成 TensorFlow 或 PyTorch,Django 可代替 Flask,Nginx 可代替 Apache。作者唯一不推荐替换的工具是 Redis。同时本文还对深度学习 REST API 进行了压力测试,这种方法可以轻松扩展到添加的服务器。

将深度学习模型用迁移到生产是一项不平凡的任务。
如果你不相信,请花点时间看看亚马逊、谷歌、微软等「科技巨头」——几乎所有公司都提供了一些将机器学习/深度学习模型迁移到云端生产环境中的方法。
虽然使用模型部署的服务是完全可行且能够接受的,但是如果你想独立操作整个过程而不依赖于外部服务呢?这种情况比你想像的更常见。试想以下情况:
不能将敏感数据移到外网的内部项目指定了整个基础架构必须留在公司内的项目需要私有云的政府组织处于「秘密模式」的创业公司,需要在内部对其服务/应用程序进行压力测试
在这种情况下,如何将你的深度学习模型迁移到生产环境中呢?或许最重要的是,同时使其具有可扩展性?
本文是关于构建深度学习模型服务器 REST API 的三部分系列文章的最后一部分:
第一部分(https://blog.keras.io/building-a-simple-keras-deep-learning-rest-api.html)(发布在官方 Keras.io 博客上)是一个简单的 Keras +深度学习 REST API,用于没有并发请求的单线程。如果这是你第一次构建深度学习 Web 服务器,或者这是家用/业余爱好项目,则此方法非常适合。第二部分(https://www.pyimagesearch.com/2018/01/29/scalable-keras-deep-learning-rest-api/)中,我们演示了如何利用 Redis 和消息队列/消息代理(broker)范式有效地批处理传入的推断请求(但伴随在服务器线程的一个小警告,它可能会导致问题)。第三部分,我将向你展示如何解决这些服务器线程问题,进一步扩展我们的方法,提供基准,并演示如何有效地利用 Keras、Redis、Flask 和 Apache。
压力测试结果将证明,我们的单机 GPU 可以轻松处理 500 个并发请求(每个之间 0.05 秒的延迟)而毫不费力——性能也在不断扩展。
想要了解如何使用 Keras、Redis、Flask 和 Apache 将自己的深度学习模型迁移到生产环境,请继续阅读。
源代码地址:https://www.getdrip.com/forms/15005528/submissions
02:02
本文的代码主要基于我之前的文章(https://www.pyimagesearch.com/2018/01/29/scalable-keras-deep-learning-rest-api/),但有一些小修改——今天指南的第一部分将一起回顾这些变化和项目架构。之后,我们将继续配置深度学习 Web 应用程序,包括安装和配置你可能需要的任何软件包(Redis、Apache 等)。最后,我们将压力测试我们的服务器并对结果进行基准对比。
想要快速了解我们的深度学习生产系统(包括演示),请观看上面的视频!
深度学习项目架构
我们的项目架构如下:
├── helpers.py├── jemma.png├── keras_rest_api_app.wsgi├── run_model_server.py├── run_web_server.py├── settings.py├── simple_request.py└── stress_test.py
我们来回顾一下重要的 .py 文件:
run_web_server.py 包含我们所有的 Flask Web 服务器代码——Apache 在启动我们的深度学习 Web 应用程序时加载它。run_model_server.py 将会:从磁盘加载我们的 Keras 模型不断从 Redis 请求(poll)新图像进行分类分类图像(为提高效率进行批处理)将推断结果写回 Redis,以便通过 Flask 将其返回给客户端settings.py 包含所有基于 Python 的深度学习生产服务设置,例如 Redis 主机/端口信息、图像分类设置、图像队列名称等。helpers.py 包含 run_web_server.py 和 run_model_server.py 将使用的效用函数(即 base64 编码)。keras_rest_api_app.wsgi 包含我们的 WSGI 设置,所以我们可以从 Apache 服务器提供对 Flask 应用程序的服务。simple_request.py 可用于以编程方式处理深度学习 API 服务的结果。jemma.png 是我家小猎犬的照片。我将使用它作为调用 REST API(来验证它确实正在工作)的示例图像。最后,我们将使用 stress_test.py 来压力测试我们的服务器并衡量所有图像的分类。
如第二部分所介绍的,我们在 Flask 服务器上有一个终点(endpoint)「/predict」。此方法位于 run_web_server.py 中,并将根据需要计算输入图像的分类。图像预处理也在 run_web_server.py 中。
为了使我们的服务器为生产做好准备,我从上周的脚本中提取了 classify_process 函数,并将其放在 run_model_server.py 中。这个脚本非常重要,因为它会加载我们的 Keras 模型,并从 Redis 的图像队列中抓取图像进行分类。结果将写回 Redis(「/predict」终点和 run_web_server.py 中的相应函数会监控 Redis 将结果发送回客户端)。
但是,除非知道它的能力和限制,否则如何知道深度学习 REST API 服务器有什么好处?
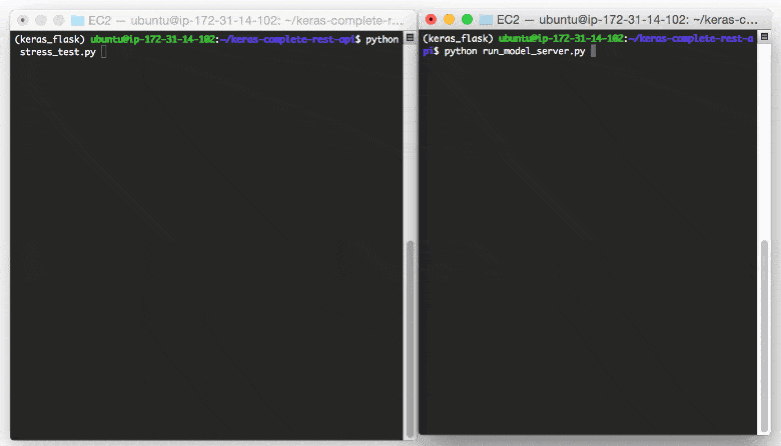
在 stress_test.py 中,我们将测试服务器。我们将通过开发 500 个并发线程来完成这个任务,这些线程将把图像发送到服务器进行并行分类。我建议启动时在服务器本地主机上运行,然后从离线的客户端运行它。
建立我们的深度学习 web 应用

图 1:使用 Python、Keras、Redis 和 Flask 构建的深度学习 REST API 服务器的数据流图。
几乎在这个项目中使用的每一行代码都来自我们之前关于构建可扩展深度学习 REST API 的文章(https://www.pyimagesearch.com/2018/01/29/scalable-keras-deep-learning-rest-api/)——唯一的变化是我们将一些代码迁移到单独的文件中,以便在生产环境中实现可扩展性。
为了完整性,我将每个文件的源代码包括在本文中(以及本文的「下载」部分)。有关这些文件的详细内容,请参阅之前的文章。
设置和配置
# initialize Redis connection settingsREDIS_HOST = "localhost"REDIS_PORT = 6379REDIS_DB = 0# initialize constants used to control image spatial dimensions and# data typeIMAGE_WIDTH = 224IMAGE_HEIGHT = 224IMAGE_CHANS = 3IMAGE_DTYPE = "float32"# initialize constants used for server queuingIMAGE_QUEUE = "image_queue"BATCH_SIZE = 32SERVER_SLEEP = 0.25CLIENT_SLEEP = 0.25
在 settings.py 中,你可以更改服务器连接参数:图像维度 + 数据类型,以及服务器队列。
帮助文件的效用
# import the necessary packagesimport numpy as npimport base64import sysdefbase64_encode_image(a):# base64 encode the input NumPy arrayreturn base64.b64encode(a).decode("utf-8")defbase64_decode_image(a, dtype, shape):# if this is Python 3, we need the extra step of encoding the# serialized NumPy string as a byte objectif sys.version_info.major == 3: a = bytes(a, encoding="utf-8")# convert the string to a NumPy array using the supplied data# type and target shape a = np.frombuffer(base64.decodestring(a), dtype=dtype) a = a.reshape(shape)# return the decoded imagereturn a
helpers.py 文件包含两个函数——一个用于 base64 编码,另一个用于解码。
编码是必要的,以便我们可以在 Redis 中序列化 + 存储我们的图像。同样,解码是必要的,以便我们可以在预处理之前将图像反序列化(deserialize)为 NumPy 数组格式。
深度学习 web 服务器
# import the necessary packagesfrom keras.preprocessing.image import img_to_arrayfrom keras.applications import imagenet_utilsfrom PIL import Imageimport numpy as npimport settingsimport helpersimport flaskimport redisimport uuidimport timeimport jsonimport io# initialize our Flask application and Redis serverapp = flask.Flask(__name__)db = redis.StrictRedis(host=settings.REDIS_HOST, port=settings.REDIS_PORT, db=settings.REDIS_DB)defprepare_image(image, target):# if the image mode is not RGB, convert itif image.mode != "RGB": image = image.convert("RGB")# resize the input image and preprocess it image = image.resize(target) image = img_to_array(image) image = np.expand_dims(image, axis=0) image = imagenet_utils.preprocess_input(image)# return the processed imagereturn image@app.route("/")defhomepage():return"Welcome to the PyImageSearch Keras REST API!"@app.route("/predict", methods=["POST"])defpredict():# initialize the data dictionary that will be returned from the# view data = {"success": False}# ensure an image was properly uploaded to our endpointif flask.request.method == "POST":if flask.request.files.get("image"):# read the image in PIL format and prepare it for# classification image = flask.request.files["image"].read() image = Image.open(io.BytesIO(image))image = prepare_image(image, (settings.IMAGE_WIDTH, settings.IMAGE_HEIGHT))# ensure our NumPy array is C-contiguous as well,# otherwise we won't be able to serialize it image = image.copy(order="C")# generate an ID for the classification then add the# classification ID + image to the queue k = str(uuid.uuid4()) image = helpers.base64_encode_image(image) d = {"id": k, "image": image}db.rpush(settings.IMAGE_QUEUE, json.dumps(d))# keep looping until our model server returns the output# predictionswhileTrue:# attempt to grab the output predictions output = db.get(k)# check to see if our model has classified the input# imageif output isnotNone:# add the output predictions to our data# dictionary so we can return it to the client output = output.decode("utf-8")data["predictions"] = json.loads(output)# delete the result from the database and break# from the polling loop db.delete(k)break# sleep for a small amount to give the model a chance# to classify the input imagetime.sleep(settings.CLIENT_SLEEP)# indicate that the request was a success data["success"] = True# return the data dictionary as a JSON responsereturn flask.jsonify(data)# for debugging purposes, it's helpful to start the Flask testing# server (don't use this for productionif __name__ == "__main__": print("* Starting web service...") app.run()
在 run_web_server.py 中,你会看到 predict,这是与 REST API/predict 终点相关的函数。
predict 函数将编码图像推入 Redis 队列,然后不断循环/请求,直到它从模型服务器得到预测数据。然后,我们对数据进行 JSON 编码,并指示 Flask 将数据发送回客户端。
深度学习模型服务器
# import the necessary packagesfrom keras.applications import ResNet50from keras.applications import imagenet_utilsimport numpy as npimport settingsimport helpersimport redisimport timeimport json# connect to Redis serverdb = redis.StrictRedis(host=settings.REDIS_HOST,port=settings.REDIS_PORT, db=settings.REDIS_DB)defclassify_process():# load the pre-trained Keras model (here we are using a model# pre-trained on ImageNet and provided by Keras, but you can# substitute in your own networks just as easily) print("* Loading model...") model = ResNet50(weights="imagenet") print("* Model loaded")# continually pool for new images to classifywhileTrue:# attempt to grab a batch of images from the database, then# initialize the image IDs and batch of images themselvesqueue = db.lrange(settings.IMAGE_QUEUE, 0, settings.BATCH_SIZE - 1)imageIDs = [] batch = None# loop over the queuefor q in queue:# deserialize the object and obtain the input image q = json.loads(q.decode("utf-8")) image = helpers.base64_decode_image(q["image"], settings.IMAGE_DTYPE, (1, settings.IMAGE_HEIGHT, settings.IMAGE_WIDTH,settings.IMAGE_CHANS))# check to see if the batch list is Noneif batch isNone: batch = image# otherwise, stack the dataelse: batch = np.vstack([batch, image])# update the list of image IDsimageIDs.append(q["id"])# check to see if we need to process the batchif len(imageIDs) > 0:# classify the batch print("* Batch size: {}".format(batch.shape)) preds = model.predict(batch) results = imagenet_utils.decode_predictions(preds)# loop over the image IDs and their corresponding set of# results from our modelfor (imageID, resultSet) in zip(imageIDs, results):# initialize the list of output predictions output = []# loop over the results and add them to the list of# output predictionsfor (imagenetID, label, prob) in resultSet: r = {"label": label, "probability": float(prob)}output.append(r)# store the output predictions in the database, using# the image ID as the key so we can fetch the results db.set(imageID, json.dumps(output))# remove the set of images from our queuedb.ltrim(settings.IMAGE_QUEUE, len(imageIDs), -1)# sleep for a small amount time.sleep(settings.SERVER_SLEEP)# if this is the main thread of execution start the model server# processif __name__ == "__main__":classify_process()
run_model_server.py 文件包含我们的 classify_process 函数。这个函数会加载模型并对批图像进行预测。此过程在 GPU 上运行最佳,但也可以使用 CPU。
本例中,为了简单起见,我们将使用在 ImageNet 数据集上预先训练的 ResNet50。你可以修改 classify_process 函数以适用于你自己的深度学习模型。
WSGI 配置
# add our app to the system pathimport syssys.path.insert(0, "/var/www/html/keras-complete-rest-api")# import the application and away we go...from run_web_server import app as application
下一个文件 keras_rest_api_app.wsgi 是深度学习 REST API 的新组件(相比于上周)。
WSGI 配置文件将服务器目录添加到系统路径,并导入 web 应用以启动所有操作。我们在本文后面提到的 Apache 服务器设置文件 /etc/apache2/sites-available/000-default.conf 中指向这个文件。
压力测试
# USAGE# python stress_test.py# import the necessary packagesfrom threading import Threadimport requestsimport time# initialize the Keras REST API endpoint URL along with the input# image pathKERAS_REST_API_URL = "http://localhost/predict"IMAGE_PATH = "jemma.png"# initialize the number of requests for the stress test along with# the sleep amount between requestsNUM_REQUESTS = 500SLEEP_COUNT = 0.05defcall_predict_endpoint(n):# load the input image and construct the payload for the request image = open(IMAGE_PATH, "rb").read() payload = {"image": image}# submit the request r = requests.post(KERAS_REST_API_URL, files=payload).json()# ensure the request was sucessfulif r["success"]: print("[INFO] thread {} OK".format(n))# otherwise, the request failedelse: print("[INFO] thread {} FAILED".format(n))# loop over the number of threadsfor i in range(0, NUM_REQUESTS):# start a new thread to call the API t = Thread(target=call_predict_endpoint, args=(i,))t.daemon = True t.start() time.sleep(SLEEP_COUNT)# insert a long sleep so we can wait until the server is finished# processing the imagestime.sleep(300)
stress_test.py 脚本将帮助我们测试服务器并确定其局限性。我一直建议对深度学习 REST API 服务器进行压力测试,以便知道是否需要添加其它 GPU、CPU 或 RAM。此脚本启动 NUM_REQUESTS 线程并 POST 发送到 /predict 终点。这取决于 Flask web 应用。
配置我们的深度学习生产环境
本节将讨论如何为我们的深度学习 API 服务器安装和配置必要的先决条件。
我们将使用我的 PyImageSearch 深度学习 AMI(https://www.pyimagesearch.com/2017/09/20/pre-configured-amazon-aws-deep-learning-ami-with-python/)作为基础。在这个例子中,我选择了一个 p2.xlarge 实例和单个 GPU。
你可以修改代码以利用多个 GPU:
运行多个模型服务器进程;为每个 GPU 维护一个图像队列以及相应的模型进程。
但请记住,你的机器仍然受到 I/O 设备限制。改用多台机器(每台机器上 1-4 个 GPU)可能是有益的,而不是将一台机器扩展到 8 或 16 个 GPU。
编译和安装 Redis
Redis 是一个高效的内存数据库,将作为我们的队列/消息代理。
获取和安装 Redis 非常容易:
$ wget http://download.redis.io/redis-stable.tar.gz$ tar xvzf redis-stable.tar.gz$ cd redis-stable$ make$ sudo make install
创建你的深度学习 Python 虚拟环境
我们来为这个项目创建一个 Python 虚拟环境。请参阅上周的教程(https://www.pyimagesearch.com/2018/01/29/scalable-keras-deep-learning-rest-api/),通过说明了解如何在不熟悉 Python 虚拟环境的情况下安装 virtualenv 和 virtualenvwrapper。
准备工作就绪后,创建虚拟环境:
$ mkvirtualenv keras_flask -p python3
在此之上,我们来安装必要的软件包:
$ pip install numpy$ pip install scipy h5py$ pip install tensorflow==1.4.1# tensorflow-gpu==1.4.1 for GPU machines$ pip install keras$ pip install flask gevent$ pip install imutils requests$ pip install redis$ pip install Pillow
注意:由于我们正在使用 CUDA 8,这里使用 TensorFlow 1.4.1。如果使用 CUDA 9,则应该使用 TensorFlow 1.5。
安装 Apache Web 服务器
由于我对 Apache 更加熟悉,我将在这个例子中使用 Apache,但是你也可以使用其它的网络服务器,例如 nginx。
Apache 可以通过以下方式安装:
$ sudo apt-get install apache2
如果你使用 Python 3 创建了一个虚拟环境,则需要安装 Python 3 WSGI + Apache 模块:
$ sudo apt-get install libapache2-mod-wsgi-py3$ sudo a2enmod wsgi
否则,Python 2.7 用户应该安装 Pytohn 2.7 WSGI + Apache 模块:
$ sudo apt-get install libapache2-mod-wsgi$ sudo a2enmod wsgi
要验证是否安装了 Apache,请打开浏览器并输入 web 服务器的 IP 地址。如果看不到服务器启动画面,请确保打开端口 80 和端口 5000。
我的服务器的 IP 地址是 54.187.46.215(你的 IP 将不同)。在浏览器中输入地址后我看到:

图 2:默认的 Apache 启动画面让我们知道已经安装 Apache,并可以从开放的端口 80 访问。
……这是默认的 Apache 主页。
Sym-link 你的 Flask + 深度学习应用程序
默认情况下,Apache 提供来自 /var/www/html 的内容。我建议创建一个从 /var/www/html 到你的 Flask web 应用的 sym-link。
我已经将我的深度学习 + Flask 应用程序上传到我的主目录中的一个名为 keras-complete-rest-api 的目录中:
$ ls ~keras-complete-rest-api
我可以通过以下方式将它 sym-link 到 /var/www/html:
$ cd /var/www/html/$ sudo ln -s ~/keras-complete-rest-api keras-complete-rest-api
更新你的 Apache 配置以指向 Flask 应用程序
为了配置 Apache 以便指向我们的 Flask 应用程序,我们需要编辑 /etc/apache2/sites-available/000-default.conf。
打开你最喜欢的文本编辑器(这里我将使用 vi):
$ sudo vi /etc/apache2/sites-available/000-default.conf
在文件头提供你的 WSGIPythonHome(Python bin 目录的路径)和 WSGIPythonPath(Python site-packages 目录的路径)配置:
WSGIPythonHome /home/ubuntu/.virtualenvs/keras_flask/binWSGIPythonPath /home/ubuntu/.virtualenvs/keras_flask/lib/python3.5/site-packages<VirtualHost *:80> ...</VirtualHost>
由于在这个实例中使用了 Python 虚拟环境(我已经将我的虚拟环境命名为 keras_flask),我们提供了 Python 虚拟环境的 bin 和 site-packages 目录的路径。
然后在 <VirtualHost> 的主体中,在 ServerAdmin 和 DocumentRoot 之后添加:
<VirtualHost *:80> ... WSGIDaemonProcess keras_rest_api_app threads=10WSGIScriptAlias / /var/www/html/keras-complete-rest-api/keras_rest_api_app.wsgi <Directory /var/www/html/keras-complete-rest-api> WSGIProcessGroup keras_rest_api_app WSGIApplicationGroup %{GLOBAL} Order deny,allow Allow from all </Directory> ...</VirtualHost>
Sym-link CUDA 库(可选,仅限 GPU)
如果你的深度学习模型正在使用 GPU,并希望利用 CUDA,但很不幸的是 Apache 在 /usr/local/cuda/lib64 中并不知道 CUDA 的库。
我不知道告诉 Apache 这些 CUDA 库在哪里的「最正确」的方式,但「完全破解」的解决方案是将 /usr/local/cuda/lib64 中的所有文件 sym-link 到 /usr/lib:
$ cd /usr/lib$ sudo ln -s /usr/local/cuda/lib64/* ./
重新启动 Apache Web 服务器
一旦你编辑了你的 Apache 配置文件,并且选择 sym-link CUDA 深度学习库,一定要通过以下方式重新启动你的 Apache 服务器:
$ sudo service apache2 restart
测试你的 Apache Web 服务器 + 深度学习终点
要测试 Apache 是否已正确配置以产生你的 Flask + 深度学习应用程序,请刷新 web 浏览器:

图 3:Apache + Flask 已经配置成功并工作,因为我看到了欢迎消息。
你现在应该在浏览器中看到「欢迎使用 PyImageSearch Keras REST API!」文本。
一旦你到了这个阶段,你的 Flask 深度学习应用程序应该准备好了。如果你遇到任何问题,请务必参考下一节……
提示:如果遇到麻烦,请监控 Apache 错误日志
多年来,我一直在使用 Python + Web 框架(如 Flask 和 Django),却仍然在正确配置环境的过程中犯错误。虽然我希望有一个万全的方法来确保所有事情运行顺利,但事实是,一些事情很可能将工作搞砸。好消息是,WSGI 会将 Python 事件(包括运行失败)记录到服务器日志中。
在 Ubuntu 上,Apache 服务器日志位于 /var/log/apache2/ 中:
$ ls /var/log/apache2access.log error.log other_vhosts_access.log
在调试的时候,我通常会开着运行调试的终端:
$ tail -f /var/log/apache2/error.log
……所以我可以在错误滚入的瞬间看到它。使用错误日志来帮助你在服务器上创建并运行 Flask。
启动你的深度学习模型服务器
你的 Apache 服务器应该已经在运行了。如果没有,你可以通过以下方式启动它:
$ sudo service apache2 start
然后,你将启动 Redis 商店(数据库):
$ redis-server
在另一个单独的终端启动 Keras 模型服务器:
$ python run_model_server.py* Loading model......* Model loaded
之后,尝试将图像示例提交给你的深度学习 API 服务:
$ curl -X POST -F image=@jemma.png 'http://localhost/predict'{"predictions": [ {"label": "beagle", "probability": 0.9461532831192017 }, {"label": "bluetick", "probability": 0.031958963721990585 }, {"label": "redbone", "probability": 0.0066171870566904545 }, {"label": "Walker_hound", "probability": 0.003387963864952326 }, {"label": "Greater_Swiss_Mountain_dog", "probability": 0.0025766845792531967 } ], "success": true}
如果一切正常,你将从深度学习 API 模型服务器接收到带有类预测 + 概率的格式化的 JSON 输出。

图 4:使用 cURL 来测试我们的 Keras REST API 服务器。图像为我家小猎犬 Jemma。她通过我们的 ResNet 模型以 94.6% 的置信度被分类为比格猎犬。
对你的深度学习 REST API 进行压力测试
当然,这只是一个例子。让我们来压力测试我们的深度学习 REST API。
打开另一个终端并执行以下命令:
$ python stress_test.py [INFO] thread 3 OK[INFO] thread 0 OK[INFO] thread 1 OK...[INFO] thread 497 OK[INFO] thread 499 OK[INFO] thread 498 OK
在你的 run_model_server.py 输出中,你将看到以下内容被记录到终端中:
* Batch size: (4, 224, 224, 3)* Batch size: (9, 224, 224, 3)* Batch size: (9, 224, 224, 3)* Batch size: (8, 224, 224, 3)...* Batch size: (2, 224, 224, 3)* Batch size: (10, 224, 224, 3)* Batch size: (7, 224, 224, 3)
即使每隔 0.05 秒发出一个新的请求,我们的批大小也不会超过每批约 10-12 个图像。我们的模型服务器可以轻松处理加载,而且可以轻松扩展。
如果你的加载超过了服务器承受(也许你的批大小太大,同时你的 GPU 内存用完了并开始报错),你应该停止服务器,然后使用 Redis CLI 清除队列:
$ redis-cli> FLUSHALL
之后,你可以调整 settings.py 和 /etc/apache2/sites-available/000-default.conf 中的设置。然后你可以重新启动服务器。
有关完整演示,请观看文章开头的视频。
将你的深度学习模型部署到生产环境中的建议
我可以给出的最好的建议之一就是让你的数据(特别是你的 Redis 服务器)尽可能离 GPU 近。
你可能想要使用数百 GB 的 RAM 来启动一个巨大的 Redis 服务器,以处理多个图像队列并为多个 GPU 机器提供服务。
这里的问题将是 I/O 延迟和网络开销。
假设 224×224×3 的图像用 float32 数组表示,一个批大小为 32 的图像将是约 19MB 的数据。这意味着对于来自模型服务器的每个批请求,Redis 将需要提取 19MB 的数据并将其发送到服务器。
在快速交换机上,这不是什么大问题,但是你应该考虑在同一台服务器上同时运行模型服务器和 Redis,来保证数据尽可能离 GPU 近。
总结
在本文中,我们学习了如何使用 Keras、Redis、Flask 和 Apache 将深度学习模型部署到生产。
我们这里使用的大多数工具是可以互换的。你可以将 Keras 替换成 TensorFlow 或 PyTorch。Django 可以用来代替 Flask。Nginx 可以代替 Apache。
我唯一不推荐替换的工具是 Redis。Redis 可以说是内存数据存储的最佳解决方案。除非你有特殊原因不使用 Redis,否则我建议你使用 Redis 进行队列操作。
最后,我们压力测试了我们的深度学习 REST API。
我们向服务器提交了 500 个图像分类请求,每个请求之间有 0.05 秒的延迟——我们的服务器没有分阶段(phase)(CNN 的批大小不超过满负载的 37% 左右)。
此外,这种方法可以轻松扩展到添加的服务器。如果为这些服务器设置加载平衡器,你可以轻松地进一步扩展此方法。
原文链接:https://www.pyimagesearch.com/2018/02/05/deep-learning-production-keras-redis-flask-apache/
Deep learning in production with Keras, Redis, Flask, and Apache
by Adrian Rosebrock on February 5, 2018 in Deep Learning, Keras
0
0
0
0
Shipping deep learning models to production is a non-trivial task.
If you don’t believe me, take a second and look at the “tech giants” such as Amazon, Google, Microsoft, etc. — nearly all of them provide some method to ship your machine learning/deep learning models to production in the cloud.
Going with a model deployment service is perfectly fine and acceptable…but what if you wanted to own the entire process and not rely on external services?
This type of situation is more common than you may think. Consider:
- An in-house project where you cannot move sensitive data outside your network
- A project that specifies that the entire infrastructure must reside within the company
- A government organization that needs a private cloud
- A startup that is in “stealth mode” and needs to stress test their service/application in-house
How would you go about shipping your deep learning models to production in these situations, and perhaps most importantly, making it scalable at the same time?
Today’s post is the final chapter in our three part series on building a deep learning model server REST API:
- Part one (which was posted on the official Keras.io blog!) is a simple Keras + deep learning REST API which is intended for single threaded use with no concurrent requests. This method is a perfect fit if this is your first time building a deep learning web server or if you’re working on a home/hobby project.
- In part two we demonstrated how to leverage Redis along with message queueing/message brokering paradigms to efficiently batch process incoming inference requests (but with a small caveat on server threading that could cause problems).
- In the final part of this series, I’ll show you how to resolve these server threading issues, further scale our method, provide benchmarks, and demonstrate how to efficiently scale deep learning in production using Keras, Redis, Flask, and Apache.
As the results of our stress test will demonstrate, our single GPU machine can easily handle 500 concurrent requests (0.05 second delay in between each one) without ever breaking a sweat — this performance continues to scale as well.
To learn how to ship your own deep learning models to production using Keras, Redis, Flask, and Apache, just keep reading.
Looking for the source code to this post?
Jump right to the downloads section.
Deep learning in production with Keras, Redis, Flask, and Apache
The code for this blog post is primarily based on our previous post, but with some minor modifications — the first part of today’s guide will review these changes along with our project structure.
From there we’ll move on to configuring our deep learning web application, including installing and configuring any packages you may need (Redis, Apache, etc.).
Finally, we’ll stress test our server and benchmark our results.
For a quick overview of our deep learning production system (including a demo) be sure to watch the video above!
Our deep learning project structure
Our project structure is as follows:
Deep learning in production with Keras, Redis, Flask, and Apache
Shell
| 1 2 3 4 5 6 7 8 | ├── helpers.py ├── jemma.png ├── keras_rest_api_app.wsgi ├── run_model_server.py ├── run_web_server.py ├── settings.py ├── simple_request.py └── stress_test.py |
Let’s review the important files:
- run_web_server.py contains all our Flask web server code — Apache will load this when starting our deep learning web app.
- run_model_server.py will:
- Load our Keras model from disk
- Continually poll Redis for new images to classify
- Classify images (batch processing them for efficiency)
- Write the inference results back to Redis so they can be returned to the client via Flask
- settings.py contains all Python-based settings for our deep learning productions service, such as Redis host/port information, image classification settings, image queue name, etc.
- helpers.py contains utility functions that both run_web_server.py andrun_model_server.py will use (namely base64 encoding).
- keras_rest_api_app.wsgi contains our WSGI settings so we can serve the Flask app from our Apache server.
- simple_request.py can be used to programmatically consume the results of our deep learning API service.
- jemma.png is a photo of my family’s beagle. We’ll be using her as an example image when calling the REST API to validate it is indeed working.
- Finally, we’ll use stress_test.py to stress our server and measure image classification throughout.
As described last week, we have a single endpoint on our Flask server, /predict . This method lives in run_web_server.py and will compute the classification for an input image on demand. Image pre-processing is also handled in run_web_server.py .
In order to make our server production-ready, I’ve pulled out the classify_process function from last week’s single script and placed it in run_model_server.py . This script is very important as it will load our Keras model and grab images from our image queue in Redis for classification. Results are written back to Redis (the /predict endpoint and corresponding function in run_web_server.py monitors Redis for results to send back to the client).
But what good is a deep learning REST API server unless we know its capabilities and limitations?
In stress_test.py , we test our server. We’ll accomplish this by kicking off 500 concurrent threads which will send our images to the server for classification in parallel. I recommend running this on the server localhost to start, and then running it from a client that is off site.
Building our deep learning web app
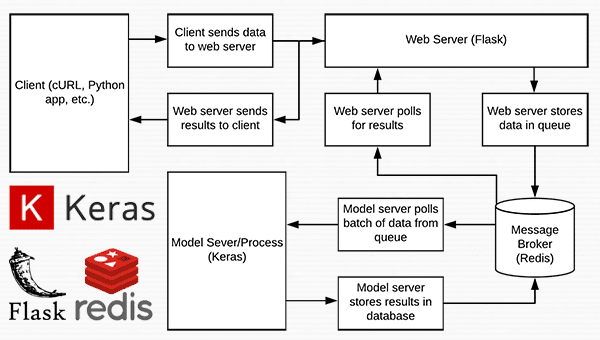
Figure 1: Data flow diagram for a deep learning REST API server built with Python, Keras, Redis, and Flask.
Nearly every single line of code used in this project comes from our previous post on building a scalable deep learning REST API — the only change is that we are moving some of the code to separate files to facilitate scalability in a production environment.
As a matter of completeness I’ll be including the source code to each file in this blog post (and in the “Downloads” section of this blog post). For a detailed review of the files, please see the previous post.
Settings and configurations
Deep learning in production with Keras, Redis, Flask, and Apache
Python
| 1 2 3 4 5 6 7 8 9 10 11 12 13 14 15 16 17 | # initialize Redis connection settings REDIS_HOST = "localhost" REDIS_PORT = 6379 REDIS_DB = 0
# initialize constants used to control image spatial dimensions and # data type IMAGE_WIDTH = 224 IMAGE_HEIGHT = 224 IMAGE_CHANS = 3 IMAGE_DTYPE = "float32"
# initialize constants used for server queuing IMAGE_QUEUE = "image_queue" BATCH_SIZE = 32 SERVER_SLEEP = 0.25 CLIENT_SLEEP = 0.25 |
In settings.py you’ll be able to change parameters for the server connectivity, image dimensions + data type, and server queuing.
Helper utilities
Deep learning in production with Keras, Redis, Flask, and Apache
Python
| 1 2 3 4 5 6 7 8 9 10 11 12 13 14 15 16 17 18 19 20 21 22 | # import the necessary packages import numpy as np import base64 import sys
def base64_encode_image(a): # base64 encode the input NumPy array return base64.b64encode(a).decode("utf-8")
def base64_decode_image(a, dtype, shape): # if this is Python 3, we need the extra step of encoding the # serialized NumPy string as a byte object if sys.version_info.major == 3: a = bytes(a, encoding="utf-8")
# convert the string to a NumPy array using the supplied data # type and target shape a = np.frombuffer(base64.decodestring(a), dtype=dtype) a = a.reshape(shape)
# return the decoded image return a |
The helpers.py file contains two functions — one for base64 encoding and the other for decoding.
Encoding is necessary so that we can serialize + store our image in Redis. Likewise, decoding is necessary so that we can deserialize the image into NumPy array format prior to pre-processing.
The deep learning web server
Deep learning in production with Keras, Redis, Flask, and Apache
Python
| 1 2 3 4 5 6 7 8 9 10 11 12 13 14 15 16 17 18 19 20 21 22 23 24 25 26 27 28 29 30 31 32 33 34 35 36 37 38 39 40 41 42 43 44 45 46 47 48 49 50 51 52 53 54 55 56 57 58 59 60 61 62 63 64 65 66 67 68 69 70 71 72 73 74 75 76 77 78 79 80 81 82 83 84 85 86 87 88 89 90 91 92 93 94 95 96 97 98 | # import the necessary packages from keras.preprocessing.image import img_to_array from keras.applications import imagenet_utils from PIL import Image import numpy as np import settings import helpers import flask import redis import uuid import time import json import io
# initialize our Flask application and Redis server app = flask.Flask(__name__) db = redis.StrictRedis(host=settings.REDIS_HOST, port=settings.REDIS_PORT, db=settings.REDIS_DB)
def prepare_image(image, target): # if the image mode is not RGB, convert it if image.mode != "RGB": image = image.convert("RGB")
# resize the input image and preprocess it image = image.resize(target) image = img_to_array(image) image = np.expand_dims(image, axis=0) image = imagenet_utils.preprocess_input(image)
# return the processed image return image
@app.route("/") def homepage(): return "Welcome to the PyImageSearch Keras REST API!"
@app.route("/predict", methods=["POST"]) def predict(): # initialize the data dictionary that will be returned from the # view data = {"success": False}
# ensure an image was properly uploaded to our endpoint if flask.request.method == "POST": if flask.request.files.get("image"): # read the image in PIL format and prepare it for # classification image = flask.request.files["image"].read() image = Image.open(io.BytesIO(image)) image = prepare_image(image, (settings.IMAGE_WIDTH, settings.IMAGE_HEIGHT))
# ensure our NumPy array is C-contiguous as well, # otherwise we won't be able to serialize it image = image.copy(order="C")
# generate an ID for the classification then add the # classification ID + image to the queue k = str(uuid.uuid4()) image = helpers.base64_encode_image(image) d = {"id": k, "image": image} db.rpush(settings.IMAGE_QUEUE, json.dumps(d))
# keep looping until our model server returns the output # predictions while True: # attempt to grab the output predictions output = db.get(k)
# check to see if our model has classified the input # image if output is not None: # add the output predictions to our data # dictionary so we can return it to the client output = output.decode("utf-8") data["predictions"] = json.loads(output)
# delete the result from the database and break # from the polling loop db.delete(k) break
# sleep for a small amount to give the model a chance # to classify the input image time.sleep(settings.CLIENT_SLEEP)
# indicate that the request was a success data["success"] = True
# return the data dictionary as a JSON response return flask.jsonify(data)
# for debugging purposes, it's helpful to start the Flask testing # server (don't use this for production if __name__ == "__main__": print("* Starting web service...") app.run() |
Here in run_web_server.py , you’ll see predict , the function associated with our REST API/predict endpoint.
The predict function pushes the encoded image into the Redis queue and then continually loops/polls until it obains the prediction data back from the model server. We then JSON-encode the data and instruct Flask to send the data back to the client.
The deep learning model server
Deep learning in production with Keras, Redis, Flask, and Apache
Python
| 1 2 3 4 5 6 7 8 9 10 11 12 13 14 15 16 17 18 19 20 21 22 23 24 25 26 27 28 29 30 31 32 33 34 35 36 37 38 39 40 41 42 43 44 45 46 47 48 49 50 51 52 53 54 55 56 57 58 59 60 61 62 63 64 65 66 67 68 69 70 71 72 73 74 75 76 77 78 79 80 81 82 83 84 | # import the necessary packages from keras.applications import ResNet50 from keras.applications import imagenet_utils import numpy as np import settings import helpers import redis import time import json
# connect to Redis server db = redis.StrictRedis(host=settings.REDIS_HOST, port=settings.REDIS_PORT, db=settings.REDIS_DB)
def classify_process(): # load the pre-trained Keras model (here we are using a model # pre-trained on ImageNet and provided by Keras, but you can # substitute in your own networks just as easily) print("* Loading model...") model = ResNet50(weights="imagenet") print("* Model loaded")
# continually pool for new images to classify while True: # attempt to grab a batch of images from the database, then # initialize the image IDs and batch of images themselves queue = db.lrange(settings.IMAGE_QUEUE, 0, settings.BATCH_SIZE - 1) imageIDs = [] batch = None
# loop over the queue for q in queue: # deserialize the object and obtain the input image q = json.loads(q.decode("utf-8")) image = helpers.base64_decode_image(q["image"], settings.IMAGE_DTYPE, (1, settings.IMAGE_HEIGHT, settings.IMAGE_WIDTH, settings.IMAGE_CHANS))
# check to see if the batch list is None if batch is None: batch = image
# otherwise, stack the data else: batch = np.vstack([batch, image])
# update the list of image IDs imageIDs.append(q["id"])
# check to see if we need to process the batch if len(imageIDs) > 0: # classify the batch print("* Batch size: {}".format(batch.shape)) preds = model.predict(batch) results = imagenet_utils.decode_predictions(preds)
# loop over the image IDs and their corresponding set of # results from our model for (imageID, resultSet) in zip(imageIDs, results): # initialize the list of output predictions output = []
# loop over the results and add them to the list of # output predictions for (imagenetID, label, prob) in resultSet: r = {"label": label, "probability": float(prob)} output.append(r)
# store the output predictions in the database, using # the image ID as the key so we can fetch the results db.set(imageID, json.dumps(output))
# remove the set of images from our queue db.ltrim(settings.IMAGE_QUEUE, len(imageIDs), -1)
# sleep for a small amount time.sleep(settings.SERVER_SLEEP)
# if this is the main thread of execution start the model server # process if __name__ == "__main__": classify_process() |
The run_model_server.py file houses our classify_process function. This function loads our model and then runs predictions on a batch of images. This process is ideally excuted on a GPU, but a CPU can also be used.
In this example, for sake of simplicity, we’ll be using ResNet50 pre-trained on the ImageNet dataset. You can modify classify_process to utilize your own deep learning models.
The WSGI configuration
Deep learning in production with Keras, Redis, Flask, and Apache
Python
| 1 2 3 4 5 6 | # add our app to the system path import sys sys.path.insert(0, "/var/www/html/keras-complete-rest-api")
# import the application and away we go... from run_web_server import app as application |
Our next file, keras_rest_api_app.wsgi , is a new component to our deep learning REST API compared to last week.
This WSGI configuration file adds our server directory to the system path and imports the web app to kick off all the action. We point to this file in our Apache server settings file,/etc/apache2/sites-available/000-default.conf , later in this blog post.
The stress test
Deep learning in production with Keras, Redis, Flask, and Apache
Python
| 1 2 3 4 5 6 7 8 9 10 11 12 13 14 15 16 17 18 19 20 21 22 23 24 25 26 27 28 29 30 31 32 33 34 35 36 37 38 39 40 41 42 43 44 45 | # USAGE # python stress_test.py
# import the necessary packages from threading import Thread import requests import time
# initialize the Keras REST API endpoint URL along with the input # image path KERAS_REST_API_URL = "http://localhost/predict" IMAGE_PATH = "jemma.png"
# initialize the number of requests for the stress test along with # the sleep amount between requests NUM_REQUESTS = 500 SLEEP_COUNT = 0.05
def call_predict_endpoint(n): # load the input image and construct the payload for the request image = open(IMAGE_PATH, "rb").read() payload = {"image": image}
# submit the request r = requests.post(KERAS_REST_API_URL, files=payload).json()
# ensure the request was sucessful if r["success"]: print("[INFO] thread {} OK".format(n))
# otherwise, the request failed else: print("[INFO] thread {} FAILED".format(n))
# loop over the number of threads for i in range(0, NUM_REQUESTS): # start a new thread to call the API t = Thread(target=call_predict_endpoint, args=(i,)) t.daemon = True t.start() time.sleep(SLEEP_COUNT)
# insert a long sleep so we can wait until the server is finished # processing the images time.sleep(300) |
Our stress_test.py script will help us to test the server and determine its limitations. I always recommend stress testing your deep learning REST API server so that you know if (and more importantly, when) you need to add additional GPUs, CPUs, or RAM. This script kicks offNUM_REQUESTS threads and POSTs to the /predict endpoint. It’s up to our Flask web app from there.
Configuring our deep learning production environment
This section will discuss how to install and configure the necessary prerequisites for our deep learning API server.
We’ll use my PyImageSearch Deep Learning AMI (freely available to you to use) as a base. I chose a p2.xlarge instance with a single GPU for this example.
You can modify the code in this example to leverage multiple GPUs as well by:
- Running multiple model server processes
- Maintaining an image queue for each GPU and corresponding model process
However, keep in mind that your machine will still be limited by I/O. It may be beneficial to instead utilize multiple machines, each with 1-4 GPUs than trying to scale to 8 or 16 GPUs on a single machine.
Compile and installing Redis
Redis, an efficient in-memory database, will act as our queue/message broker.
Obtaining and installing Redis is very easy:
Deep learning in production with Keras, Redis, Flask, and Apache
Shell
| 1 2 3 4 5 | $ wget http://download.redis.io/redis-stable.tar.gz $ tar xvzf redis-stable.tar.gz $ cd redis-stable $ make $ sudo make install |
Create your deep learning Python virtual environment
Let’s create a Python virtual environment for this project. Please see last week’s tutorial for instructions on how to install virtualenv and virtualenvwrapper if you are new to Python virtual environments.
When you’re ready, create the virtual environment:
Deep learning in production with Keras, Redis, Flask, and Apache
Shell
| 1 | $ mkvirtualenv keras_flask -p python3 |
From there, let’s install the necessary packages:
Deep learning in production with Keras, Redis, Flask, and Apache
Shell
| 1 2 3 4 5 6 7 8 | $ pip install numpy $ pip install scipy h5py $ pip install tensorflow==1.4.1 # tensorflow-gpu==1.4.1 for GPU machines $ pip install keras $ pip install flask gevent $ pip install imutils requests $ pip install redis $ pip install Pillow |
Note: We use TensorFlow 1.4.1 since we are using CUDA 8. You should use TensorFlow 1.5 if using CUDA 9.
Install the Apache web server
Other web servers can be used such as nginx but since I have more experience with Apache (and therefore more familiar with Apache in general), I’ll be using Apache for this example.
Apache can be installed via:
Deep learning in production with Keras, Redis, Flask, and Apache
Shell
| 1 | $ sudo apt-get install apache2 |
If you’ve created a virtual environment using Python 3 you’ll want to install the Python 3 WSGI + Apache module:
Deep learning in production with Keras, Redis, Flask, and Apache
Shell
| 1 2 | $ sudo apt-get install libapache2-mod-wsgi-py3 $ sudo a2enmod wsgi |
Otherwise, Python 2.7 users should install the Pytohn 2.7 WSGI + Apache module:
Deep learning in production with Keras, Redis, Flask, and Apache
Shell
| 1 2 | $ sudo apt-get install libapache2-mod-wsgi $ sudo a2enmod wsgi |
To validate that Apache is installed, open up a browser and enter the IP address of your web server. If you can’t see the server splash screen then be sure to open up Port 80 and Port 5000.
In my case, the IP address of my server is 54.187.46.215 (yours will be different). Entering this in a browser I see:
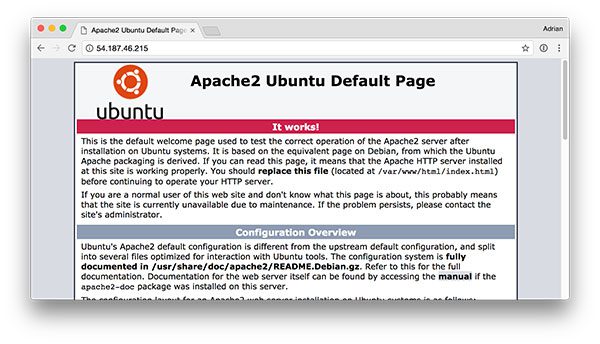
Figure 2: The default Apache splash screen lets us know that Apache is installed and that it can be accessed from an open port 80.
…which is the default Apache homepage.
Sym-link your Flask + deep learning app
By default, Apache serves content from /var/www/html . I would recommend creating a sym-link from /var/www/html to your Flask web app.
I have uploaded my deep learning + Flask app to my home directory in a directory namedkeras-complete-rest-api :
Deep learning in production with Keras, Redis, Flask, and Apache
Shell
| 1 2 | $ ls ~ keras-complete-rest-api |
I can sym-link it to /var/www/html via:
Deep learning in production with Keras, Redis, Flask, and Apache
Shell
| 1 2 | $ cd /var/www/html/ $ sudo ln -s ~/keras-complete-rest-api keras-complete-rest-api |
Update your Apache configuration to point to the Flask app
In order to configure Apache to point to our Flask app, we need to edit /etc/apache2/sites-available/000-default.conf .
Open in your favorite text editor (here I’ll be using vi ):
Deep learning in production with Keras, Redis, Flask, and Apache
Python
| 1 | $ sudo vi /etc/apache2/sites-available/000-default.conf |
At the top of the file supply your WSGIPythonHome (path to Python bin directory) andWSGIPythonPath (path to Python site-packages directory) configurations:
Deep learning in production with Keras, Redis, Flask, and Apache
Apache
| 1 2 3 4 5 6 | WSGIPythonHome /home/ubuntu/.virtualenvs/keras_flask/bin WSGIPythonPath /home/ubuntu/.virtualenvs/keras_flask/lib/python3.5/site-packages
<VirtualHost *:80> ... </VirtualHost> |
Since we are using Python virtual environments in this example (I have named my virtual environment keras_flask ), we supply the path to the bin and site-packages directory for the Python virtual environment.
Then in body of <VirtualHost> , right after ServerAdmin and DocumentRoot , add:
Deep learning in production with Keras, Redis, Flask, and Apache
Apache
| 1 2 3 4 5 6 7 8 9 10 11 12 13 14 15 | <VirtualHost *:80> ... WSGIDaemonProcess keras_rest_api_app threads=10 WSGIScriptAlias / /var/www/html/keras-complete-rest-api/keras_rest_api_app.wsgi <Directory /var/www/html/keras-complete-rest-api> WSGIProcessGroup keras_rest_api_app WSGIApplicationGroup %{GLOBAL} Order deny,allow Allow from all </Directory> ... </VirtualHost> |
Sym-link CUDA libraries (optional, GPU only)
If you’re using your GPU for deep learning and want to leverage CUDA (and why wouldn’t you), Apache unfortunately has no knowledge of CUDA’s *.so libraries in /usr/local/cuda/lib64 .
I’m not sure what the “most correct” way instruct to Apache of where these CUDA libraries live, but the “total hack” solution is to sym-link all files from /usr/local/cuda/lib64 to /usr/lib :
Deep learning in production with Keras, Redis, Flask, and Apache
Shell
| 1 2 | $ cd /usr/lib $ sudo ln -s /usr/local/cuda/lib64/* ./ |
If there is a better way to make Apache aware of the CUDA libraries, please let me know in the comments.
Restart the Apache web server
Once you’ve edited your Apache configuration file and optionally sym-linked the CUDA deep learning libraries, be sure to restart your Apache server via:
Deep learning in production with Keras, Redis, Flask, and Apache
Shell
| 1 | $ sudo service apache2 restart |
Testing your Apache web server + deep learning endpoint
To test that Apache is properly configured to deliver your Flask + deep learning app, refresh your web browser:
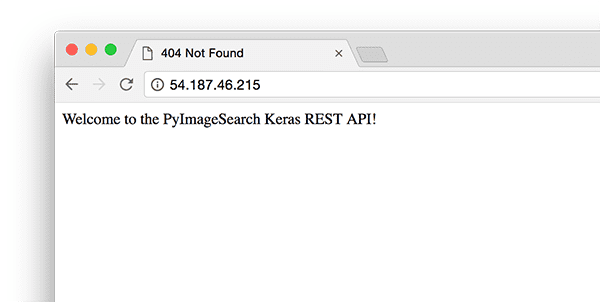
Figure 3: Apache + Flask have been configured to work and I see my welcome message.
You should now see the text “Welcome to the PyImageSearch Keras REST API!” in your browser.
Once you’ve reached this stage your Flask deep learning app should be ready to go.
All that said, if you run into any problems make sure you refer to the next section…
TIP: Monitor your Apache error logs if you run into trouble
I’ve been using Python + web frameworks such as Flask and Django for years and I still make mistakes when getting my environment configured properly.
While I wish there was a bullet proof way to make sure everything works out of the gate, the truth is something is likely going to gum up the works along the way.
The good news is that WSGI logs Python events, including failures, to the server log.
On Ubuntu, the Apache server log is located in /var/log/apache2/ :
Deep learning in production with Keras, Redis, Flask, and Apache
Shell
| 1 2 | $ ls /var/log/apache2 access.log error.log other_vhosts_access.log |
When debugging, I often keep a terminal open that runs:
Deep learning in production with Keras, Redis, Flask, and Apache
Shell
| 1 | $ tail -f /var/log/apache2/error.log |
…so I can see the second an error rolls in.
Use the error log to help you get Flask up and running on your server.
Starting your deep learning model server
Your Apache server should already be running. If not, you can start it via:
Deep learning in production with Keras, Redis, Flask, and Apache
Python
| 1 | $ sudo service apache2 start |
You’ll then want to start the Redis store:
Deep learning in production with Keras, Redis, Flask, and Apache
Shell
| 1 | $ redis-server |
And in a separate terminal launch the Keras model server:
Deep learning in production with Keras, Redis, Flask, and Apache
Shell
| 1 2 3 4 | $ python run_model_server.py * Loading model... ... * Model loaded |
From there try to submit an example image to your deep learning API service:
Deep learning in production with Keras, Redis, Flask, and Apache
Shell
| 1 2 3 4 5 6 7 8 9 10 11 12 13 14 15 16 17 18 19 20 21 22 23 24 25 26 | $ curl -X POST -F image=@jemma.png 'http://localhost/predict' { "predictions": [ { "label": "beagle", "probability": 0.9461532831192017 }, { "label": "bluetick", "probability": 0.031958963721990585 }, { "label": "redbone", "probability": 0.0066171870566904545 }, { "label": "Walker_hound", "probability": 0.003387963864952326 }, { "label": "Greater_Swiss_Mountain_dog", "probability": 0.0025766845792531967 } ], "success": true } |
If everything is working, you should receive formatted JSON output back from the deep learning API model server with the class predictions + probabilities.
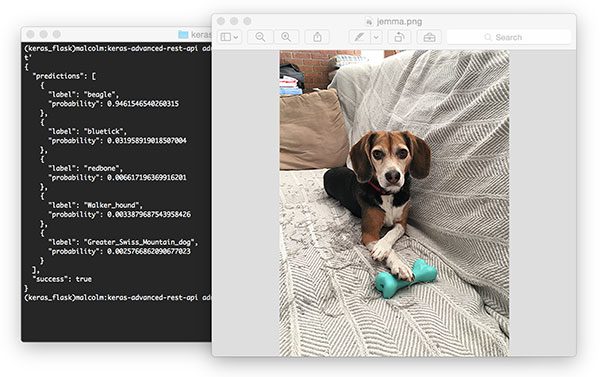
Figure 4: Using cURL to test our Keras REST API server. Pictured is my family beagle, Jemma. She is classified as a beagle with 94.6% confidence by our ResNet model.
Stress testing your deep learning REST API
Of course, this is just an example. Let’s stress test our deep learning REST API.
Open up another terminal and execute the following command:
Deep learning in production with Keras, Redis, Flask, and Apache
Shell
| 1 2 3 4 5 6 7 8 | $ python stress_test.py [INFO] thread 3 OK [INFO] thread 0 OK [INFO] thread 1 OK ... [INFO] thread 497 OK [INFO] thread 499 OK [INFO] thread 498 OK |
In your run_model_server.py output you’ll start to see the following lines logged to the terminal:
Deep learning in production with Keras, Redis, Flask, and Apache
Shell
| 1 2 3 4 5 6 7 8 | * Batch size: (4, 224, 224, 3) * Batch size: (9, 224, 224, 3) * Batch size: (9, 224, 224, 3) * Batch size: (8, 224, 224, 3) ... * Batch size: (2, 224, 224, 3) * Batch size: (10, 224, 224, 3) * Batch size: (7, 224, 224, 3) |
Even with a new request coming in every 0.05 seconds our batch size never gets larger than ~10-12 images per batch.
Our model server handles the load easily without breaking a sweat and it can easily scale beyond this.
If you do overload the server (perhaps your batch size is too big and you run out of GPU memory with an error message), you should stop the server, and use the Redis CLI to clear the queue:
Deep learning in production with Keras, Redis, Flask, and Apache
Shell
| 1 2 | $ redis-cli > FLUSHALL |
From there you can adjust settings in settings.py and /etc/apache2/sites-available/000-default.conf . Then you may restart the server.
For a full demo, please see the video below:
Recommendations for deploying your own deep learning models to production
One of the best pieces of advice I can give is to keep your data, in particular your Redis server, close to the GPU.
You may be tempted to spin up a giant Redis server with hundreds of gigabytes of RAM to handle multiple image queues and serve multiple GPU machines.
The problem here will be I/O latency and network overhead.
Assuming 224 x 224 x 3 images represented as float32 array, a batch size of 32 images will be ~19MB of data. This implies that for each batch request from a model server, Redis will need to pull out 19MB of data and send it to the server.
On fast switches this isn’t a big deal, but you should consider running both your model server and Redis on the same server to keep your data close to the GPU.
Summary
In today’s blog post we learned how to deploy a deep learning model to production using Keras, Redis, Flask, and Apache.
Most of the tools we used here are interchangeable. You could swap in TensorFlow or PyTorch for Keras. Django could be used instead of Flask. Nginx could be swapped in for Apache.
The only tool I would not recommend swapping out is Redis. Redis is arguably the best solution for in-memory data stores. Unless you have a specific reason to not use Redis, I would suggest utilizing Redis for your queuing operations.
Finally, we stress tested our deep learning REST API.
We submitted a total of 500 requests for image classification to our server with 0.05 second delays in between each — our server was not phased (the batch size for the CNN was never more than ~37% full).
Furthermore, this method is easily scalable to additional servers. If you place these servers behind a load balancer you can easily scale this method further.
I hope you enjoyed today’s blog post!
To be notified when future blog posts are published on PyImageSearch, be sure to enter your email address in the form below!
Downloads:
![]() If you would like to download the code and images used in this post, please enter your email address in the form below. Not only will you get a .zip of the code, I’ll also send you a FREE 17-page Resource Guide on Computer Vision, OpenCV, and Deep Learning. Inside you'll find my hand-picked tutorials, books, courses, and libraries to help you master CV and DL! Sound good? If so, enter your email address and I’ll send you the code immediately!
If you would like to download the code and images used in this post, please enter your email address in the form below. Not only will you get a .zip of the code, I’ll also send you a FREE 17-page Resource Guide on Computer Vision, OpenCV, and Deep Learning. Inside you'll find my hand-picked tutorials, books, courses, and libraries to help you master CV and DL! Sound good? If so, enter your email address and I’ll send you the code immediately!
这篇关于教程 | 如何使用Keras、Redis、Flask和Apache把深度学习模型部署到生产环境?的文章就介绍到这儿,希望我们推荐的文章对编程师们有所帮助!


