本文主要是介绍Flutter创建自定义的软键盘,希望对大家解决编程问题提供一定的参考价值,需要的开发者们随着小编来一起学习吧!
参考代码:
Flutter - Create Custom Keyboard Examples
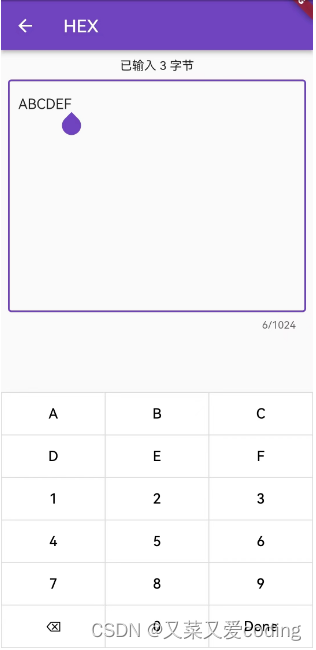
本文贴出的代码实现了一个输入十六进制数据的键盘:
(1)支持长按退格键连续删除字符;
(2)可通过退格键删除选中的文字;
(3)监听文本变化(包括粘贴剪切导致的变化)。
hex_keyboard.dart
import 'dart:async';import 'package:flutter/material.dart';class HexKeyboard extends StatefulWidget {final TextEditingController controller;final void Function() onDone;final void Function(String) onTextChanged;const HexKeyboard({super.key,required this.controller,required this.onDone,required this.onTextChanged,});@overrideState<HexKeyboard> createState() => _HexKeyboardState();
}class _HexKeyboardState extends State<HexKeyboard> {late TextEditingController _controller;final Widget _horizontalPadding = const SizedBox(width: 1.0);final Widget _verticalPadding = const SizedBox(height: 1.0);Timer? _timer;@overridevoid initState() {super.initState();_controller = widget.controller;}void _handleType(String text) {int position = _controller.selection.base.offset;var value = _controller.text;if (value.isEmpty) {_controller.text = text;} else {_controller.text = value.substring(0, position) +text +value.substring(position, value.length);}_controller.selection =TextSelection.fromPosition(TextPosition(offset: position + 1));widget.onTextChanged(_controller.text);}void _handleBackspace() {final value = _controller.text;if (value.isNotEmpty) {final start = _controller.selection.start;final end = _controller.selection.end;print("selection.start=$start, selection.end=$end");final int offset;if(end > 0) {if(start == end) {_controller.text = value.substring(0, start - 1) +value.substring(start, value.length);offset = start - 1;} else {_controller.text = value.substring(0, start) +value.substring(end, value.length);offset = start;}_controller.selection =TextSelection.fromPosition(TextPosition(offset: offset));widget.onTextChanged(_controller.text);}}}Widget _buildButton(String text,{VoidCallback? onPressed,VoidCallback? onLongPressStart,VoidCallback? onLongPressUp}) {return Expanded(child: Container(color: Colors.white,child: GestureDetector(onLongPressStart: (e) {onLongPressStart?.call();},onLongPressUp: onLongPressUp,child: TextButton(onPressed: onPressed ?? () => _handleType(text),child: Text(text,style: const TextStyle(color: Colors.black, fontSize: 16),),),),),);}@overrideWidget build(BuildContext context) {return _buildButtonKeyboard();}Widget _buildButtonRow(String key1, String key2, String key3) {return Row(mainAxisAlignment: MainAxisAlignment.spaceEvenly,children: [_horizontalPadding,_buildButton(key1),_horizontalPadding,_buildButton(key2),_horizontalPadding,_buildButton(key3),_horizontalPadding,],);}Widget _buildButtonKeyboard() {return Container(color: const Color(0xffdddddd),child: Column(children: [_verticalPadding,_buildButtonRow('A', 'B', 'C'),_verticalPadding,_buildButtonRow('D', 'E', 'F'),_verticalPadding,_buildButtonRow('1', '2', '3'),_verticalPadding,_buildButtonRow('4', '5', '6'),_verticalPadding,_buildButtonRow('7', '8', '9'),_verticalPadding,Row(children: [_horizontalPadding,_buildButton('⌫',onPressed: _handleBackspace,onLongPressStart: () {_timer =Timer.periodic(const Duration(milliseconds: 50), (timer) {_handleBackspace();});},onLongPressUp: () {_timer?.cancel();},),_horizontalPadding,_buildButton('0'),_horizontalPadding,_buildButton('Done',onPressed: widget.onDone,),_horizontalPadding,],),_verticalPadding,],),);}
}
hex_input_screen.dart
import 'package:flutter/material.dart';class HexInputScreen extends StatefulWidget {final String text;const HexInputScreen({super.key, required this.text});@overrideState<HexInputScreen> createState() => _HexInputScreenState();
}class _HexInputScreenState extends State<HexInputScreen> {late TextEditingController _controller;final FocusNode _focus = FocusNode();late ValueNotifier<bool> _focusValueNotifier;int _byteCount = 0;int _toByteCount(String hex) {return hex.length % 2 == 0 ? hex.length ~/ 2 : hex.length ~/ 2 + 1;}void _onTextChanged(String text) {//更新字节数setState(() {_byteCount = _toByteCount(text);});}@overridevoid initState() {_controller = TextEditingController(text: widget.text);_focus.addListener(_handleFocusChange);_focusValueNotifier = ValueNotifier<bool>(_focus.hasFocus);_focus.requestFocus();setState(() {_byteCount = widget.text.length;});super.initState();}@overridevoid dispose() {super.dispose();_focus.removeListener(_handleFocusChange);_focus.dispose();}void _handleFocusChange() {_focusValueNotifier.value = _focus.hasFocus;}void _onDone() {print(_controller.text);Navigator.pop(context, _controller.text);}@overrideWidget build(BuildContext context) {return Scaffold(appBar: AppBar(title: const Text('HEX' /*, style: TextStyle(color: Colors.white)*/),// backgroundColor: Colors.black,),body: Column(mainAxisAlignment: MainAxisAlignment.start,children: [const SizedBox(height: 10),Text('已输入 $_byteCount 字节'),Padding(padding: const EdgeInsets.all(8.0),child: TextField(decoration: const InputDecoration(border: OutlineInputBorder(borderSide: BorderSide(color: Colors.grey,width: 1,),),),controller: _controller,keyboardType: TextInputType.none,focusNode: _focus,maxLines: 12,maxLength: 1024,onChanged: _onTextChanged,//这里监听粘贴剪切导致的变化),),const Spacer(),ListenableBuilder(listenable: _focusValueNotifier,builder: (BuildContext context, Widget? child) {return _focus.hasFocus? HexKeyboard(controller: _controller,onDone: _onDone,onTextChanged: _onTextChanged,//这里监听自定义键盘导致的变化): Container();},),],),);}
}
这篇关于Flutter创建自定义的软键盘的文章就介绍到这儿,希望我们推荐的文章对编程师们有所帮助!


