本文主要是介绍云原生Kubernetes: K8S 1.29版本 部署Nexus,希望对大家解决编程问题提供一定的参考价值,需要的开发者们随着小编来一起学习吧!
目录
一、实验
1.环境
2.搭建NFS
3. K8S 1.29版本 部署Nexus
二、问题
1.volumeMode有哪几种模式
一、实验
1.环境
(1)主机
表1 主机
| 主机 | 架构 | 版本 | IP | 备注 |
| master | K8S master节点 | 1.29.0 | 192.168.204.8 | |
| node1 | K8S node节点 | 1.29.0 | 192.168.204.9 | |
| node2 | K8S node节点 | 1.29.0 | 192.168.204.10 | 已部署Kuboard |
(2)master节点查看集群
1)查看node
kubectl get node2)查看node详细信息
kubectl get node -o wide

(3)查看pod
[root@master ~]# kubectl get pod -A

(4) 访问Kuboard
http://192.168.204.10:30080/kuboard/cluster
查看节点

2.搭建NFS
(1)检查并安装rpcbind和nfs-utils软件包
[root@master ~]# rpm -q rpcbind nfs-utils

(2)创建目录并授权
[root@master ~]# mkdir -p /opt/nexus

[root@master opt]# chmod 777 nexus/

(3)打开nfs的配置文件
[root@master opt]# vim /etc/exports

(4)配置文件
给所有网段用户赋予读写权限、同步内容、不压缩共享对象root用户权限
……
/opt/nexus *(rw,sync,no_root_squash)

(5)先后开启rpcbind、nfs服务并热加载配置文件内容,查看本机发布的nfs共享目录
[root@master opt]# systemctl restart nfs
![]()
(6)监听端口
[root@master opt]# ss -antp | grep rpcbind

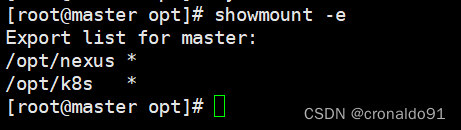
(7)查看共享
[root@master opt]# showmount -e
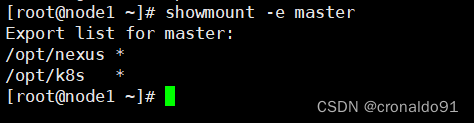
其他节点查看
[root@node1 ~]# showmount -e master
3. K8S 1.29版本 部署Nexus
(1)创建名称空间
[root@master opt]# kubectl create ns nexus

(2)创建nexus的pv
[root@master ~]# vim pv-nexus.yaml
![]()
apiVersion: v1
kind: PersistentVolume
metadata:name: pv-nexus
spec:capacity:storage: 30Gi    #配置容量大小volumeMode: FilesystemaccessModes:- ReadWriteOnce     #配置访问策略为只允许一个节点读写persistentVolumeReclaimPolicy: Retain  #配置回收策略,Retain为手动回收storageClassName: "pv-nexus"       #配置为nfsnfs:path: /opt/nexus   #配置nfs服务端的共享路径server: 192.168.204.8    #配置nfs服务器地址

(3)生成资源
[root@master ~]# kubectl apply -f pv-nexus.yaml

(4)查看pv
[root@master ~]# kubectl get pv

(5)拉取镜像
node1
[root@node1 ~]# docker pull sonatype/nexus3:3.28.0

(6) 导出镜像
[root@node1 ~]# docker save -o nexus.tar sonatype/nexus3:3.28.0

(7)复制Docker镜像到node2节点
[root@node1 ~]# scp nexus.tar root@node2:~

(8)node2节点导入Docker镜像
[root@node2 ~]# docker load -i nexus.tar

(9)部署nexus
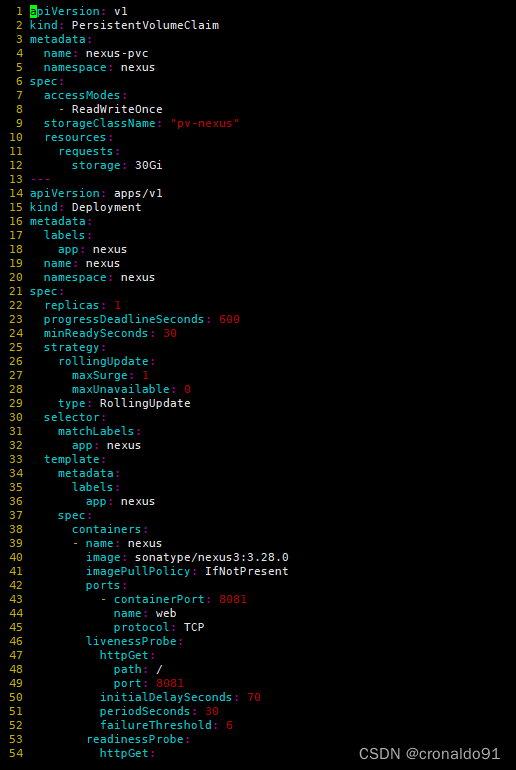
[root@master ~]# vim nexus.yaml
![]()
apiVersion: v1
kind: PersistentVolumeClaim
metadata:name: nexus-pvcnamespace: nexus
spec:accessModes:- ReadWriteOncestorageClassName: "pv-nexus"resources:requests:storage: 30Gi
---
apiVersion: apps/v1
kind: Deployment
metadata:labels:app: nexusname: nexusnamespace: nexus
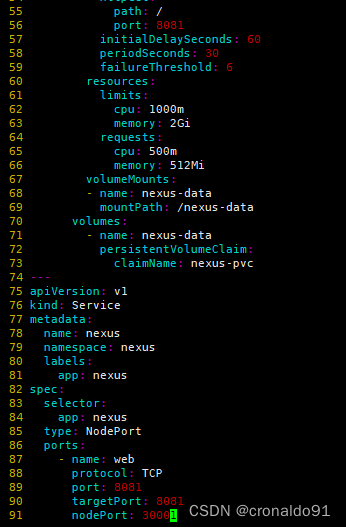
spec:replicas: 1progressDeadlineSeconds: 600minReadySeconds: 30strategy:rollingUpdate:maxSurge: 1maxUnavailable: 0type: RollingUpdateselector:matchLabels:app: nexustemplate:metadata:labels:app: nexusspec:containers:- name: nexusimage: sonatype/nexus3:3.28.0imagePullPolicy: IfNotPresentports:- containerPort: 8081name: webprotocol: TCPlivenessProbe:httpGet:path: /port: 8081initialDelaySeconds: 70periodSeconds: 30failureThreshold: 6readinessProbe:httpGet:path: /port: 8081initialDelaySeconds: 60periodSeconds: 30failureThreshold: 6resources:limits:cpu: 1000mmemory: 2Girequests:cpu: 500mmemory: 512MivolumeMounts:- name: nexus-datamountPath: /nexus-datavolumes:- name: nexus-datapersistentVolumeClaim:claimName: nexus-pvc
---
apiVersion: v1
kind: Service
metadata:name: nexusnamespace: nexuslabels:app: nexus
spec:selector:app: nexustype: NodePortports:- name: webprotocol: TCPport: 8081targetPort: 8081nodePort: 30001
(11)生成资源
[root@master nexus]# kubectl apply -f nexus.yaml
![]()

(12)查看pv,pvc
[root@master ~]# kubectl get pv

[root@master ~]# kubectl get pvc -n nexus

(13) 查看pod,svc
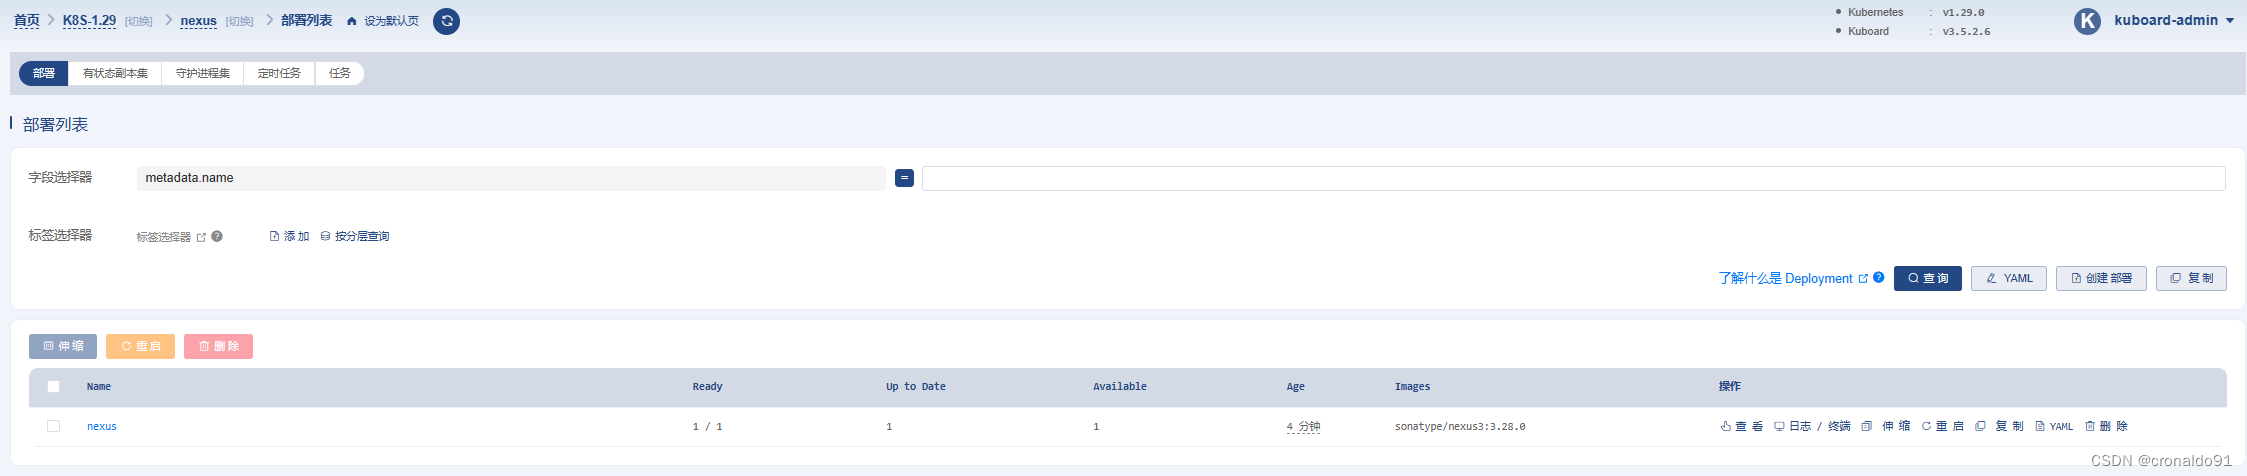
[root@master ~]# kubectl get pod,svc -n nexus

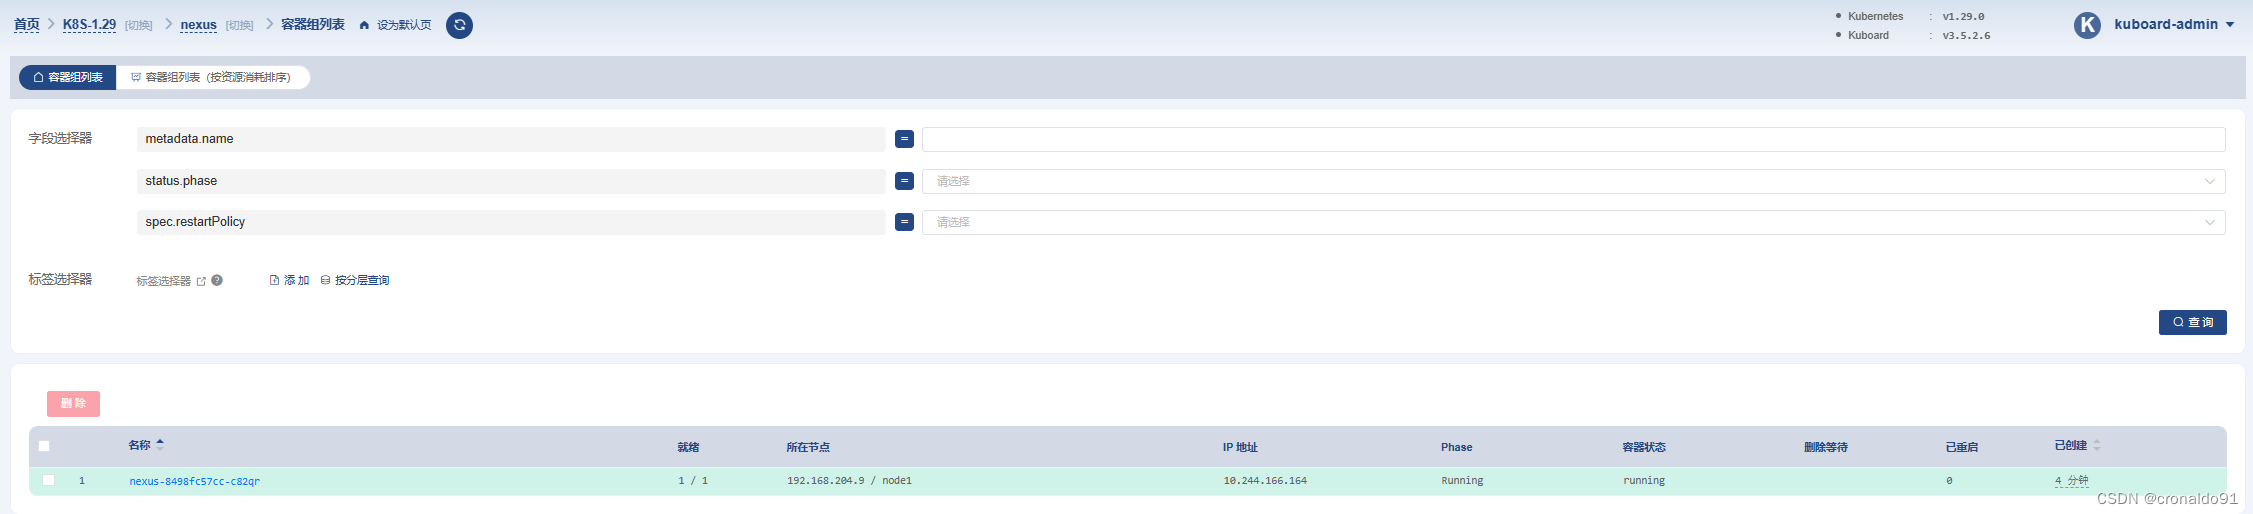
(14) Kuboard查看
工作负载
容器组
服务

存储

(15)部署ingress
vim ingress-nexus.yaml![]()
apiVersion: networking.k8s.io/v1
kind: Ingress
metadata:name: ingress-nexusnamespace: nexus
spec:ingressClassName: "nginx"rules:- host: nexus.sitehttp:paths:- path: /pathType: Prefixbackend:service:name: nexusport:number: 8081

(16)生成资源
[root@master ~]# kubectl apply -f ingress-nexus.yaml

(17)查看ingress
[root@master ~]# kubectl get ingress -n nexus

(18)详细查看
[root@master ~]# kubectl describe ingress ingress-nexus -n nexus
Name:             ingress-nexus
Labels:           <none>
Namespace:        nexus
Address:          10.101.23.182
Ingress Class:    nginx
Default backend:  <default>
Rules:Host        Path  Backends----        ----  --------nexus.site  /   nexus:8081 (10.244.166.164:8081)
Annotations:  <none>
Events:Type    Reason  Age                From                      Message----    ------  ----               ----                      -------Normal  Sync    68s (x2 over 82s)  nginx-ingress-controller  Scheduled for syncNormal  Sync    68s (x2 over 82s)  nginx-ingress-controller  Scheduled for sync

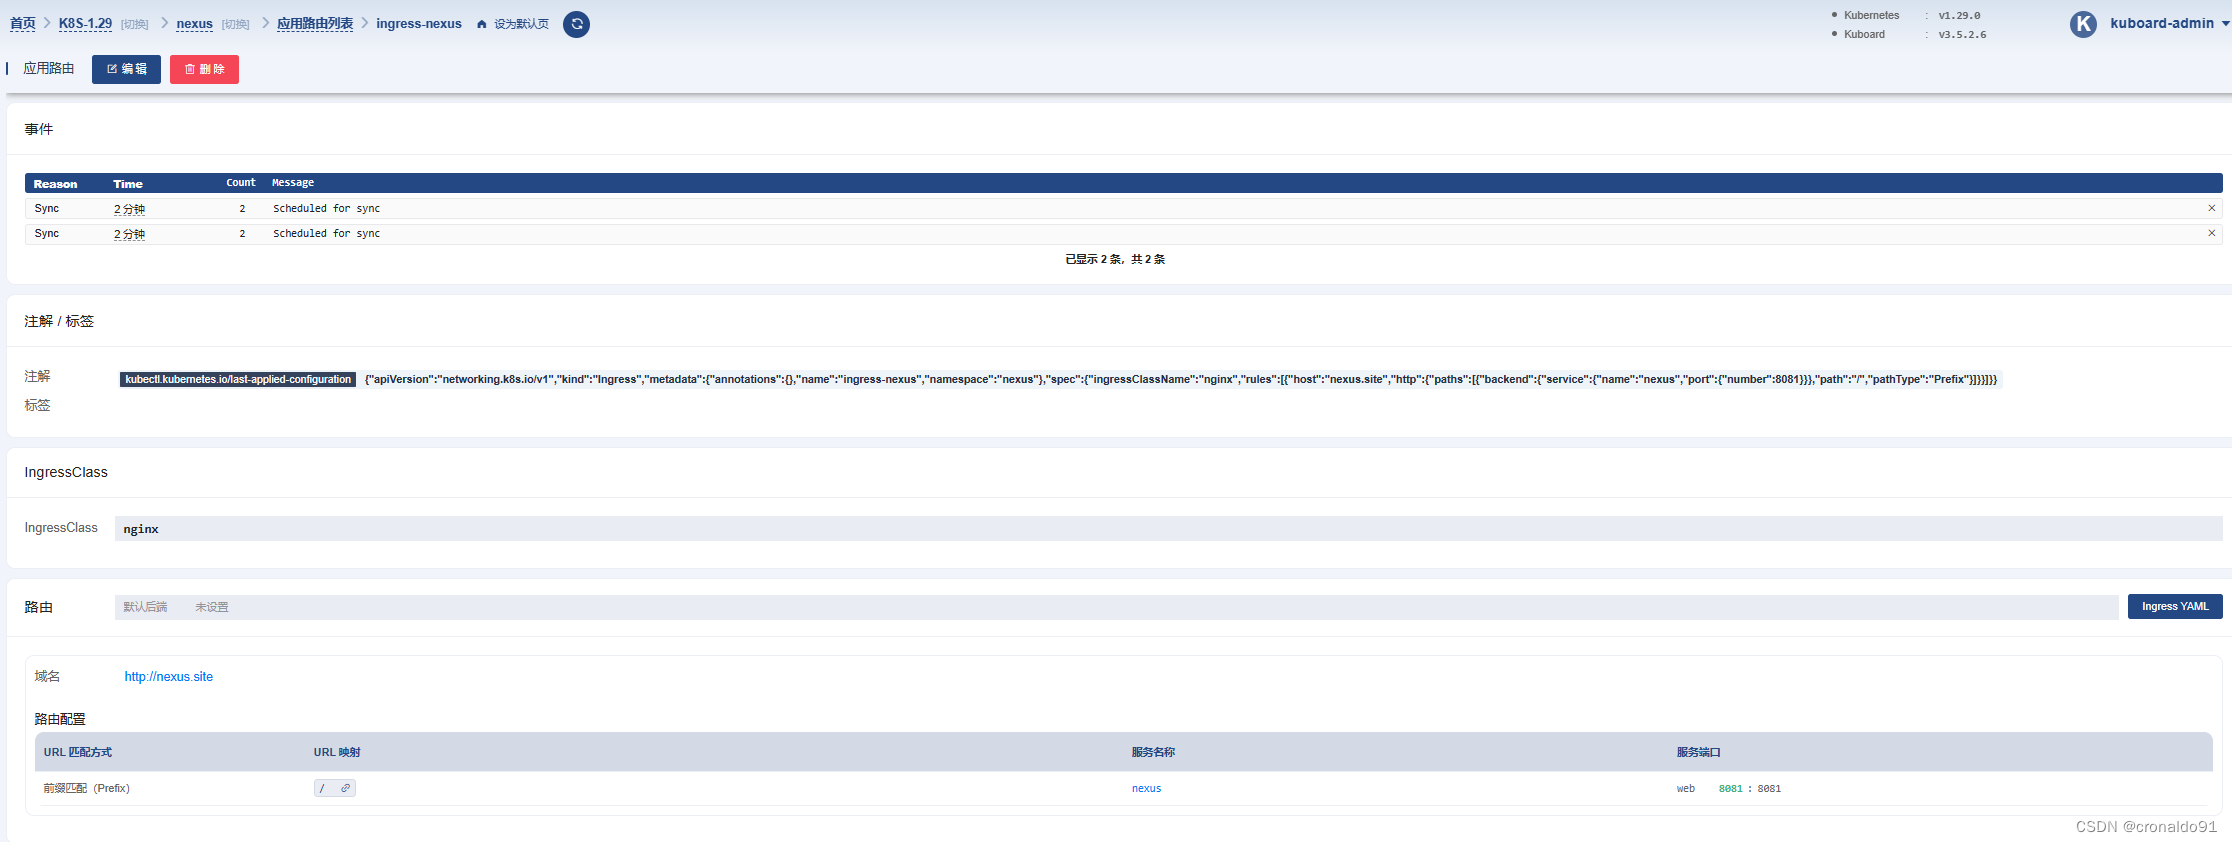
(19)Kuboard查看
应用路由

详细信息
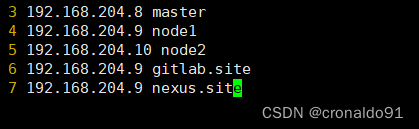
(20)master节点修改hosts
[root@master ~]# vim /etc/hosts
![]()
(21)curl测试
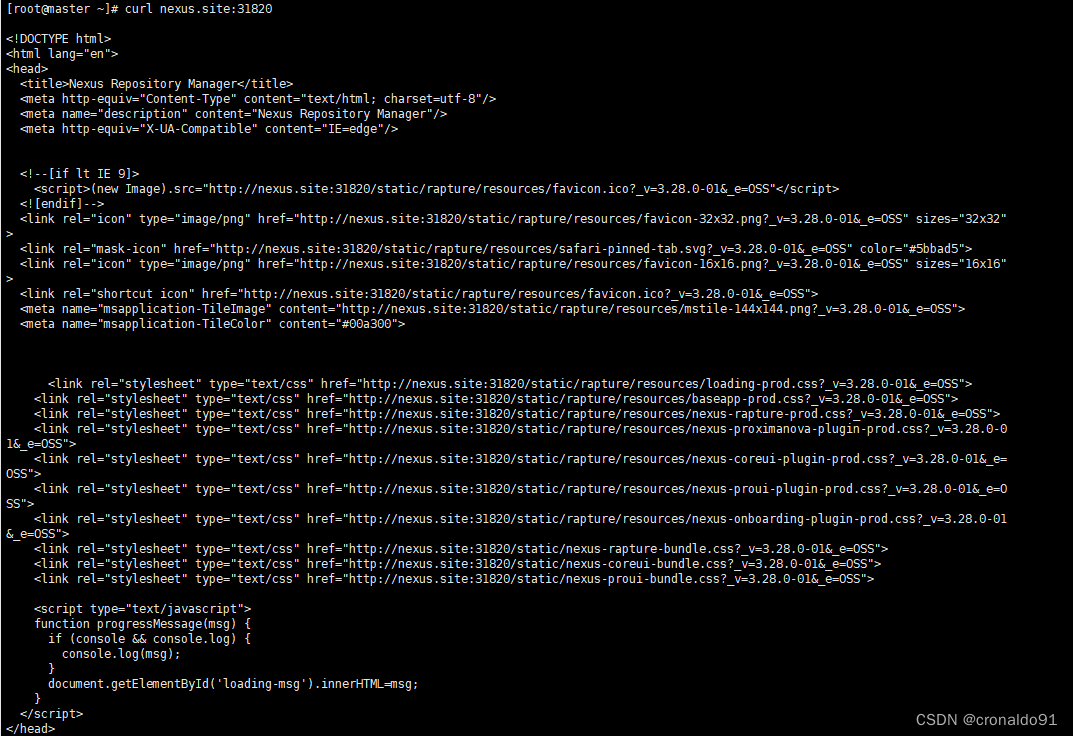
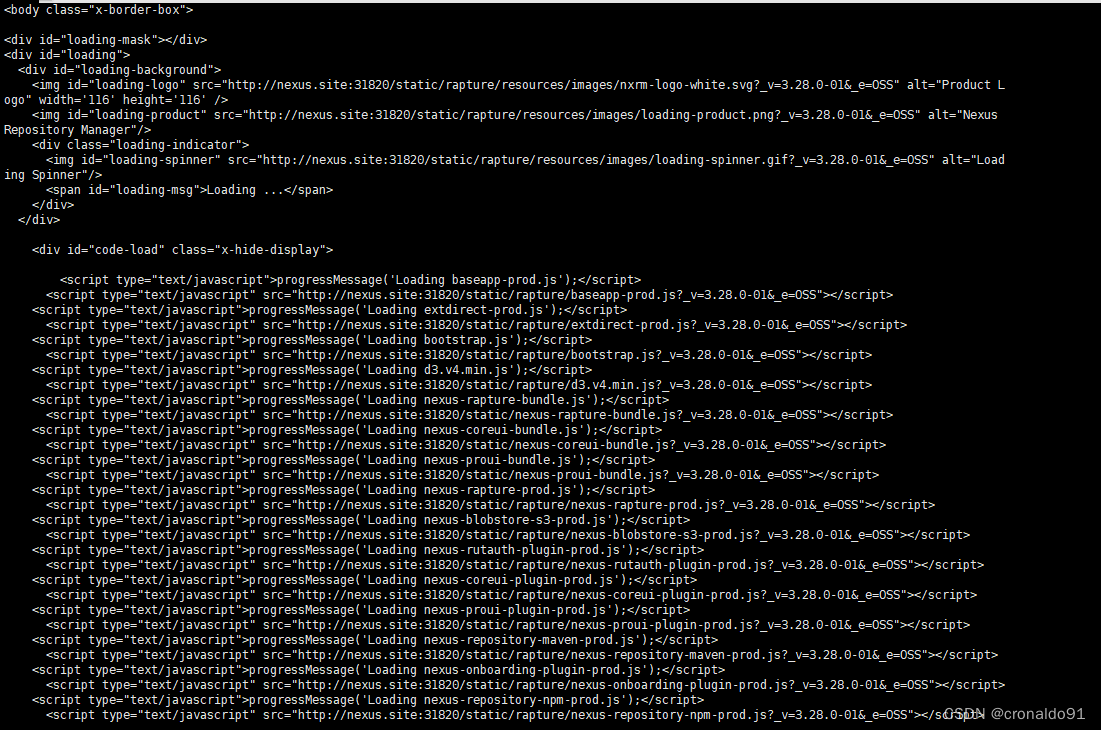
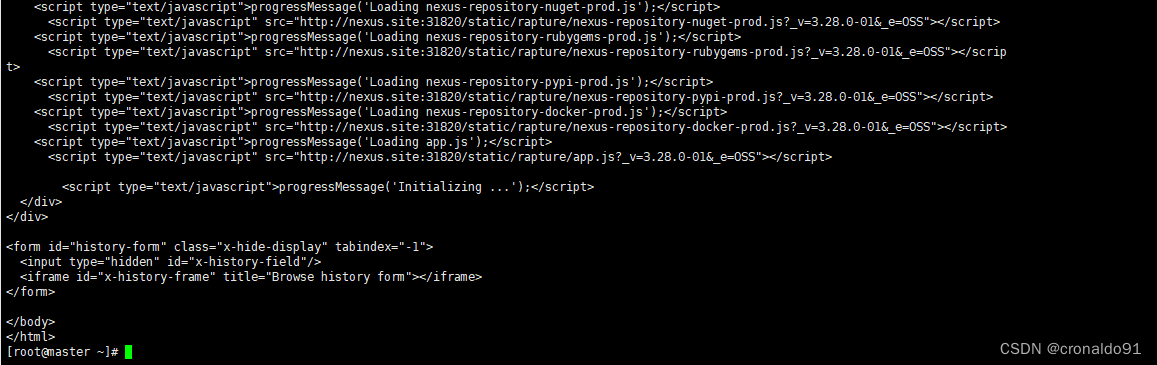
(22)物理机修改hosts

![]()
(23)访问系统
http://nexus.site:31820
(24)K8S进入容器获取nexus初始的登录密码
[root@master ~]# kubectl exec -it nexus-8498fc57cc-c82qr -n nexus /bin/bash
……
cat /nexus-data/admin.password

(25)输入用户名和密码
账号:admin
密码:上面获取的初始密码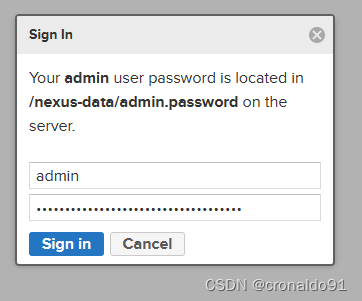
(26)进入系统
初始化操作,下一步

修改密码

先设置允许匿名访问

完成

(26)登录成功

(27)查看挂载情况(内容一致)
NFS
[root@master ~]# cd /opt/nexus/
[root@master nexus]# ls
blobs  db             etc                instances  karaf.pid  lock  nexus.yaml  port                 tmp
cache  elasticsearch  generated-bundles  javaprefs  keystores  log   orient      restore-from-backup

K8S容器
[root@master ~]# kubectl exec -it nexus-8498fc57cc-c82qr -n nexus /bin/bash
kubectl exec [POD] [COMMAND] is DEPRECATED and will be removed in a future version. Use kubectl exec [POD] -- [COMMAND] instead.
bash-4.4$ ls
bin   dev  help.1  lib	  licenses    media  nexus-data  proc  run   srv  tmp		     uid_template.sh  var
boot  etc  home    lib64  lost+found  mnt    opt	 root  sbin  sys  uid_entrypoint.sh  usr
bash-4.4$ cd nexus-data/
bash-4.4$ ls
blobs  db	      etc		 instances  karaf.pid  lock  nexus.yaml  port		      tmp
cache  elasticsearch  generated-bundles  javaprefs  keystores  log   orient	 restore-from-backup
bash-4.4$ exit
exit

(28)其他方式的nexus部署
可以参考本人博客:
持续集成交付CICD:CentOS 7 安装 Nexus 3.63-CSDN博客
二、问题
1.volumeMode有哪几种模式
(1)分类
针对 PV 持久卷,Kubernetes 支持两种卷模式(volumeModes):Filesystem(文件系统) 和 Block(块)。
volumeMode 是一个可选的 API 参数。 如果该参数被省略,默认的卷模式是 Filesystem。
volumeMode 属性设置为 Filesystem 的卷会被 Pod 挂载(Mount) 到某个目录。 如果卷的存储来自某块设备而该设备目前为空,Kuberneretes 会在第一次挂载卷之前 在设备上创建文件系统。
这篇关于云原生Kubernetes: K8S 1.29版本 部署Nexus的文章就介绍到这儿,希望我们推荐的文章对编程师们有所帮助!


