本文主要是介绍Android14 - WindowManagerService之客户端Activity布局,希望对大家解决编程问题提供一定的参考价值,需要的开发者们随着小编来一起学习吧!
Android14 - WindowManagerService之客户端Activity布局
一、主要角色
WMS作为一个服务端,有多种客户端与其交互的场景。我们以常见的Activity为例:

Activity:在ActivityThread构建一个Activity后,会调用其attach方法,在attach中构建了一个PhoneWindow。
PhoneWindow:一个Activity对应一个PhoneWindow。而每个PhoneWindow持有一个WindowManagerImpl对象。
WindowManagerImpl:是服务端WMS在客户端的代理。而WindowManagerImpl中持有WindowManagerGlobal。
WindowManagerGlobal:是进程内的单例。WindowManagerGlobal不仅持有WMS服务端的WindowManagerService、WindowSession的引用,并且集合了所有的ViewRootImpl、DecorView等
ViewRootImpl:每个Activity对应一个ViewRootImp对象。ViewRootImp是作为客户端与WMS的桥梁。从客户端到服务端的角度,ViewRootImp中持有的WindowSession对象是服务端Session的引用,一个Session对应一个window。从服务端到客户端的角度,ViewRootImp中有一个子类W,是binder通信的服务端,W对象的引用被WMS持有,用来服务端向客户端通信。另外,ViewRootImp中持有DecorView对象。从逻辑上,ViewRootImpl是View树的根,但其本身并不是一个View,只是实现了ViewParent接口。DecorView是ViewRootImp的子类(见setView()方法中的view.assignParent(this))
)
DecorView:每个Activity对应一个DecorView。DecorView是真正的顶层View,是最外层的view。其inflate PhoneWidow传过来的layout后,将其addView作为自己的第0个类。DecorView维护了一个窗口的基本结构,包括主内容区域、titlebar区域等。
二、窗口的构建过程
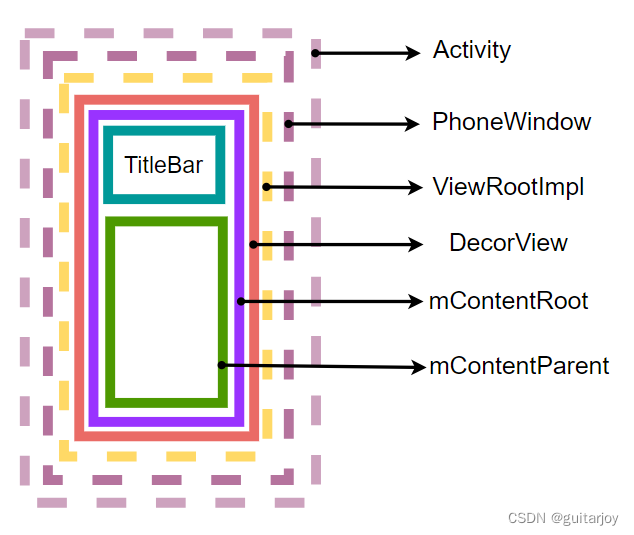
窗口的结构大致如下:
其过程参考上图,在PhoneWindow的初始化过程中,调用了generateLayout(DecorView decor)方法,其中对一个window的整体画面进行了初始化。
protected ViewGroup generateLayout(DecorView decor) {// Apply data from current theme.// Style来自于Theme xml文件TypedArray a = getWindowStyle();	mIsFloating = a.getBoolean(R.styleable.Window_windowIsFloating, false);int flagsToUpdate = (FLAG_LAYOUT_IN_SCREEN|FLAG_LAYOUT_INSET_DECOR)& (~getForcedWindowFlags());if (mIsFloating) {setLayout(WRAP_CONTENT, WRAP_CONTENT);setFlags(0, flagsToUpdate);} else {setFlags(FLAG_LAYOUT_IN_SCREEN|FLAG_LAYOUT_INSET_DECOR, flagsToUpdate);getAttributes().setFitInsetsSides(0);getAttributes().setFitInsetsTypes(0);}if (a.getBoolean(R.styleable.Window_windowNoTitle, false)) {requestFeature(FEATURE_NO_TITLE);} else if (a.getBoolean(R.styleable.Window_windowActionBar, false)) {// Don't allow an action bar if there is no title.requestFeature(FEATURE_ACTION_BAR);}if (a.getBoolean(R.styleable.Window_windowActionBarOverlay, false)) {requestFeature(FEATURE_ACTION_BAR_OVERLAY);}if (a.getBoolean(R.styleable.Window_windowActionModeOverlay, false)) {requestFeature(FEATURE_ACTION_MODE_OVERLAY);}if (a.getBoolean(R.styleable.Window_windowFullscreen, false)) {setFlags(FLAG_FULLSCREEN, FLAG_FULLSCREEN & (~getForcedWindowFlags()));}if (a.getBoolean(R.styleable.Window_windowTranslucentStatus,false)) {setFlags(FLAG_TRANSLUCENT_STATUS, FLAG_TRANSLUCENT_STATUS& (~getForcedWindowFlags()));}if (a.getBoolean(R.styleable.Window_windowTranslucentNavigation,false)) {setFlags(FLAG_TRANSLUCENT_NAVIGATION, FLAG_TRANSLUCENT_NAVIGATION& (~getForcedWindowFlags()));}if (a.getBoolean(R.styleable.Window_windowShowWallpaper, false)) {setFlags(FLAG_SHOW_WALLPAPER, FLAG_SHOW_WALLPAPER&(~getForcedWindowFlags()));}if (a.getBoolean(R.styleable.Window_windowEnableSplitTouch,getContext().getApplicationInfo().targetSdkVersion>= android.os.Build.VERSION_CODES.HONEYCOMB)) {setFlags(FLAG_SPLIT_TOUCH, FLAG_SPLIT_TOUCH&(~getForcedWindowFlags()));}	a.getValue(R.styleable.Window_windowMinWidthMajor, mMinWidthMajor);
	a.getValue(R.styleable.Window_windowMinWidthMinor, mMinWidthMinor);if (DEBUG) Log.d(TAG, "Min width minor: " + mMinWidthMinor.coerceToString()+ ", major: " + mMinWidthMajor.coerceToString());if (a.hasValue(R.styleable.Window_windowFixedWidthMajor)) {if (mFixedWidthMajor == null) mFixedWidthMajor = new TypedValue();
		a.getValue(R.styleable.Window_windowFixedWidthMajor,
				mFixedWidthMajor);}if (a.hasValue(R.styleable.Window_windowFixedWidthMinor)) {if (mFixedWidthMinor == null) mFixedWidthMinor = new TypedValue();
		a.getValue(R.styleable.Window_windowFixedWidthMinor,
				mFixedWidthMinor);}if (a.hasValue(R.styleable.Window_windowFixedHeightMajor)) {if (mFixedHeightMajor == null) mFixedHeightMajor = new TypedValue();
		a.getValue(R.styleable.Window_windowFixedHeightMajor,
				mFixedHeightMajor);}if (a.hasValue(R.styleable.Window_windowFixedHeightMinor)) {if (mFixedHeightMinor == null) mFixedHeightMinor = new TypedValue();
		a.getValue(R.styleable.Window_windowFixedHeightMinor,
				mFixedHeightMinor);}if (a.getBoolean(R.styleable.Window_windowContentTransitions, false)) {requestFeature(FEATURE_CONTENT_TRANSITIONS);}if (a.getBoolean(R.styleable.Window_windowActivityTransitions, false)) {requestFeature(FEATURE_ACTIVITY_TRANSITIONS);}	mIsTranslucent = a.getBoolean(R.styleable.Window_windowIsTranslucent, false);final Context context = getContext();final int targetSdk = context.getApplicationInfo().targetSdkVersion;final boolean targetPreL = targetSdk < android.os.Build.VERSION_CODES.LOLLIPOP;final boolean targetPreQ = targetSdk < Build.VERSION_CODES.Q;if (!mForcedStatusBarColor) {
		mStatusBarColor = a.getColor(R.styleable.Window_statusBarColor, Color.BLACK);}if (!mForcedNavigationBarColor) {final int navBarCompatibleColor = context.getColor(R.color.navigation_bar_compatible);final int navBarDefaultColor = context.getColor(R.color.navigation_bar_default);final int navBarColor = a.getColor(R.styleable.Window_navigationBarColor,
				navBarDefaultColor);		mNavigationBarColor =
				navBarColor == navBarDefaultColor&& !context.getResources().getBoolean(R.bool.config_navBarDefaultTransparent)? navBarCompatibleColor: navBarColor;		mNavigationBarDividerColor = a.getColor(R.styleable.Window_navigationBarDividerColor,Color.TRANSPARENT);}if (!targetPreQ) {
		mEnsureStatusBarContrastWhenTransparent = a.getBoolean(R.styleable.Window_enforceStatusBarContrast, false);
		mEnsureNavigationBarContrastWhenTransparent = a.getBoolean(R.styleable.Window_enforceNavigationBarContrast, true);}WindowManager.LayoutParams params = getAttributes();// Non-floating windows on high end devices must put up decor beneath the system bars and// therefore must know about visibility changes of those.if (!mIsFloating) {if (!targetPreL && a.getBoolean(R.styleable.Window_windowDrawsSystemBarBackgrounds,false)) {setFlags(FLAG_DRAWS_SYSTEM_BAR_BACKGROUNDS,
					FLAG_DRAWS_SYSTEM_BAR_BACKGROUNDS & ~getForcedWindowFlags());}if (mDecor.mForceWindowDrawsBarBackgrounds) {
			params.privateFlags |= PRIVATE_FLAG_FORCE_DRAW_BAR_BACKGROUNDS;}
		params.privateFlags |= PRIVATE_FLAG_NO_MOVE_ANIMATION;}if (a.getBoolean(R.styleable.Window_windowNoMoveAnimation,false)) {
		params.privateFlags |= PRIVATE_FLAG_NO_MOVE_ANIMATION;}final int sysUiVis = decor.getSystemUiVisibility();final int statusLightFlag = View.SYSTEM_UI_FLAG_LIGHT_STATUS_BAR;final int statusFlag = a.getBoolean(R.styleable.Window_windowLightStatusBar, false)? statusLightFlag : 0;final int navLightFlag = View.SYSTEM_UI_FLAG_LIGHT_NAVIGATION_BAR;final int navFlag = a.getBoolean(R.styleable.Window_windowLightNavigationBar, false)? navLightFlag : 0;
	decor.setSystemUiVisibility((sysUiVis & ~(statusLightFlag | navLightFlag)) | (statusFlag | navFlag));if (a.hasValue(R.styleable.Window_windowLayoutInDisplayCutoutMode)) {int mode = a.getInt(R.styleable.Window_windowLayoutInDisplayCutoutMode, -1);if (mode < LAYOUT_IN_DISPLAY_CUTOUT_MODE_DEFAULT|| mode > LAYOUT_IN_DISPLAY_CUTOUT_MODE_ALWAYS) {throw new UnsupportedOperationException("Unknown windowLayoutInDisplayCutoutMode: "+ a.getString(R.styleable.Window_windowLayoutInDisplayCutoutMode));}
		params.layoutInDisplayCutoutMode = mode;}if (mAlwaysReadCloseOnTouchAttr || getContext().getApplicationInfo().targetSdkVersion>= android.os.Build.VERSION_CODES.HONEYCOMB) {if (a.getBoolean(R.styleable.Window_windowCloseOnTouchOutside,false)) {setCloseOnTouchOutsideIfNotSet(true);}}if (!hasSoftInputMode()) {
		params.softInputMode = a.getInt(R.styleable.Window_windowSoftInputMode,
				params.softInputMode);}if (a.getBoolean(R.styleable.Window_backgroundDimEnabled,
			mIsFloating)) {/* All dialogs should have the window dimmed */if ((getForcedWindowFlags()&WindowManager.LayoutParams.FLAG_DIM_BEHIND) == 0) {
			params.flags |= WindowManager.LayoutParams.FLAG_DIM_BEHIND;}if (!haveDimAmount()) {
			params.dimAmount = a.getFloat(android.R.styleable.Window_backgroundDimAmount, 0.5f);}}if (a.getBoolean(R.styleable.Window_windowBlurBehindEnabled, false)) {if ((getForcedWindowFlags() & WindowManager.LayoutParams.FLAG_BLUR_BEHIND) == 0) {
			params.flags |= WindowManager.LayoutParams.FLAG_BLUR_BEHIND;}		params.setBlurBehindRadius(a.getDimensionPixelSize(android.R.styleable.Window_windowBlurBehindRadius, 0));}setBackgroundBlurRadius(a.getDimensionPixelSize(R.styleable.Window_windowBackgroundBlurRadius, 0));if (params.windowAnimations == 0) {
		params.windowAnimations = a.getResourceId(R.styleable.Window_windowAnimationStyle, 0);}// The rest are only done if this window is not embedded; otherwise,// the values are inherited from our container.if (getContainer() == null) {if (mBackgroundDrawable == null) {if (mFrameResource == 0) {
				mFrameResource = a.getResourceId(R.styleable.Window_windowFrame, 0);}if (a.hasValue(R.styleable.Window_windowBackground)) {
				mBackgroundDrawable = a.getDrawable(R.styleable.Window_windowBackground);}}if (a.hasValue(R.styleable.Window_windowBackgroundFallback)) {
			mBackgroundFallbackDrawable =
					a.getDrawable(R.styleable.Window_windowBackgroundFallback);}if (mLoadElevation) {
			mElevation = a.getDimension(R.styleable.Window_windowElevation, 0);}
		mClipToOutline = a.getBoolean(R.styleable.Window_windowClipToOutline, false);
		mTextColor = a.getColor(R.styleable.Window_textColor, Color.TRANSPARENT);}// Inflate the window decor.// 根据Feature的设置,选择不同的layout xml。具体的resource来源于platform/frameworks/base/core/res/res,根据不同平台选择具体的资源文件。// 如果什么都没有设置,最后默认的会选择R.layout.screen_simple;int layoutResource;int features = getLocalFeatures();// System.out.println("Features: 0x" + Integer.toHexString(features));if ((features & ((1 << FEATURE_LEFT_ICON) | (1 << FEATURE_RIGHT_ICON))) != 0) {if (mIsFloating) {TypedValue res = new TypedValue();getContext().getTheme().resolveAttribute(R.attr.dialogTitleIconsDecorLayout, res, true);
			layoutResource = res.resourceId;} else {
			layoutResource = R.layout.screen_title_icons;}// XXX Remove this once action bar supports these features.removeFeature(FEATURE_ACTION_BAR);// System.out.println("Title Icons!");} else if ((features & ((1 << FEATURE_PROGRESS) | (1 << FEATURE_INDETERMINATE_PROGRESS))) != 0&& (features & (1 << FEATURE_ACTION_BAR)) == 0) {// Special case for a window with only a progress bar (and title).// XXX Need to have a no-title version of embedded windows.
		layoutResource = R.layout.screen_progress;// System.out.println("Progress!");} else if ((features & (1 << FEATURE_CUSTOM_TITLE)) != 0) {// Special case for a window with a custom title.// If the window is floating, we need a dialog layoutif (mIsFloating) {TypedValue res = new TypedValue();getContext().getTheme().resolveAttribute(R.attr.dialogCustomTitleDecorLayout, res, true);
			layoutResource = res.resourceId;} else {
			layoutResource = R.layout.screen_custom_title;}// XXX Remove this once action bar supports these features.removeFeature(FEATURE_ACTION_BAR);} else if ((features & (1 << FEATURE_NO_TITLE)) == 0) {// If no other features and not embedded, only need a title.// If the window is floating, we need a dialog layoutif (mIsFloating) {TypedValue res = new TypedValue();getContext().getTheme().resolveAttribute(R.attr.dialogTitleDecorLayout, res, true);
			layoutResource = res.resourceId;} else if ((features & (1 << FEATURE_ACTION_BAR)) != 0) {
			layoutResource = a.getResourceId(R.styleable.Window_windowActionBarFullscreenDecorLayout,R.layout.screen_action_bar);} else {
			layoutResource = R.layout.screen_title;}// System.out.println("Title!");} else if ((features & (1 << FEATURE_ACTION_MODE_OVERLAY)) != 0) {
		layoutResource = R.layout.screen_simple_overlay_action_mode;} else {// Embedded, so no decoration is needed.
		layoutResource = R.layout.screen_simple;// System.out.println("Simple!");}	mDecor.startChanging();// 将最终的layoutResource传给DecorView,在DecorView里面去inflate
	mDecor.onResourcesLoaded(mLayoutInflater, layoutResource);ViewGroup contentParent = (ViewGroup)findViewById(ID_ANDROID_CONTENT);if (contentParent == null) {throw new RuntimeException("Window couldn't find content container view");}if ((features & (1 << FEATURE_INDETERMINATE_PROGRESS)) != 0) {ProgressBar progress = getCircularProgressBar(false);if (progress != null) {
			progress.setIndeterminate(true);}}// Remaining setup -- of background and title -- that only applies// to top-level windows.if (getContainer() == null) {
		mDecor.setWindowBackground(mBackgroundDrawable);final Drawable frame;if (mFrameResource != 0) {
			frame = getContext().getDrawable(mFrameResource);} else {
			frame = null;}
		mDecor.setWindowFrame(frame);		mDecor.setElevation(mElevation);
		mDecor.setClipToOutline(mClipToOutline);if (mTitle != null) {setTitle(mTitle);}if (mTitleColor == 0) {
			mTitleColor = mTextColor;}setTitleColor(mTitleColor);}	mDecor.finishChanging();return contentParent;
}
该方法做了几件事:
1. 获取主题属性。TypedArray a = getWindowStyle();
getWindowStyle最终调用的是
platform/frameworks/base/core/java/android/content/Context.java@NonNull
public final TypedArray obtainStyledAttributes(@NonNull @StyleableRes int[] attrs) {return getTheme().obtainStyledAttributes(attrs);
}Theme获取根据不同平台、版本返回不同的文件:
platform/frameworks/base/core/java/android/content/res/Resources.java@UnsupportedAppUsage
public static int selectDefaultTheme(int curTheme, int targetSdkVersion) {return selectSystemTheme(curTheme, targetSdkVersion,com.android.internal.R.style.Theme,com.android.internal.R.style.Theme_Holo,com.android.internal.R.style.Theme_DeviceDefault,com.android.internal.R.style.Theme_DeviceDefault_Light_DarkActionBar);
}/** @hide */
public static int selectSystemTheme(int curTheme, int targetSdkVersion, int orig, int holo,int dark, int deviceDefault) {if (curTheme != ID_NULL) {return curTheme;}if (targetSdkVersion < Build.VERSION_CODES.HONEYCOMB) {return orig;}if (targetSdkVersion < Build.VERSION_CODES.ICE_CREAM_SANDWICH) {return holo;}if (targetSdkVersion < Build.VERSION_CODES.N) {return dark;}return deviceDefault;
}对应的是platform/frameworks/base/core/res/res/values/themes.xml、platform/frameworks/base/core/res/res/values/themes_holo.xml、platform/frameworks/base/core/res/res/values/themes_device_defaults.xml等等这些主题文件。
2. 根据theme里的配置,设置feature、flags、背景色等。
3. 根据设置后的feature,选择一个layout文件layoutResource。该layoutResource传给DecorView进行窗口View构建。
一般layout都分为上面的titlebar的区域,和下面的content主区域。titlebar部分的区域不是固定的,每个layout可能有不同的布局。content一般是固定的。就是说大部分layout都会有一个id为content的layout。
以默认的platform/frameworks/base/core/res/res/layout/screen_simple.xml文件为例:
<LinearLayout xmlns:android="http://schemas.android.com/apk/res/android"
    android:layout_width="match_parent"
    android:layout_height="match_parent"
    android:fitsSystemWindows="true"
    android:orientation="vertical"><ViewStub android:id="@+id/action_mode_bar_stub"
              android:inflatedId="@+id/action_mode_bar"
              android:layout="@layout/action_mode_bar"
              android:layout_width="match_parent"
              android:layout_height="wrap_content"
              android:theme="?attr/actionBarTheme" /><FrameLayout
         android:id="@android:id/content"
         android:layout_width="match_parent"
         android:layout_height="match_parent"
         android:foregroundInsidePadding="false"
         android:foregroundGravity="fill_horizontal|top"
         android:foreground="?android:attr/windowContentOverlay" />
</LinearLayout>action_mode_bar_stub是title的部分。
@android:id/content是主内容区域。对应的是PhoneWindow的mContentParent成员。
而整个布局对应的是DecorView的mContentRoot成员变量,在mContentRoot构建后,也被add到DecorView的第0个Child。具体
platform/frameworks/base/core/java/com/android/internal/policy/DecorView.javavoid onResourcesLoaded(LayoutInflater inflater, int layoutResource) {if (mBackdropFrameRenderer != null) {loadBackgroundDrawablesIfNeeded();
		mBackdropFrameRenderer.onResourcesLoaded(this, mResizingBackgroundDrawable, mCaptionBackgroundDrawable,
				mUserCaptionBackgroundDrawable, getCurrentColor(mStatusColorViewState),getCurrentColor(mNavigationColorViewState));}	mDecorCaptionView = createDecorCaptionView(inflater);final View root = inflater.inflate(layoutResource, null);if (mDecorCaptionView != null) {if (mDecorCaptionView.getParent() == null) {addView(mDecorCaptionView,new ViewGroup.LayoutParams(MATCH_PARENT, MATCH_PARENT));}
		mDecorCaptionView.addView(root,new ViewGroup.MarginLayoutParams(MATCH_PARENT, MATCH_PARENT));} else {// Put it below the color views.addView(root, 0, new ViewGroup.LayoutParams(MATCH_PARENT, MATCH_PARENT));}
	mContentRoot = (ViewGroup) root;initializeElevation();
}
这篇关于Android14 - WindowManagerService之客户端Activity布局的文章就介绍到这儿,希望我们推荐的文章对编程师们有所帮助!


