本文主要是介绍【Vue】第十七部分 Vuex、多组件共享数据、四个map方法、namespace、Vuex模块化 (重要),希望对大家解决编程问题提供一定的参考价值,需要的开发者们随着小编来一起学习吧!
【Vue】第十七部分 Vuex、多组件共享数据、四个map方法、namespace、Vuex模块化 (重要)
文章目录
- 【Vue】第十七部分 Vuex、多组件共享数据、四个map方法、namespace、Vuex模块化 (重要)
- 17. Vuex
- 17.1 了解Vuex
- 17.1.1 Vuex是什么?
- 17.1.2 多组件共享数据---全局事件总线实现
- 17.1.3 多组件共享数据---Vuex实现
- 17.1.4 多组件共享状态的问题
- 17.2 Vuex的工作原理
- 17.3 Vuex的搭建
- 17.3.1 准备工作
- 17.3.2 搭建环境成功示意图
- 17.4 Vuex案例
- 17.5 getters 配置项
- 17.6 四个map方法的使用
- 17.6.1 mapState方法
- 17.6.2 mapGetters方法
- 17.6.3 mapMutations方法
- 17.6.4 mapActions方法
- 17.7 多组件共享数据案例
- 17.8 Vuex模块化和namespace
- 总结
17. Vuex
17.1 了解Vuex
17.1.1 Vuex是什么?
- github 站点
- 在线文档
- 它是对vue 应用中多个组件的共享状态进行集中式的管理。
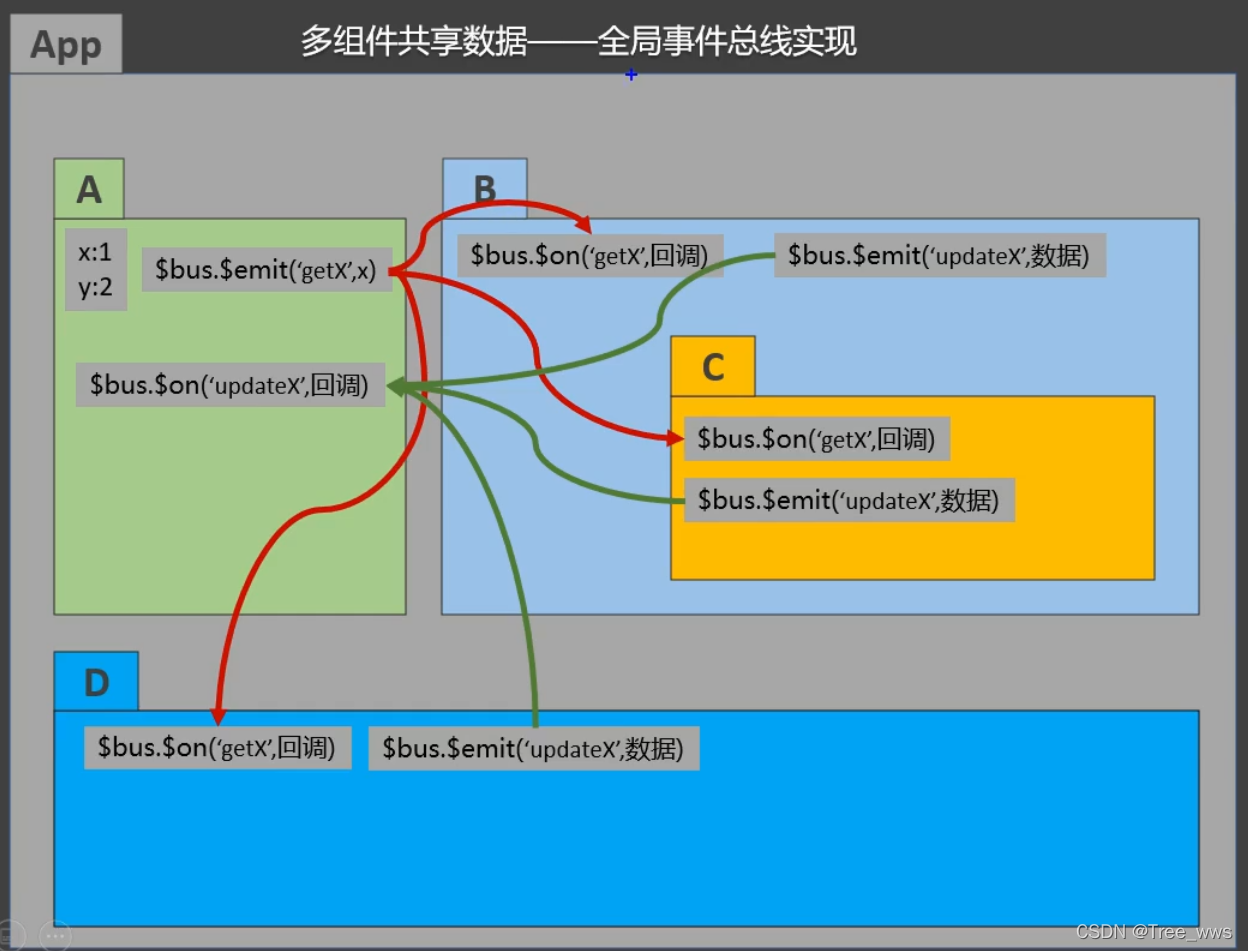
17.1.2 多组件共享数据—全局事件总线实现
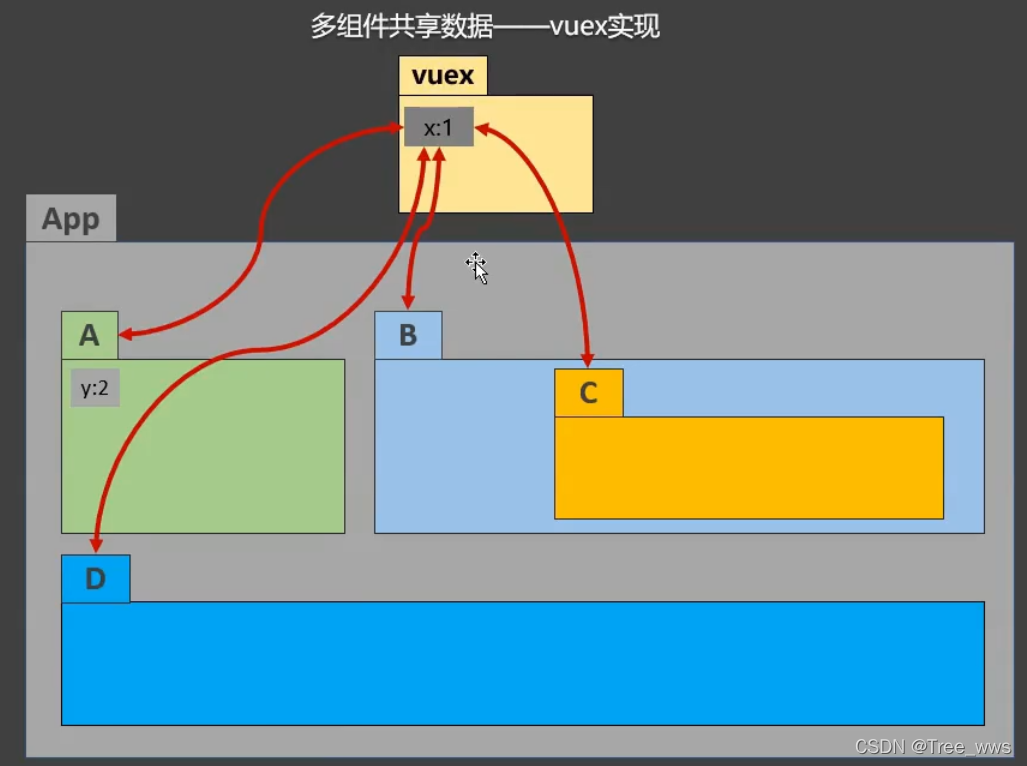
17.1.3 多组件共享数据—Vuex实现
17.1.4 多组件共享状态的问题
由上图可以发现,全局事件总线处理多组件共享状态会很麻烦
问题:
- 多个视图依赖于同一状态
- 来自不同视图的行为需要变更同一状态
所以vuex 就是用来解决上述问题的
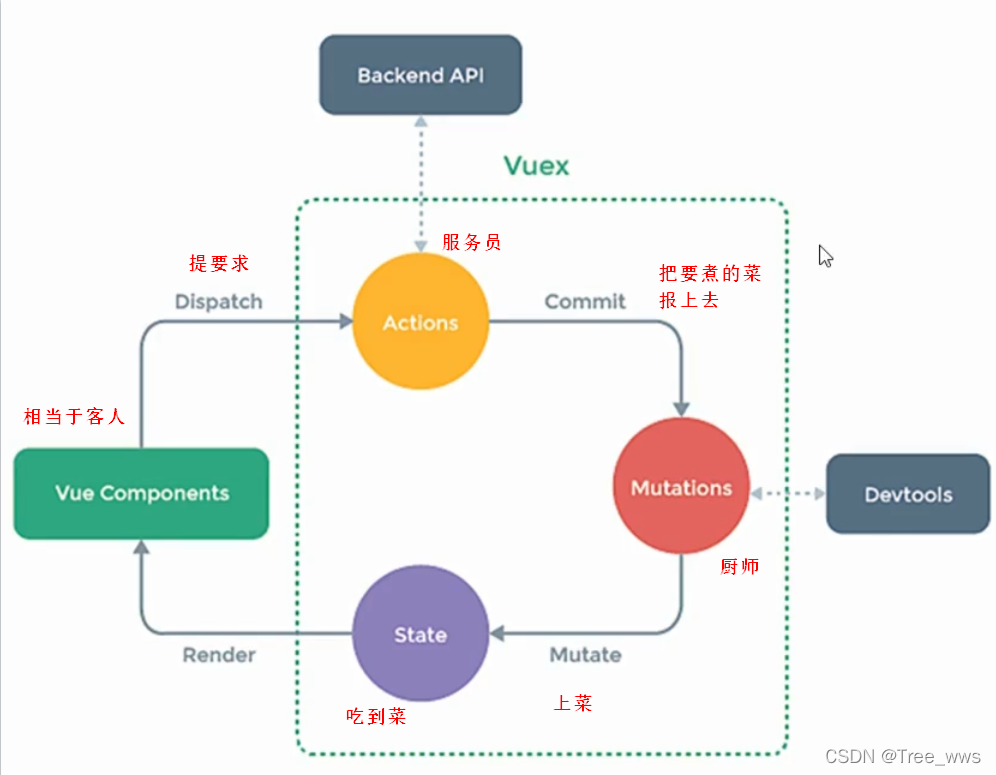
17.2 Vuex的工作原理
原理图(下面注释为比喻)
17.3 Vuex的搭建
17.3.1 准备工作
npm i Vuex@3 案例是使用Vue2所以只能使用Vuex3,到后面使用Vuex3只能使用Vuex4,Vuex比Vue都是高一个版本
src/store/index.js
// 导入Vuex
import Vuex from "vuex"
import Vue from "vue"// 使用插件
Vue.use(Vuex)// 准备一个actions对象 --- 响应组件中用户的动作
const actions = {}// 准备一个mutations对象 --- 用来操作数据(state)
const mutations = {}//准备一个state对象 --- 用来保存数据
const state = {}//创建并且暴露 Store
export default new Vuex.Store({actions,mutations,state
})
main.js
import Vue from "vue"
import store from "./store/index"Vue.config.productionTip = false   //阻止vue在生成时自动产生提示
new Vue({el: '#app',data: {},//配置Storestore,render: h => h(App),beforeCreate(){Vue.prototype.$bus = this  //绑定事件总线}
})
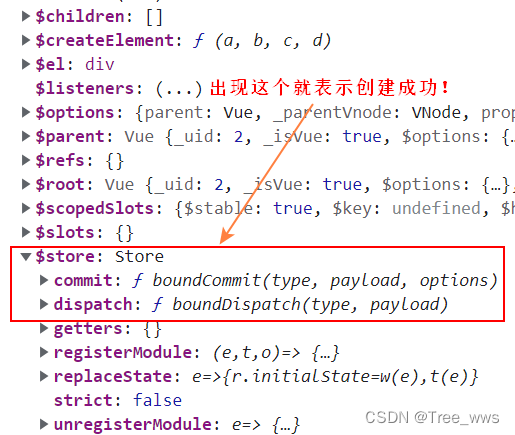
17.3.2 搭建环境成功示意图
17.4 Vuex案例
案例示图

main.js
import Vue from "vue"
import App from "./App.vue"
import store from "./store/index"Vue.config.productionTip = false   //阻止vue在生成时自动产生提示\
new Vue({el: '#app',data: {},//配置storestore,render: h => h(App),beforeCreate(){Vue.prototype.$bus = this  //绑定事件总线}
})
src/store/index.js
// 导入Vuex
import Vuex from "vuex"
import Vue from "vue"// 使用插件
Vue.use(Vuex)// 准备一个actions对象 --- 响应组件中用户的动作
const actions = {// plus:function(context,value){}/*第一个参数context:相当于ministore第二个参数value:就是传进来的this.val*/plus(context,value){//console.log(context,value);//console.log("actions");//调用commit去连接mutations //有个小技巧就是写mutation传大写形式,好区分context.commit("PLUS",value)},subtract(context,value){context.commit("SUBTRACT",value)},odd(context,value){if(context.state.sum % 2 != 0)context.commit("PLUS",value)},delay(context,value){setTimeout(()=>{context.commit("PLUS",value)},500)},
}// 准备一个mutations对象 --- 用来操作数据(state)
const mutations = {// plus:function(){}/*第一个参数:代理后的state(是一个对象)第二个参数:就是传进来的this.val*/PLUS(state,value){// console.log(state,value);//console.log("mutations");state.sum += value},SUBTRACT(state,value){state.sum -= value}
}//准备一个state对象 --- 用来保存数据
//有点像data
const state = {sum : 0
}//创建并且暴露 Store
export default new Vuex.Store({actions,mutations,state
})
count组件
<template><div><h1>当前的值为: {{$store.state.sum}}</h1><select v-model.number="val"><option value="1">1</option><option value="2">2</option><option value="3">3</option></select><button @click="add"> + </button><button @click="reduce"> - </button><button @click="oddAdd"> 奇数加一 </button><button @click="delayAdd"> 延迟加一 </button></div>
</template><script>
export default {data(){return{val: 1}},methods:{add(){/*调用dispatch,通过dispatch去连接actions*/this.$store.dispatch("plus",this.val)},reduce(){this.$store.dispatch("subtract",this.val)},oddAdd(){this.$store.dispatch("odd",this.val)},delayAdd(){this.$store.dispatch("delay",this.val)},}
}
</script><style>button{margin: 0 8px 0 8px;}
</style>
17.5 getters 配置项
作用:对state中的数据进行加工处理(二次处理数据)
// 准备一个getters配置对象 --- 用于对state中的数据进行加工
// 有点像computed,它也是依靠return进行返回
const getters = {totle(state){return state.sum*10}
}//配置并且暴露
export default new Vuex({...getters
})
17.6 四个map方法的使用
17.6.1 mapState方法
作用:用于帮助我们去映射state中的数据为计算属性
src/store/index.js
...
...
const state = {name:'Tree',gender:'male'age:"18"
}
count组件
当想要调用state中的数据时,需要写一大串的this.$store.state.xxx
例如:自己写的话重复写了很多this.$store.state//computed:{//       name(){//           return this.$store.state.name//      },//       gender(){return this.$store.state.gender//       },//      age(){return this.$store.state.age
//        }
//    }所以这时候就可以使用mapState方法帮我们去映射state中的数据准备工作:需要先导入
import {mapState} from "vuex"
...
<script>export default{// 在computed中使用computed:{//使用ES6扩展运算符将对象拆解成一对对键值(对象写法)// 计算属性名:state中的数据名...mapState({name:"name",gender:"gender",age:"age"}) //(数组写法)需要注意使用数组写法例如:name表示2种意思 计算属性名 和 state中数据的名字要一致...mapState(['name','gender','age'])}}
</script>要使用数组写法必须满足这样的条件计算属性名 和 state中数据的名字要一致

17.6.2 mapGetters方法
作用:用于帮助我们去映射getters中的数据为计算属性
准备工作:需要先导入
import {mapGetters} from "vuex"	export default{			   computed: {//借助mapGetters生成计算属性:totoal(对象写法)...mapGetters({totoal:'totoal'}),//借助mapGetters生成计算属性:totoal(数组写法)...mapGetters(['totoal'])}}
17.6.3 mapMutations方法
作用:借助mapMutations帮我们去生成mutations中对应的方法,在该方法中调用commit去联系mutations
import {mapMutations} from "vuex"
export default{
methods:{//手动写// add(){// /*//     调用dispatch,通过dispatch去连接actions// *///     this.$store.commit("PLUS",this.val)// },// reduce(){//     this.$store.commit("SUBTRACT",this.val)// },/* 借助mapMutations帮我们去生成对应的方法(对象写法)在该方法中调用commit去联系mutations方法名:mutations中的方法名需要注意:如果我们有使用参数要记得传参数,不然mutations并不知道因为我们只写了方法名和actions中的方法名*/...mapMutations({add:'PLUS',reduce:'SUBTRACT'}),// 借助mapMutations帮我们去生成对应的方法(数组写法)// 方法名和actions中的方法名一致//...mapMutations("add","reduce")}
}
17.6.4 mapActions方法
作用:借助mapMutations帮我们去生成actions中对应的方法,在该方法中调用dispatch去联系actions
import {mapMutations} from "vuex"
export default{
methods:{//手动写// oddAdd(){//     this.$store.dispatch("odd",this.val)// },// delayAdd(){//     this.$store.dispatch("delay",this.val)// }/* 借助mapActions帮我们去生成对应的方法(对象写法)在该方法中调用dispatch去联系actions方法名:actions中的方法名需要注意:如果我们有使用参数要记得传参数,不然mapActions并不知道因为我们只写了方法名和actions中的方法名*/...mapActions({oddAdd:'odd',delayAdd:'delay'})// 借助mapAction帮我们去生成对应的方法(数组写法)// 方法名和actions中的方法名一致// ...mapActions(['odd','delay'])   }
}
17.7 多组件共享数据案例
案例示图

App组件
<template><div><count/><hr><person/></div>
</template><script>
import count from "./components/count.vue"
import person from './components/person.vue'
export default {name:"App",components:{count, person}
}
</script><style>button{margin: 0 6px}
</style>
person组件
<template><div><h1>人员信息</h1><input type="text" placeholder="请输入你想添加的人员信息" v-model="val"@keyup.enter = "addPerson"><ul><li v-for="p in personList" :key="p.id">{{p.name}}</li></ul><h3 style="color:red">count组件计算总和为: {{sum}}</h3></div>
</template><script>
import { mapState } from 'vuex'
import {nanoid} from 'nanoid'
export default {name:"person",data(){return{val:''}},methods:{addPerson(){if(this.val.trim()){const people = {id:nanoid(),name:this.val}this.$store.commit("ADDPERSON",people)this.val = "" }}},computed:{...mapState(['personList',"sum"])}
}
</script><style></style>
count组件
<template><div><h1>统计信息</h1><h2>当前的值为: {{sum}}</h2><select v-model.number="val"><option value="1">1</option><option value="2">2</option><option value="3">3</option></select><button @click="add(val)"> + </button><button @click="reduce(val)"> - </button><button @click="oddAdd(val)"> 奇数+ </button><button @click="delayAdd(val)"> 延迟+ </button><h3 style="color:red">Person组件总人数为: {{personList.length}}</h3></div>
</template><script>
import { mapActions, mapMutations, mapState } from 'vuex'
export default {name:"count",data(){return{val: 1}},methods:{// 使用mapMutations生成对应的方法...mapMutations({add:"ADD"}),...mapMutations({reduce:"STBTRACT"}),//使用mapActions生成对应的方法...mapActions(["oddAdd","delayAdd"])},computed:{// 使用mapState生成对应的方法...mapState(['sum','personList'])}
}
</script><style ></style>
src/store/index.js
import Vuex from "vuex"
import Vue from "vue"//使用vuex插件
Vue.use(Vuex)// 准备一个actions对象 --- 响应组件中用户的动作
const actions = {oddAdd(ministore,val){if(ministore.state.sum % 2 != 0){ministore.commit("ADD",val)}},delayAdd(ministore,val){setTimeout(()=>{ministore.commit("ADD",val)},500)}
}// 准备一个mutations对象 --- 用来操作数据(state)
const mutations = {ADD(state,val){state.sum += val},STBTRACT(state,val){state.sum -= val},ADDPERSON(state,val){state.personList.push(val)}
}//准备一个state对象 --- 用来保存数据
const state = {sum:0,personList:[{id:"001",name:"张三"}]
}export default new Vuex.Store({actions: actions,mutations: mutations,state: state
})
17.8 Vuex模块化和namespace
对上述的案例进行模块化
作用:便于对代码的更新,有效的进行分类
src/store/index.js
import Vuex from "vuex"
import Vue from "vue"//使用vuex插件
Vue.use(Vuex)//模块化Vuex//求和相关的配置
const countAbout = {//命名空间配置namespaced: true,actions:{oddAdd(ministore,val){if(ministore.state.sum % 2 != 0){ministore.commit("ADD",val)}},delayAdd(ministore,val){setTimeout(()=>{ministore.commit("ADD",val)},500)}},mutations:{ADD(state,val){state.sum += val},STBTRACT(state,val){state.sum -= val}},state:{sum:0},getters:{bigsum(state){return state.sum*10}}
}//人员相关信息的配置
const personAbout = {//命名空间配置namespaced: true,actions:{},mutations:{ADDPERSON(state,val){state.personList.push(val)}},state:{personList:[]},getters:{}
}export default new Vuex.Store({//模块化配置modules:{countAbout,personAbout}
})
person组件
<template><div><h1>人员信息</h1><input type="text" placeholder="请输入你想添加的人员信息" v-model="val"@keyup.enter = "addPerson"><ul><li v-for="p in personList" :key="p.id">{{p.name}}</li></ul><h3 style="color:red">count组件计算总和为: {{sum}}</h3></div>
</template><script>
import { mapState } from 'vuex'
import {nanoid} from 'nanoid'
export default {name:"person",data(){return{val:'',}},methods:{addPerson(){if(this.val.trim()){const people = {id:nanoid(),name:this.val}this.$store.commit("personAbout/ADDPERSON",people)this.val = ""}}},computed:{...mapState('personAbout',['personList']),...mapState('countAbout',['sum'])}
}
</script><style></style>
count组件
<template><div><h1>统计信息</h1><h2>当前的值为: {{sum}}</h2><h2>放大10倍的值: {{bigsum}}</h2><select v-model.number="val"><option value="1">1</option><option value="2">2</option><option value="3">3</option></select><button @click="add(val)"> + </button><button @click="reduce(val)"> - </button><button @click="oddAdd(val)"> 奇数+ </button><button @click="delayAdd(val)"> 延迟+ </button><h3 style="color:red">Person组件总人数为: {{personList.length}}</h3></div>
</template><script>
import { mapActions, mapGetters, mapMutations, mapState } from 'vuex'
export default {name:"count",data(){return{val: 1}},methods:{// 使用mapMutations生成对应的方法...mapMutations('countAbout',{add:"ADD"}),...mapMutations('countAbout',{reduce:"STBTRACT"}),//使用mapActions生成对应的方法...mapActions('countAbout',["oddAdd","delayAdd"])},computed:{// 使用mapState生成对应的方法...mapState('countAbout',['sum','personList']),// 使用mapGetters生成对应的方法 ...mapGetters('countAbout',['bigsum']) ,     ...mapState('personAbout',['personList'])       }
}
</script><style ></style>
总结
以上就是今天要讲的内容,本文介绍了Vuex的工作原理、Vuex的搭建、四个map方法的使用、namespace 、Vuex模块化 等等希望对大家有所帮助!!!
这篇关于【Vue】第十七部分 Vuex、多组件共享数据、四个map方法、namespace、Vuex模块化 (重要)的文章就介绍到这儿,希望我们推荐的文章对编程师们有所帮助!


