本文主要是介绍Spring AI,调用OpenAI大模型接口,让ChatGPT给你讲笑话,希望对大家解决编程问题提供一定的参考价值,需要的开发者们随着小编来一起学习吧!
前言
Spring最近刚刚推出了SpringAI,封装了AI大模型接口的使用。本文将参考Spring官网案例,一步步教你如何调用OpenAI的接口,让ChatGPT接口返回一个笑话。
前提条件
- 请下载并安装好JDK17或更新的版本,本文使用的是JDK21。JDK下载地址。
- 准备好梯子。没有梯子,调用OpenAI接口会报500错误。(也别问我梯子是啥,懂得都懂🤫)。
- 准备好OpenAI接口的API Key,淘宝上有卖的(应该不差过10元)。
- 如果你的Maven用的是阿里云仓库,建议先注释掉。AI依赖包太新了,目前阿里云还没有。
创建项目
-
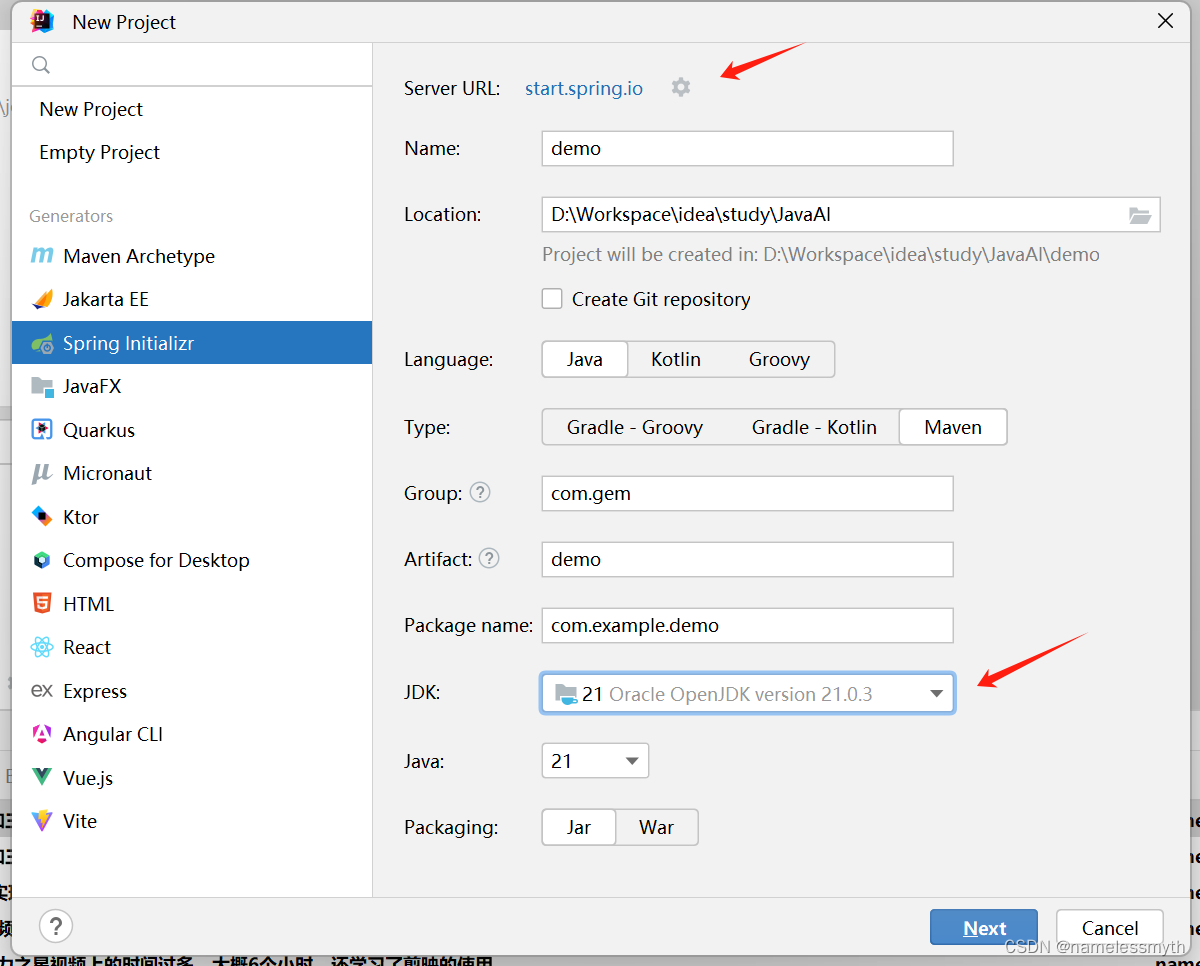
使用idea创建一个新的Spring项目。File > New > Project > Spring Initializer
-
Server URL一定要用Spring的:https://start.spring.io,其他的地址目前还没更新。
-
JDK版本一定要大于等于17,低版本不支持Springboot3
-
-
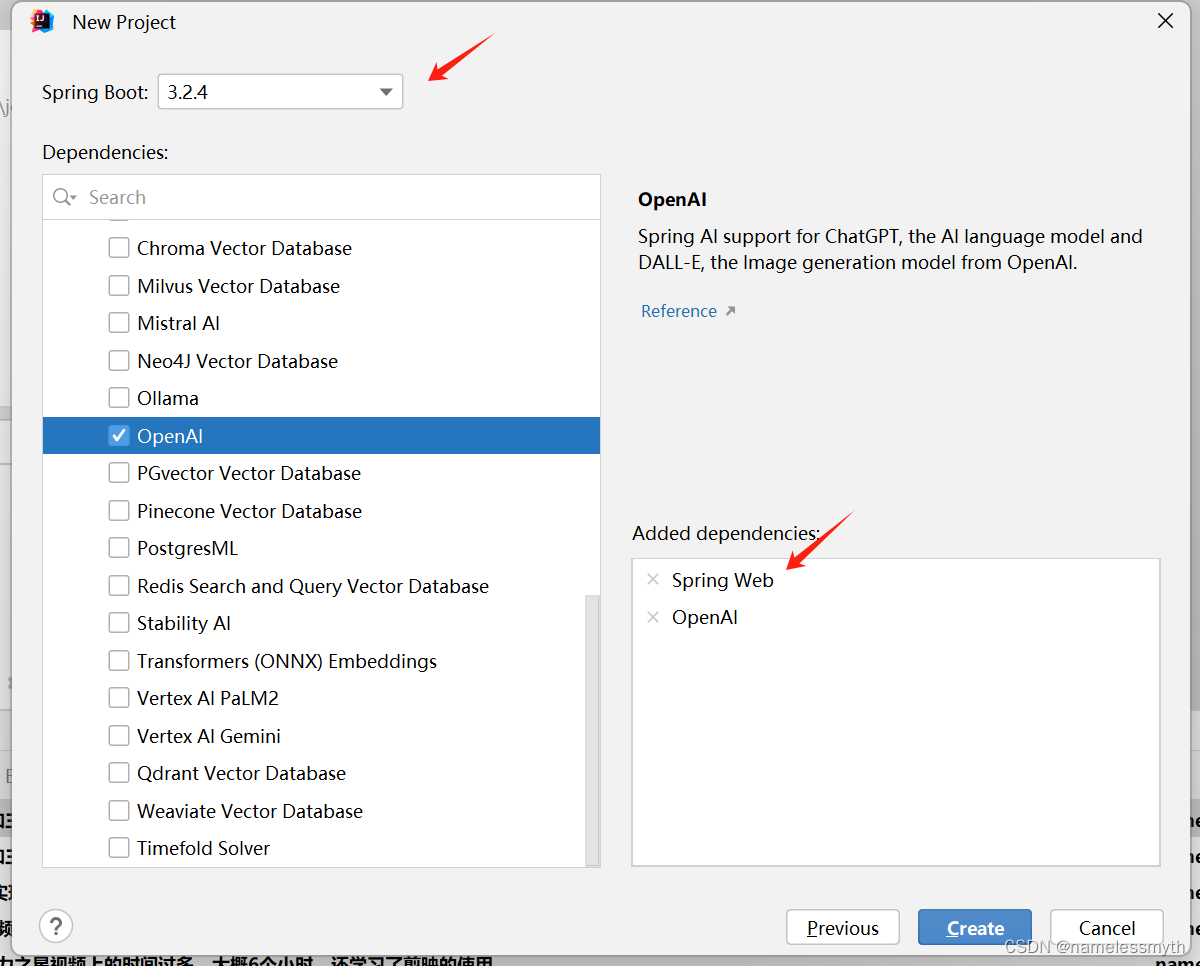
依赖包选择Spring Web和OpenAI(在最下方),如下图
-
-
创建成功之后,等待项目自动下载依赖包。这里就看大家网速了。
配置开发
-
项目创建好之后,加入OpenAI接口配置。
-
application.properties
-
spring.application.name=JavaAI # openai api-key 没有的建议自己去买一个,我这个应该很快就会失效 spring.ai.openai.api-key=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 # ChatGPT模型版本 spring.ai.openai.chat.options.model=gpt-3.5-turbo spring.ai.openai.chat.options.temperature=0.7 -
pom.xml,这里面的内容是自动生成的,一般不用改。
-
<?xml version="1.0" encoding="UTF-8"?>
<project xmlns="http://maven.apache.org/POM/4.0.0" xmlns:xsi="http://www.w3.org/2001/XMLSchema-instance"xsi:schemaLocation="http://maven.apache.org/POM/4.0.0 https://maven.apache.org/xsd/maven-4.0.0.xsd"><modelVersion>4.0.0</modelVersion><parent><groupId>org.springframework.boot</groupId><artifactId>spring-boot-starter-parent</artifactId><version>3.2.4</version><relativePath/> <!-- lookup parent from repository --></parent><groupId>com.gem</groupId><artifactId>JavaAI</artifactId><version>0.0.1-SNAPSHOT</version><name>JavaAI</name><description>JavaAI</description><properties><java.version>21</java.version><spring-ai.version>0.8.1</spring-ai.version></properties><dependencies><dependency><groupId>org.springframework.boot</groupId><artifactId>spring-boot-starter-web</artifactId></dependency><dependency><groupId>org.springframework.ai</groupId><artifactId>spring-ai-openai-spring-boot-starter</artifactId></dependency><dependency><groupId>org.projectlombok</groupId><artifactId>lombok</artifactId><optional>true</optional></dependency><dependency><groupId>org.springframework.boot</groupId><artifactId>spring-boot-starter-test</artifactId><scope>test</scope></dependency></dependencies><dependencyManagement><dependencies><dependency><groupId>org.springframework.ai</groupId><artifactId>spring-ai-bom</artifactId><version>${spring-ai.version}</version><type>pom</type><scope>import</scope></dependency></dependencies></dependencyManagement><build><plugins><plugin><groupId>org.springframework.boot</groupId><artifactId>spring-boot-maven-plugin</artifactId><configuration><excludes><exclude><groupId>org.projectlombok</groupId><artifactId>lombok</artifactId></exclude></excludes></configuration></plugin></plugins></build><repositories><repository><id>spring-milestones</id><name>Spring Milestones</name><url>https://repo.spring.io/milestone</url><snapshots><enabled>false</enabled></snapshots></repository></repositories>
</project>
-
-
在你的启动类中加入代理设置,不然掉接口会报500。
-
JavaAiApplication.java
-
import org.springframework.boot.SpringApplication;
import org.springframework.boot.autoconfigure.SpringBootApplication;@SpringBootApplication
public class JavaAiApplication {public static void main(String[] args) {// 设置代理,这里需要根据自己找的代理软件来调整配置System.setProperty("proxySet","true");System.setProperty("proxyType","4");// 代理地址,根据代理软件System.setProperty("proxyHost", "127.0.0.1");// 代理端口(Http)System.setProperty("proxyPort","21882");SpringApplication.run(JavaAiApplication.class, args);}
}
-
-
创建controller,使用调用OpenAI的接口。
-
ChatController
-
import org.springframework.ai.chat.ChatResponse; import org.springframework.ai.chat.messages.UserMessage; import org.springframework.ai.chat.prompt.Prompt; import org.springframework.ai.openai.OpenAiChatClient; import org.springframework.beans.factory.annotation.Autowired; import org.springframework.web.bind.annotation.GetMapping; import org.springframework.web.bind.annotation.RequestParam; import org.springframework.web.bind.annotation.RestController; import reactor.core.publisher.Flux;import java.util.Map;/*** ChatGPT接口调用<br>** @author Gem* @version 1.0* @date 2024/4/18*/ @RestController public class ChatController {private final OpenAiChatClient chatClient;@Autowiredpublic ChatController(OpenAiChatClient chatClient) {this.chatClient = chatClient;}@GetMapping("/ai/generate")public Map generate(@RequestParam(value = "message", defaultValue = "Tell me a joke") String message) {return Map.of("generation", chatClient.call(message));}@GetMapping("/ai/generateStream")public Flux<ChatResponse> generateStream(@RequestParam(value = "message", defaultValue = "Tell me a joke") String message) {Prompt prompt = new Prompt(new UserMessage(message));return chatClient.stream(prompt);} } -
到此,开发配置结束。
-
启动调试
-
启动项目,启动前请先开启梯子,默认端口号:8080。
-
启动成功日志
-
Connected to the target VM, address: '127.0.0.1:55997', transport: 'socket'.   ____          _            __ _ _/\\ / ___'_ __ _ _(_)_ __  __ _ \ \ \ \
( ( )\___ | '_ | '_| | '_ \/ _` | \ \ \ \\\/  ___)| |_)| | | | | || (_| |  ) ) ) )'  |____| .__|_| |_|_| |_\__, | / / / /=========|_|==============|___/=/_/_/_/:: Spring Boot ::                (v3.2.4)2024-04-18T17:42:27.495+08:00  INFO 22192 --- [JavaAI] [           main] com.gem.javaai.JavaAiApplication         : Starting JavaAiApplication using Java 21.0.3 with PID 22192 (D:\Workspace\idea\study\JavaAI\JavaAI\target\classes started by Administrator in D:\Workspace\idea\study\JavaAI\JavaAI)
2024-04-18T17:42:27.497+08:00  INFO 22192 --- [JavaAI] [           main] com.gem.javaai.JavaAiApplication         : No active profile set, falling back to 1 default profile: "default"
2024-04-18T17:42:28.371+08:00  INFO 22192 --- [JavaAI] [           main] o.s.b.w.embedded.tomcat.TomcatWebServer  : Tomcat initialized with port 8080 (http)
2024-04-18T17:42:28.380+08:00  INFO 22192 --- [JavaAI] [           main] o.apache.catalina.core.StandardService   : Starting service [Tomcat]
2024-04-18T17:42:28.380+08:00  INFO 22192 --- [JavaAI] [           main] o.apache.catalina.core.StandardEngine    : Starting Servlet engine: [Apache Tomcat/10.1.19]
2024-04-18T17:42:28.423+08:00  INFO 22192 --- [JavaAI] [           main] o.a.c.c.C.[Tomcat].[localhost].[/]       : Initializing Spring embedded WebApplicationContext
2024-04-18T17:42:28.423+08:00  INFO 22192 --- [JavaAI] [           main] w.s.c.ServletWebServerApplicationContext : Root WebApplicationContext: initialization completed in 744 ms
2024-04-18T17:42:29.100+08:00  INFO 22192 --- [JavaAI] [           main] o.s.b.w.embedded.tomcat.TomcatWebServer  : Tomcat started on port 8080 (http) with context path ''
2024-04-18T17:42:29.106+08:00  INFO 22192 --- [JavaAI] [           main] com.gem.javaai.JavaAiApplication         : Started JavaAiApplication in 1.95 seconds (process running for 2.765)
-
-
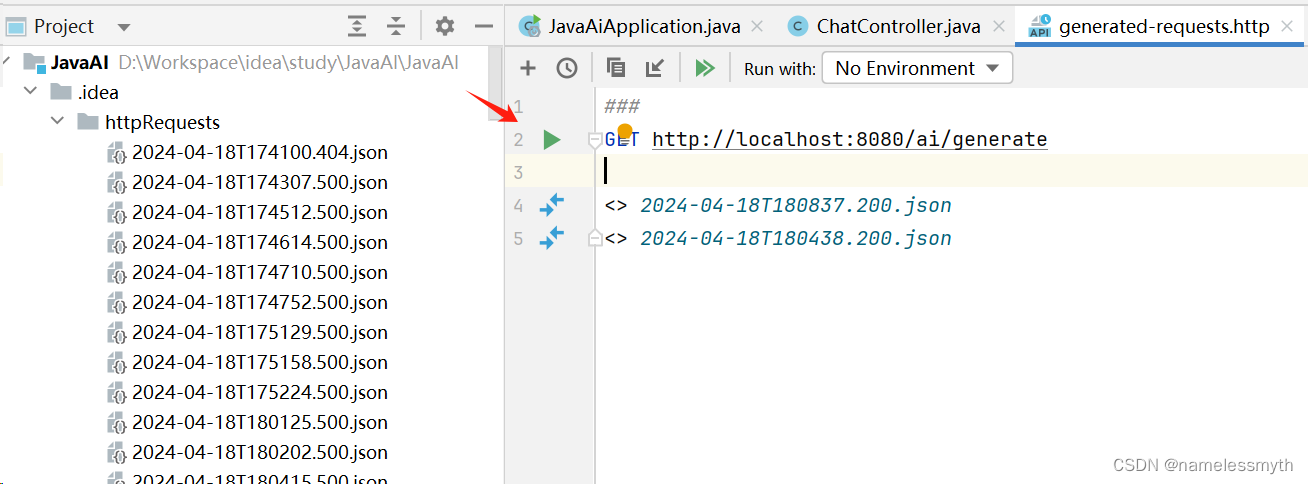
启动成功后,我们可以使用IDEA自带的Http Client工具进行测试。点击方法左侧的绿色豆子即可。
-
使用这个工具的好处是他会记录每次的返回结果且不用额外安装。当然你也可以使用其他测试工具。
-
点绿色的箭头,调用成功后,会在返回结果中看到ChatGPT讲的笑话。
-
GET http://localhost:8080/ai/generateHTTP/1.1 200
Content-Type: application/json
Transfer-Encoding: chunked
Date: Thu, 18 Apr 2024 10:08:37 GMT
Keep-Alive: timeout=60
Connection: keep-alive{"generation": "Why did the scarecrow win an award? Because he was outstanding in his field!"
}Response file saved.
> 2024-04-18T180837.200.jsonResponse code: 200; Time: 1602ms (1 s 602 ms); Content length: 94 bytes (94 B)
-
-
程序内部调用的是这个接口地址,可以先用浏览器访问下是否能正常返回
-
本文到此结束,大家学会了么?😁

参考教程
https://www.bilibili.com/video/BV1HJ4m1L7qw/?spm_id_from=333.337.search-card.all.click&vd_source=cbae38ae3b5a4c826df018bbf1c10a9d
这篇关于Spring AI,调用OpenAI大模型接口,让ChatGPT给你讲笑话的文章就介绍到这儿,希望我们推荐的文章对编程师们有所帮助!


