本文主要是介绍书生·浦语2.0(InternLM2)大模型实战--Day04 XTuner微调 | 1.8B 多模态Agent(Part 2: 多模态部分),希望对大家解决编程问题提供一定的参考价值,需要的开发者们随着小编来一起学习吧!

- 视频地址: https://b23.tv/QUhT6ni
- 课程文档:https://github.com/InternLM/Tutorial/blob/camp2/xtuner/readme.md
- 作业文档:https://github.com/InternLM/Tutorial/blob/camp2/xtuner/homework.md
1. XTuner多模态训练与测试
在本节课中,我们将学习使用XTuner微调多模态LLM的内容,本部分需要的GPU资源为24GB 30% 的 A100。
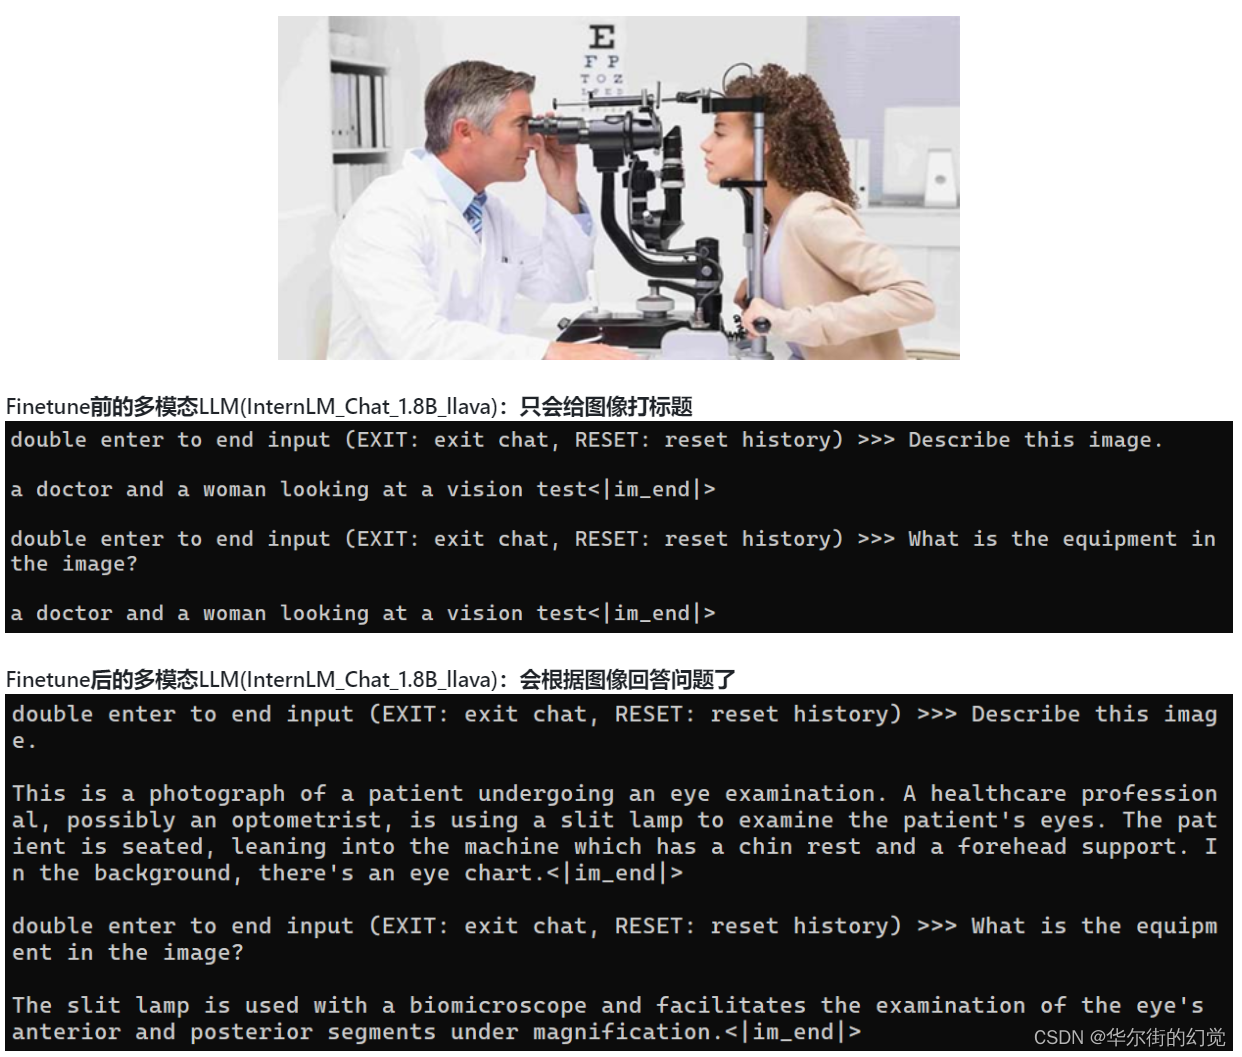
这是学完本节内容后的多模态LLM性能效果展示:
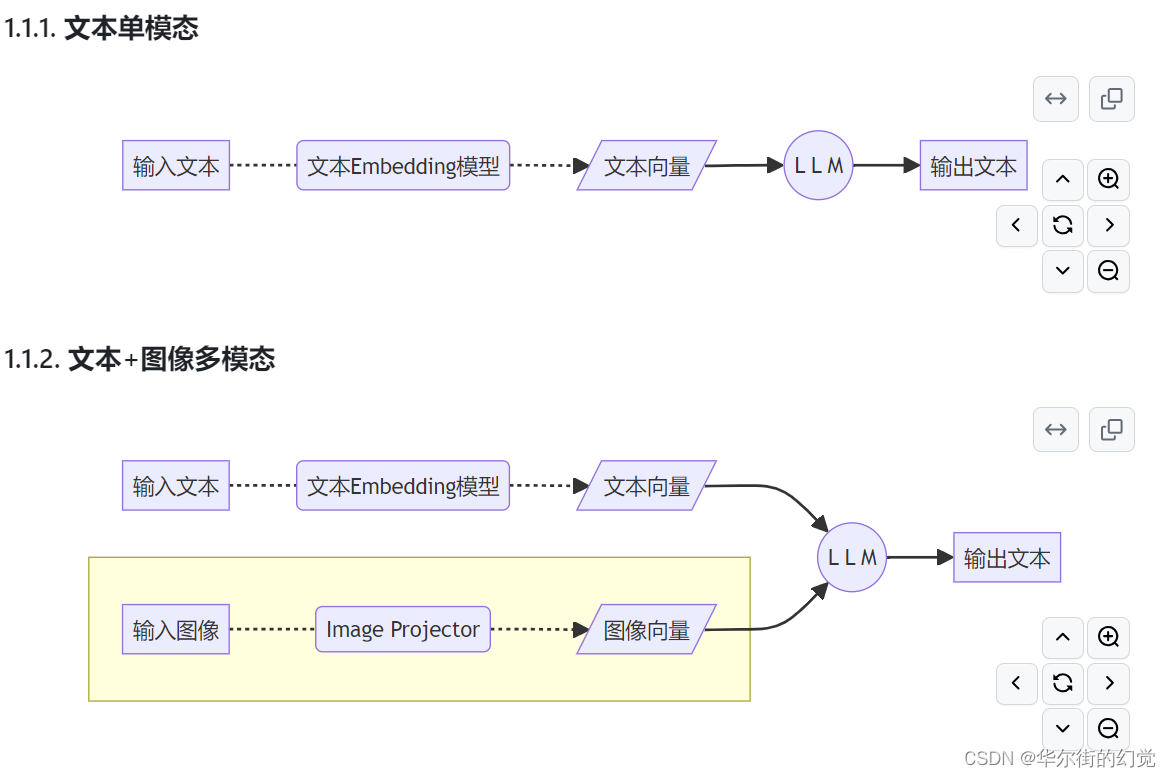
1.1. 给LLM装上电子眼:多模态LLM原理简介
1.2. 什么型号的电子眼:LLaVA方案简介
使用GPT-4V对图像数据生成描述,以此构建出大量<question text><image> – <answer text>的数据对。利用这些数据对,配合文本单模态LLM,训练出一个Image Projector。
所使用的文本单模型LLM和训练出来的Image Projector,统称为LLaVA模型。
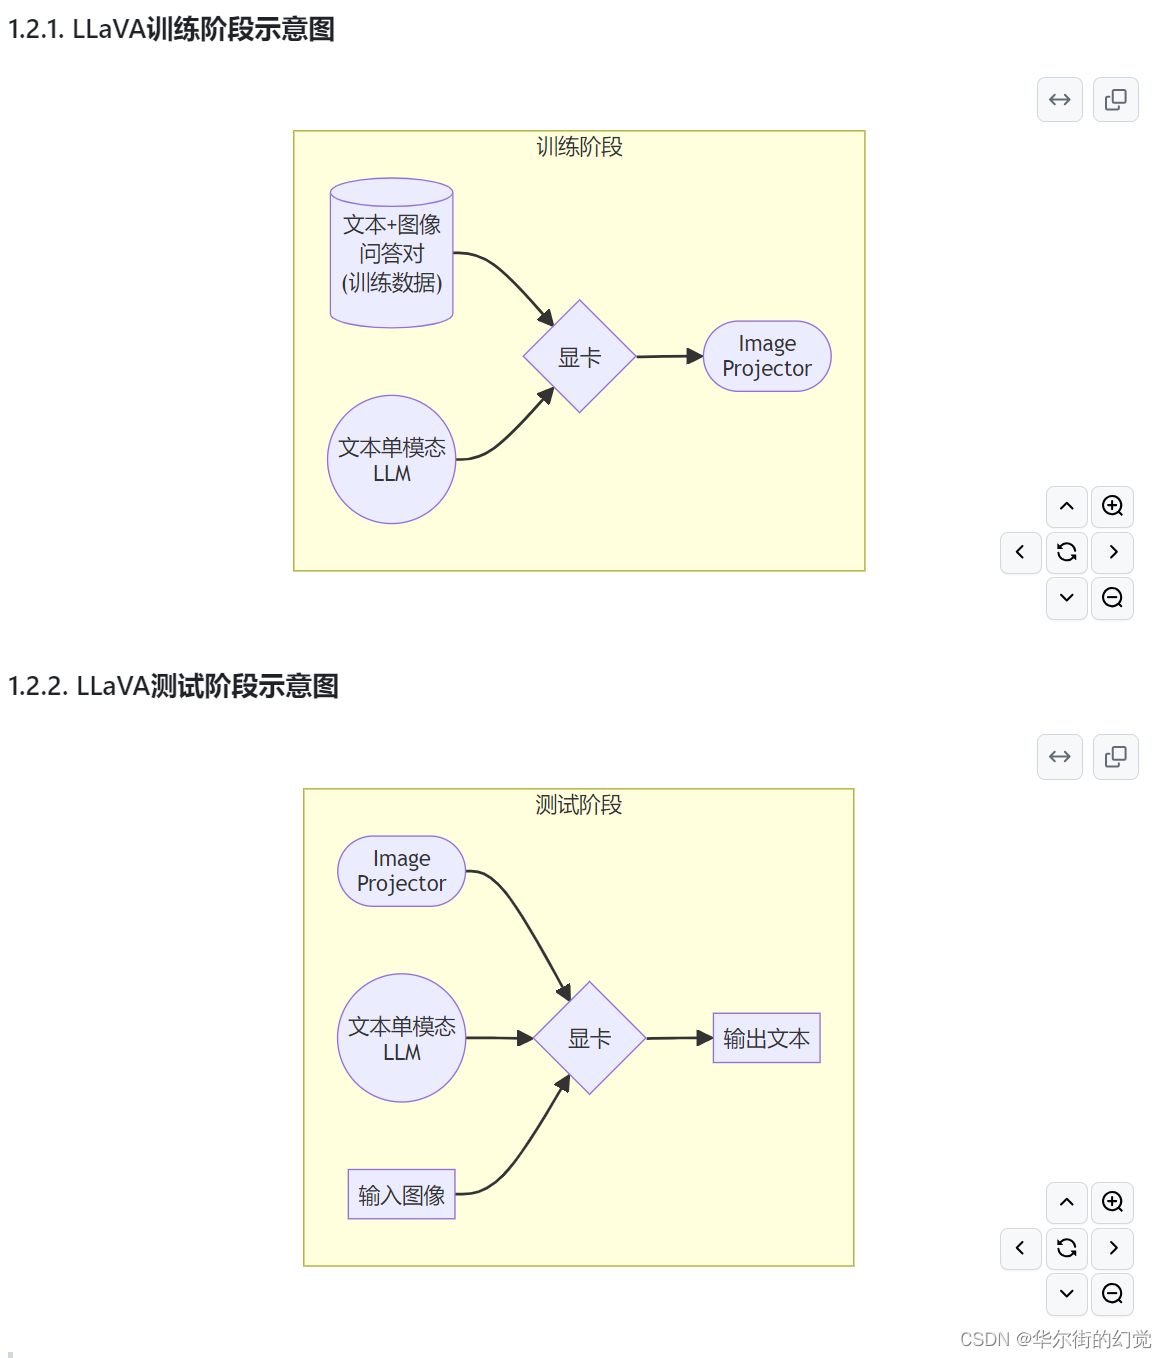
Image Projector的训练和测试,有点类似之前我们讲过的LoRA微调方案。
二者都是在已有LLM的基础上,用新的数据训练一个新的小文件。
只不过,LLM套上LoRA之后,有了新的灵魂(角色);而LLM套上Image Projector之后,才有了眼睛。
1.3 快速上手
1.3.1 环境准备
Part1安装过的,直接激活环境即可
XTuner安装
# 如果你是在 InternStudio 平台,则从本地 clone 一个已有 pytorch 的环境:
# pytorch    2.0.1   py3.10_cuda11.7_cudnn8.5.0_0cd ~ && studio-conda xtuner0.1.17
# 如果你是在其他平台:
# conda create --name xtuner0.1.17 python=3.10 -y# 激活环境
conda activate xtuner0.1.17
# 进入家目录 (~的意思是 “当前用户的home路径”)
cd ~
# 创建版本文件夹并进入,以跟随本教程
mkdir -p /root/xtuner0117 && cd /root/xtuner0117# 拉取 0.1.17 的版本源码
git clone -b v0.1.17  https://github.com/InternLM/xtuner
# 无法访问github的用户请从 gitee 拉取:
# git clone -b v0.1.15 https://gitee.com/Internlm/xtuner# 进入源码目录
cd /root/xtuner0117/xtuner# 从源码安装 XTuner
pip install -e '.[all]' && cd ~
假如速度太慢可以 Ctrl + C 退出后换成
pip install -e '.[all]' -i https://mirrors.aliyun.com/pypi/simple/
1.3.2. 概述
在本节中,我们将 自己构造 <question text><image>–<answer text> 数据对,基于InternLM2_Chat_1.8B这个文本单模态模型,使用LLaVA方案,训练一个给InternLM2_Chat_1.8B使用的Image Projector文件。
LLaVA方案中,给LLM增加视觉能力的过程,即是训练Image Projector文件的过程。 该过程分为2个阶段:Pretrain和Finetune。

1.3.3. Pretrain阶段
在Pretrain阶段,我们会使用大量的图片+简单文本(caption, 即图片标题)数据对,使LLM理解图像中的普遍特征。即,对大量的图片进行粗看。
Pretrain阶段训练完成后,此时的模型已经有视觉能力了!但是由于训练数据中都是图片+图片标题,所以此时的模型虽然有视觉能力,但无论用户问它什么,它都只会回答输入图片的标题。即,此时的模型只会给输入图像“写标题”。
在本次实战营中,我们已经为大家提供了Pretrain阶段的产物——iter_2181.pth文件。它就是幼稚园阶段的Image Projector!大家带着iter_2181.pth文件继续进入下一阶段进行Finetune即可。
1.3.4. Finetune阶段
在Finetune阶段,我们会使用图片+复杂文本数据对,来对Pretrain得到的Image Projector即iter_2181.pth进行进一步的训练。
1.3.4.1. 训练数据构建
1.3.4.1.1. 格式
[{"id": "随便什么字符串","image": "图片文件的相对位置。相对谁?相对你后面config文件里指定的image_folder参数的路径。","conversation": [{"from": "human","value": "<image>\n第1个问题。"},{"from": "gpt","value": "第1个回答"},{"from": "human","value": "第2个问题。"},{"from": "gpt","value": "第2个回答"},# ......{"from": "human","value": "第n个问题。"},{"from": "gpt","value": "第n个回答"},]},# 下面是第2组训练数据了。{"id": "随便什么字符串","image": "图片文件的相对位置。相对谁?相对你后面config文件里指定的image_folder参数的路径。","conversation": [{"from": "human","value": "<image>\n第1个问题。"},# ......{"from": "gpt","value": "第n个回答"}]}
]
注意:每组训练数据的第1个来自human的问题前,要加上图片占位符,即
<image>
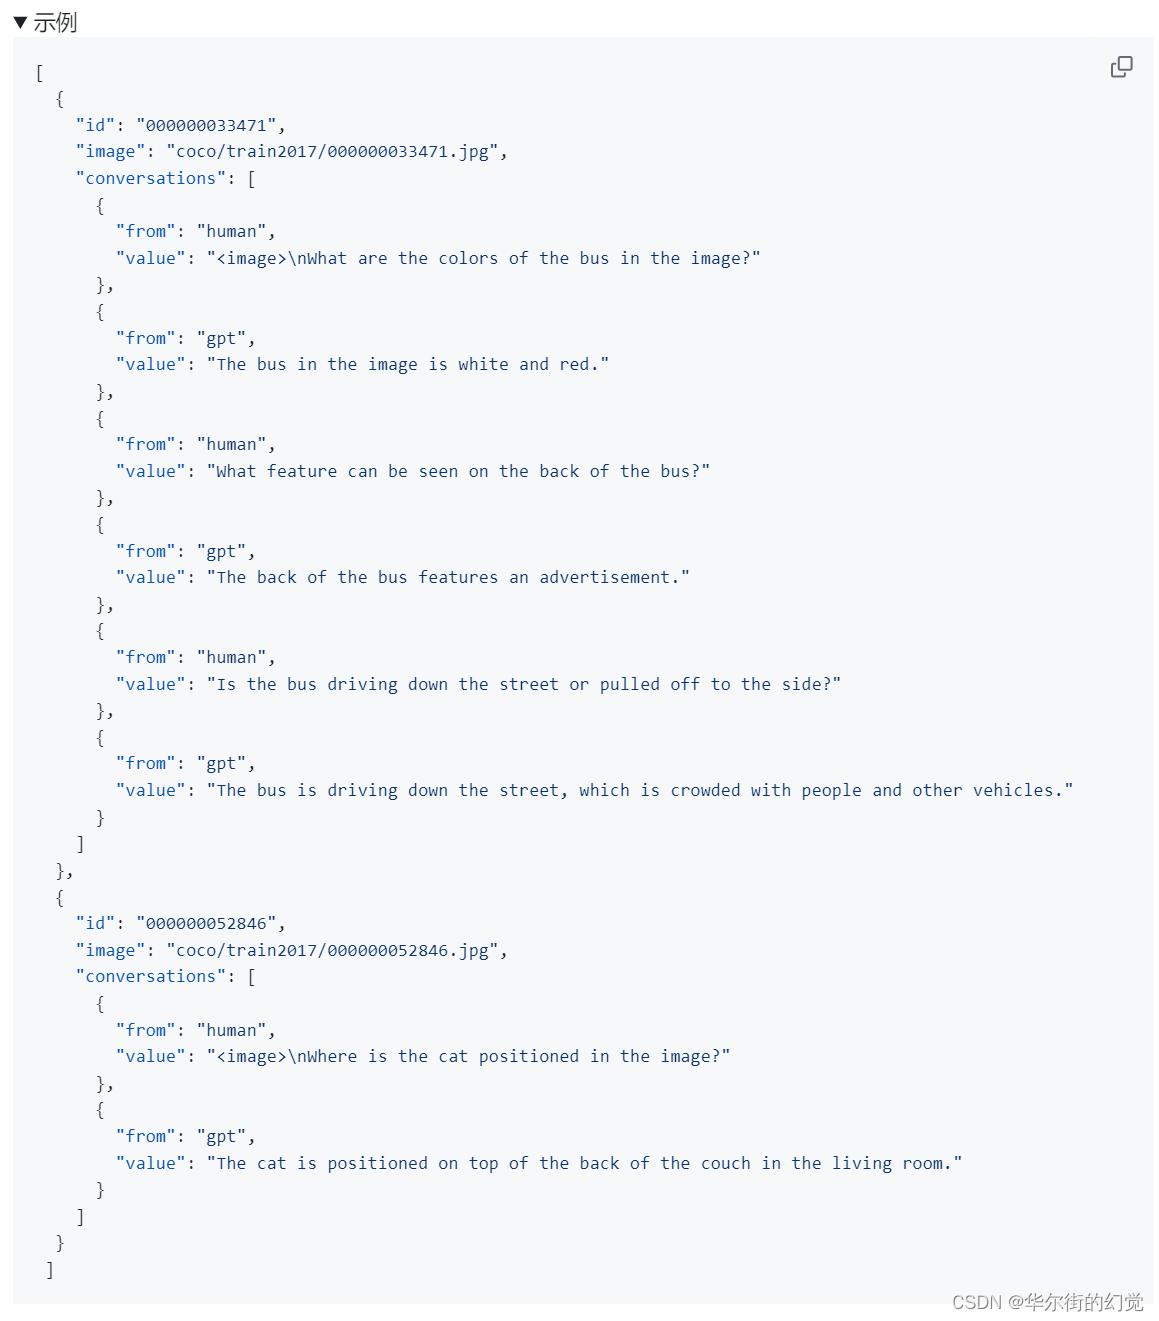
1.3.4.1.2. 制作
我们可以效法LLaVA作者的做法,将自己的图片发送给GPT,要求其按照上述格式生成若干条问答对。
为了方便大家跟随课程,针对这张示例图片的问答对数据(repeat_data.json),大家按照下面的脚本运行就可以生成啦~(重复200次)
cd ~ && git clone https://github.com/InternLM/tutorial -b camp2 && conda activate xtuner0.1.17 && cd tutorialpython /root/tutorial/xtuner/llava/llava_data/repeat.py \-i /root/tutorial/xtuner/llava/llava_data/unique_data.json \-o /root/tutorial/xtuner/llava/llava_data/repeated_data.json \-n 200

1.3.4.2. 准备配置文件
如果你懒到不想自己改配置文件,或者怎么改都失败。我们准备了一个fool_config文件在仓库里。运行:
cp /root/tutorial/xtuner/llava/llava_data/internlm2_chat_1_8b_llava_tutorial_fool_config.py /root/tutorial/xtuner/llava/llava_internlm2_chat_1_8b_qlora_clip_vit_large_p14_336_lora_e1_gpu8_finetune_copy.py
1.3.4.2.1. 创建配置文件
# 查询xtuner内置配置文件
xtuner list-cfg -p llava_internlm2_chat_1_8b# 拷贝配置文件到当前目录
xtuner copy-cfg \llava_internlm2_chat_1_8b_qlora_clip_vit_large_p14_336_lora_e1_gpu8_finetune \/root/tutorial/xtuner/llava

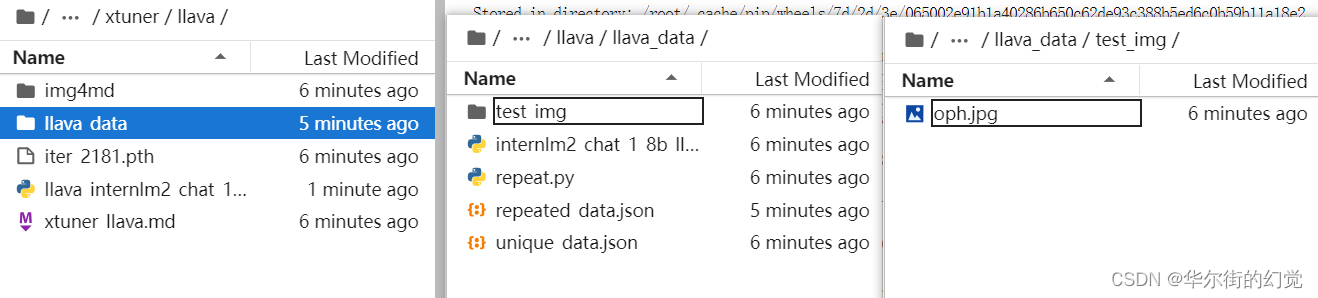
当前你的/root/tutorial/xtuner/llava/目录下的文件结构应该是这样:
|-- llava_data
|   |-- repeat.py
|   |-- repeated_data.json
|   |-- test_img
|   |   `-- oph.jpg
|   `-- unique_data.json
`-- llava_internlm2_chat_1_8b_qlora_clip_vit_large_p14_336_lora_e1_gpu8_finetune_copy.py
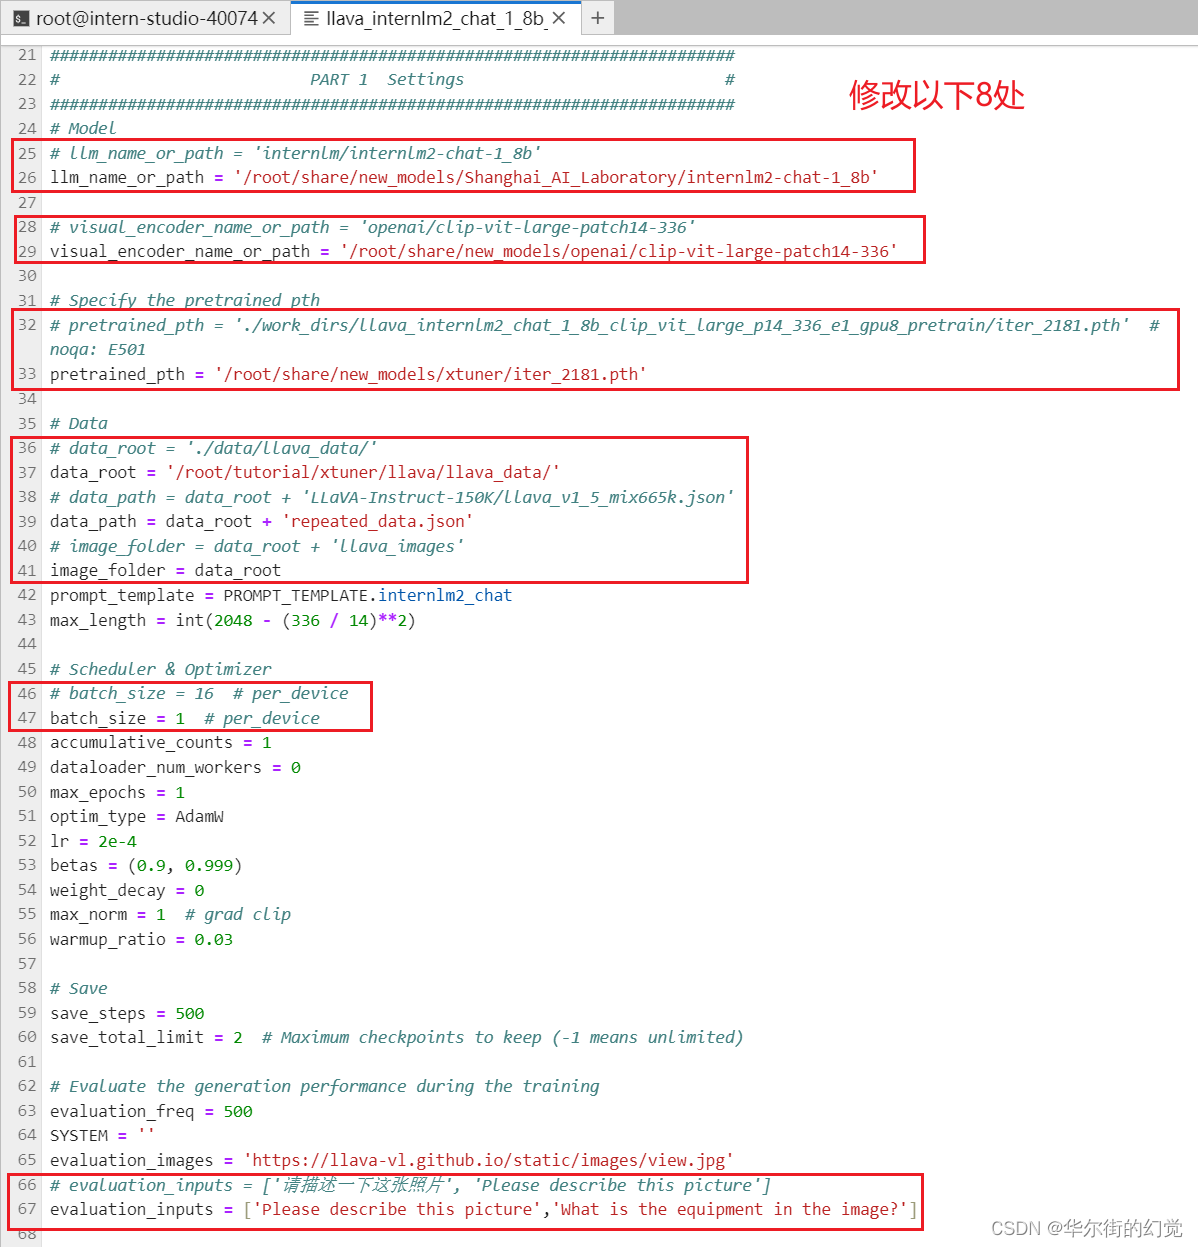
1.3.4.2.2. 修改配置文件
修改llava_internlm2_chat_1_8b_qlora_clip_vit_large_p14_336_lora_e1_gpu8_finetune_copy.py文件中的:
- pretrained_pth
- llm_name_or_path
- visual_encoder_name_or_path
- data_root
- data_path
- image_folder
# Model
- llm_name_or_path = 'internlm/internlm2-chat-1_8b'
+ llm_name_or_path = '/root/share/new_models/Shanghai_AI_Laboratory/internlm2-chat-1_8b'
- visual_encoder_name_or_path = 'openai/clip-vit-large-patch14-336'
+ visual_encoder_name_or_path = '/root/share/new_models/openai/clip-vit-large-patch14-336'# Specify the pretrained pth
- pretrained_pth = './work_dirs/llava_internlm2_chat_1_8b_clip_vit_large_p14_336_e1_gpu8_pretrain/iter_2181.pth'  # noqa: E501
+ pretrained_pth = '/root/share/new_models/xtuner/iter_2181.pth'# Data
- data_root = './data/llava_data/'
+ data_root = '/root/tutorial/xtuner/llava/llava_data/'
- data_path = data_root + 'LLaVA-Instruct-150K/llava_v1_5_mix665k.json'
+ data_path = data_root + 'repeated_data.json'
- image_folder = data_root + 'llava_images'
+ image_folder = data_root# Scheduler & Optimizer
- batch_size = 16  # per_device
+ batch_size = 1  # per_device# evaluation_inputs
- evaluation_inputs = ['请描述一下这张图片','Please describe this picture']
+ evaluation_inputs = ['Please describe this picture','What is the equipment in the image?']
可以直接复制,到PART1和PART2之间。
# Model
# llm_name_or_path = 'internlm/internlm2-chat-1_8b'
llm_name_or_path = '/root/share/new_models/Shanghai_AI_Laboratory/internlm2-chat-1_8b'# visual_encoder_name_or_path = 'openai/clip-vit-large-patch14-336'
visual_encoder_name_or_path = '/root/share/new_models/openai/clip-vit-large-patch14-336'# Specify the pretrained pth
# pretrained_pth = './work_dirs/llava_internlm2_chat_1_8b_clip_vit_large_p14_336_e1_gpu8_pretrain/iter_2181.pth'  # noqa: E501
pretrained_pth = '/root/share/new_models/xtuner/iter_2181.pth'# Data
# data_root = './data/llava_data/'
data_root = '/root/tutorial/xtuner/llava/llava_data/'
# data_path = data_root + 'LLaVA-Instruct-150K/llava_v1_5_mix665k.json'
data_path = data_root + 'repeated_data.json'
# image_folder = data_root + 'llava_images'
image_folder = data_root
prompt_template = PROMPT_TEMPLATE.internlm2_chat
max_length = int(2048 - (336 / 14)**2)# Scheduler & Optimizer
# batch_size = 16  # per_device
batch_size = 1  # per_device
accumulative_counts = 1
dataloader_num_workers = 0
max_epochs = 1
optim_type = AdamW
lr = 2e-4
betas = (0.9, 0.999)
weight_decay = 0
max_norm = 1  # grad clip
warmup_ratio = 0.03# Save
save_steps = 500
save_total_limit = 2  # Maximum checkpoints to keep (-1 means unlimited)# Evaluate the generation performance during the training
evaluation_freq = 500
SYSTEM = ''
evaluation_images = 'https://llava-vl.github.io/static/images/view.jpg'
# evaluation_inputs = ['请描述一下这张照片', 'Please describe this picture']
evaluation_inputs = ['Please describe this picture','What is the equipment in the image?']
1.3.4.3. 开始Finetune
cd /root/tutorial/xtuner/llava/
xtuner train /root/tutorial/xtuner/llava/llava_internlm2_chat_1_8b_qlora_clip_vit_large_p14_336_lora_e1_gpu8_finetune_copy.py --deepspeed deepspeed_zero2

要运行半小时多噢
1.3.5. 对比Finetune前后的性能差异
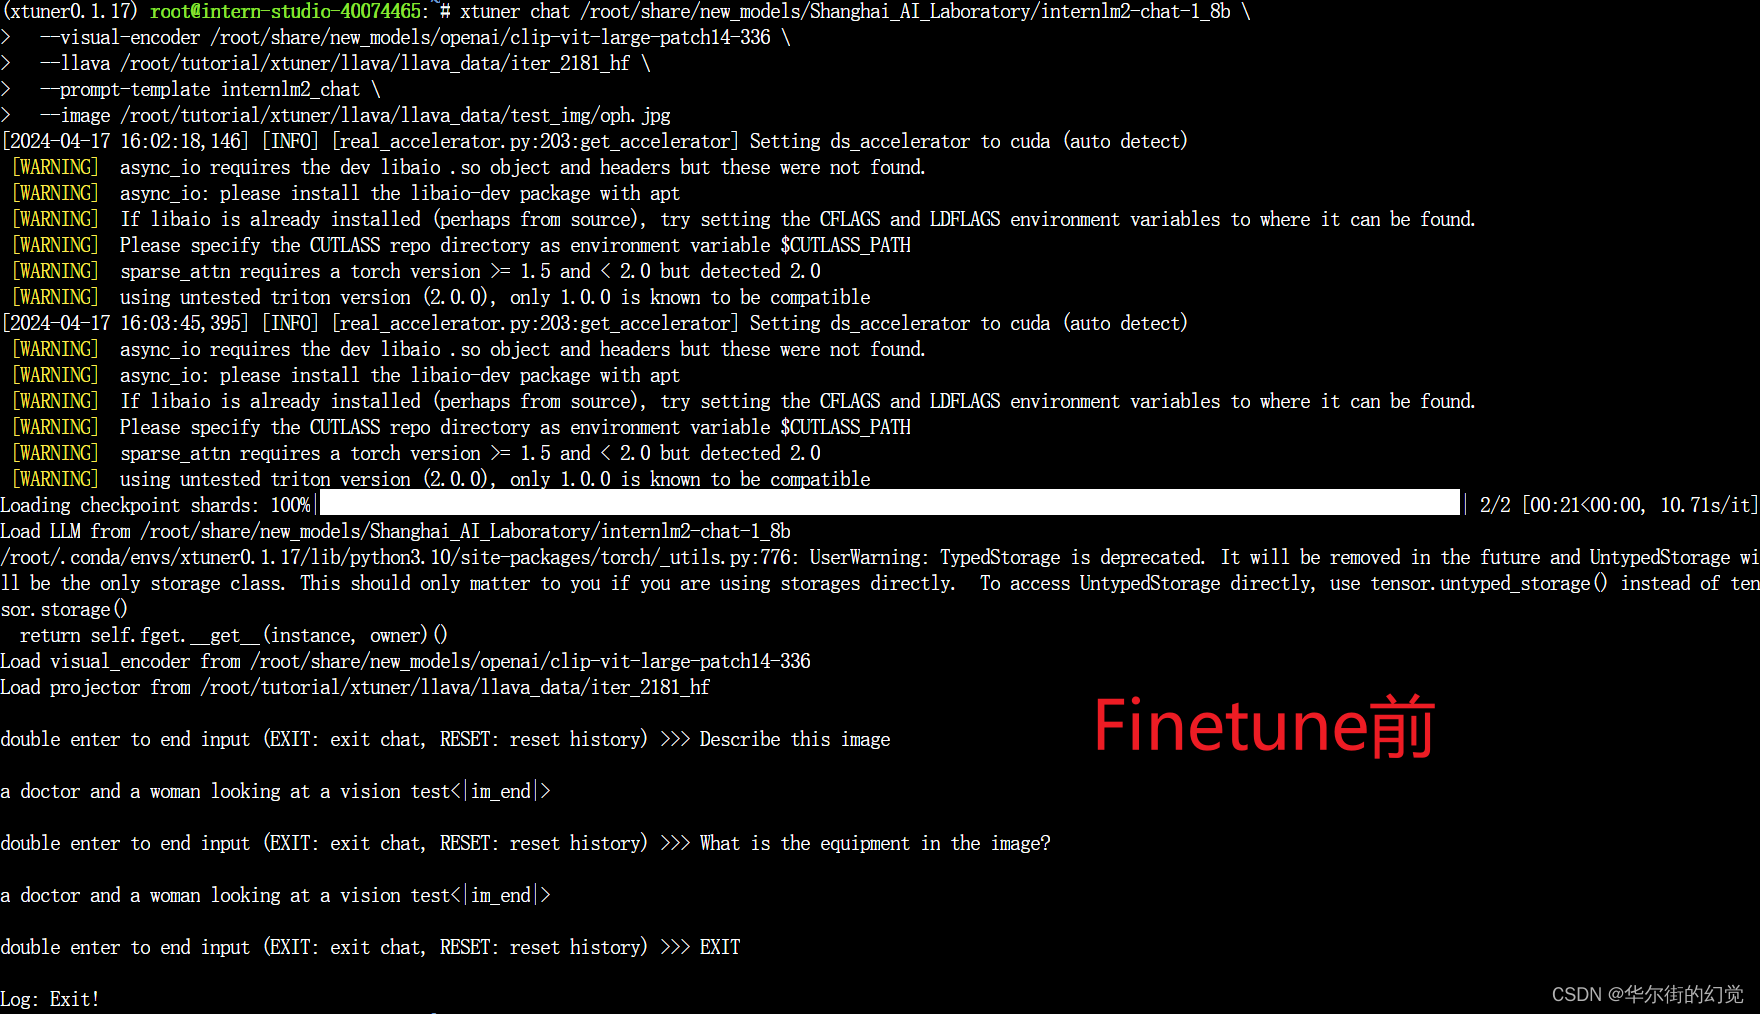
1.3.5.1. Finetune前
即:加载 1.8B 和 Pretrain阶段产物(iter_2181) 到显存。
# 解决小bug
export MKL_SERVICE_FORCE_INTEL=1
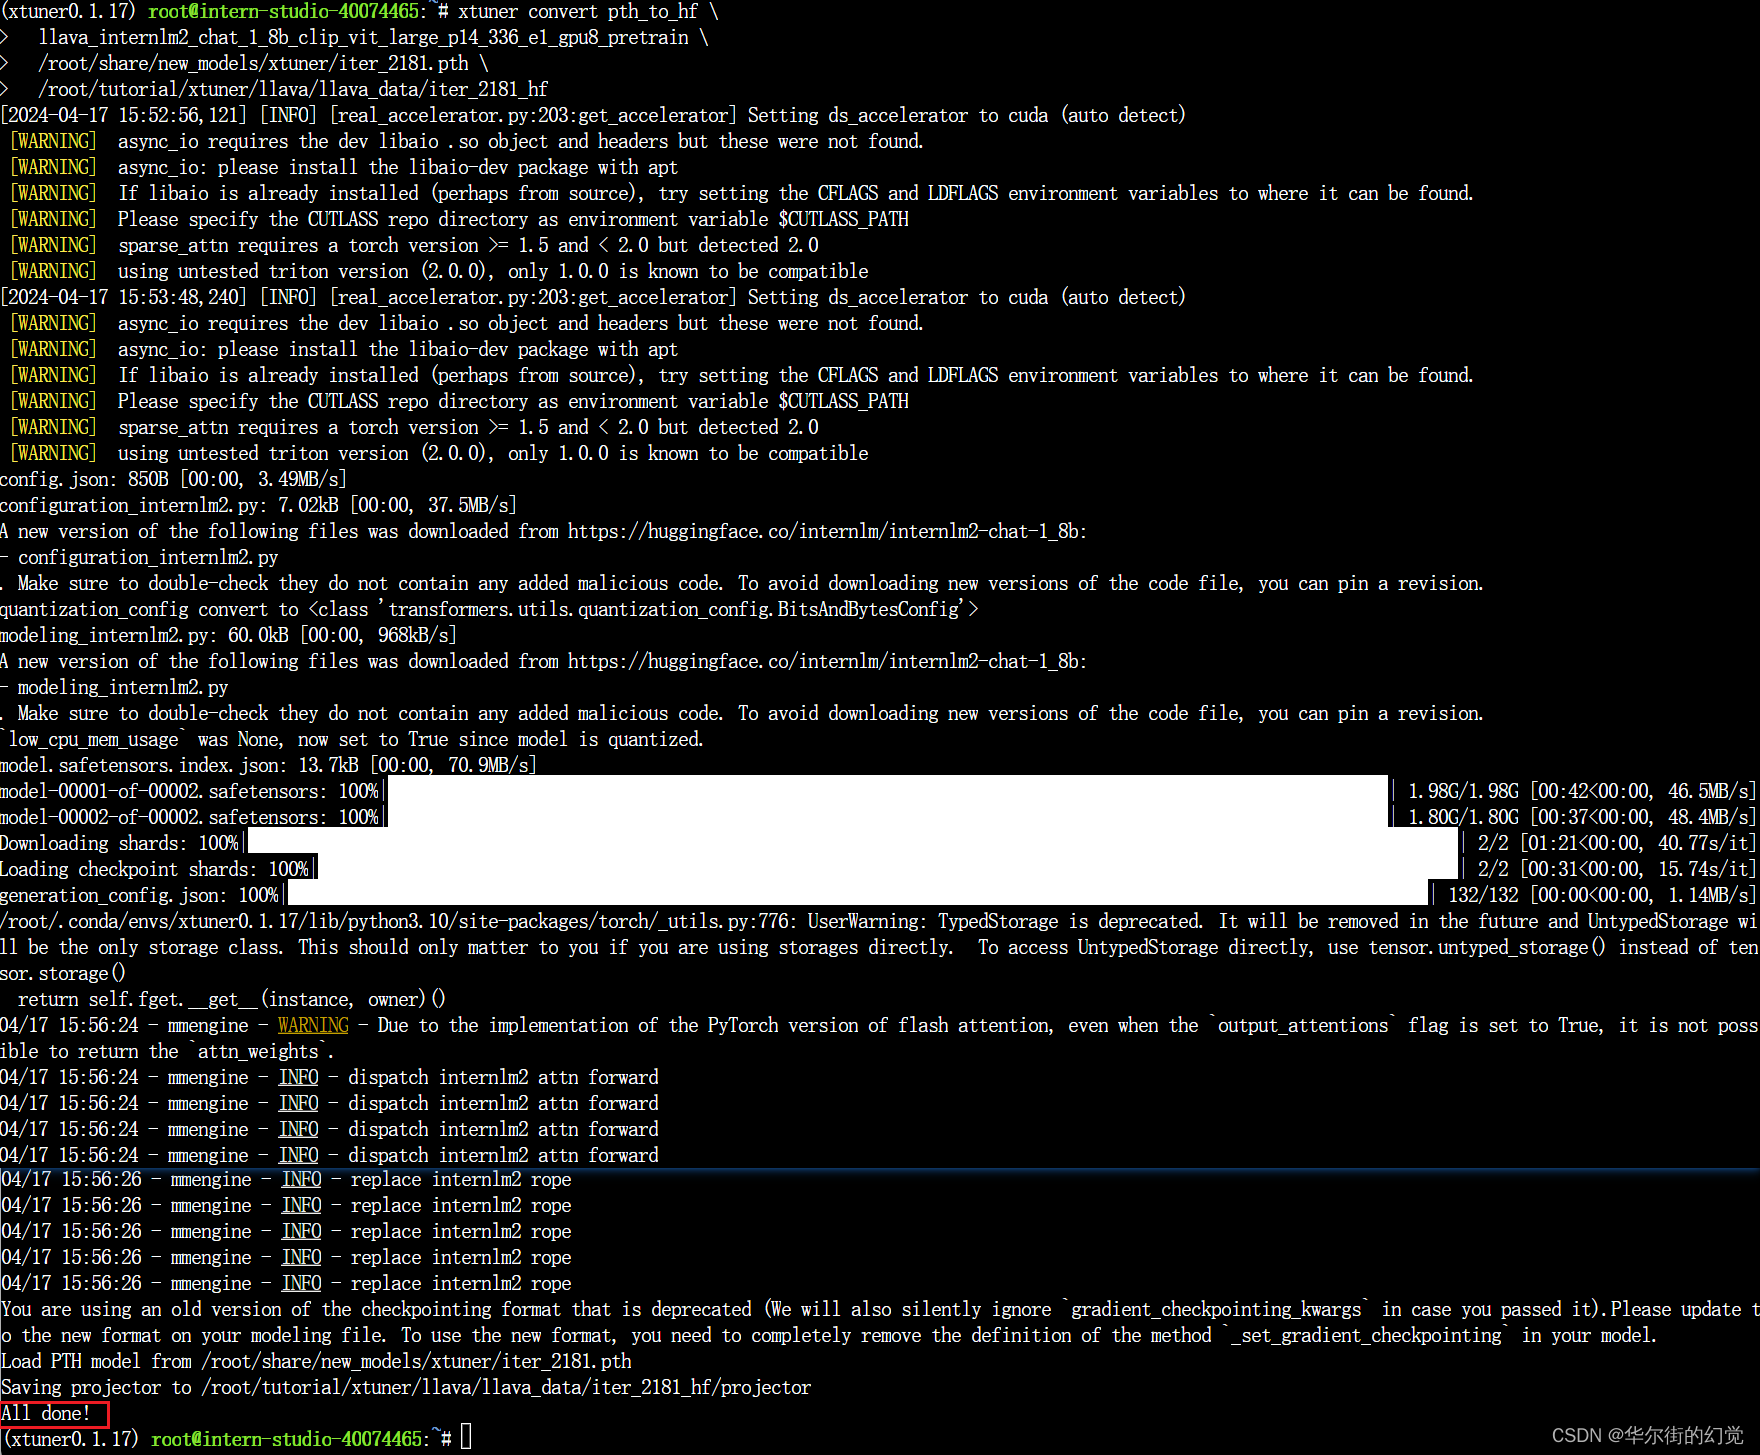
export MKL_THREADING_LAYER=GNU# 模型转换
# pth转huggingface
# xtuner convert pth_to_hf ${配置文件地址} ${权重文件地址} ${转换后模型保存地址}
xtuner convert pth_to_hf \llava_internlm2_chat_1_8b_clip_vit_large_p14_336_e1_gpu8_pretrain \/root/share/new_models/xtuner/iter_2181.pth \/root/tutorial/xtuner/llava/llava_data/iter_2181_hf# 启动!
xtuner chat /root/share/new_models/Shanghai_AI_Laboratory/internlm2-chat-1_8b \--visual-encoder /root/share/new_models/openai/clip-vit-large-patch14-336 \--llava /root/tutorial/xtuner/llava/llava_data/iter_2181_hf \--prompt-template internlm2_chat \--image /root/tutorial/xtuner/llava/llava_data/test_img/oph.jpg
Q1: Describe this image.
Q2: What is the equipment in the image?
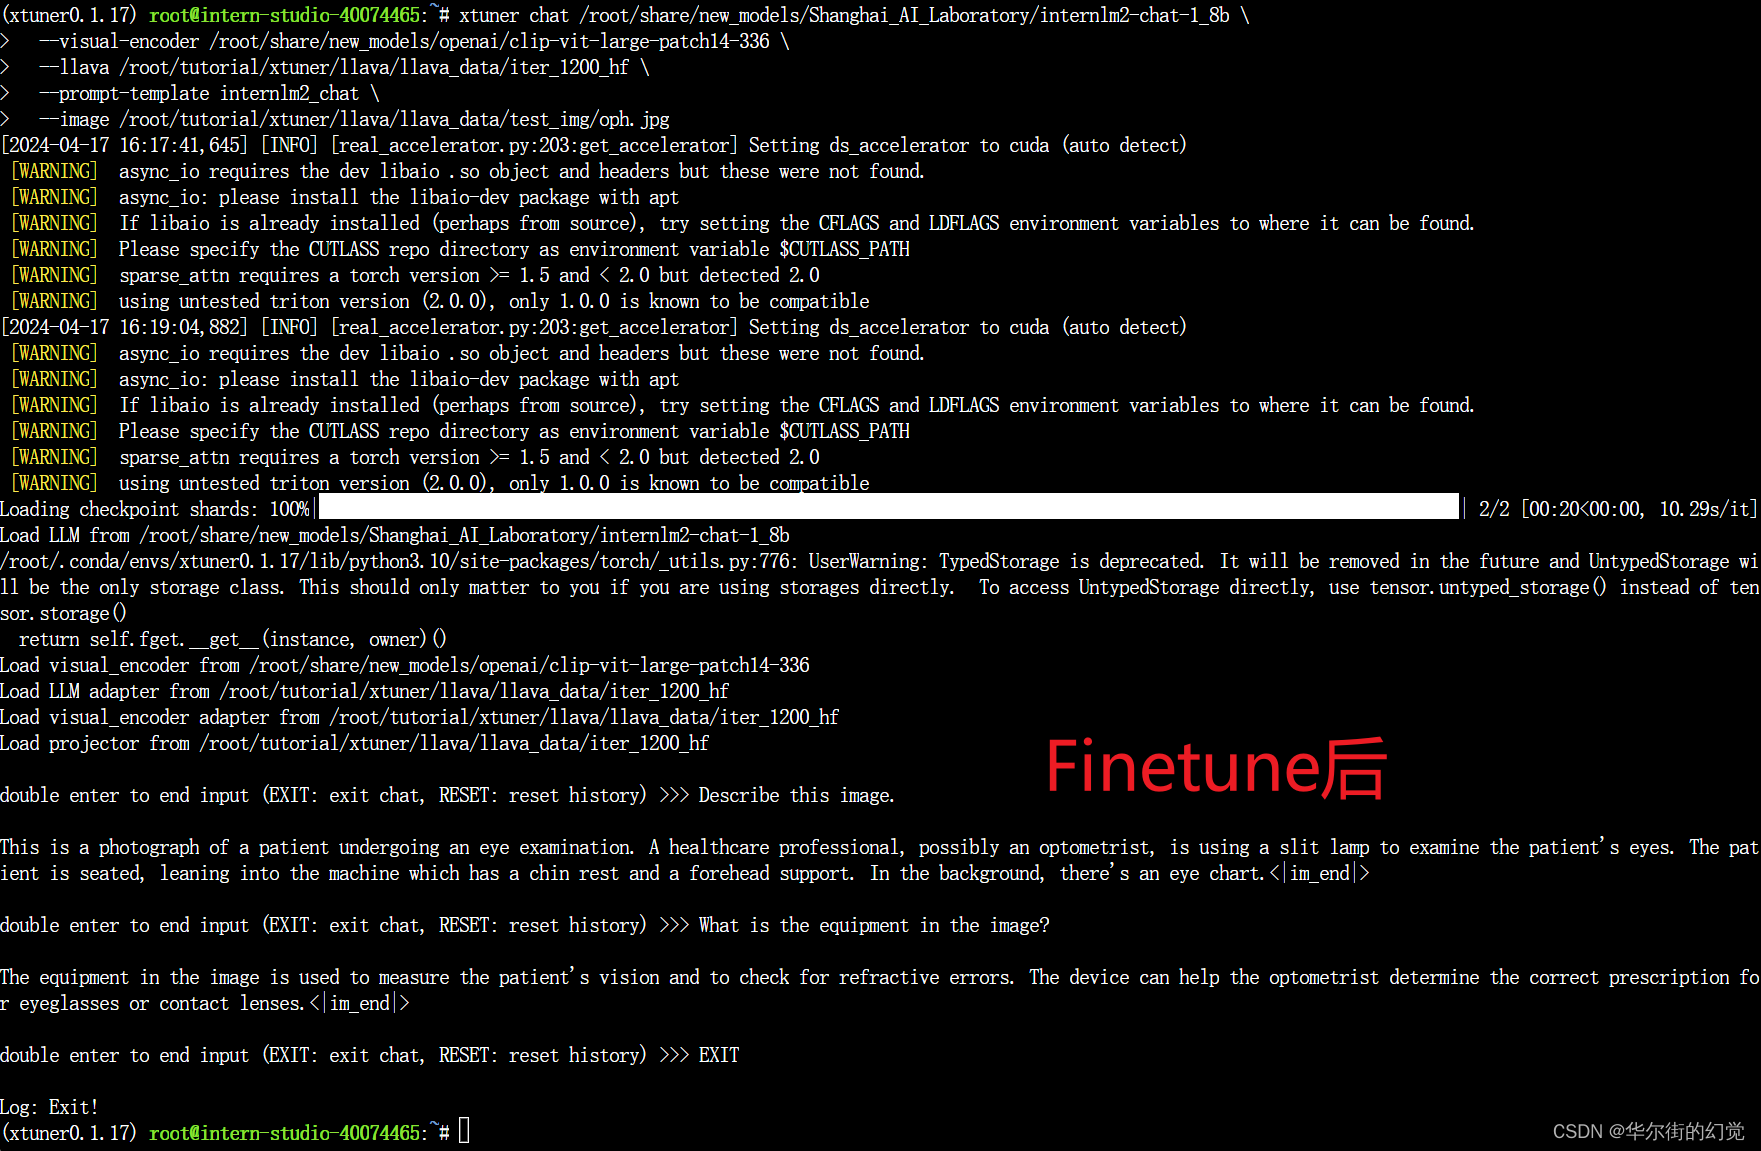
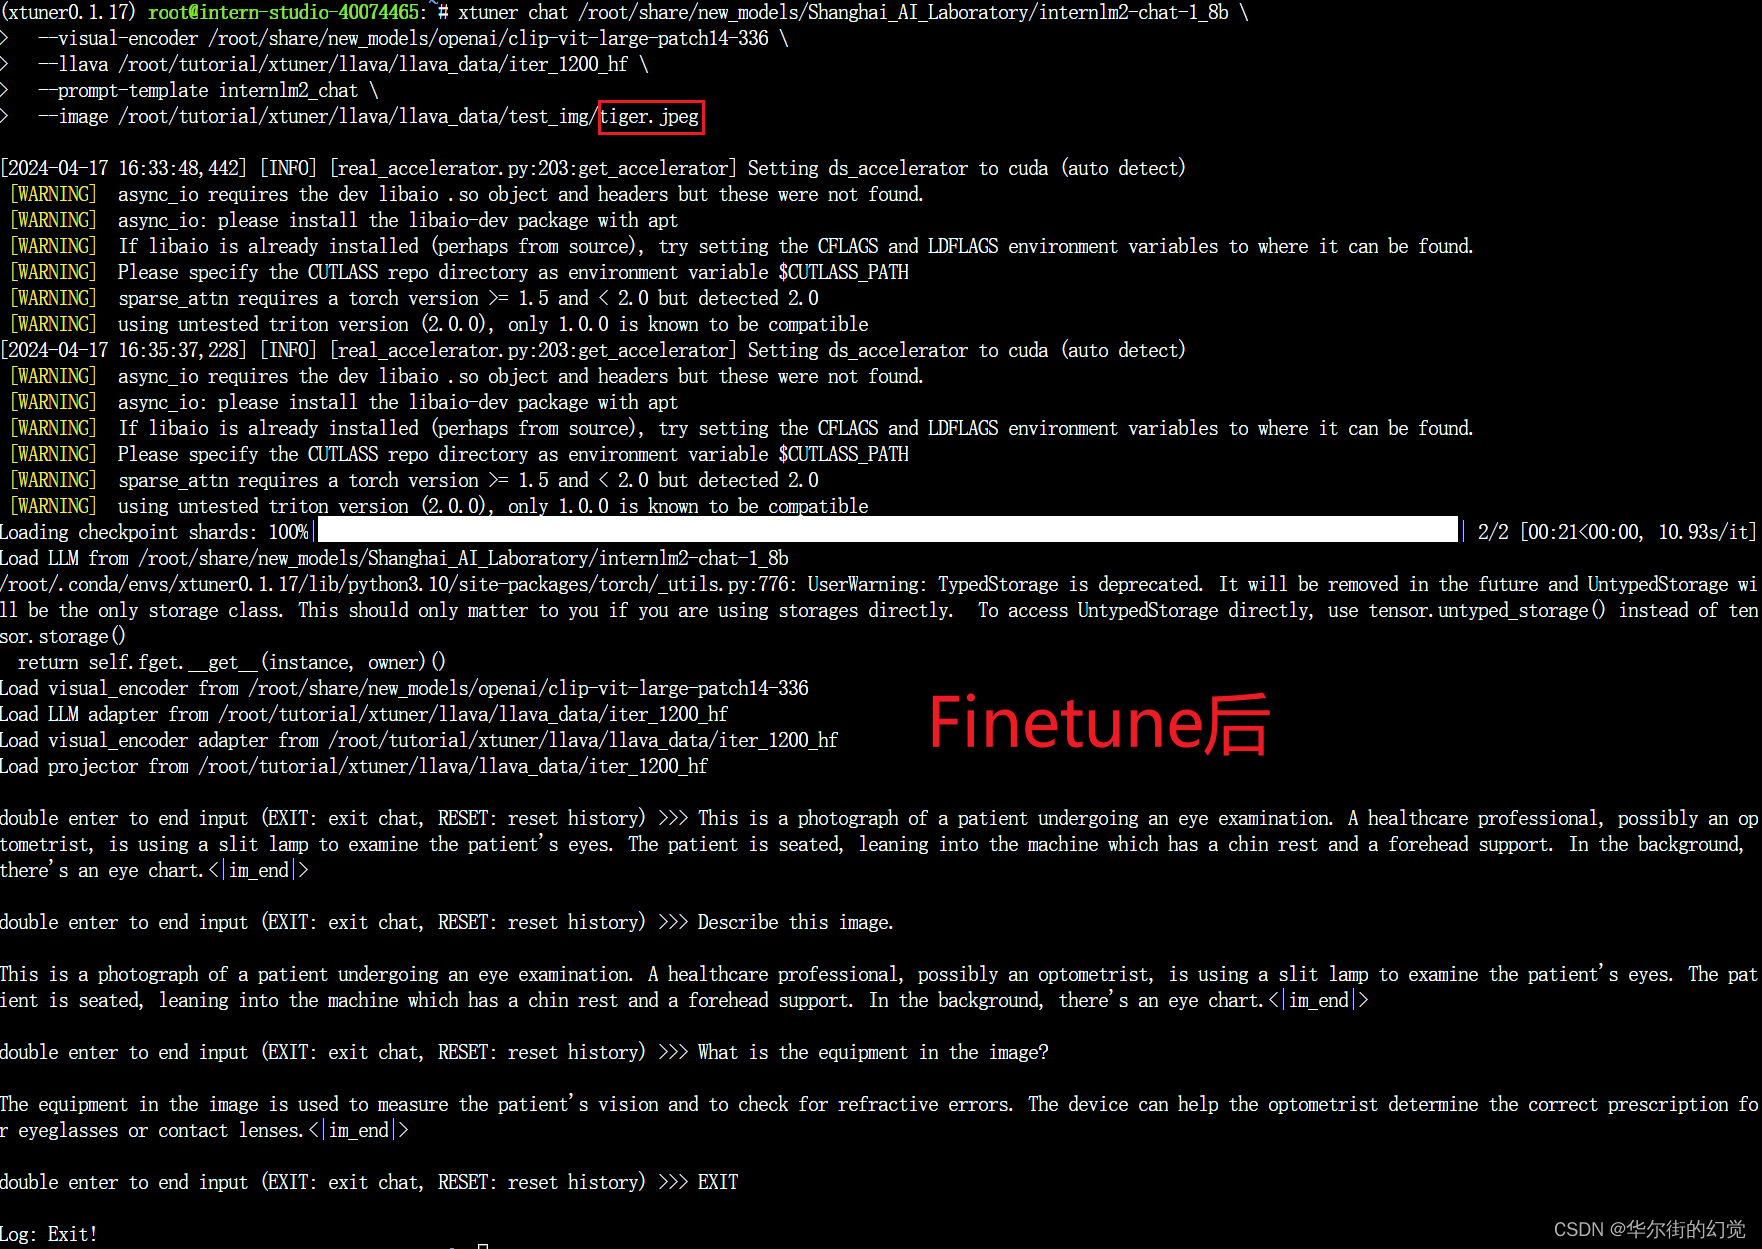
1.3.5.2. Finetune后
即:加载 1.8B 和 Pretrain阶段产物(iter_2181) 到显存。
# 解决小bug
export MKL_SERVICE_FORCE_INTEL=1
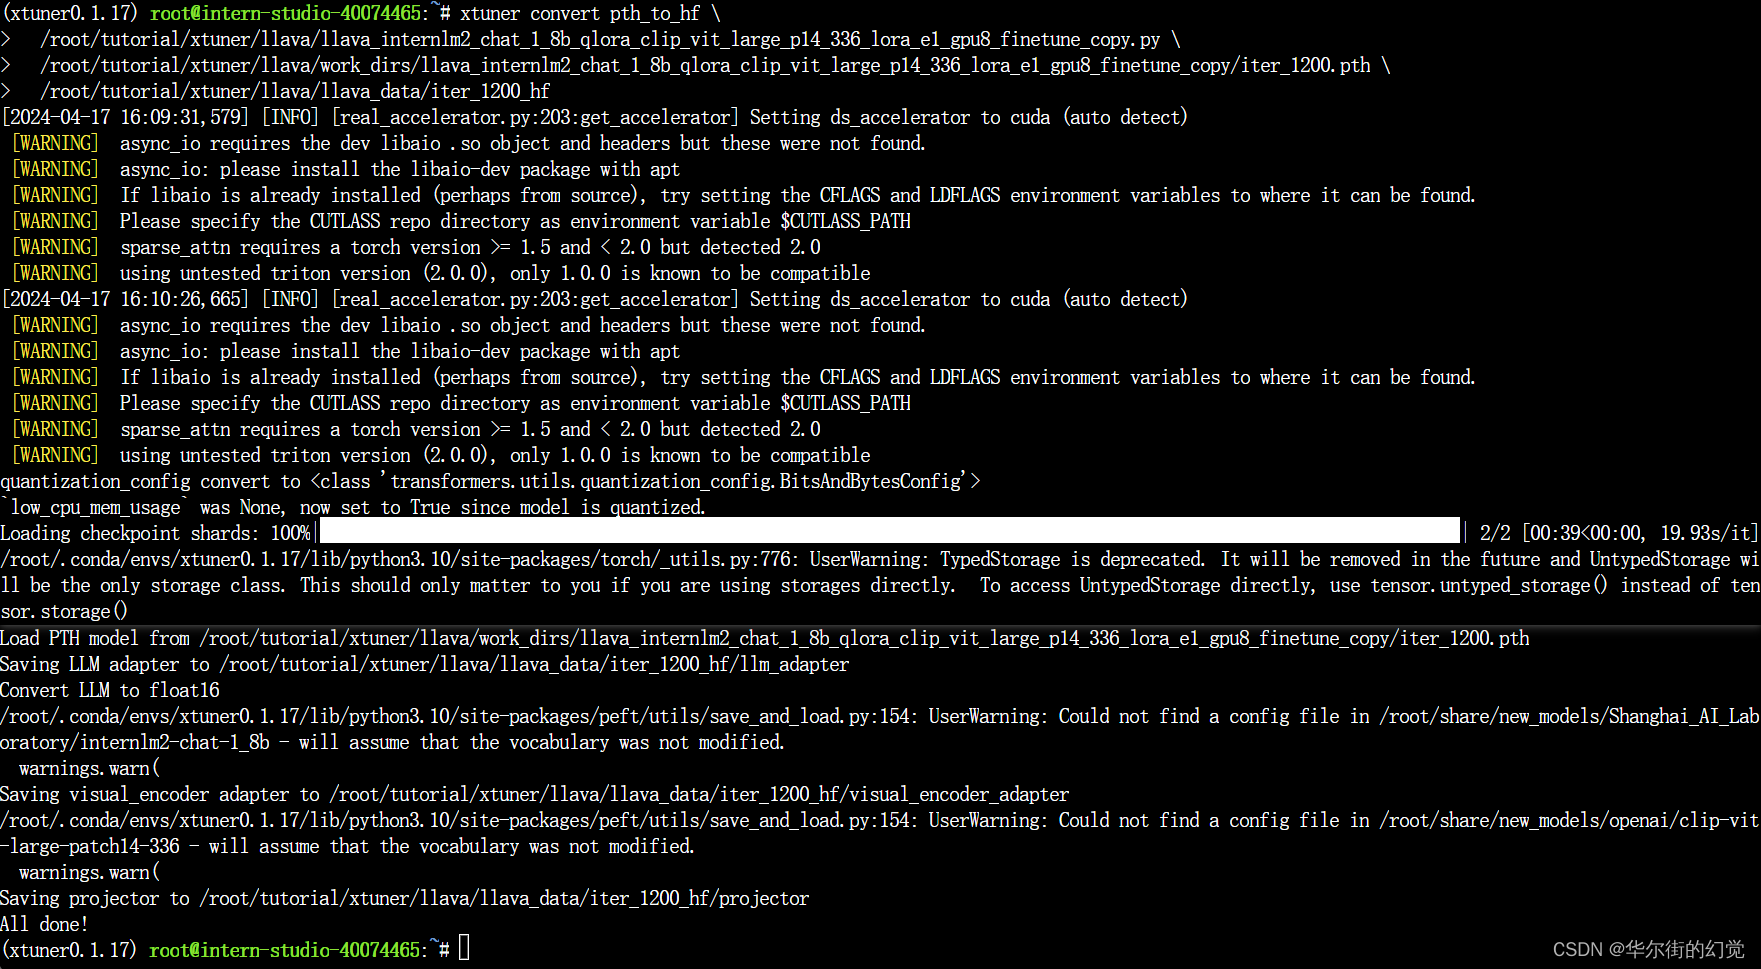
export MKL_THREADING_LAYER=GNU# pth转huggingface
xtuner convert pth_to_hf \/root/tutorial/xtuner/llava/llava_internlm2_chat_1_8b_qlora_clip_vit_large_p14_336_lora_e1_gpu8_finetune_copy.py \/root/tutorial/xtuner/llava/work_dirs/llava_internlm2_chat_1_8b_qlora_clip_vit_large_p14_336_lora_e1_gpu8_finetune_copy/iter_1200.pth \/root/tutorial/xtuner/llava/llava_data/iter_1200_hf# 启动!
xtuner chat /root/share/new_models/Shanghai_AI_Laboratory/internlm2-chat-1_8b \--visual-encoder /root/share/new_models/openai/clip-vit-large-patch14-336 \--llava /root/tutorial/xtuner/llava/llava_data/iter_1200_hf \--prompt-template internlm2_chat \--image /root/tutorial/xtuner/llava/llava_data/test_img/oph.jpg
Q1: Describe this image.
Q2: What is the equipment in the image?
换一张图片不行的。要重新训练。。。。

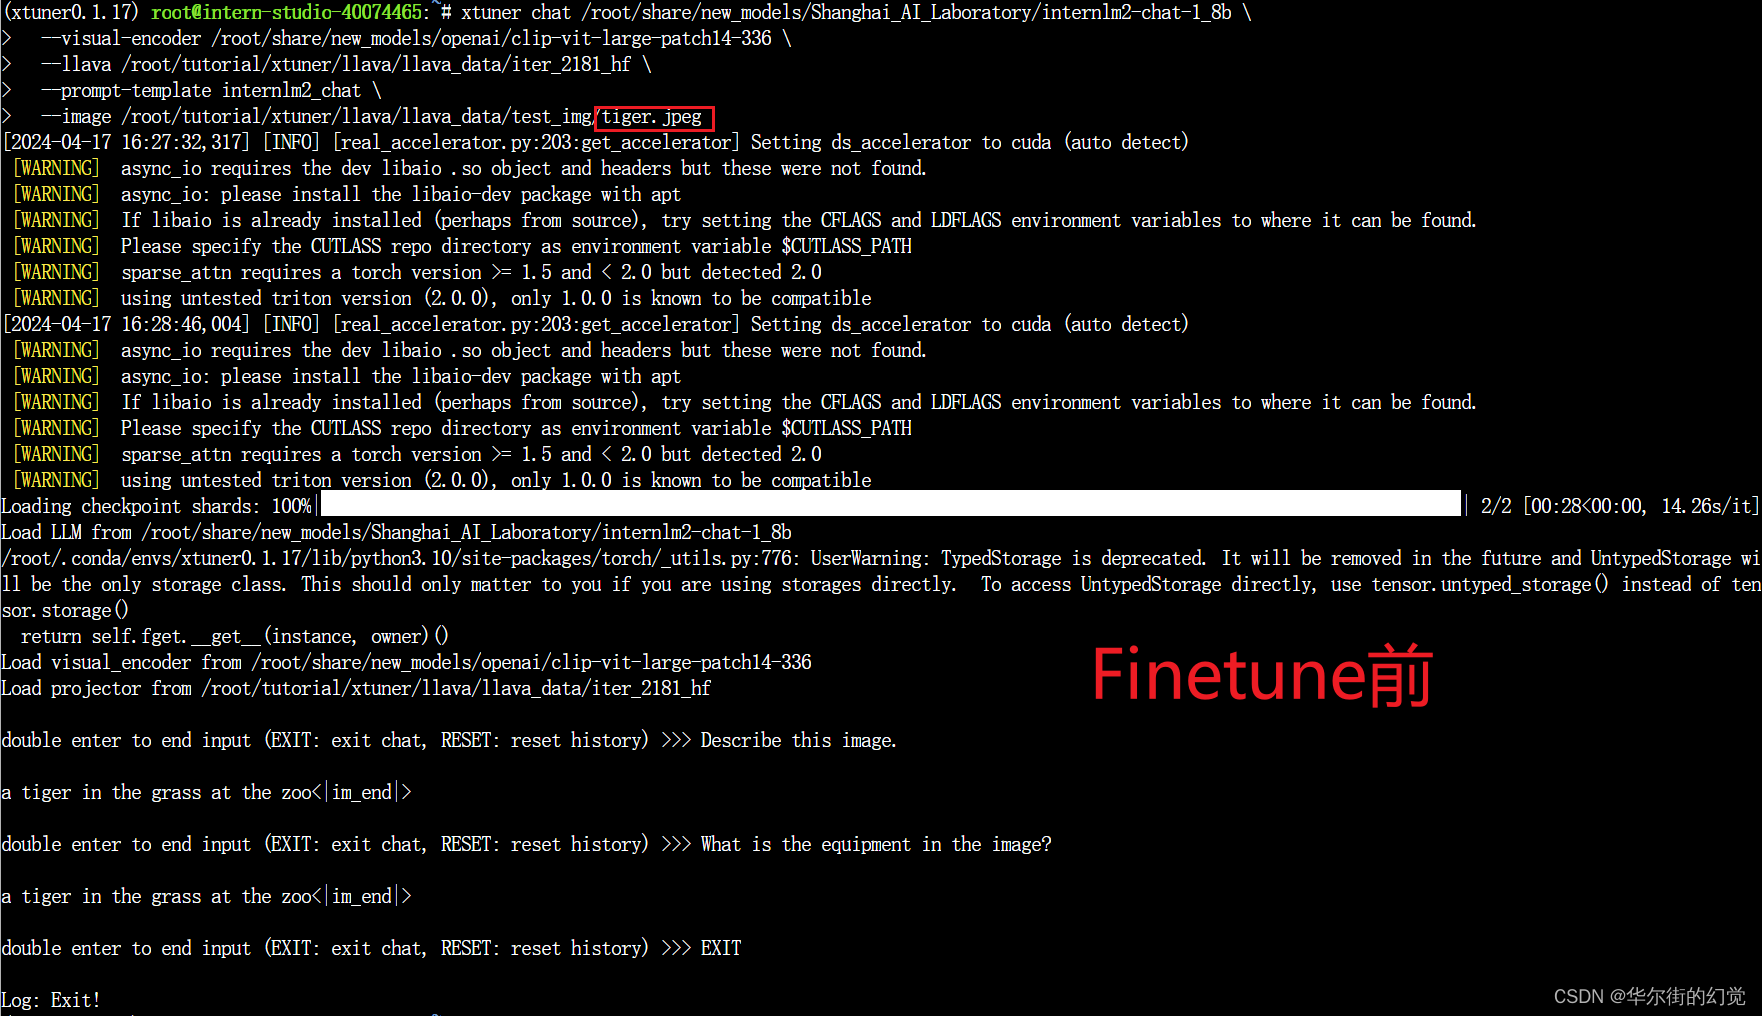
这真是训练了个寂寞呀。。。
我还以为好歹能微调一个,能针对某张图片,只回答这两个问题的也行啊。。。
。。。
。。。
1.3.6 小节
Finetune前后效果对比:
- Finetune前:只会打标题
- Finetune后:会回答问题了
这篇关于书生·浦语2.0(InternLM2)大模型实战--Day04 XTuner微调 | 1.8B 多模态Agent(Part 2: 多模态部分)的文章就介绍到这儿,希望我们推荐的文章对编程师们有所帮助!


