本文主要是介绍【深度学习】【机器学习】用神经网络进行入侵检测,NSL-KDD数据集,基于机器学习(深度学习)判断网络入侵,网络攻击,流量异常【3】,希望对大家解决编程问题提供一定的参考价值,需要的开发者们随着小编来一起学习吧!
之前用NSL-KDD数据集做入侵检测的项目是:
【1】https://qq742971636.blog.csdn.net/article/details/137082925
【2】https://qq742971636.blog.csdn.net/article/details/137170933
有人问我是不是可以改代码,我说可以。
训练
我将NSL_KDD_Final_1.ipynb的代码改为了train.py,效果还不错。

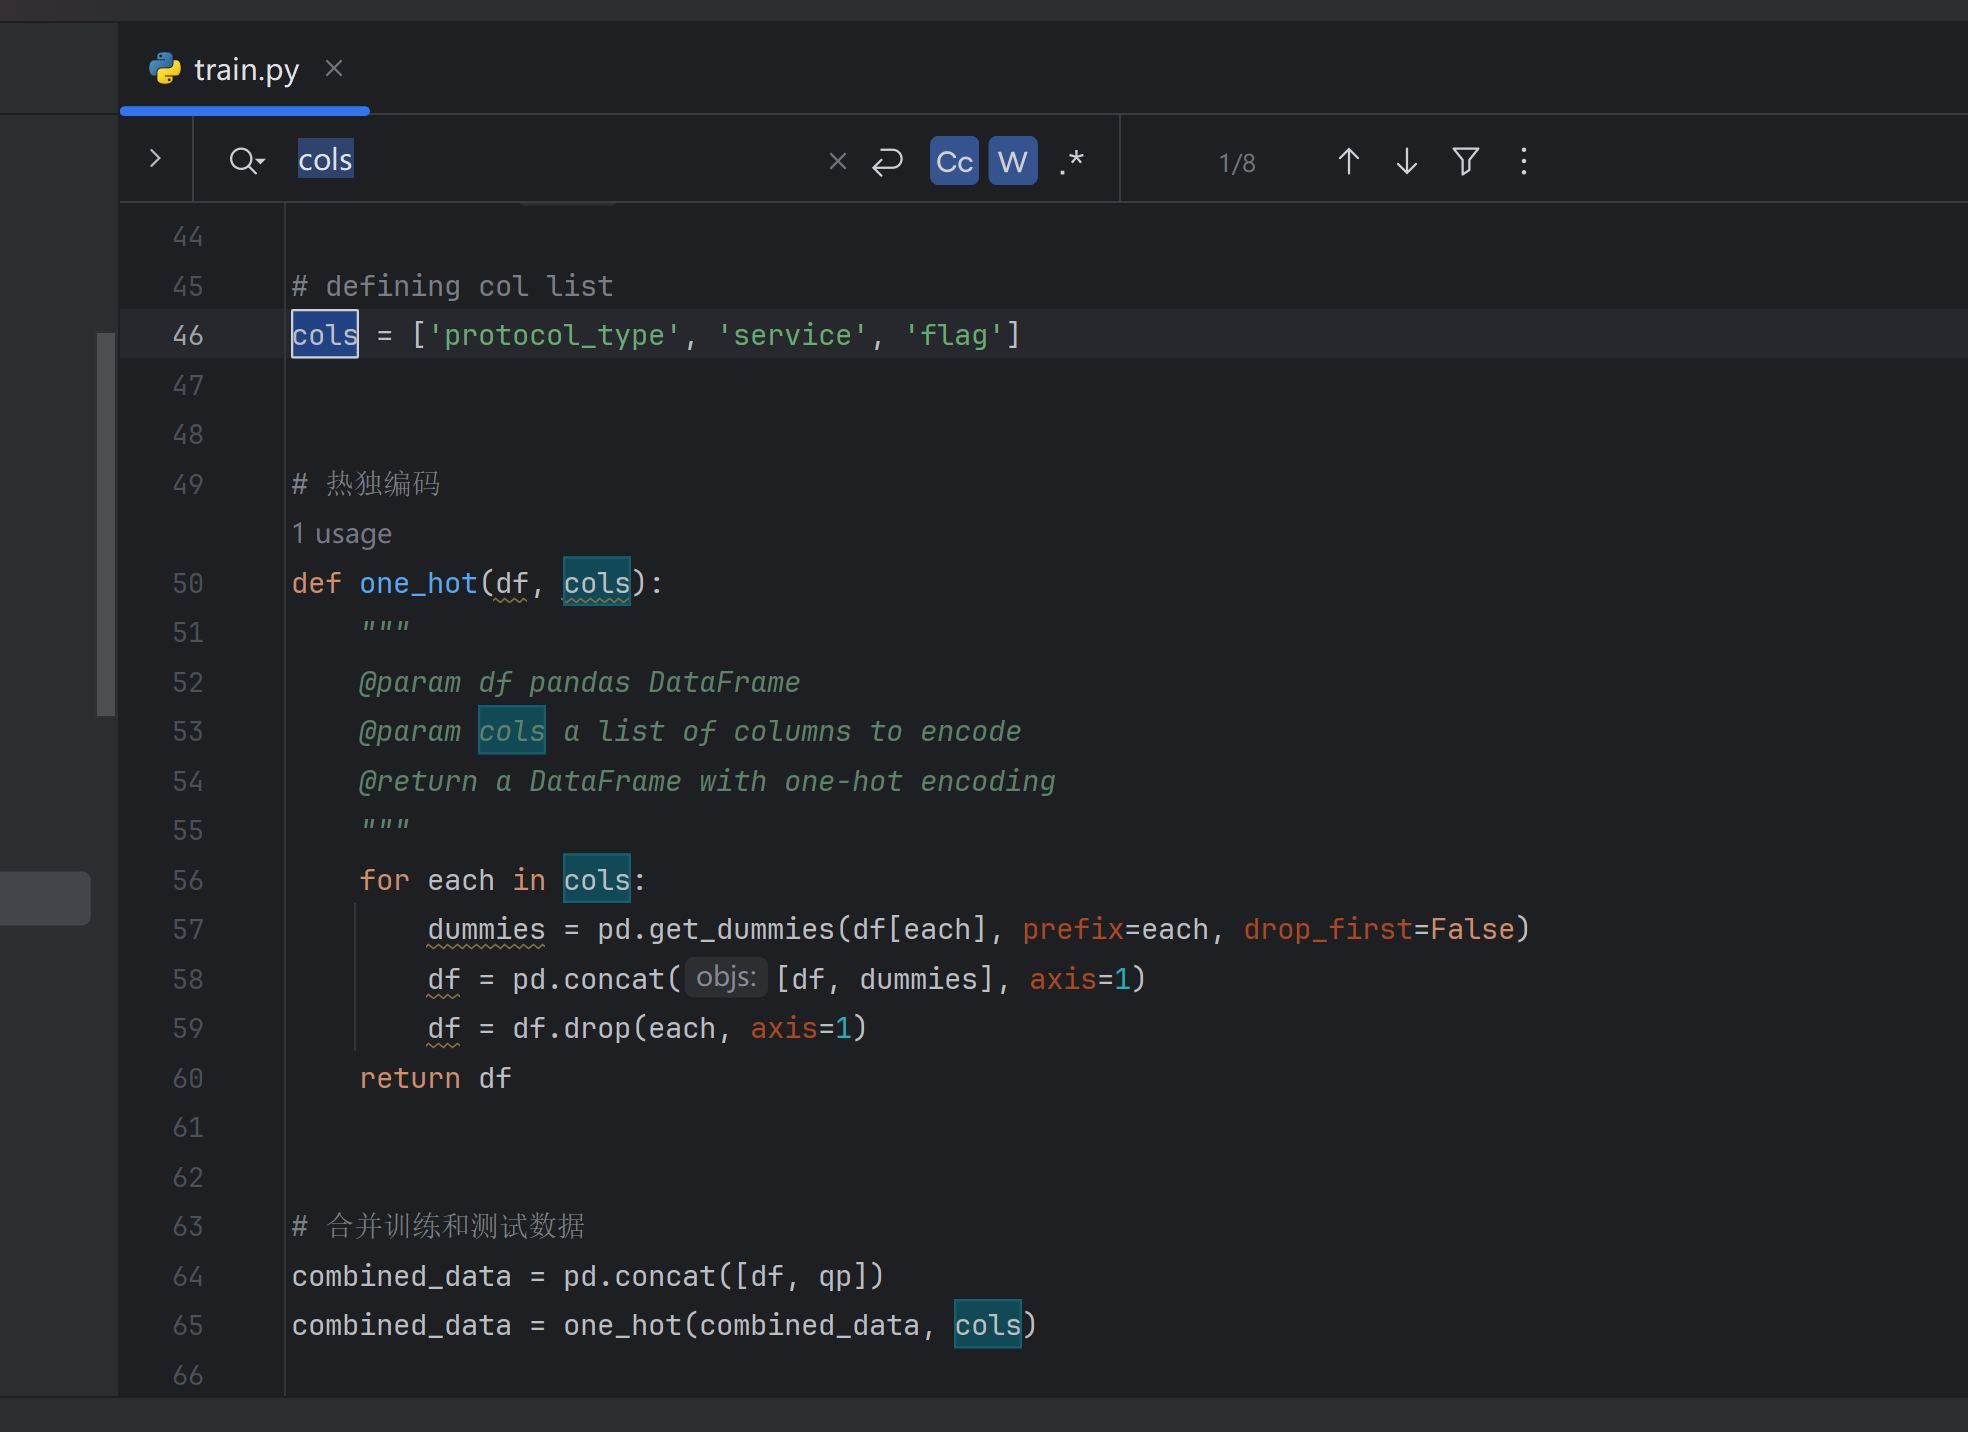
前处理也是需要onehot编码:
也会归一化:

模型:
# 双向RNN
batch_size = 32
model = Sequential()
model.add(Convolution1D(64, kernel_size=122, padding="same", activation="relu", input_shape=(122, 1)))
model.add(MaxPooling1D(pool_size=(5)))
model.add(BatchNormalization())
model.add(Bidirectional(LSTM(64, return_sequences=False)))
model.add(Reshape((128, 1), input_shape=(128,)))
model.add(MaxPooling1D(pool_size=(5)))
model.add(BatchNormalization())
model.add(Bidirectional(LSTM(128, return_sequences=False)))
model.add(Dropout(0.5))
model.add(Dense(5))
model.add(Activation('softmax'))
model.compile(loss='categorical_crossentropy', optimizer='adam', metrics=['accuracy'])
print(model.summary())
Model: "sequential"
┌─────────────────────────────────┬────────────────────────┬───────────────┐
│ Layer (type)                    │ Output Shape           │       Param # │
├─────────────────────────────────┼────────────────────────┼───────────────┤
│ conv1d (Conv1D)                 │ (None, 122, 64)        │         7,872 │
├─────────────────────────────────┼────────────────────────┼───────────────┤
│ max_pooling1d (MaxPooling1D)    │ (None, 24, 64)         │             0 │
├─────────────────────────────────┼────────────────────────┼───────────────┤
│ batch_normalization             │ (None, 24, 64)         │           256 │
│ (BatchNormalization)            │                        │               │
├─────────────────────────────────┼────────────────────────┼───────────────┤
│ bidirectional (Bidirectional)   │ (None, 128)            │        66,048 │
├─────────────────────────────────┼────────────────────────┼───────────────┤
│ reshape (Reshape)               │ (None, 128, 1)         │             0 │
├─────────────────────────────────┼────────────────────────┼───────────────┤
│ max_pooling1d_1 (MaxPooling1D)  │ (None, 25, 1)          │             0 │
├─────────────────────────────────┼────────────────────────┼───────────────┤
│ batch_normalization_1           │ (None, 25, 1)          │             4 │
│ (BatchNormalization)            │                        │               │
├─────────────────────────────────┼────────────────────────┼───────────────┤
│ bidirectional_1 (Bidirectional) │ (None, 256)            │       133,120 │
├─────────────────────────────────┼────────────────────────┼───────────────┤
│ dropout (Dropout)               │ (None, 256)            │             0 │
├─────────────────────────────────┼────────────────────────┼───────────────┤
│ dense (Dense)                   │ (None, 5)              │         1,285 │
├─────────────────────────────────┼────────────────────────┼───────────────┤
│ activation (Activation)         │ (None, 5)              │             0 │
└─────────────────────────────────┴────────────────────────┴───────────────┘Total params: 208,585 (814.79 KB)Trainable params: 208,455 (814.28 KB)Non-trainable params: 130 (520.00 B)
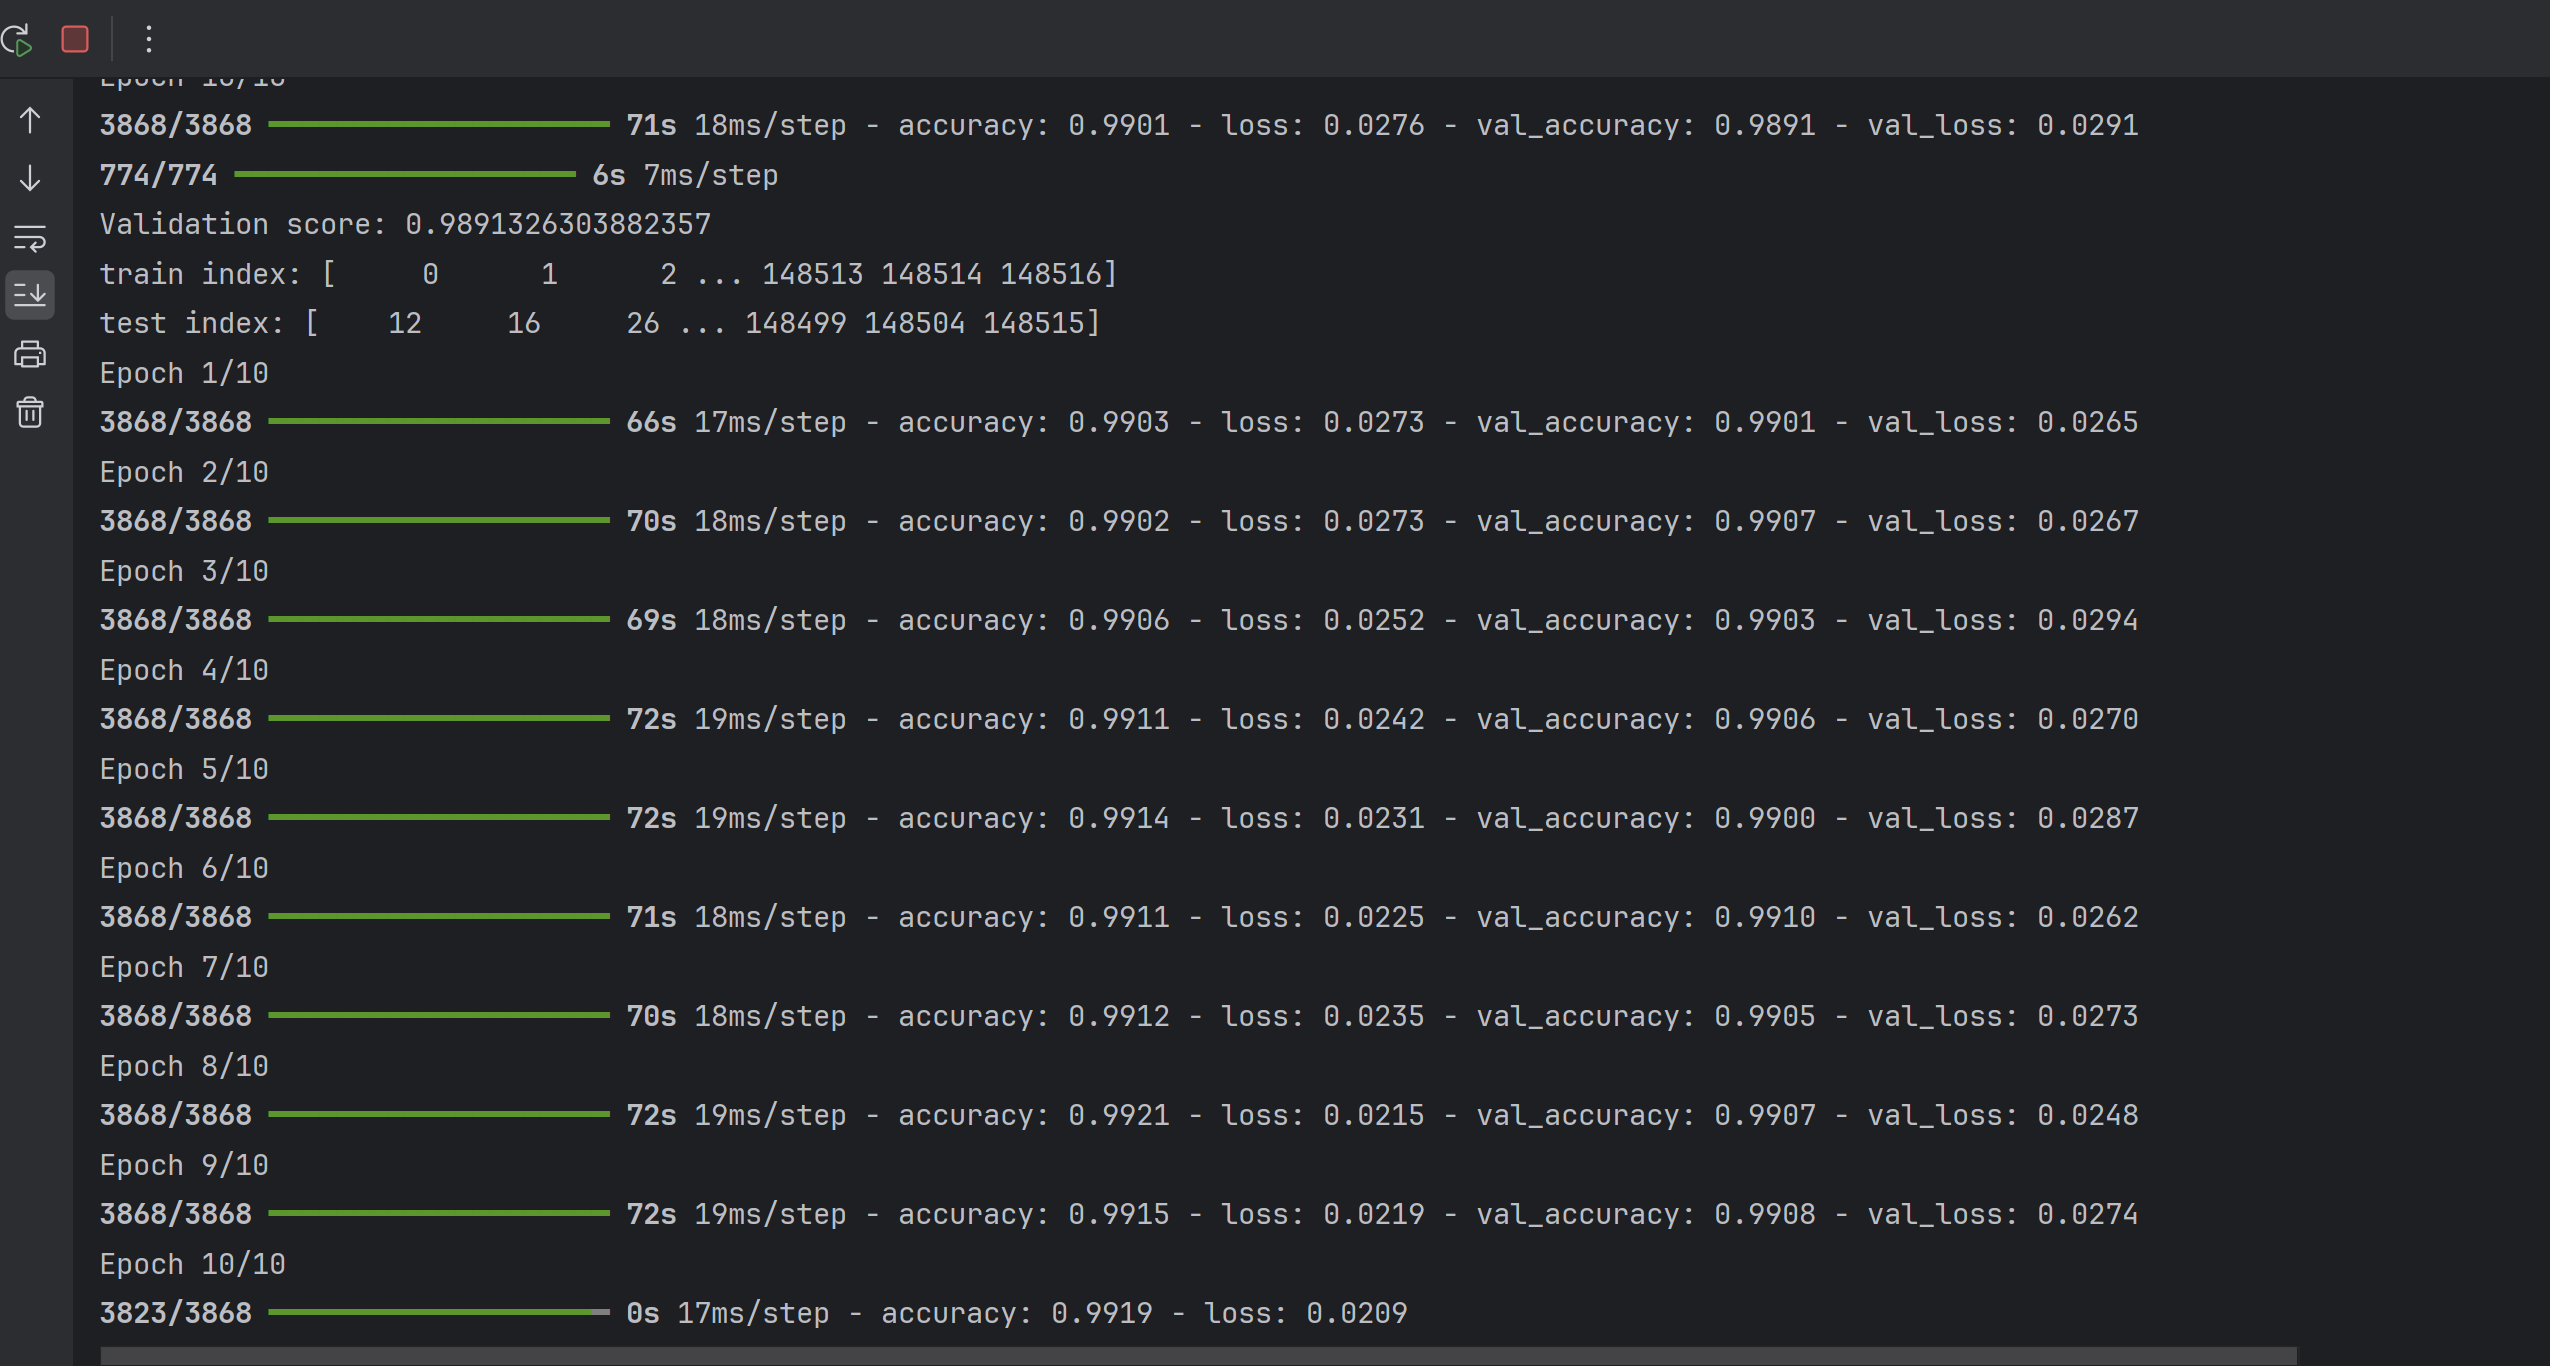
在训练过程中,效果已经不错:
输入特征:
list(combined_data_X.columns)
Out[4]:
['duration','src_bytes','dst_bytes','land','wrong_fragment','urgent','hot','num_failed_logins','logged_in','num_compromised','root_shell','su_attempted','num_root','num_file_creations','num_shells','num_access_files','num_outbound_cmds','is_host_login','is_guest_login','count','srv_count','serror_rate','srv_serror_rate','rerror_rate','srv_rerror_rate','same_srv_rate','diff_srv_rate','srv_diff_host_rate','dst_host_count','dst_host_srv_count','dst_host_same_srv_rate','dst_host_diff_srv_rate','dst_host_same_src_port_rate','dst_host_srv_diff_host_rate','dst_host_serror_rate','dst_host_srv_serror_rate','dst_host_rerror_rate','dst_host_srv_rerror_rate','protocol_type_icmp','protocol_type_tcp','protocol_type_udp','service_IRC','service_X11','service_Z39_50','service_aol','service_auth','service_bgp','service_courier','service_csnet_ns','service_ctf','service_daytime','service_discard','service_domain','service_domain_u','service_echo','service_eco_i','service_ecr_i','service_efs','service_exec','service_finger','service_ftp','service_ftp_data','service_gopher','service_harvest','service_hostnames','service_http','service_http_2784','service_http_443','service_http_8001','service_imap4','service_iso_tsap','service_klogin','service_kshell','service_ldap','service_link','service_login','service_mtp','service_name','service_netbios_dgm','service_netbios_ns','service_netbios_ssn','service_netstat','service_nnsp','service_nntp','service_ntp_u','service_other','service_pm_dump','service_pop_2','service_pop_3','service_printer','service_private','service_red_i','service_remote_job','service_rje','service_shell','service_smtp','service_sql_net','service_ssh','service_sunrpc','service_supdup','service_systat','service_telnet','service_tftp_u','service_tim_i','service_time','service_urh_i','service_urp_i','service_uucp','service_uucp_path','service_vmnet','service_whois','flag_OTH','flag_REJ','flag_RSTO','flag_RSTOS0','flag_RSTR','flag_S0','flag_S1','flag_S2','flag_S3','flag_SF','flag_SH']
类别输出:
Class
Normal 77232
DoS 53387
Probe 14077
R2L 3702
U2R 119
Name: count, dtype: int64
推理
推理代码:
# 加载测试集
import numpy as np
import pandas as pd
from keras import Sequential
from keras.models import Sequential
from keras.layers import Dense, Dropout, Activation, Embedding
from keras.layers import LSTM, SimpleRNN, GRU, Bidirectional, BatchNormalization, Convolution1D, MaxPooling1D, Reshape, \GlobalAveragePooling1D
from keras.utils import to_categorical
import sklearn.preprocessing
from sklearn import metrics
from keras.models import load_model# 双向RNN
batch_size = 32
model = Sequential()
model.add(Convolution1D(64, kernel_size=122, padding="same", activation="relu", input_shape=(122, 1)))
model.add(MaxPooling1D(pool_size=(5)))
model.add(BatchNormalization())
model.add(Bidirectional(LSTM(64, return_sequences=False)))
model.add(Reshape((128, 1), input_shape=(128,)))
model.add(MaxPooling1D(pool_size=(5)))
model.add(BatchNormalization())
model.add(Bidirectional(LSTM(128, return_sequences=False)))
model.add(Dropout(0.5))
model.add(Dense(5))
model.add(Activation('softmax'))
model.compile(loss='categorical_crossentropy', optimizer='adam', metrics=['accuracy'])
print(model.summary())
# 加载之前保存的模型
# model = load_model('oldNSL_KDD.h5')
# 在确保模型架构完全一致的情况下,只加载权重
model.load_weights('oldNSL_KDD.h5')data = pd.read_excel('combined_data_X.xlsx', index_col=0)
input_features = data.iloc[0, :].values# 因为模型期望的输入形状是 (batch_size, timesteps, features_per_timestep)
# 我们需要将输入数据reshape成 (1, 122, 1) 形状,这里 1 是batch size
input_features = input_features.reshape(1, 122, 1)# 使用模型进行推理
predictions = model.predict(input_features)# 打印预测的概率,predictions将是一个形状为(1, 5)的数组,包含5个输出类别的概率
print(predictions)# Class
# Normal    77232
# DoS       53387
# Probe     14077
# R2L        3702
# U2R         119
# Name: count, dtype: int64# 输出top1的类别和概率
top1_class = np.argmax(predictions)
top1_probability = predictions[0, top1_class]
print(f"Top1 class: {top1_class}, probability: {top1_probability}")
推理结果:
D:\ProgramData\miniconda3\envs\py310\python.exe E:\workcode\pytestx\pythonProject\ruqinx\b_lstm\val.py
2024-04-16 17:02:44.386562: I tensorflow/core/util/port.cc:113] oneDNN custom operations are on. You may see slightly different numerical results due to floating-point round-off errors from different computation orders. To turn them off, set the environment variable `TF_ENABLE_ONEDNN_OPTS=0`.
2024-04-16 17:02:45.090275: I tensorflow/core/util/port.cc:113] oneDNN custom operations are on. You may see slightly different numerical results due to floating-point round-off errors from different computation orders. To turn them off, set the environment variable `TF_ENABLE_ONEDNN_OPTS=0`.
D:\ProgramData\miniconda3\envs\py310\lib\site-packages\keras\src\layers\convolutional\base_conv.py:99: UserWarning: Do not pass an `input_shape`/`input_dim` argument to a layer. When using Sequential models, prefer using an `Input(shape)` object as the first layer in the model instead.super().__init__(
2024-04-16 17:02:46.745679: I tensorflow/core/platform/cpu_feature_guard.cc:210] This TensorFlow binary is optimized to use available CPU instructions in performance-critical operations.
To enable the following instructions: AVX2 AVX512F AVX512_VNNI FMA, in other operations, rebuild TensorFlow with the appropriate compiler flags.
D:\ProgramData\miniconda3\envs\py310\lib\site-packages\keras\src\layers\reshaping\reshape.py:39: UserWarning: Do not pass an `input_shape`/`input_dim` argument to a layer. When using Sequential models, prefer using an `Input(shape)` object as the first layer in the model instead.super().__init__(**kwargs)
Model: "sequential"
┌─────────────────────────────────┬────────────────────────┬───────────────┐
│ Layer (type)                    │ Output Shape           │       Param # │
├─────────────────────────────────┼────────────────────────┼───────────────┤
│ conv1d (Conv1D)                 │ (None, 122, 64)        │         7,872 │
├─────────────────────────────────┼────────────────────────┼───────────────┤
│ max_pooling1d (MaxPooling1D)    │ (None, 24, 64)         │             0 │
├─────────────────────────────────┼────────────────────────┼───────────────┤
│ batch_normalization             │ (None, 24, 64)         │           256 │
│ (BatchNormalization)            │                        │               │
├─────────────────────────────────┼────────────────────────┼───────────────┤
│ bidirectional (Bidirectional)   │ (None, 128)            │        66,048 │
├─────────────────────────────────┼────────────────────────┼───────────────┤
│ reshape (Reshape)               │ (None, 128, 1)         │             0 │
├─────────────────────────────────┼────────────────────────┼───────────────┤
│ max_pooling1d_1 (MaxPooling1D)  │ (None, 25, 1)          │             0 │
├─────────────────────────────────┼────────────────────────┼───────────────┤
│ batch_normalization_1           │ (None, 25, 1)          │             4 │
│ (BatchNormalization)            │                        │               │
├─────────────────────────────────┼────────────────────────┼───────────────┤
│ bidirectional_1 (Bidirectional) │ (None, 256)            │       133,120 │
├─────────────────────────────────┼────────────────────────┼───────────────┤
│ dropout (Dropout)               │ (None, 256)            │             0 │
├─────────────────────────────────┼────────────────────────┼───────────────┤
│ dense (Dense)                   │ (None, 5)              │         1,285 │
├─────────────────────────────────┼────────────────────────┼───────────────┤
│ activation (Activation)         │ (None, 5)              │             0 │
└─────────────────────────────────┴────────────────────────┴───────────────┘Total params: 208,585 (814.79 KB)Trainable params: 208,455 (814.28 KB)Non-trainable params: 130 (520.00 B)
None
1/1 ━━━━━━━━━━━━━━━━━━━━ 0s 393ms/step
[[1.7173363e-06 9.9280131e-01 1.5588279e-05 7.0899338e-03 9.1460090e-05]]
Top1 class: 1, probability: 0.992801308631897Process finished with exit code 0
工程介绍
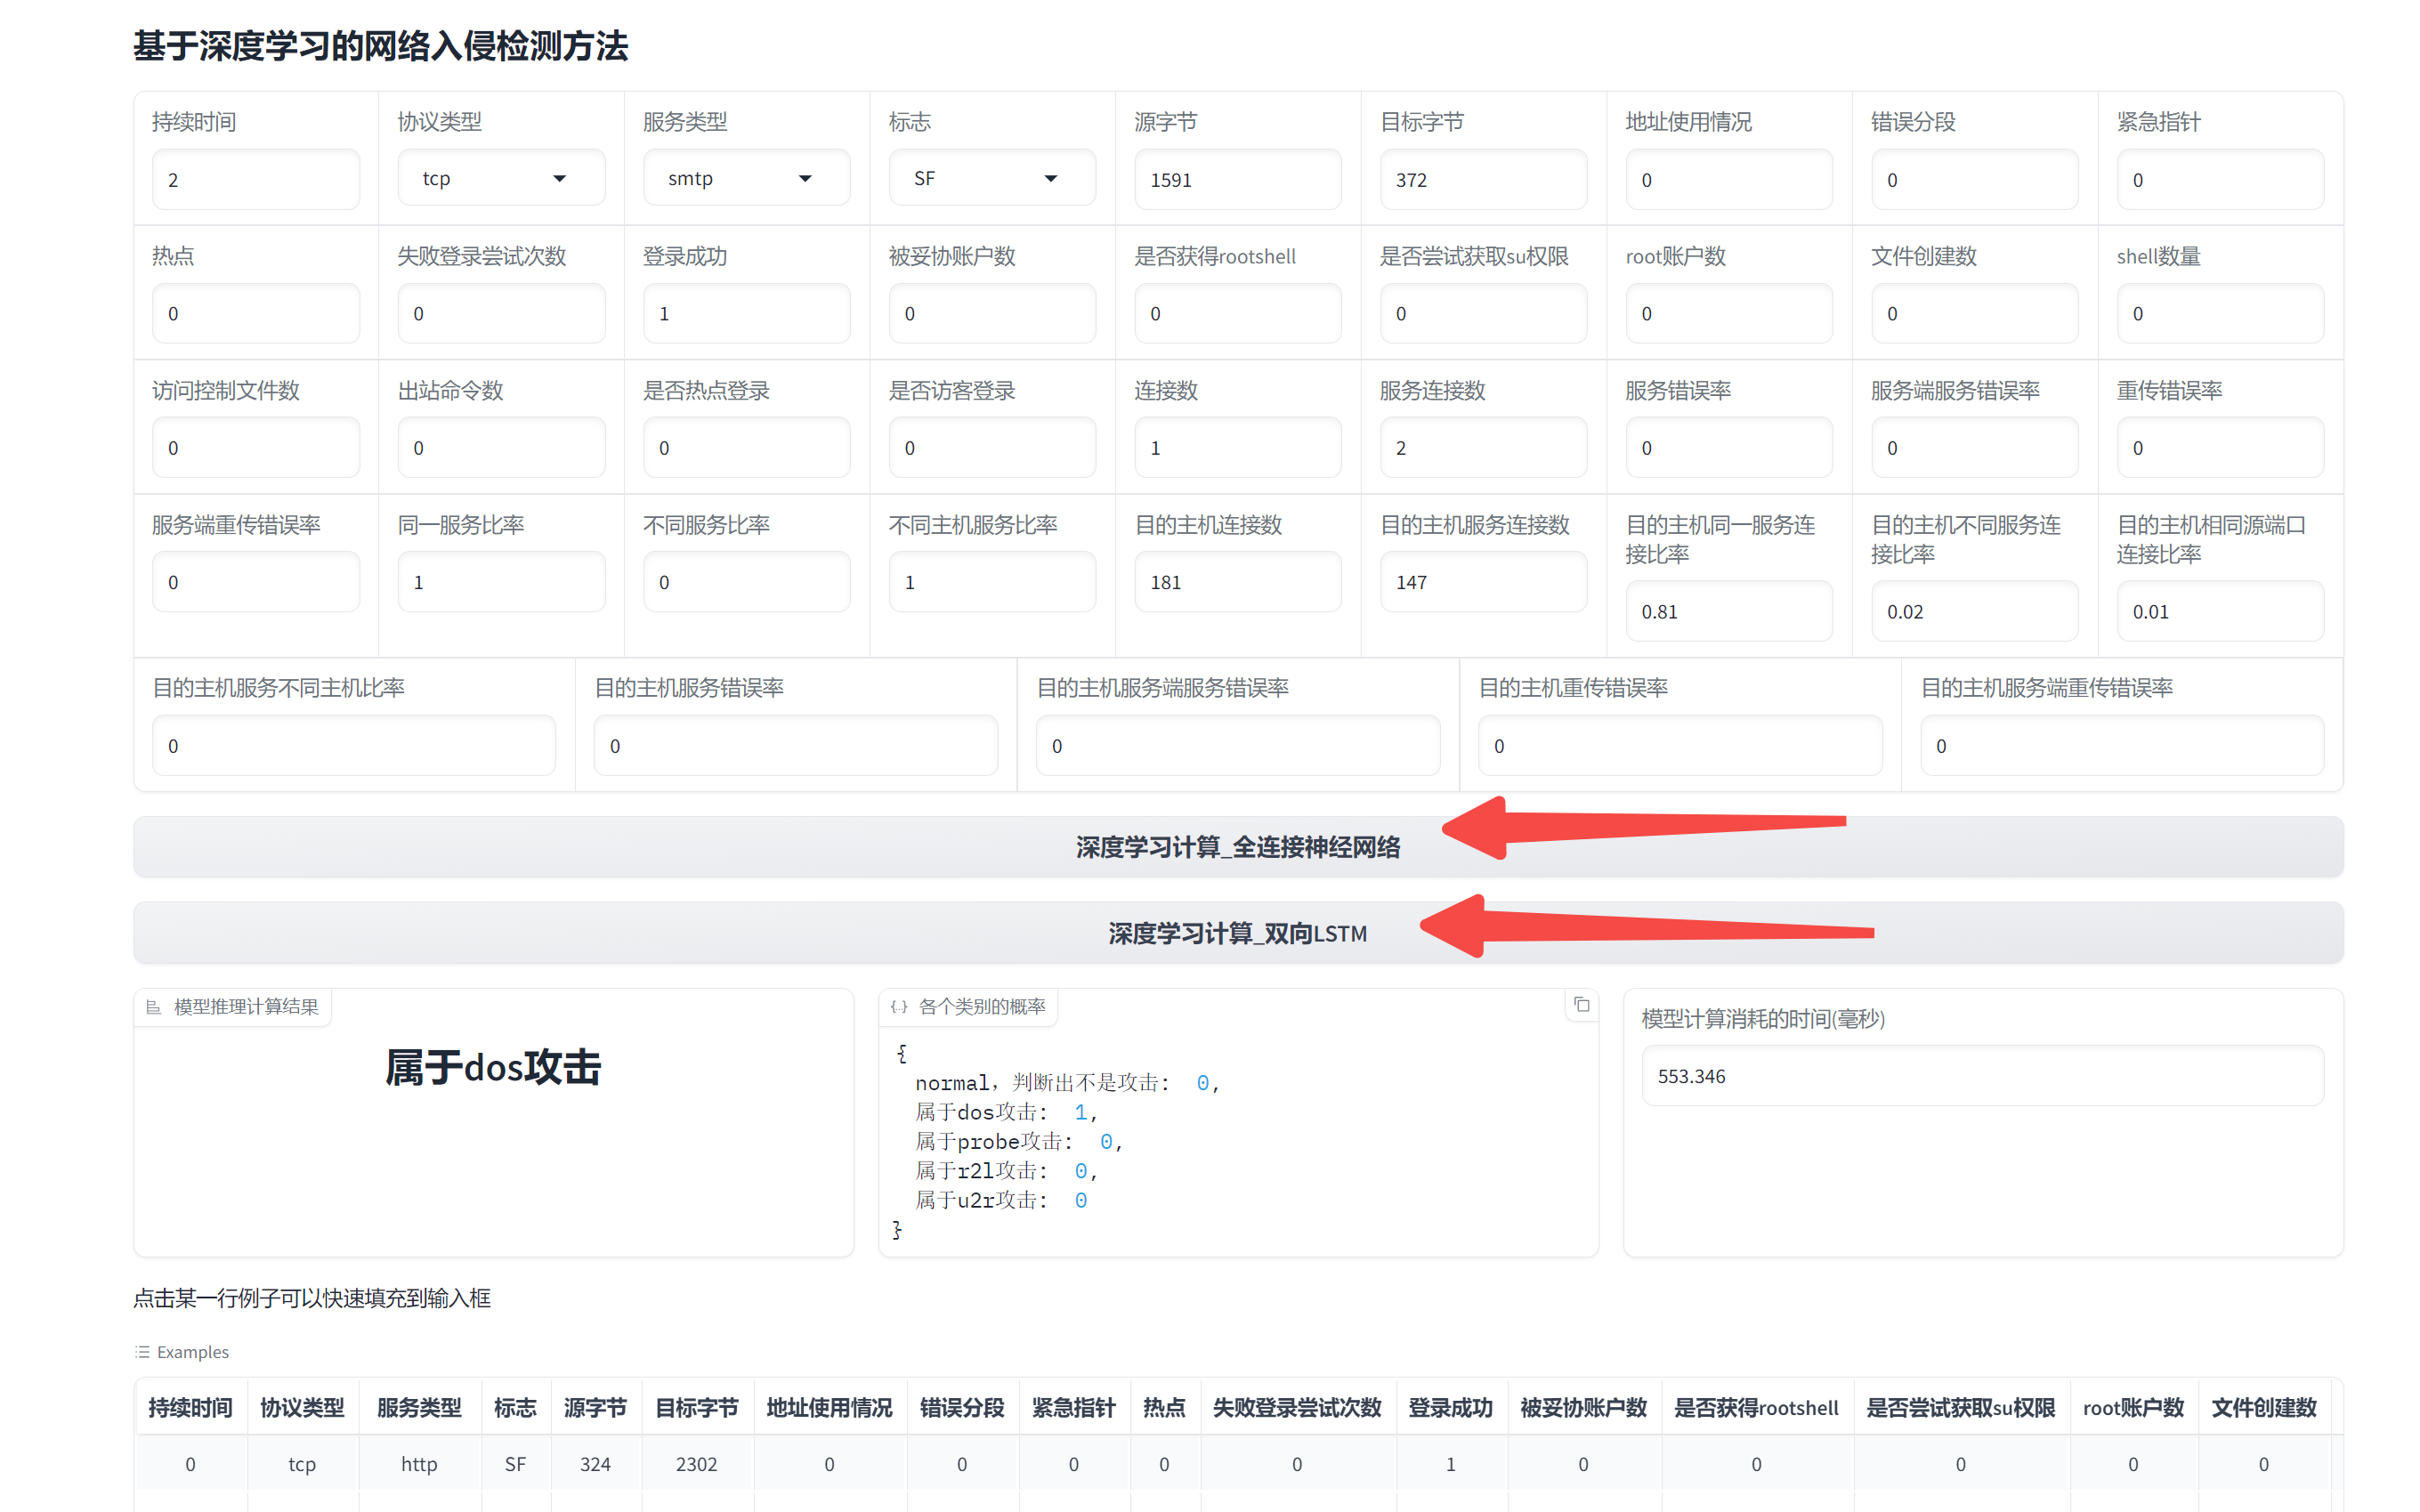
gradio前端展示界面
代码获取
https://docs.qq.com/sheet/DUEdqZ2lmbmR6UVdU?tab=BB08J2
这篇关于【深度学习】【机器学习】用神经网络进行入侵检测,NSL-KDD数据集,基于机器学习(深度学习)判断网络入侵,网络攻击,流量异常【3】的文章就介绍到这儿,希望我们推荐的文章对编程师们有所帮助!


