本文主要是介绍选择性搜索 Selective Search -- 算法详解+源码分析,希望对大家解决编程问题提供一定的参考价值,需要的开发者们随着小编来一起学习吧!
目录
1 前言
2 Selective Search算法
3 Python源码分析
-
1 前言
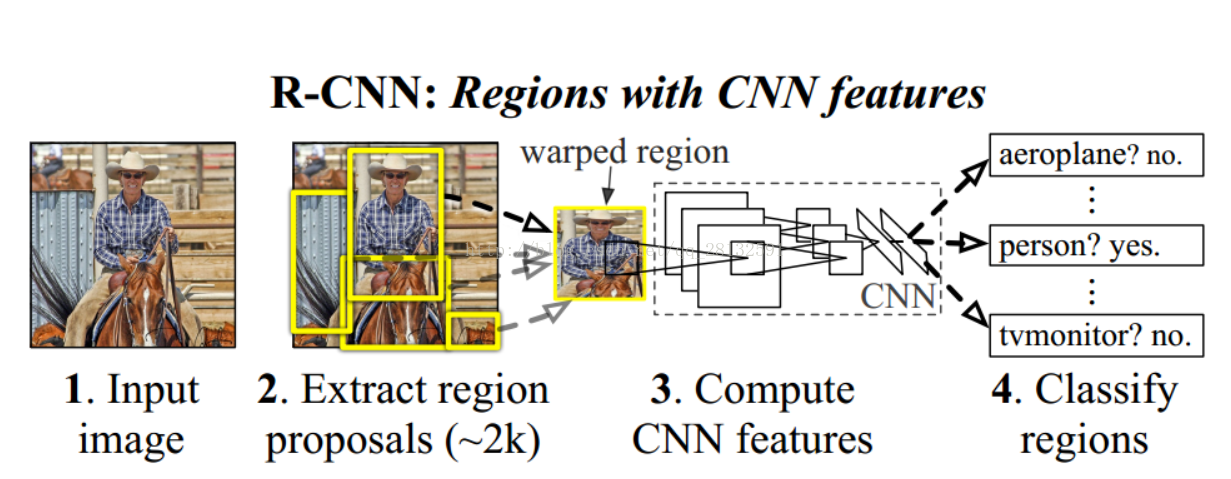
在目标检测时,为了定位到目标的具体位置,通常会把图像分成许多子块(sub-regions / patches),然后把子块作为输入,送到目标识别的模型中。selective search就是一种选择子块的启发式方法。
-
2 Selective Search算法
主要思路:输入一张图片,首先通过图像分割的方法(如大名鼎鼎的felzenszwalb算法)获得很多小的区域,然后对这些小的区域不断进行合并,一直到无法合并为止。此时这些原始的小区域和合并得到的区域的就是我们得到的bounding box.
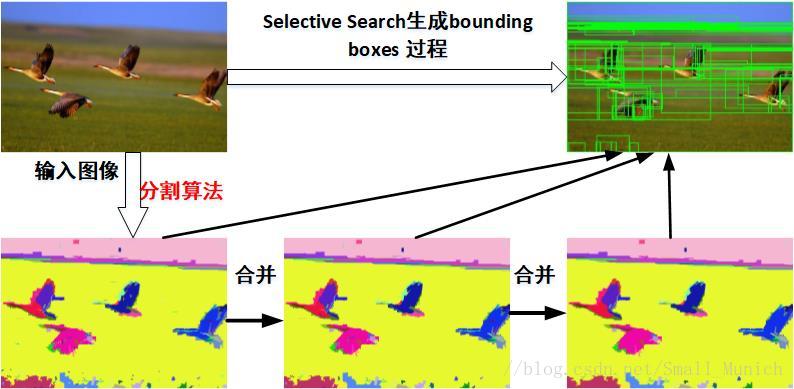
算法分为如下几个大步:
1. 生成原始的区域集R(利用felzenszwalb算法)
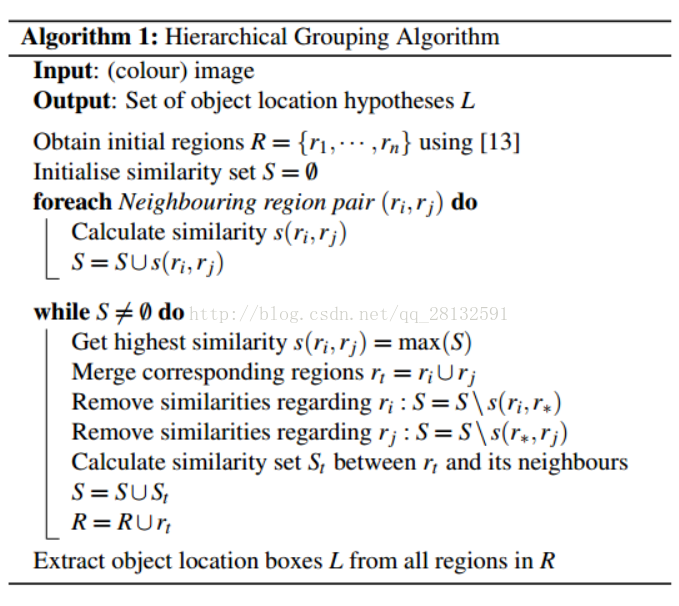
2. 计算区域集R里每个相邻区域的相似度S={s1,s2,…}
3. 找出相似度最高的两个区域,将其合并为新集,添加进R
4. 从S中移除所有与第3步中有关的子集
5. 计算新集与所有子集的相似度
6.跳至第三步,不断循环,合并,直至S为空(到不能再合并时为止)
-
3 Python源码分析
Github上有一个选择性搜索的简单实现 -- selectivesearch ,可以帮助大家理解
import skimage.data
import selectivesearchimg = skimage.data.astronaut()
img_lbl, regions = selectivesearch.selective_search(img, scale=500, sigma=0.9, min_size=10)
regions[:10]
=>
[{'labels': [0.0], 'rect': (0, 0, 15, 24), 'size': 260},{'labels': [1.0], 'rect': (13, 0, 1, 12), 'size': 23},{'labels': [2.0], 'rect': (0, 15, 15, 11), 'size': 30},{'labels': [3.0], 'rect': (15, 14, 0, 0), 'size': 1},{'labels': [4.0], 'rect': (0, 0, 61, 153), 'size': 4927},{'labels': [5.0], 'rect': (0, 12, 61, 142), 'size': 177},{'labels': [6.0], 'rect': (7, 54, 6, 17), 'size': 8},{'labels': [7.0], 'rect': (28, 50, 18, 32), 'size': 22},{'labels': [8.0], 'rect': (2, 99, 7, 24), 'size': 24},{'labels': [9.0], 'rect': (14, 118, 79, 117), 'size': 4008}]
1. 用户生成原始区域集的函数,其中用到了felzenszwalb图像分割算法。每一个区域都有一个编号,将编号并入图片中,方便后面的操作
def _generate_segments(im_orig, scale, sigma, min_size):"""segment smallest regions by the algorithm of Felzenswalb andHuttenlocher"""# open the Imageim_mask = skimage.segmentation.felzenszwalb(skimage.util.img_as_float(im_orig), scale=scale, sigma=sigma,min_size=min_size)# merge mask channel to the image as a 4th channelim_orig = numpy.append(im_orig, numpy.zeros(im_orig.shape[:2])[:, :, numpy.newaxis], axis=2)im_orig[:, :, 3] = im_maskreturn im_orig2. 计算两个区域的相似度
论文中考虑了四种相似度 -- 颜色,纹理,尺寸,以及交叠。
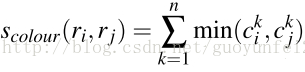
其中颜色和纹理相似度,通过获取两个区域的直方图的交集,来判断相似度。
最后的相似度是四种相似度的加和。
def _sim_colour(r1, r2):"""calculate the sum of histogram intersection of colour"""return sum([min(a, b) for a, b in zip(r1["hist_c"], r2["hist_c"])])def _sim_texture(r1, r2):"""calculate the sum of histogram intersection of texture"""return sum([min(a, b) for a, b in zip(r1["hist_t"], r2["hist_t"])])def _sim_size(r1, r2, imsize):"""calculate the size similarity over the image"""return 1.0 - (r1["size"] + r2["size"]) / imsizedef _sim_fill(r1, r2, imsize):"""calculate the fill similarity over the image"""bbsize = ((max(r1["max_x"], r2["max_x"]) - min(r1["min_x"], r2["min_x"]))* (max(r1["max_y"], r2["max_y"]) - min(r1["min_y"], r2["min_y"])))return 1.0 - (bbsize - r1["size"] - r2["size"]) / imsizedef _calc_sim(r1, r2, imsize):return (_sim_colour(r1, r2) + _sim_texture(r1, r2)+ _sim_size(r1, r2, imsize) + _sim_fill(r1, r2, imsize))3. 用于计算颜色和纹理的直方图的函数
颜色直方图:将色彩空间转为HSV,每个通道下以bins=25计算直方图,这样每个区域的颜色直方图有25*3=75个区间。 对直方图除以区域尺寸做归一化后使用下式计算相似度:
纹理相似度:论文采用方差为1的高斯分布在8个方向做梯度统计,然后将统计结果(尺寸与区域大小一致)以bins=10计算直方图。直方图区间数为8*3*10=240(使用RGB色彩空间)。这里是用了LBP(local binary pattern)获取纹理特征,建立直方图,其余相同

其中, 是直方图中第
 个bin的值。
def _calc_colour_hist(img):"""calculate colour histogram for each regionthe size of output histogram will be BINS * COLOUR_CHANNELS(3)number of bins is 25 as same as [uijlings_ijcv2013_draft.pdf]extract HSV"""BINS = 25hist = numpy.array([])for colour_channel in (0, 1, 2):# extracting one colour channelc = img[:, colour_channel]# calculate histogram for each colour and join to the resulthist = numpy.concatenate([hist] + [numpy.histogram(c, BINS, (0.0, 255.0))[0]])# L1 normalizehist = hist / len(img)return histdef _calc_texture_gradient(img):"""calculate texture gradient for entire imageThe original SelectiveSearch algorithm proposed Gaussian derivativefor 8 orientations, but we use LBP instead.output will be [height(*)][width(*)]"""ret = numpy.zeros((img.shape[0], img.shape[1], img.shape[2]))for colour_channel in (0, 1, 2):ret[:, :, colour_channel] = skimage.feature.local_binary_pattern(img[:, :, colour_channel], 8, 1.0)return retdef _calc_texture_hist(img):"""calculate texture histogram for each regioncalculate the histogram of gradient for each coloursthe size of output histogram will beBINS * ORIENTATIONS * COLOUR_CHANNELS(3)"""BINS = 10hist = numpy.array([])for colour_channel in (0, 1, 2):# mask by the colour channelfd = img[:, colour_channel]# calculate histogram for each orientation and concatenate them all# and join to the resulthist = numpy.concatenate([hist] + [numpy.histogram(fd, BINS, (0.0, 1.0))[0]])# L1 Normalizehist = hist / len(img)return hist4. 提取区域的尺寸,颜色和纹理特征
def _extract_regions(img):R = {}# get hsv imagehsv = skimage.color.rgb2hsv(img[:, :, :3])# pass 1: count pixel positionsfor y, i in enumerate(img):for x, (r, g, b, l) in enumerate(i):# initialize a new regionif l not in R:R[l] = {"min_x": 0xffff, "min_y": 0xffff,"max_x": 0, "max_y": 0, "labels": [l]}# bounding boxif R[l]["min_x"] > x:R[l]["min_x"] = xif R[l]["min_y"] > y:R[l]["min_y"] = yif R[l]["max_x"] < x:R[l]["max_x"] = xif R[l]["max_y"] < y:R[l]["max_y"] = y# pass 2: calculate texture gradienttex_grad = _calc_texture_gradient(img)# pass 3: calculate colour histogram of each regionfor k, v in list(R.items()):# colour histogrammasked_pixels = hsv[:, :, :][img[:, :, 3] == k]R[k]["size"] = len(masked_pixels / 4)R[k]["hist_c"] = _calc_colour_hist(masked_pixels)# texture histogramR[k]["hist_t"] = _calc_texture_hist(tex_grad[:, :][img[:, :, 3] == k])return R
5. 找邻居 -- 通过计算每个区域与其余的所有区域是否有相交,来判断是不是邻居
def _extract_neighbours(regions):def intersect(a, b):if (a["min_x"] < b["min_x"] < a["max_x"]and a["min_y"] < b["min_y"] < a["max_y"]) or (a["min_x"] < b["max_x"] < a["max_x"]and a["min_y"] < b["max_y"] < a["max_y"]) or (a["min_x"] < b["min_x"] < a["max_x"]and a["min_y"] < b["max_y"] < a["max_y"]) or (a["min_x"] < b["max_x"] < a["max_x"]and a["min_y"] < b["min_y"] < a["max_y"]):return Truereturn FalseR = list(regions.items())neighbours = []for cur, a in enumerate(R[:-1]):for b in R[cur + 1:]:if intersect(a[1], b[1]):neighbours.append((a, b))return neighbours
6. 合并两个区域的函数
def _merge_regions(r1, r2):new_size = r1["size"] + r2["size"]rt = {"min_x": min(r1["min_x"], r2["min_x"]),"min_y": min(r1["min_y"], r2["min_y"]),"max_x": max(r1["max_x"], r2["max_x"]),"max_y": max(r1["max_y"], r2["max_y"]),"size": new_size,"hist_c": (r1["hist_c"] * r1["size"] + r2["hist_c"] * r2["size"]) / new_size,"hist_t": (r1["hist_t"] * r1["size"] + r2["hist_t"] * r2["size"]) / new_size,"labels": r1["labels"] + r2["labels"]}return rt7. 主函数 -- Selective Search
scale:图像分割的集群程度。值越大,意味集群程度越高,分割的越少,获得子区域越大。默认为1
signa: 图像分割前,会先对原图像进行高斯滤波去噪,sigma即为高斯核的大小。默认为0.8
min_size : 最小的区域像素点个数。当小于此值时,图像分割的计算就停止,默认为20
每次选出相似度最高的一组区域(如编号为100和120的区域),进行合并,得到新的区域(如编号为300)。然后计算新的区域300与区域100的所有邻居和区域120的所有邻居的相似度,加入区域集S。不断循环,知道S为空,此时最后只剩下一个区域,而且它的像素数会非常大,接近原始图片的像素数,因此无法继续合并。最后退出程序。
def selective_search(im_orig, scale=1.0, sigma=0.8, min_size=50):'''Selective SearchParameters----------im_orig : ndarrayInput imagescale : intFree parameter. Higher means larger clusters in felzenszwalb segmentation.sigma : floatWidth of Gaussian kernel for felzenszwalb segmentation.min_size : intMinimum component size for felzenszwalb segmentation.Returns-------img : ndarrayimage with region labelregion label is stored in the 4th value of each pixel [r,g,b,(region)]regions : array of dict[{'rect': (left, top, width, height),'labels': [...],'size': component_size},...]'''assert im_orig.shape[2] == 3, "3ch image is expected"# load image and get smallest regions# region label is stored in the 4th value of each pixel [r,g,b,(region)]img = _generate_segments(im_orig, scale, sigma, min_size)if img is None:return None, {}imsize = img.shape[0] * img.shape[1]R = _extract_regions(img)# extract neighbouring informationneighbours = _extract_neighbours(R)# calculate initial similaritiesS = {}for (ai, ar), (bi, br) in neighbours:S[(ai, bi)] = _calc_sim(ar, br, imsize)# hierarchal searchwhile S != {}:# get highest similarityi, j = sorted(S.items(), key=lambda i: i[1])[-1][0]# merge corresponding regionst = max(R.keys()) + 1.0R[t] = _merge_regions(R[i], R[j])# mark similarities for regions to be removedkey_to_delete = []for k, v in list(S.items()):if (i in k) or (j in k):key_to_delete.append(k)# remove old similarities of related regionsfor k in key_to_delete:del S[k]# calculate similarity set with the new regionfor k in [a for a in key_to_delete if a != (i, j)]:n = k[1] if k[0] in (i, j) else k[0]S[(t, n)] = _calc_sim(R[t], R[n], imsize)regions = []for k, r in list(R.items()):regions.append({'rect': (r['min_x'], r['min_y'],r['max_x'] - r['min_x'], r['max_y'] - r['min_y']),'size': r['size'],'labels': r['labels']})return img, regions
这篇关于选择性搜索 Selective Search -- 算法详解+源码分析的文章就介绍到这儿,希望我们推荐的文章对编程师们有所帮助!


