本文主要是介绍SpringBoot3 集成Springdoc 实现Swagger3功能,希望对大家解决编程问题提供一定的参考价值,需要的开发者们随着小编来一起学习吧!
说明: 只通过引用org.springdoc 的两个包就可以使用Swagger3 功能(步骤1);如想更美观及实现动态认证的开启与关闭,及Swagger3登录认证等功能,需实现(步骤1、2、3)的配置;
1、 引包
<dependency><groupId>org.springdoc</groupId><artifactId>springdoc-openapi-starter-webmvc-ui</artifactId><version>2.2.0</version></dependency><dependency><groupId>org.springdoc</groupId><artifactId>springdoc-openapi-starter-webmvc-api</artifactId><version>2.2.0</version></dependency><dependency><groupId>com.github.xiaoymin</groupId><artifactId>knife4j-openapi3-jakarta-spring-boot-starter</artifactId><version>4.4.0</version></dependency>2、配置
import io.swagger.v3.oas.models.security.SecurityRequirement;
import io.swagger.v3.oas.models.security.SecurityScheme;
import io.swagger.v3.oas.models.Components;
import io.swagger.v3.oas.models.info.Info;
import io.swagger.v3.oas.models.OpenAPI;
import io.swagger.v3.oas.models.info.Contact;
import org.springframework.context.annotation.Bean;
import org.springframework.context.annotation.Configuration;
import org.springframework.beans.factory.annotation.Value;import java.util.ArrayList;
import java.util.List;/*** Springboot3 + springdoc 实现swagger* 原生地址 http://www.xx.xx/swagger-ui/index.html* 美化地址 http://www.xx.xx/doc.html*/
@Configuration
public class Swagger {@Value("${swagger.token}")private String token = "X_TOKEN";@Value("${swagger.enable-token}")private boolean enableToken = true;@Beanpublic OpenAPI springShopOpenAPI() {OpenAPI openApi = new OpenAPI().info(new Info().title("测试文档").contact(new Contact().name("zc")).description("我的API文档").version("v1"));if(enableToken){openApi.components(components()).security(securityRequirement());}return openApi;}/*** 设置授权认证信息* @return*/private Components components(){return new Components()// 设置 spring security jwt accessToken 认证的请求头 Authorization: Bearer xxx.xxx.xxx.addSecuritySchemes(token, new SecurityScheme().type(SecurityScheme.Type.HTTP).bearerFormat("JWT").in(SecurityScheme.In.HEADER).name("Authorization").scheme("Bearer"));}private List<SecurityRequirement> securityRequirement(){List<SecurityRequirement> securityRequirementList = new ArrayList<>();securityRequirementList.add(new SecurityRequirement().addList(token));return securityRequirementList;}}
3、 配置加强文件
swagger:# 是否开启token 认证enable-token: false# token认证 keytoken: X_TOKEN
springdoc:swagger-ui:path: /swagger-ui.htmltags-sorter: alphaoperations-sorter: alphaapi-docs:path: /v3/api-docsgroup-configs:- group: 'default'paths-to-match: '/**'# 生成文档所需的扫包路径packages-to-scan: com.zc.controller
##knife4j 增强配置
knife4j:#是否启用增强设置enable: true#开启生产环境屏蔽production: false#是否启用登录认证 basic:enable: trueusername: adminpassword: 123456setting:  # 前端UI的个性化配置属性language: zh_cn # 显示语言中文enable-version: trueenable-swagger-models: true # 是否显示界面中SwaggerModel功能swagger-model-name: SwaggerModel2  # 重命名SwaggerModel名称,默认enable-document-manage: true # 是否显示界面中"文档管理"功能
4、controller
这里有个问题:controller 里面不加security = @SecurityRequirement(name = "X_TOKEN") 美化的doc.html路径的token 会失效;swagger-ui/index.html 路径的正常; X_TOKEN 就是配置文件中的token值; 如有好的处理办法,请各位大神指教一下;
import com.zc.bean.HostDiffBean;
import com.zc.service.TestHostService;
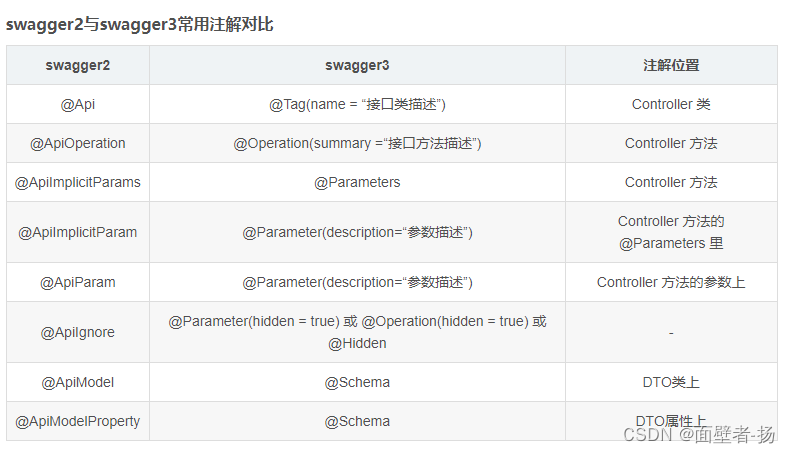
import io.swagger.v3.oas.annotations.Operation;
import io.swagger.v3.oas.annotations.Parameter;
import io.swagger.v3.oas.annotations.security.SecurityRequirement;import io.swagger.v3.oas.annotations.tags.Tag;
import org.springframework.beans.factory.annotation.Autowired;
import org.springframework.beans.factory.annotation.Value;
import org.springframework.web.bind.annotation.GetMapping;
import org.springframework.web.bind.annotation.RequestMapping;
import org.springframework.web.bind.annotation.RequestParam;
import org.springframework.web.bind.annotation.RestController;import java.util.List;/*** @author zc* @date 2024/2/23 13:29* @desc*/
@Tag(name = "Test")
@RestController
@RequestMapping("/test1")
public class TestSwagger3Controller {@Value("${swagger.token}")private String token = "X_TOKEN";@Autowiredprivate TestHostService testHostService;@GetMapping("/get")@Operation(summary  = "测试方法", description = "测试方法", security = @SecurityRequirement(name = "X_TOKEN"))public List<HostDiffBean> test(@RequestParam(name = "pageSize") @Parameter(name = "pageSize", description = "页数") Integer pageSize){return testHostService.list();}@GetMapping("/getHost")@Operation(summary  = "测试方法", description = "测试方法", security = @SecurityRequirement(name = "X_TOKEN"))public List<HostDiffBean> testHost(@RequestParam(name = "pageSize") @Parameter(name = "pageSize", description = "页数") Integer pageSize){return testHostService.list();}
}
5、bean
import com.baomidou.mybatisplus.annotation.IdType;
import com.baomidou.mybatisplus.annotation.TableField;
import com.baomidou.mybatisplus.annotation.TableId;
import com.baomidou.mybatisplus.annotation.TableName;
import com.zc.enums.SexEnum;
import io.swagger.v3.oas.annotations.media.Schema;
import lombok.Data;import java.io.Serializable;
import java.util.Date;/*** @author zc* @date 2024/3/14 17:16* @desc*/
@Data
@TableName("cm_host_compare_diff")
@Schema(description = "测试表")
public class HostDiffBean implements Serializable {/*** id*/@TableId(type = IdType.ASSIGN_UUID)@Schema(description = "主键")private String id;/*** 序列号*/@Schema(description = "序列号")private String serialNumber;/*** ip*/private String ip;/*** 设备型号*/private String deviceNo;/*** 华为端ip*/@TableField(value = "h_ip")private String hIp;/*** 华为端设备型号*/@TableField(value = "h_device_No")private String hDeviceNo;/*** 创建时间*/private Date createTime;/*** 性别*/private SexEnum sex;
}
6、参考
springboot集成springdoc-openapi(模拟前端请求)_springdoc-openapi-ui-CSDN博客
Java21 + SpringBoot3整合springdoc-openapi,自动生成在线接口文档,支持SpringSecurity和JWT认证方式_java 使用springdoc-openapi-CSDN博客
这篇关于SpringBoot3 集成Springdoc 实现Swagger3功能的文章就介绍到这儿,希望我们推荐的文章对编程师们有所帮助!


