本文主要是介绍Gradle 实战 - SourceSet 配置 -ApiHug准备-工具篇-011,希望对大家解决编程问题提供一定的参考价值,需要的开发者们随着小编来一起学习吧!
🤗 ApiHug × {Postman|Swagger|Api...} = 快↑ 准√ 省↓
- GitHub - apihug/apihug.com: All abou the Apihug
- apihug.com: 有爱,有温度,有质量,有信任
- ApiHug - API design Copilot - IntelliJ IDEs Plugin | Marketplace
ApiHug 整个工具链基于 Gradle, 使用 ApiHug 准备工作最先需要学习的就是 gradle. 工欲善其事,必先利其器
多 Sourceset 管理 也是 ApiHug 喜欢使用的, 我们称之为 干湿分离, 不同代码放置不同目录
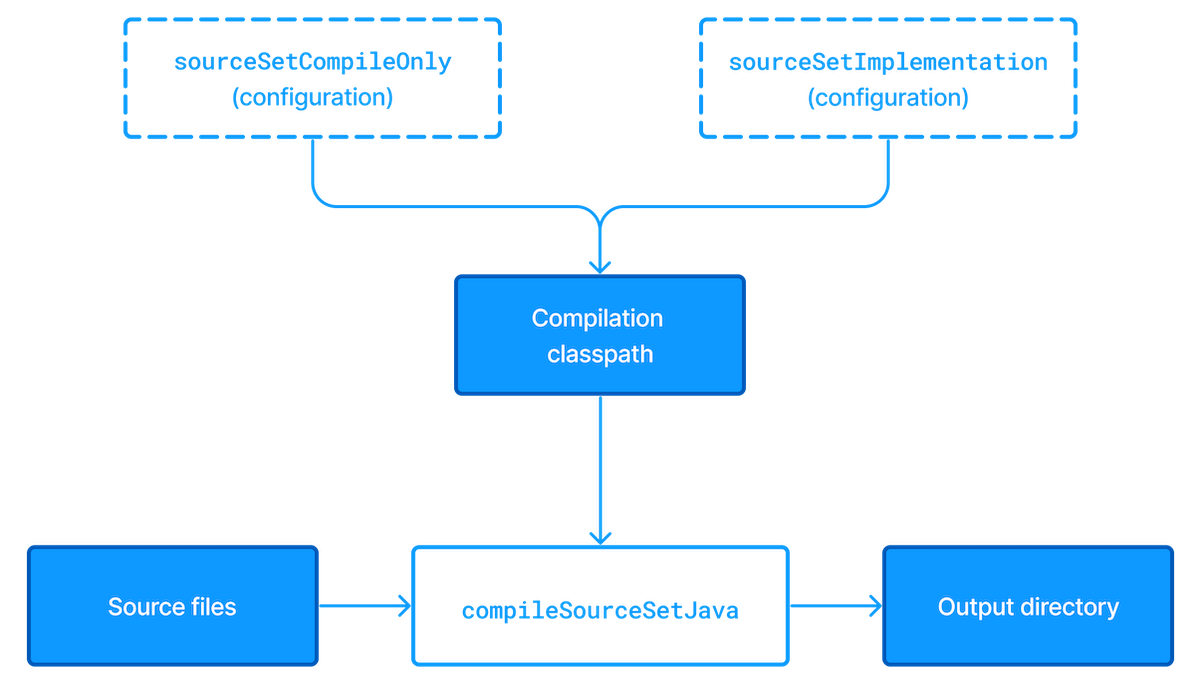
SourceSet 给我们在 gradle 项目中组织我们代码结构的自由; Gradle SourceSet 定义open in new window & org.gradle.api.tasks.SourceSet 支持的APIopen in new window。
SourceSet到底是什么,官网中像下面这样解释的,SourceSet包括源文件及位置、它们的依赖、编译输出的位置这三个概念,SourceSet可以把不同文件目录里的文件按照逻辑关系组织起来。
- the source files and where they’re located
- the compilation classpath, including any required dependencies (via Gradle configurations)
- where the compiled class files are placed
#项目结构
一般的项目结构可能看起来:
source-sets ├── src │ ├── main │ │ └── java │ │ ├── SourceSetsMain.java│ │ └── SourceSetsObject.java│ └── test │ └── java │ └── SourceSetsTest.java└── build.gradle build.gradle 内容:
apply plugin : "java"
description = "Source Sets example"
test {testLogging {events "passed", "skipped", "failed"}
}
dependencies {   implementation('org.apache.httpcomponents:httpclient:4.5.12')testImplementation('junit:junit:4.12')
}
java plugin 默认 src/main/java & src/test/java 为源码目录, 手动打印下:
task printSourceSetInformation(){doLast{sourceSets.each { srcSet ->println "["+srcSet.name+"]"print "-->Source directories: "+srcSet.allJava.srcDirs+"\n"print "-->Output directories: "+srcSet.output.classesDirs.files+"\n"println ""}}
}
SourceSet 文档open in new window, 有非常多的字段,这里不一一枚举。
你可以看到输出如下:
 ./gradlew printSourceSetInformation> Task :source-sets:printSourceSetInformation
[main]
-->Source directories: [.../source-sets/src/main/java]
-->Output directories: [.../source-sets/build/classes/java/main][test]
-->Source directories: [.../source-sets/src/test/java]
-->Output directories: [.../source-sets/build/classes/java/test]
默认两个 sourcesets 一个是 main 另外一个是 test 。
mainContains the production source code of the project, which is compiled and assembled into a JAR.testContains your test source code, which is compiled and executed using JUnit or TestNG. These are typically unit tests, but you can include any test in this source set as long as they all share the same compilation and runtime classpaths#其他默认配置
java 插件同样生成一些默认的 gradle 配置, 基本遵循这样的规则 <sourceSetName><configurationName>, 我们熟悉的 main & test。
比如我们配置的 build.gradle:
dependencies { implementation('org.apache.httpcomponents:httpclient:4.5.12') testImplementation('junit:junit:4.12')
}
注意 implementation 而不是 mainimplementation, gradle 为 main 做了例外。
默认 testImplementation 继承 implementation, 继承他所有的 dependencies & outputs。
打印验证:
task printSourceSetInformation(){doLast{sourceSets.each { srcSet ->println "["+srcSet.name+"]"print "-->Source directories: "+srcSet.allJava.srcDirs+"\n"print "-->Output directories: "+srcSet.output.classesDirs.files+"\n"print "-->Compile classpath:\n"srcSet.compileClasspath.files.each { print "  "+it.path+"\n"}println ""}}
}
输出如下:
[main]
// same output as before
-->Compile classpath:.../httpclient-4.5.12.jar.../httpcore-4.4.13.jar.../commons-logging-1.2.jar.../commons-codec-1.11.jar[test]
// same output as before
-->Compile classpath:.../source-sets/build/classes/java/main.../source-sets/build/resources/main.../httpclient-4.5.12.jar.../junit-4.12.jar.../httpcore-4.4.13.jar.../commons-logging-1.2.jar.../commons-codec-1.11.jar.../hamcrest-core-1.3.jar
注意 test 的编译路径上, 既包含 main 也包含自己的比如 junit 依赖。
public class SourceSetsTest {@Testpublic void whenRun_ThenSuccess() {SourceSetsObject underTest = new SourceSetsObject("lorem", "ipsum");assertThat(underTest.getUser(), is("lorem"));assertThat(underTest.getPassword(), is("ipsum"));}
}
所以测试用例的项目, 得以运行, 依赖 junit + main。
.\gradlew.bat  source-sets:build test  BUILD SUCCESSFUL in 3s
6 actionable tasks: 1 executed, 5 up-to-date
#定制 Source Sets
特别在我们定制一些 integration 测试目录的时候, 有两种方式一种是筛选 IT 结尾的测试类, 另外一种是用独立的 sourceset.
#文件后缀方式
include "**/*IT*", "**/*IntTest*" 表达式来匹配:
task integrationTest(type: Test) {useJUnitPlatform()description = "Execute integration tests."group = "verification"include "**/*IT*", "**/*IntTest*"testLogging {events 'FAILED', 'SKIPPED'}
}
#独立文件目录
目录结构:
└─src├─itest│ └─java│ └─com│ └─dearxue│ └─itest│ SourceSetsItest.java│├─main│ └─java│ └─com│ └─dearxue│ └─main│ SourceSetsMain.java│ SourceSetsObject.java│└─test└─java└─com└─dearxue└─testSourceSetsTest.javabuild 配置
sourceSets {itest {java {}}
}
这里我们没有配置任何source 目录, 因为目录 itest 匹配 sourceSets 名称 itest。 当然我们也可以定制一个自己的名字:
sourceSets{itest {java {srcDirs("src/itest")}}
}
目录输出:
Task :source-sets:printSourceSetInformation
[itest]
-->Source directories: [....\source-sets\src\itest\java]
-->Output directories: [....\source-sets\build\classes\java\itest]
-->Compile classpath:
....
#Source Sets 定制依赖
如果你还记得 main & implementation 和 test & testImplementation, 那么你的定制 sourcesets 也可以有自己的依赖关系;
遵从这样规则: <sourceSetName><configurationName>:
dependencies {implementation('org.apache.httpcomponents:httpclient:4.5.12')testImplementation('junit:junit:4.12')itestImplementation('com.google.guava:guava:29.0-jre')
}
itestImplementation 只对我们的 itest 生效, 添加如下测试用例:
public class SourceSetsItest {@Testpublic void givenImmutableList_whenRun_ThenSuccess() {SourceSetsObject underTest = new SourceSetsObject("lorem", "ipsum");List<String> someStrings = ImmutableList.of("deraxue", "is", "cool");assertThat(underTest.getUser(), is("lorem"));assertThat(underTest.getPassword(), is("ipsum"));assertThat(someStrings.size(), is(3));}
}
添加独立针对 itest 的任务:
task itest(type: Test) {description = "Run integration tests"group = "verification"testClassesDirs = sourceSets.itest.output.classesDirsclasspath = sourceSets.itest.runtimeClasspath
}
注意这部分声明是在 gradle 的 configuration 阶段执行的, 也就是他们的执行的顺序非常重要, 我们还不能引用到 itest 的sources set; 这样的执行结果会:
$ ./gradlew clean itest// some compilation issuesFAILURE: Build failed with an exception.* What went wrong:
Execution failed for task ':source-sets:compileItestJava'.
> Compilation failed; see the compiler error output for details.
新的 itest 生成独立的配置, 也就是 itestImplementation 没有继承 JUnit 依赖, 也没有继承 main 的 output。
sourceSets{itest {compileClasspath += sourceSets.main.outputruntimeClasspath += sourceSets.main.outputjava {}}
}// dependencies declaration
configurations {itestImplementation.extendsFrom(testImplementation)itestRuntimeOnly.extendsFrom(testRuntimeOnly)
}
现在再运行就没有问题了。
项目地址: Gradle Source Sets 例子open in new window
#一些配置参考
//protobuf generated 目录配置
sourceSets {main {java {srcDirs 'build/generated/source/proto/main/grpc'srcDirs 'build/generated/source/proto/main/java'}}
}//分门别类设置不同测试目录
sourceSets {componentTest {compileClasspath += sourceSets.main.output + sourceSets.test.outputruntimeClasspath += sourceSets.main.output + sourceSets.test.output}apiTest {compileClasspath += sourceSets.main.output + sourceSets.test.outputruntimeClasspath += sourceSets.main.output + sourceSets.test.output}
}//各个测试任务的目录依赖
task componentTest(type: Test) {description = 'Run component tests.'group = 'verification'testClassesDirs = sourceSets.componentTest.output.classesDirsclasspath = sourceSets.componentTest.runtimeClasspathshouldRunAfter test
}task apiTest(type: Test) {description = 'Run API tests.'group = 'verification'testClassesDirs = sourceSets.apiTest.output.classesDirsclasspath = sourceSets.apiTest.runtimeClasspathshouldRunAfter componentTest
}check.dependsOn componentTest
check.dependsOn apiTest
这篇关于Gradle 实战 - SourceSet 配置 -ApiHug准备-工具篇-011的文章就介绍到这儿,希望我们推荐的文章对编程师们有所帮助!


