本文主要是介绍SpringBoot3整合RabbitMQ之四_发布订阅模型中的fanout模型,希望对大家解决编程问题提供一定的参考价值,需要的开发者们随着小编来一起学习吧!
SpringBoot3整合RabbitMQ之四_发布订阅模型中的fanout模型
文章目录
- SpringBoot3整合RabbitMQ之四_发布订阅模型中的fanout模型
- 3. 发布/订阅模型之fanout模型
- 1. 说明
- 1. 消息发布者
- 1. 创建工作队列的配置类
- 2. 发布消费Controller
- 2. 消息消费者One
- 3. 消息消费者Two
- 4. 消息消费者Three
- 5. 输出结果
3. 发布/订阅模型之fanout模型
1. 说明
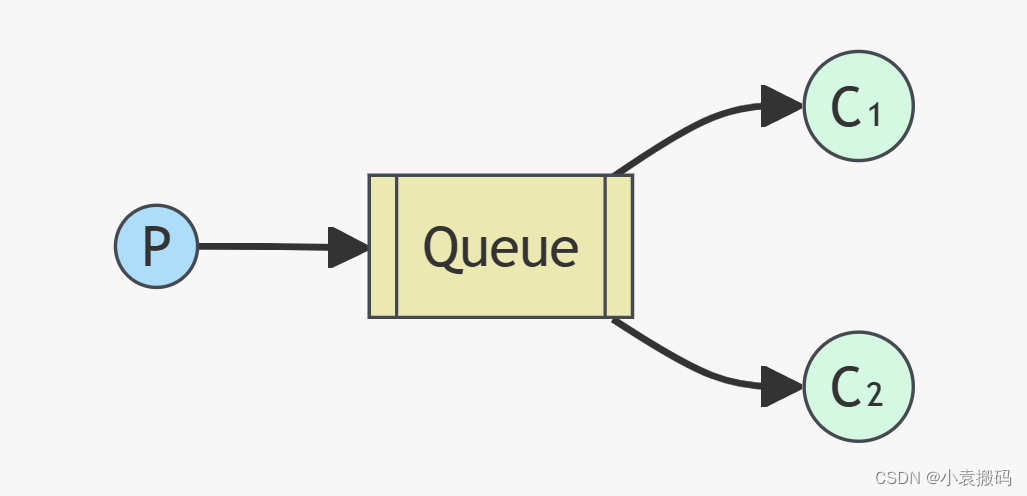
RabbitMQ广播(Fnaout)模型,也称为发布/订阅模型,是一种消息传递模式,用于将消息发送给多个消费者。在广播模型中,生产者发送消息到一个交换机(Exchange),而交换机将消息广播给所有绑定到它上面的队列(Queue),每个队列都有一个消费者监听并处理消息。
下面是 RabbitMQ 广播模型的基本原理和步骤:
- 交换机(Exchange): 生产者将消息发送到交换机。交换机负责将消息路由到一个或多个与之绑定的队列。
- 队列(Queue): 每个消费者都有一个独立的队列。队列存储交换机发送的消息,并将其提供给消费者。
- 绑定(Binding): 将队列与交换机进行绑定,指定一个或多个交换机将消息发送到该队列。
- 消费者(Consumer): 消费者监听队列,并处理收到的消息。
在广播模型中,有两种类型的交换机可供选择:
- Fanout Exchange(扇出交换机): 扇出交换机会将消息广播到绑定到它上面的所有队列,无视消息的路由键(Routing Key)。
- Headers Exchange(头交换机): 头交换机根据消息的 header 信息来进行匹配,并将消息发送到与 header 匹配的队列。
下面是使用 RabbitMQ 广播模型的基本步骤:
- 创建交换机,指定交换机类型为 Fanout Exchange。
- 创建队列,并将其绑定到交换机上。
- 生产者发送消息到交换机。
- 消费者监听队列,接收并处理消息。
使用 RabbitMQ 广播模型可以实现消息的一对多传递,适用于需要向多个消费者发送相同消息的场景,比如日志系统、通知系统等。
1. 消息发布者
1. 创建工作队列的配置类
package com.happy.msg.config;import org.springframework.amqp.core.Queue;
import org.springframework.amqp.core.QueueBuilder;
import org.springframework.context.annotation.Bean;
import org.springframework.context.annotation.Configuration;/*** <p>** @Description: 工作队列模型_创建名称为 work_queue 的队列 <br>* </p>* @Datetime: 2024/3/27 18:18* @Author: Yuan · JinSheng <br>* @Since 2024/3/27 18:18*/
@Configuration
public class WorkQueueConfig {@BeanQueue workQueue() {return QueueBuilder.durable("work_queue").build();}
}
2. 发布消费Controller
package com.happy.msg.publisher;import com.alibaba.fastjson.JSONArray;
import com.alibaba.fastjson.JSONObject;
import org.springframework.amqp.rabbit.core.RabbitTemplate;
import org.springframework.beans.factory.annotation.Autowired;
import org.springframework.web.bind.annotation.GetMapping;
import org.springframework.web.bind.annotation.RequestMapping;
import org.springframework.web.bind.annotation.RestController;import java.util.ArrayList;
import java.util.List;
import java.util.stream.Collectors;/*** <p>** @Description: 生产消息的控制器 <br>* </p>* @Datetime: 2024/3/27 10:53* @Author: Yuan · JinSheng <br>* @Since 2024/3/27 10:53*/
@RestController
@RequestMapping("/work")
public class WorkQueuePublisherController {@Autowiredprivate RabbitTemplate rabbitTemplate;@GetMapping("/send")public String sentMessage() {for (int i = 1; i <=10 ; i++) {rabbitTemplate.convertAndSend("work_queue", "work_queue队列第["+i+"]条消息,hello,rabbitmq"+i);}return "发送成功";}
}
2. 消息消费者One
package com.happy.msg.consumer;import lombok.extern.slf4j.Slf4j;
import org.springframework.amqp.core.Message;
import org.springframework.amqp.rabbit.annotation.RabbitListener;
import org.springframework.stereotype.Component;import java.time.LocalDateTime;
/*** <p>* @Description: 工作队列模型_消息消费者一 <br>* </p>* @Datetime: 2024/3/28 20:28* @Author: Yuan · JinSheng <br>* @Since 2024/3/28 20:28*/
@Slf4j
@Component
public class WorkQueueConsumerOne {/**** @param message 消息* @Description: 监听work_queue队列中的消息,当客户端启动后,work_queue队列中的所有的消息都被此消费者消费并打印* @Author: Yuan · JinSheng*/@RabbitListener(queues = "work_queue")public void msg(Message message){byte[] messageBody = message.getBody();String msg = new String(messageBody);log.info("WorkQueueConsumerOne接收到work_queue队列中的消息==={},===接收时间==={}",msg, LocalDateTime.now());}
}- 输出结果
WorkQueueConsumerOne接收到work_queue队列中的消息===work_queue队列第[1]条消息,hello,rabbitmq1,===接收时间===2024-03-29T10:34:34.468074100
WorkQueueConsumerOne接收到work_queue队列中的消息===work_queue队列第[3]条消息,hello,rabbitmq3,===接收时间===2024-03-29T10:34:34.469081600
WorkQueueConsumerOne接收到work_queue队列中的消息===work_queue队列第[5]条消息,hello,rabbitmq5,===接收时间===2024-03-29T10:34:34.469976
WorkQueueConsumerOne接收到work_queue队列中的消息===work_queue队列第[7]条消息,hello,rabbitmq7,===接收时间===2024-03-29T10:34:34.469976
WorkQueueConsumerOne接收到work_queue队列中的消息===work_queue队列第[9]条消息,hello,rabbitmq9,===接收时间===2024-03-29T10:34:34.470811800
3. 消息消费者Two
package com.happy.msg.consumer;import lombok.extern.slf4j.Slf4j;
import org.springframework.amqp.core.Message;
import org.springframework.amqp.rabbit.annotation.RabbitListener;
import org.springframework.stereotype.Component;import java.time.LocalDateTime;
/*** <p>* @Description: 工作队列模型_消息消费者二<br>* </p>* @Datetime: 2024/3/28 20:30* @Author: Yuan · JinSheng <br>* @Since 2024/3/28 20:30*/
@Slf4j
@Component
public class WorkQueueConsumerTwo {/**** @param message 消息* @Description: 监听work_queue队列中的消息,当客户端启动后,work_queue队列中的所有的消息都被此消费者消费并打印* @Author: Yuan · JinSheng*/@RabbitListener(queues = "work_queue")public void msg(Message message){byte[] messageBody = message.getBody();String msg = new String(messageBody);log.info("WorkQueueConsumerTwo接收到work_queue队列中的消息==={},===接收时间==={}",msg, LocalDateTime.now());}
}
4. 消息消费者Three
package com.happy.msg.consumer;import lombok.extern.slf4j.Slf4j;
import org.springframework.amqp.core.Message;
import org.springframework.amqp.rabbit.annotation.RabbitListener;
import org.springframework.stereotype.Component;import java.time.LocalDateTime;
/*** <p>* @Description: 工作队列模型_消息消费者三<br>* </p>* @Datetime: 2024/3/28 20:30* @Author: Yuan · JinSheng <br>* @Since 2024/3/28 20:30*/
@Slf4j
@Component
public class WorkQueueConsumerTwo {/**** @param message 消息* @Description: 监听work_queue队列中的消息,当客户端启动后,work_queue队列中的所有的消息都被此消费者消费并打印* @Author: Yuan · JinSheng*/@RabbitListener(queues = "work_queue")public void msg(Message message){byte[] messageBody = message.getBody();String msg = new String(messageBody);//log.info("WorkQueueConsumerTwo接收到work_queue队列中的消息==={},===接收时间==={}",msg, LocalDateTime.now());System.out.println("WorkQueueConsumerTwo接收到work_queue队列中的消息==="+msg+",===接收时间==="+LocalDateTime.now());}
}
5. 输出结果
可看到消息被三个消费者按相等数量消费,总共10条消息,消费者1消费了4条,其他两个消费者消费了3条消息
WorkQueueConsumerTwo接收到work_queue队列中的消息===work_queue队列第[3]条消息,hello,rabbitmq3,===接收时间===2024-03-29T10:39:32.942546200
WorkQueueConsumerThree接收到work_queue队列中的消息===work_queue队列第[2]条消息,hello,rabbitmq2,===接收时间===2024-03-29T10:39:32.942546200
WorkQueueConsumerOne接收到work_queue队列中的消息===work_queue队列第[1]条消息,hello,rabbitmq1,===接收时间===2024-03-29T10:39:32.942037700
WorkQueueConsumerTwo接收到work_queue队列中的消息===work_queue队列第[6]条消息,hello,rabbitmq6,===接收时间===2024-03-29T10:39:32.943806300
WorkQueueConsumerOne接收到work_queue队列中的消息===work_queue队列第[4]条消息,hello,rabbitmq4,===接收时间===2024-03-29T10:39:32.944336900
WorkQueueConsumerTwo接收到work_queue队列中的消息===work_queue队列第[9]条消息,hello,rabbitmq9,===接收时间===2024-03-29T10:39:32.944336900
WorkQueueConsumerThree接收到work_queue队列中的消息===work_queue队列第[5]条消息,hello,rabbitmq5,===接收时间===2024-03-29T10:39:32.944336900
WorkQueueConsumerOne接收到work_queue队列中的消息===work_queue队列第[7]条消息,hello,rabbitmq7,===接收时间===2024-03-29T10:39:32.944336900
WorkQueueConsumerOne接收到work_queue队列中的消息===work_queue队列第[10]条消息,hello,rabbitmq10,===接收时间===2024-03-29T10:39:32.944336900
WorkQueueConsumerThree接收到work_queue队列中的消息===work_queue队列第[8]条消息,hello,rabbitmq8,===接收时间===2024-03-29T10:39:32.944336900
这篇关于SpringBoot3整合RabbitMQ之四_发布订阅模型中的fanout模型的文章就介绍到这儿,希望我们推荐的文章对编程师们有所帮助!


