本文主要是介绍【C++练级之路】【Lv.17】【STL】set类和map类的模拟实现,希望对大家解决编程问题提供一定的参考价值,需要的开发者们随着小编来一起学习吧!

文章目录
- 引言
- 一、红黑树(改造版)
- 1.1 结点
- 1.2 迭代器
- 1.2.1 operator++
- 1.2.2 operator- -
- 1.3 本体
- 1.3.1 begin和end
- 1.3.2 Find
- 1.3.3 Insert
- 二、set
- 2.1 成员变量与仿函数
- 2.2 begin和end
- 2.3 find
- 2.4 insert
- 三、map
- 3.1 成员变量与仿函数
- 3.2 begin和end
- 3.3 find
- 3.4 insert
- 3.5 operator[ ]
引言
STL库中的set类和map类,其底层原理都是通过红黑树来实现的。尽管set和map可以各自实现一棵红黑树,但是为了提高代码的复用率,STL库中将红黑树进行了一定的改造,实现以相同的底层实现不同的容器。
一、红黑树(改造版)
1.1 结点
enum Color
{RED,BLACK
};template<class T>
struct RBTreeNode
{RBTreeNode<T>* _left;RBTreeNode<T>* _right;RBTreeNode<T>* _parent;T _data;Color _col;RBTreeNode(const T& data): _left(nullptr), _right(nullptr), _parent(nullptr), _data(data), _col(RED){}
};
细节:
- 将数据类型改为T,因为要同时适用set(存储键值)和map(存储键值对)
1.2 迭代器
改造后的红黑树,最重要的功能之一就是支持双向迭代器,以最左结点为首,以最右结点为尾。
template<class T, class Ref, class Ptr>
struct RBTreeIterator
{typedef RBTreeNode<T> Node;typedef RBTreeIterator<T, T&, T*> Iterator;typedef RBTreeIterator<T, Ref, Ptr> Self;Node* _node;RBTreeIterator(Node* node): _node(node){}RBTreeIterator(const Iterator& it): _node(it._node){}Ref operator*(){return _node->_data;}Ptr operator->(){return &(operator*());}bool operator!=(const Self& s){return _node != s._node;}bool operator==(const Self& s){return _node == s._node;}
};
细节:
- 一些基本的迭代器范式操作已经给出,重点的++与- -操作后面详细实现
- 迭代器的拷贝构造函数有两个用途:
- 以普通迭代器拷贝出普通迭代器(普通迭代器调用时)
- 以普通迭代器拷贝出const迭代器(const迭代器调用时)
1.2.1 operator++
Self operator++()
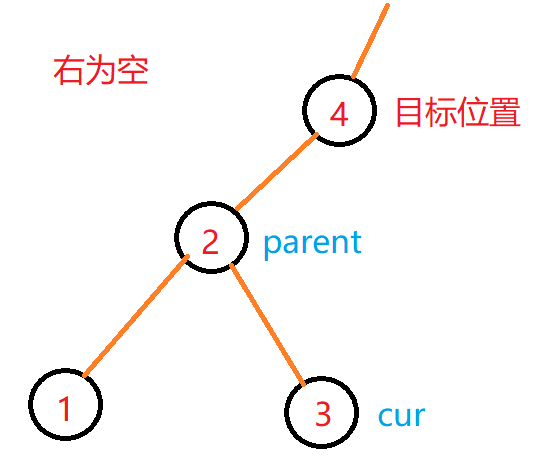
{if (_node->_right)//右不为空,找右子树的最左结点{Node* subLeft = _node->_right;while (subLeft->_left){subLeft = subLeft->_left;}_node = subLeft;}else//右为空,向上找孩子是父亲左的那个父亲{Node* parent = _node->_parent;Node* cur = _node;while (parent && parent->_right == cur){cur = parent;parent = cur->_parent;}_node = parent;}return *this;
}Self operator++(int)
{Node* tmp = _node;++*this;return tmp;
}
细节:
- 前置++的思路:
- 右不为空,找右子树的最左结点
- 右为空,向上找孩子是父亲左的那个父亲
- 后置++:复用前置++,返回临时对象
1.2.2 operator- -
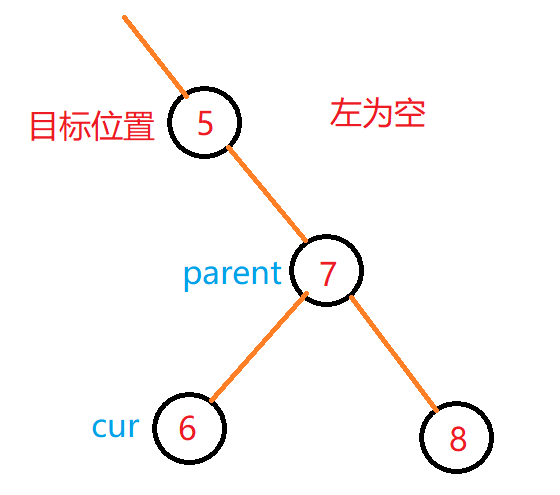
Self operator--()
{if (_node->_left)//左不为空,找左子树的最右结点{Node* subRight = _node->_left;while (subRight->_right){subRight = subRight->_right;}_node = subRight;}else//左为空,向上找孩子是父亲右的那个父亲{Node* parent = _node->_parent;Node* cur = _node;while (parent && parent->_left == cur){cur = parent;parent = cur->_parent;}_node = parent;}return *this;
}Self operator--(int)
{Node* tmp = _node;--*this;return tmp;
}
细节:
- 前置- -的思路:
- 左不为空,找左子树的最右结点
- 左为空,向上找孩子是父亲右的那个父亲
- 后置- -:复用前置- -,返回临时对象
1.3 本体
template<class K, class T, class KeyOfT>
class RBTree
{
protected:typedef RBTreeNode<T> Node;
public:
protected:Node* _root = nullptr;
};
细节:
- 模板参数第一个为K,键值类型(比较时会用到)
- 模板参数第二个为T,同时适用set(存储键值)和map(存储键值对)
- 模板参数第三个为KeyOfT(仿函数类型),用于获取不同数据T的键值key来进行比较
1.3.1 begin和end
typedef RBTreeIterator<T, T&, T*> iterator;
typedef RBTreeIterator<T, const T&, const T*> const_iterator;iterator begin()
{Node* cur = _root;while (cur->_left){cur = cur->_left;}return iterator(cur);
}const_iterator begin() const
{Node* cur = _root;while (cur->_left){cur = cur->_left;}return const_iterator(cur);
}iterator end()
{return iterator(nullptr);
}const_iterator end() const
{return const_iterator(nullptr);
}
细节:begin返回最左节点的迭代器,end返回空迭代器
1.3.2 Find
iterator Find(const K& key)
{if (_root == nullptr){return iterator(nullptr);}KeyOfT kot;Node* cur = _root;while (cur){if (kot(cur->_data) < key){cur = cur->_right;}else if (kot(cur->_data) > key){cur = cur->_left;}else{return iterator(cur);}}return iterator(nullptr);
}
细节:
- 返回迭代器
- 运用仿函数进行键值比较
1.3.3 Insert
pair<iterator, bool> Insert(const T& data)
{if (_root == nullptr){_root = new Node(data);_root->_col = BLACK;return make_pair(iterator(_root), true);}KeyOfT kot;Node* parent = nullptr;Node* cur = _root;while (cur){if (kot(cur->_data) < kot(data)){parent = cur;cur = cur->_right;}else if (kot(cur->_data) > kot(data)){parent = cur;cur = cur->_left;}else{return make_pair(iterator(cur), false);}}Node* newnode = new Node(data);cur = newnode;if (kot(parent->_data) < kot(data)){parent->_right = cur;}else{parent->_left = cur;}cur->_parent = parent;while (parent && parent->_col == RED){Node* grandparent = parent->_parent;if (grandparent->_right == parent)//uncle在左,parent在右{Node* uncle = grandparent->_left;if (uncle && uncle->_col == RED)//uncle为红,变色+向上调整{parent->_col = uncle->_col = BLACK;grandparent->_col = RED;cur = grandparent;parent = cur->_parent;}else//uncle为空或为黑,变色+旋转{if (parent->_right == cur)//左单旋{RotateL(grandparent);parent->_col = BLACK;grandparent->_col = RED;}else//右左旋{RotateR(parent);RotateL(grandparent);cur->_col = BLACK;grandparent->_col = RED;}}}else//parent在左,uncle在右{Node* uncle = grandparent->_right;if (uncle && uncle->_col == RED){parent->_col = uncle->_col = BLACK;grandparent->_col = RED;cur = grandparent;parent = cur->_parent;}else{if (parent->_left == cur)//右单旋{RotateR(grandparent);parent->_col = BLACK;grandparent->_col = RED;}else//左右旋{RotateL(parent);RotateR(grandparent);cur->_col = BLACK;grandparent->_col = RED;}}}}_root->_col = BLACK;return make_pair(iterator(newnode), true);
}
细节:
- 返回pair,第一个参数为迭代器,第二个参数为布尔值(记录是否插入成功)
- 运用仿函数进行键值比较
二、set
2.1 成员变量与仿函数
template<class K>
class set
{struct SetKeyOfT{const K& operator()(const K& key){return key;}};
public:
protected:RBTree<K, K, SetKeyOfT> _t;
};
细节:
- set类仿函数,直接返回参数key
- 成员变量的第二个模板参数为K,第三个模板参数为SetKeyOfT
2.2 begin和end
typedef typename RBTree<K, K, SetKeyOfT>::const_iterator iterator;
typedef typename RBTree<K, K, SetKeyOfT>::const_iterator const_iterator;iterator begin()
{return _t.begin();
}const_iterator begin() const
{return _t.begin();
}iterator end()
{return _t.end();
}const_iterator end() const
{return _t.end();
}
细节:
- 加上typename关键字,编译器才能识别类型
- set中存储的键值key均不允许修改,所以其普通迭代器和const迭代器均为红黑树的const迭代器
- 由于set的普通迭代器也是红黑树的const迭代器,调用普通begin()时,便有从普通迭代器到const迭代器的转换,此时之前写的拷贝构造(以普通迭代器拷贝构造const迭代器)便派上用场了。
2.3 find
iterator find(const K& key)
{return _t.Find(key);
}
2.4 insert
pair<iterator, bool> insert(const K& key)
{return _t.Insert(key);
}
细节:
- 插入参数类型为K(键值)
- 此时也有从普通迭代器到const迭代器的转换
三、map
3.1 成员变量与仿函数
template<class K, class V>
class map
{struct MapKeyOfT{const K& operator()(const pair<const K, V>& kv){return kv.first;}};
public:
protected:RBTree<K, pair<const K, V>, MapKeyOfT> _t;
};
细节:
- map类仿函数,返回参数pair的first
- 成员变量的第二个模板参数为pair,第三个模板参数为MapKeyOfT
3.2 begin和end
typedef typename RBTree<K, pair<const K, V>, MapKeyOfT>::iterator iterator;
typedef typename RBTree<K, pair<const K, V>, MapKeyOfT>::const_iterator const_iterator;iterator begin()
{return _t.begin();
}const_iterator begin() const
{return _t.begin();
}iterator end()
{return _t.end();
}const_iterator end() const
{return _t.end();
}
细节:
- 加上typename关键字,编译器才能识别类型
- map同样不允许修改key,故加上const修饰,但是允许修改存储的value,所以普通和const迭代器一一对应
此时,可能有人会问,那刚刚set不允许修改key,为什么不也直接用const修饰呢?请看以下这段代码:
typedef RBTreeIterator<T, const T&, const T*> const_iterator;
如果变成第二个模板参数T传入const K,那么就会形成两个连续的const,这是不被允许的。所以才想了其他方法来补救。
3.3 find
iterator find(const K& key)
{return _t.Find(key);
}
3.4 insert
pair<iterator, bool> insert(const pair<const K, V>& kv)
{return _t.Insert(kv);
}
细节:插入参数类型为pair(键值对)
3.5 operator[ ]
map最好用的重载运算符[ ],我们肯定也要实现,平常插入和修改使用[ ]更加方便。
V& operator[](const K& key)
{pair<iterator, bool> ret = _t.Insert(make_pair(key, V()));return ret.first->second;
}
细节:
- 插入成功便是插入,插入失败便是查找+修改
- 返回value的引用,可以直接插入或修改

这篇关于【C++练级之路】【Lv.17】【STL】set类和map类的模拟实现的文章就介绍到这儿,希望我们推荐的文章对编程师们有所帮助!


