本文主要是介绍python matplotlib坐标系(变换) tcy shanghai,希望对大家解决编程问题提供一定的参考价值,需要的开发者们随着小编来一起学习吧!
坐标系 2018/10/29
目录: 1.坐标系 https://mp.csdn.net/postedit/835054862.轴坐标 https://mp.csdn.net/postedit/83660100 3. 偏移变换 https://mp.csdn.net/postedit/83660161 4. 转换管道 https://blog.csdn.net/tcy23456/article/details/83660171
======================================================================
1.1.分类:数据坐标系:#描述数据空间中位置的坐标系子图坐标系:#描述子图中位置的坐标系,子图左下角坐标(0,0)右上角坐标(1,1)图表坐标系:#一幅图表可包含多个子图,且子图周围可留有空白;#用图表坐标系描述图表显示区域中的某个点。图表左下角坐标(0,0)右上角坐标(1,1)窗口坐标系:#它是绘图窗口中以像素为单位的坐标系。不包含标题栏、工具条及状态栏部分#左下角坐标(0,0)右上角坐标(width,height)======================================================================
1.2.matplotlib下绘图窗口的坐标变换
坐标系  变换对象             描述
数据    ax.transData        用户数据坐标系,由xlim和ylim控制
轴域    ax.transAxes        轴域坐标系;(0,0)轴域左下角,(1,1)是轴域右上角
图形    fig.transFigure     图形坐标系;(0,0)图形左下角,(1,1)是图形右上角
显示    None                显示器像素坐标系; (0,0)显示器左下角,(width, height)是显示器右上角,像素单位# 或用恒等变换matplotlib.transforms.IdentityTransform()来代替None。
# Axes对象的transData属性是数据坐标变换对象,
# transAxes属性是子图坐标变换对象。
# figure对象的transFigure属性是图表坐标变换对象
======================================================================
1.3.注意:数据变换中的差异# 数据和显示数据不会完全相同。 因为显示点是在显示图形之前计算的,
# 并且 GUI 后端可以在创建图形时稍微调整图形大小。 如果你自己调整图的大小,效果更明显。
# 可连接到'on_draw'事件来更新图上图坐标;https://blog.csdn.net/wizardforcel/article/details/54782600
http://blog.sciencenet.cn/home.php?mod=space&uid=3296568&do=blog&quickforward=1&id=1029689
官网:
http://matplotlib.org/users/transforms_tutorial.html
======================================================================2.1.实例1# ===================================================================
单击显示鼠标坐标点: 用鼠标事件+多线程+退出event
from matplotlib import pyplot as plt
from threading import Thread
import time
import numpy as npXY = [0, 0, 0]
x = (8, 9);y = (8, 9)# ================================
# 坐标变换处理函数
def coordinate_change(fig, ax, xy):
x = xy[1];
y = xy[2]
inv11 = ax.transData.inverted() # matplotlib.transforms.CompositeGenericTransform
inv12 = ax.transAxes.inverted()
inv13 = fig.transFigure.inverted()point21 = inv11.transform((x, y)) # 显示坐标变换为Data坐标
point22 = inv12.transform((x, y)) # 显示坐标变换为Axes坐标
point23 = inv13.transform((x, y)) # 显示坐标变换为Figure坐标pixel11 = ax.transData.transform(point21) # Data坐标变换为显示坐标系
pixel12 = ax.transAxes.transform(point22) # Axes坐标变换为显示坐标系
pixel13 = fig.transFigure.transform(point23) # Figure坐标变换为显示坐标系print('==>Data,Axes,Figure={};pixel={};time={}'.format(
(point21, point22, point23), (pixel11, pixel12, pixel13), time.ctime()))# ================================
# 绘图
fig = plt.figure(figsize=(6.4, 4.8), dpi=100)
ax = fig.add_subplot(111)
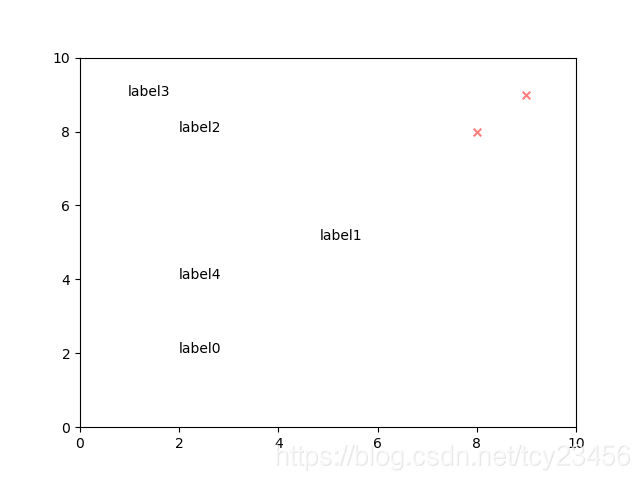
plt.scatter(x, y, s=30, c='r', alpha=0.5, marker='x')ax.set_xlim(0, 10) # Data坐标
ax.set_ylim(0, 10) # Data坐标# 在画好的图上加字:
ax.text(2, 2, 'label0') # 数据坐标
ax.text(320, 240, 'label1', transform=None) # 显示坐标像素
ax.text(0.2, 0.8, 'label2', transform=ax.transAxes) # Axes坐标0-1
ax.text(0.2, 0.8, 'label3', transform=fig.transFigure) # Figure坐标0-1
ax.text(2, 4, 'label4', transform=ax.transData)# ================================
# 鼠标事件:单击显示坐标轴数字
def onclick(event):
# fx=event.xdata if event.xdata else 0
# fy=event.ydata if event.xdata else 0
# print('%s click: button=%d, x=%d, y=%d, xdata=%f, ydata=%f' %
# ('double' if event.dblclick else 'single', event.button,event.x, event.y, fx, fy))
global XY
XY = [1, event.x, event.y].copy()# while XY[0]: # 阻塞,等待数据处理完成即打印显示
# pass
# fig=event.canvas.figure
cid = fig.canvas.mpl_connect('button_press_event', onclick)
# ================================
close_flag=0#绘图窗口关闭标志
def handle_close(evt): #窗口关闭事件
print('Closed Figure!')
global close_flag
close_flag=1cid1=fig.canvas.mpl_connect('close_event', handle_close)
# ================================# 多线程
def run(fig, ax, xy):
global XY
while not close_flag:
if XY[0]:
coordinate_change(fig, ax, XY)
XY[0] = 0thread1 = Thread(target=run, args=(fig, ax, XY), name='Thread-A')
thread1.start()
# ================================plt.show() #'''
结果打印显示:
==>Data,Axes,Figure=(array([3.58870968, 7.60822511]),
array([0.35887097, 0.76082251]),
array([0.403125 , 0.69583333]));
pixel=(array([258., 334.]), array([258., 334.]), array([258., 334.]));
time=Mon Oct 29 13:38:54 2018
'''
2.2.示例2
单击显示鼠标坐标点: 用鼠标事件+event.canvas:
from matplotlib import pyplot as pltx = (8, 9);y = (8, 9)# ================================
# 坐标变换处理函数
def coordinate_change(fig, ax, xy):
x = xy[1];y = xy[2]
inv11 = ax.transData.inverted() # matplotlib.transforms.CompositeGenericTransform
inv12 = ax.transAxes.inverted()
inv13 = fig.transFigure.inverted()point21 = inv11.transform((x, y)) # 显示坐标变换为Data坐标
point22 = inv12.transform((x, y)) # 显示坐标变换为Axes坐标
point23 = inv13.transform((x, y)) # 显示坐标变换为Figure坐标pixel11 = ax.transData.transform(point21) # Data坐标变换为显示坐标系
pixel12 = ax.transAxes.transform(point22) # Axes坐标变换为显示坐标系
pixel13 = fig.transFigure.transform(point23) # Figure坐标变换为显示坐标系# ================================
def show(point):
return '( {:4.1f},{:4.1f} )'.format(point[0],point[1])
b=(pixel11.all()==pixel12.all()) and (pixel12.all()==pixel13.all())
str1='pixel11 =pixel12 =pixel13 ='+str(b)+';像素='+show(pixel13)+';'+\
'数据='+show(point21) + ';axes=' + show(point22) + ';figure=' + show(point23)
print(str1)# ================================
# 绘图
fig = plt.figure(figsize=(6.4, 4.8), dpi=100)
ax = fig.add_subplot(111)
plt.scatter(x, y, s=30, c='r', alpha=0.5, marker='x')ax.set_xlim(0, 10) # Data坐标
ax.set_ylim(0, 10) # Data坐标# 在画好的图上加字:
ax.text(2, 2, 'label0') # 数据坐标
ax.text(320, 240, 'label1', transform=None) # 显示坐标像素
ax.text(0.2, 0.8, 'label2', transform=ax.transAxes) # Axes坐标0-1
ax.text(0.2, 0.8, 'label3', transform=fig.transFigure) # Figure坐标0-1
ax.text(2, 4, 'label4', transform=ax.transData)# ================================
# 鼠标事件:单击显示坐标轴数字
def onclick(event):xy = [1, event.x, event.y].copy()fig=event.canvas.figure
ax=fig.get_axes()[0]
coordinate_change(fig, ax, xy)
print('')cid = fig.canvas.mpl_connect('button_press_event', onclick)plt.show() #
结果显示:
...
pixel11 =pixel12 =pixel13 =True;像素=( 577.0,116.0 );数据=( 10.0, 1.7 );axes=( 1.0, 0.2 );figure=( 0.9, 0.2 )pixel11 =pixel12 =pixel13 =True;像素=( 600.0,185.0 );数据=( 10.5, 3.6 );axes=( 1.0, 0.4 );figure=( 0.9, 0.4 )
2.2.实例3
# 混合坐标
import numpy
import matplotlib.pyplot as pltplt.rcParams['font.sans-serif'] = ['SimHei'] # 用来正常显示中文标签
plt.rcParams['axes.unicode_minus'] = False # 坐标轴负数的负号显示# ======================================
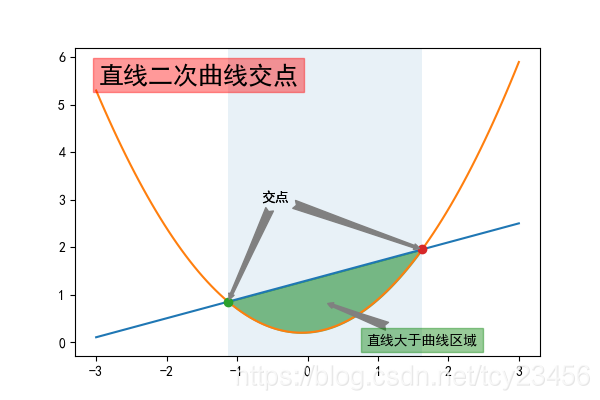
#直线
def func1(x):return 0.4*x+1.3
#曲线
def func2(x):return 0.6*x*x+0.1*x+0.2
#交点横坐标
def find_intersects(x,y1,y2):d=y1-y2idx=numpy.where(d[:-1]*d[1:]<=0)[0]x1,x2=x[idx],x[idx+1]d1,d2=d[idx],d[idx+1]return -d1*(x2-x1)/(d2-d1)+x1# =======================================
#绘图
x=numpy.linspace(-3,3,100)
f1=func1(x)
f2=func2(x)fig,ax=plt.subplots(figsize=(6,4))
ax.plot(x,func1(x),x,func2(x))#找到交点横坐标,将交点用圆圈表示
x1,x2=find_intersects(x,f1,f2)
ax.plot(x1,func1(x1),'o')
ax.plot(x2,func2(x2),'o')#直线>曲线部分的面积填充
ax.fill_between(x,f1,f2,where=f1>f2,color='g',alpha=0.5)
# ======================================#将一个以数据横坐标为宽,子图高度为高的矩形,用颜色填充
#transforms的blended_transform_factory函数可创建一个混合坐标(数据坐标,子图坐标)
from matplotlib import transforms
trans=transforms.blended_transform_factory(ax.transData,ax.transAxes)
ax.fill_between([x1,x2],0,1,transform=trans,alpha=0.1)
# ======================================#子图注释
a=ax.text(0.05,0.95,'直线二次曲线交点',transform=ax.transAxes,va='top',fontsize=18,bbox={'color':'r','alpha':0.4,})
# ======================================#箭头注释
#data表示使用的是数据坐标系中的坐标变换对象
#axes fraction表示使用的是子图坐标系的坐标变换对象
#offset points表示文字与箭头的相对位置保持不变
#arrowprops为描述箭头样式的字典
arrow={'arrowstyle':'fancy,tail_width=0.6','color':'gray'}
ax.annotate('交点',xy=(x1,func1(x1)),xycoords='data',xytext=(0.4,0.5),textcoords='axes fraction',arrowprops=arrow)
ax.annotate('交点',xy=(x2,func2(x2)),xycoords='data',xytext=(0.4,0.5),textcoords='axes fraction',arrowprops=arrow)xm=(x1+x2)/2
ym=(func1(xm)-func2(xm))/2+func2(xm)
ax.annotate('直线大于曲线区域',xy=(xm,ym),xycoords='data',xytext=(30,-30),textcoords='offset points',arrowprops=arrow,bbox={'color':'g','alpha':0.4,})
plt.show()
# ==================================================================
这篇关于python matplotlib坐标系(变换) tcy shanghai的文章就介绍到这儿,希望我们推荐的文章对编程师们有所帮助!


