本文主要是介绍Kubernetes实战(三十一)-使用开源CEPH作为后端StorageClass,希望对大家解决编程问题提供一定的参考价值,需要的开发者们随着小编来一起学习吧!
1 引言
K8S在1.13版本开始支持使用Ceph作为StorageClass。其中云原生存储Rook和开源Ceph应用都非常广泛。本文主要介绍K8S如何对接开源Ceph使用RBD卷。
K8S对接Ceph的技术栈如下图所示。K8S主要通过容器存储接口CSI和Ceph进行交互。
Ceph官方文档:Block Devices and Kubernetes — Ceph Documentation

CSI的官方地址:GitHub - ceph/ceph-csi at release-v3.9
在部署CSI前需要确认好部署的CSI版本,在CSI的官网,可以看到CSI版本与K8S之间的对应关系。
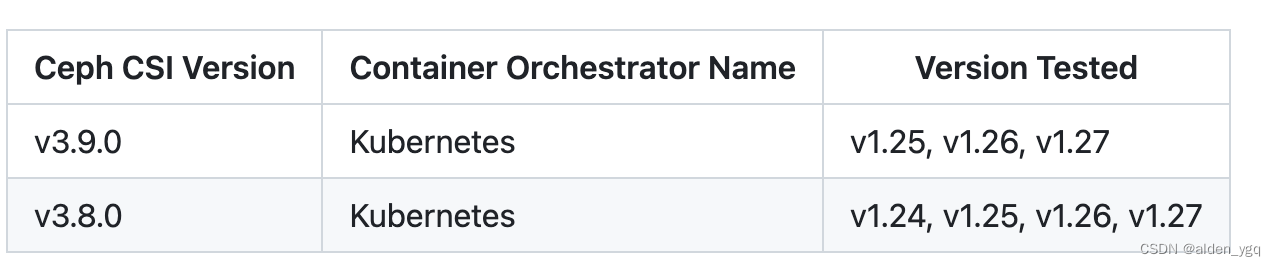
CSI与Ceph之间的对应关系参考:GitHub - ceph/ceph-csi: CSI driver for Ceph
作者环境的K8S版本为1.24,Ceph版本为14,因此使用3.5.1版本的CSI。以下是部署过程。
2 Ceph侧资源创建
[root@ceph-1 ~]# ceph osd pool create k8s 64 64  ##创建k8s存储池
pool 'k8s' created
[root@ceph-1 ~]# ceph auth get-or-create client.k8s mon 'profile rbd' osd 'profile rbd pool=k8s' mgr 'profile rbd pool=k8s'  ##新建一个ceph用户,用户名和key后续需要使用到
[client.k8s]key = AQBClIVj8usBLxAAxTl0DwZCz9prNRRRI9Bl5A==
[root@ceph-1 ~]# ceph -s |grep id  ##查看ceph 的fsidid:     395b7a30-eb33-460d-8e38-524fc48c58cb
[root@ceph-1 ~]# ceph mon stat  #查看ceph的mon服务ip,我们主要采用v1版本的ip和端口
e3: 3 mons at {
ceph-1=[v2:10.0.245.192:3300/0,v1:10.0.245.192:6789/0],
ceph-2=[v2:10.0.138.175:3300/0,v1:10.0.138.175:6789/0],
ceph-3=[v2:10.0.28.226:3300/0,v1:10.0.28.226:6789/0]},
election epoch 1112, leader 0 ceph-1, quorum 0,1,2 ceph-1,ceph-2,ceph-3
3 ceph-csi部署环境准备
主要步骤为下载官方csi部署文件,创建csi需要使用到的configmap及sa、secret。使用到的文件均位于ceph-csi/deploy/rbd/kubernetes/ 目录下,同时会新建以下三个文件用于保存ceph相关配置
- csi-kms-config-map.yaml
- ceph-config-map.yaml
- csi-rbd-secret.yaml
[root@k8s-master02 ~]# wget https://github.com/ceph/ceph-csi/archive/refs/tags/v3.5.1.tar.gz ##本次实验ceph版本为14,使用3.5.1版本有较好的兼容性
[root@k8s-master02 ~]# tar xvf v3.5.1.tar.gz
[root@k8s-master02 ~]# mv ceph-csi-3.5.1 ceph-csi
[root@k8s-master02 ~]# cd /root/ceph-csi/deploy/rbd/kubernetes/
[root@k8s-master02 kubernetes]# cat csi-config-map.yaml ##编辑config-map文件
#
# /!\ DO NOT MODIFY THIS FILE
#
# This file has been automatically generated by Ceph-CSI yamlgen.
# The source for the contents can be found in the api/deploy directory, make
# your modifications there.
#
---
apiVersion: v1
kind: ConfigMap
metadata:name: "ceph-csi-config"
data:config.json: |-[{"clusterID": "395b7a30-eb33-460d-8e38-524fc48c58cb",  #ceph -s输出的id"monitors": ["10.0.245.192:6789",  ##三个mon服务的ip地址"10.0.138.175:6789","10.0.28.226:6789"]}]
[root@k8s-master02 kubernetes]# kubectl create ns ceph-csi  ##创建namespace
namespace/ceph-csi created
[root@k8s-master02 kubernetes]# kubectl -n ceph-csi create -f csi-config-map.yaml
configmap/ceph-csi-config created
[root@k8s-master02 kubernetes]# cat csi-kms-config-map.yaml ##新建kms-config文件
---
apiVersion: v1
kind: ConfigMap
data:config.json: |-{}
metadata:name: ceph-csi-encryption-kms-config
[root@k8s-master02 kubernetes]# kubectl create -n ceph-csi -f csi-kms-config-map.yaml
configmap/ceph-csi-encryption-kms-config created
[root@k8s-master02 kubernetes]# cat ceph-config-map.yaml ##新建一个ceph-config文件,ceph.conf中的内容与ceph集群中/etc/ceph/ceph.conf的内容保持一致
---
apiVersion: v1
kind: ConfigMap
data:ceph.conf: |[global]fsid = 395b7a30-eb33-460d-8e38-524fc48c58cbpublic_network = 10.0.0.0/16cluster_network = 10.0.0.0/16mon_initial_members = ceph-1mon_host = 10.0.245.192auth_cluster_required = cephxauth_service_required = cephxauth_client_required = cephxmon_allow_pool_delete = trueauth_allow_insecure_global_id_reclaim = falserbd_default_format = 2# keyring is a required key and its value should be emptykeyring: |
metadata:name: ceph-config
[root@k8s-master02 kubernetes]# kubectl -n ceph-csi create -f ceph-config-map.yaml
configmap/ceph-config created
[root@k8s-master02 kubernetes]# cat csi-rbd-secret.yaml ##新建一个secret文件
apiVersion: v1
kind: Secret
metadata:name: csi-rbd-secretnamespace: ceph-csi
stringData:userID: k8s   ##ceph集群上创建额用户userKey: AQBClIVj8usBLxAAxTl0DwZCz9prNRRRI9Bl5A==  ##用户的key
[root@k8s-master02 kubernetes]# kubectl create -f csi-rbd-secret.yaml
secret/csi-rbd-secret created
[root@k8s-master02 ~]# sed -i "s/namespace: default/namespace: ceph-csi/g"  $(grep -rl "namespace: default" ./)  #将所有yaml文件的namespace从default改成ceph-csi
[root@k8s-master02 kubernetes]# cat csi-provisioner-rbac.yaml ##检查配置文件中namespace是否更改成功
---
apiVersion: v1
kind: ServiceAccount
metadata:name: rbd-csi-provisioner# replace with non-default namespace namenamespace: ceph-csi ---
kind: ClusterRole
apiVersion: rbac.authorization.k8s.io/v1
metadata:name: rbd-external-provisioner-runner##创建rbac权限
[root@k8s-master02 kubernetes]# kubectl create -f csi-provisioner-rbac.yaml
serviceaccount/rbd-csi-provisioner created
clusterrole.rbac.authorization.k8s.io/rbd-external-provisioner-runner created
clusterrolebinding.rbac.authorization.k8s.io/rbd-csi-provisioner-role created
role.rbac.authorization.k8s.io/rbd-external-provisioner-cfg created
rolebinding.rbac.authorization.k8s.io/rbd-csi-provisioner-role-cfg created
[root@k8s-master02 kubernetes]# kubectl create -f csi-nodeplugin-rbac.yaml
serviceaccount/rbd-csi-nodeplugin created
clusterrole.rbac.authorization.k8s.io/rbd-csi-nodeplugin created
clusterrolebinding.rbac.authorization.k8s.io/rbd-csi-nodeplugin created
4 部署ceph-csi相关容器
yaml中的镜像源需要替换,否则部署时镜像可能下载不成功。如果部署其他版本的csi,可以自己设置通过阿里云容器镜像服务托管下载http://k8s.gcr.io中相关csi版本的镜像。
[root@k8s-master02 kubernetes]# sed -i 's#k8s.gcr.io/sig-storage/#registry.cn-shanghai.aliyuncs.com/singless/#' csi-rbdplugin*  ##替换yaml里的镜像源
[root@k8s-master02 kubernetes]# kubectl -n ceph-csi create -f csi-rbdplugin-provisioner.yaml ##部署sidecar容器,yaml文件里的所有镜像地址修改为registry.cn-shanghai.aliyuncs.com/singless/
service/csi-rbdplugin-provisioner created
deployment.apps/csi-rbdplugin-provisioner created
[root@k8s-master02 kubernetes]# kubectl -n ceph-csi create -f csi-rbdplugin.yaml ##部署RBD CSI driver容器
daemonset.apps/csi-rbdplugin created
service/csi-metrics-rbdplugin created
[root@k8s-master02 kubernetes]# kubectl get pod -n ceph-csi  ##检查pod是否都已启动
NAME                                         READY   STATUS    RESTARTS   AGE
csi-rbdplugin-8s6cf                          3/3     Running   0          60m
csi-rbdplugin-g74qd                          3/3     Running   0          60m
csi-rbdplugin-provisioner-56d6d755c7-jhcwl   7/7     Running   0          14m
csi-rbdplugin-provisioner-56d6d755c7-lz2zf   7/7     Running   0          14m
csi-rbdplugin-provisioner-56d6d755c7-pxw7q   7/7     Running   0          14m
csi-rbdplugin-twjdh                          3/3     Running   0          60m
csi-rbdplugin-v529x                          3/3     Running   0          60m
csi-rbdplugin-wgh5c                          3/3     Running   0          60m
5 创建StorageClass
[root@k8s-master02 kubernetes]# cat storageclass.yaml
---
apiVersion: storage.k8s.io/v1
kind: StorageClass
metadata:name: csi-rbd-sc
provisioner: rbd.csi.ceph.com
parameters:clusterID: 395b7a30-eb33-460d-8e38-524fc48c58cb  ##ceph集群IDpool: k8s   ##ceph集群的pool名imageFeatures: layering  ##定义创建的rbd featurescsi.storage.k8s.io/provisioner-secret-name: csi-rbd-secretcsi.storage.k8s.io/provisioner-secret-namespace: ceph-csicsi.storage.k8s.io/controller-expand-secret-name: csi-rbd-secretcsi.storage.k8s.io/controller-expand-secret-namespace: ceph-csicsi.storage.k8s.io/node-stage-secret-name: csi-rbd-secretcsi.storage.k8s.io/node-stage-secret-namespace: ceph-csicsi.storage.k8s/fstype: ext4
reclaimPolicy: Delete
allowVolumeExpansion: true
mountOptions:- discard
[root@k8s-master02 kubernetes]# kubectl create -f storageclass.yaml
storageclass.storage.k8s.io/csi-rbd-sc created
6 创建PV
[root@k8s-master02 kubernetes]# cd /root/ceph-csi/examples/rbd/
[root@k8s-master02 rbd]# kubectl create -f pvc.yaml
persistentvolumeclaim/rbd-pvc created
本文主要介绍K8S对接Ceph使用RBD块的方法,对象存储或文件存储可以参考官方文档进行对接。
这篇关于Kubernetes实战(三十一)-使用开源CEPH作为后端StorageClass的文章就介绍到这儿,希望我们推荐的文章对编程师们有所帮助!


