python操作MySQL
mysqldb
python3之后的版本就不支持mysqldb了,故在此略过
pymysql
#执行SQL语句
# -*- coding:utf-8 -*-
#!/user/bin/env.python
#Author:Mr Wuimport pymysql#建立连接
conn = pymysql.connect(host='localhost',port=3306,user='root',passwd='187847',db='testdb')#创建游标
cursor = conn.cursor()#删除study_record表的所有数据,并返回受影响的行数
effect_row = cursor.execute("delete from study_record where id>=1")#删除student表的所有数据,并返回受影响的行数
effect_row = cursor.execute("delete from student where stu_id>=1")#向student表中添加单条数据
effect_row = cursor.execute('insert into student(name,age,register_date) values ("N1",20,"2010-09-24")')#向student表中批量插入数据
data = [("N2",33,"2005-08-02"),("N3",23,"2009-08-02"),("N4",13,"2000-08-02"),("N5",43,"1899-08-02"),("N6",53,"1777-08-02"),
]
effect_row = cursor.executemany('insert into student (name,age,register_date) values (%s,%s,%s)',data)#修改student表中的数据
effect_row = cursor.execute('update student set age=50 where stu_id=10')#提交,不然无法保存新建或修改的数据
conn.commit()#关闭游标
cursor.close()#关闭连接
conn.close()
#获取新创建数据自增ID
import pymysql#建立连接
conn = pymysql.connect(host='localhost',port=3306,user='root',passwd='187847',db='testdb')#创建游标
cursor = conn.cursor()cursor.execute("insert into study_record(day,status,stu_id) values (1,'Y',8)")
conn.commit()
cursor.close()
conn.close()#获取最新自增ID
new_id = cursor.lastrowid
print(new_id)
#获取查询数据
import pymysql#建立连接
conn = pymysql.connect(host='localhost',port=3306,user='root',passwd='187847',db='testdb')#创建游标
cursor = conn.cursor()cursor.execute('select * from student')#获取第一行数据
print(cursor.fetchone())#获取前n行数据
print(cursor.fetchmany(3))#获取所有数据
print(cursor.fetchall())conn.commit()
cursor.close()
conn.close()
#注:已经获取的数据不能再次获取
注:在fetch数据时按照顺序进行,可以使用cursor.scroll(num,mode)来移动游标位置,如:
cursor.scroll(1,mode='relative') # 相对当前位置移动
cursor.scroll(2,mode='absolute') # 相对绝对位置移动
#fetch数据类型
默认获取的数据时元组类型,如果想要字典类型数据,需执行相应操作
import pymysql#建立连接
conn = pymysql.connect(host='localhost',port=3306,user='root',passwd='187847',db='testdb')#创建游标,将游标设置为字典类型
cursor = conn.cursor(cursor=pymysql.cursors.DictCursor) #获取查询数据时,输出字典格式

cursor.execute('select * from student')#获取第一行数据
print(cursor.fetchone())#获取前n行数据
print(cursor.fetchmany(3))#获取所有数据
print(cursor.fetchall())conn.commit()
cursor.close()
conn.close()
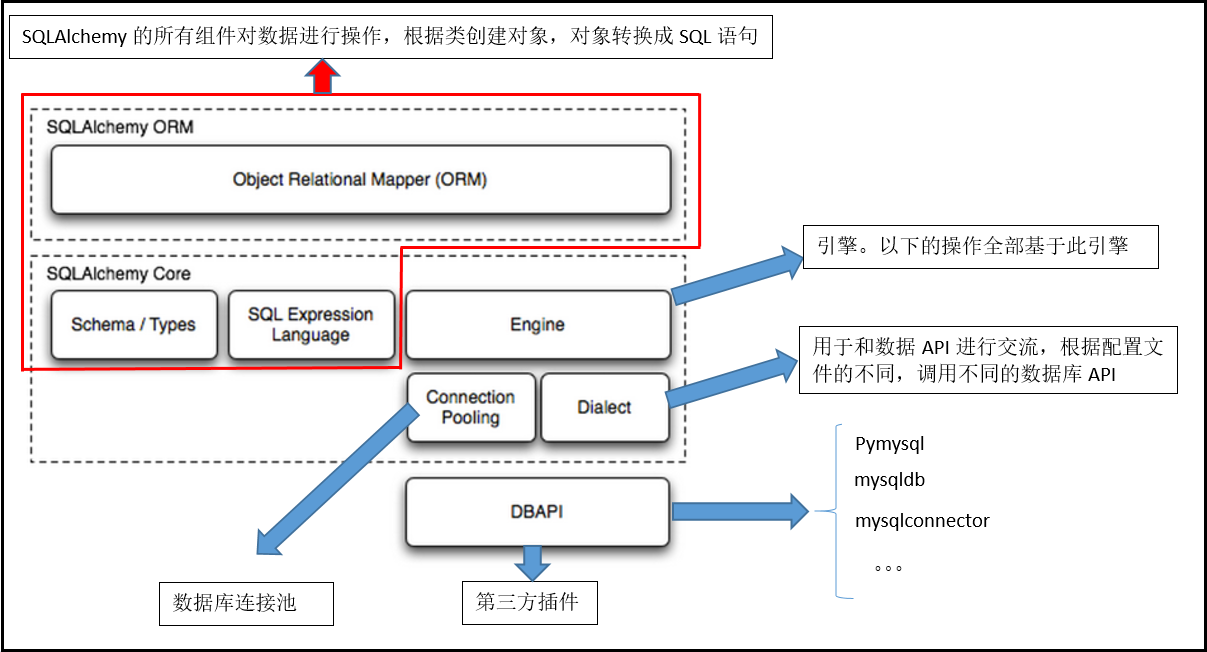
SQLachemy
orm简绍
描述:orm是一种对象映射关系程序,orm将编程语言的对象模型和数据库的关系模型建立映射关系,这样我们就能直接使用编程语言的对象模型进行对数据库的操作,而不必写自己不熟悉的数据库语句了。
orm优点:
1.隐藏了数据访问细节,使我们对数据库的操作变得简单,不必亲自写SQL语句
2.能让我们更容易构造固化数据结构
orm缺点:
由于需要将编程语言与数据库之间建立映射关系和关联管理,这会使得程序的性能低下
sqlalchemy
python常用的orm框架是SQLALchemy
sqlalchemy基本使用
#创建数据表
使用sqlalchemy创建数据表有两种方式
第一种
# -*- coding:utf-8 -*-
#!/user/bin/env.python
#Author:Mr Wuimport sqlalchemy
from sqlalchemy import create_engine
from sqlalchemy.ext.declarative import declarative_base
from sqlalchemy import Column,Integer,String,Date,Enum#建立连接
engine = create_engine("mysql+pymysql://root:187847@localhost/testdb")
#生成orm基类
Base = declarative_base()class Student(Base):'''创建学生表'''__tablename__ = "student" #表名stu_id = Column(Integer,primary_key=True) #自动设置为自增属性name = Column(String(32),nullable=False)age = Column(Integer,nullable=False)register_date = Column(Date,nullable=False)
#统一创建表结构
Base.metadata.create_all(engine)
第二种
# -*- coding:utf-8 -*-
#!/user/bin/env.python
#Author:Mr Wuimport sqlalchemy
from sqlalchemy import Table,Column
from sqlalchemy.ext.declarative import declarative_base
from sqlalchemy import create_engine
from sqlalchemy import Date,Integer,String,Enum#建立连接
engine = sqlalchemy.create_engine("mysql+pymysql://root:187847@localhost/testdb")
#生成orm基类
Base = declarative_base()
study_record = Table("study_record",Base.metadata,Column('id',Integer,primary_key=True),Column('day',Integer,nullable=False),Column('status',Enum('Y',"N")))Base.metadata.create_all(engine)
#插入数据
# -*- coding:utf-8 -*-
#!/user/bin/env.python
#Author:Mr Wuimport sqlalchemy
from sqlalchemy import create_engine
from sqlalchemy.orm import sessionmaker
from sqlalchemy.ext.declarative import declarative_base
from sqlalchemy import Column,Integer,String,Date,Enum#建立连接
engine = create_engine("mysql+pymysql://root:187847@localhost/testdb?charset=utf8")
#生成orm基类
Base = declarative_base()class Student(Base):'''建立于student表的映射关联'''__tablename__="student"stu_id = Column(Integer,primary_key=True)name = Column(String(32),nullable=False)age = Column(Integer,nullable=False)register_date = Column(Date,nullable=False)
Base.metadata.create_all(engine)
#创建于数据库的会话,返回的是一个对象
Session_class = sessionmaker(bind=engine)
#生成session实例
Session = Session_class()
#创建要插入的数据对象
s1 = Student(name="赵腊月",age=18,register_date="1999-09-23")
s2 = Student(name="徐有容",age=18,register_date="1999-08-13")
s3 = Student(name="白落衡",age=14,register_date="2003-09-03")
s4 = Student(name="白早",age=24,register_date="1993-02-24")
s5 = Student(name="过冬",age=30,register_date="1887-09-25")
s6 = Student(name="南忘",age=35,register_date="1882-09-21")
#把要出入入的数据对象添加到session中,统一创建
Session.add_all([s1,s2,s3,s4,s5,s6])
#此时才统一提交,创建数据
Session.commit()
#查询数据
常用查询语法:
#equals
Session.query(Student).filter(Student.name=="XXX")
#not equals
Session.query(Student).filter(Student.name!="XXX")
#LIKE
Session.query(Student).filter(Student.name.like("%xxx%"))
#NOT LIKE
Session.query(Student).filter(Student.name.notlike("%xxx%"))
#IN
Session.query(Student).filter(Student.name.in_(['xxx','yyy']))
#NOT IN
Session.query(Student).filter(Student.name.notin_(['xxx','yyy']))
#LIke、IN
#Session.query(Student).filter(Student.name.in_(Session.query(Student.name).filter(Student.name.like('%xxx%')).all())).all()
#多条件查询/from sqlalchemy import and_
Session.query(Student).filter(Student.name=='xxx',Student.age=='xxx').all()
Session.query(Student).filter(Student.name=='xxx').filter(Student.age=='xxx').all()
Session.query(Student).filter(and_(Student.name=='xxx',Student.age=='xxx')).all()
查询实例:
# -*- coding:utf-8 -*-
#!/user/bin/env.python
#Author:Mr Wuimport sqlalchemy
from sqlalchemy import create_engine
from sqlalchemy.orm import sessionmaker
from sqlalchemy.ext.declarative import declarative_base
from sqlalchemy import Column,Integer,String,Date,Enum#建立连接
engine = create_engine("mysql+pymysql://root:187847@localhost/testdb?charset=utf8")
#生成orm基类
Base = declarative_base()class Student(Base):'''建立于student表的映射关联'''__tablename__="student"stu_id = Column(Integer,primary_key=True)name = Column(String(32),nullable=False)age = Column(Integer,nullable=False)register_date = Column(Date,nullable=False)def __repr__(self):'''制定查询完成后,返回的数据'''return ("-->stu_id: %s name: %s age: %s register_date:%s"%(self.stu_id,self.name,self.age,self.register_date))
Base.metadata.create_all(engine)
#创建于数据库的会话,返回的是一个对象
Session_class = sessionmaker(bind=engine)
#生成session实例
Session = Session_class()
#查询stu_id>1的学生的信息,返回的是一个对象列表(每一条记录,就是一个对象)
all_student_obj = Session.query(Student).filter(Student.stu_id>1).all()#获取所有数据
for student_obj in all_student_obj:print(student_obj)#output:
'''
-->stu_id: 2 name: 徐有容 age: 18 register_date:1999-08-13
-->stu_id: 3 name: 白落衡 age: 14 register_date:2003-09-03
-->stu_id: 4 name: 白早 age: 24 register_date:1993-02-24
-->stu_id: 5 name: 过冬 age: 30 register_date:1887-09-25
-->stu_id: 6 name: 南忘 age: 35 register_date:1882-09-21
'''
注:当query里面包含字段选项而不只是数据表类时,查询后返回的每一条记录是元组的形式(由
query里的字段组成)
#修改数据
#修改stu_id=3的学生的年龄为15
student_obj = Session.query(Student).filter(Student.stu_id==3).first()
student_obj.age = 15
#统一提交生效
Session.commit()
#撤销命令
sqlalchemy默认开启事务,因此可以使用回滚撤销事务
student_obj = Session.query(Student).filter(Student.stu_id==3).first()
student_obj.age = 14
print(student_obj.age) #14
Session.rollback()
print(student_obj.age) #15
#多条件查询
#查询stu_id >3 且 age <30的学生的信息
all_student = Session.query(Student).filter(Student.stu_id>3).filter(Student.age<30).all()
for student in all_student:print(student)
#output: -->stu_id: 4 name: 白早 age: 24 register_date:1993-02-24
#统计与分组
#统计age>20的学生的人数
stu_number = Session.query(Student).filter(Student.age>20).count()
print(stu_number)
#output: 3
#把学生按照姓名分组输出具有相同名字的人数
#此时返回的每条记录是一个元组,由query里的字段组成
all_obj = Session.query(Student.name,func.count(Student.name)).group_by(Student.name).all()
for obj in all_obj:print("name: %s count: %s"%(obj[0],obj[1]))
#output:
'''
name: 南忘 count: 1
name: 徐有容 count: 1
name: 白早 count: 1
name: 白落衡 count: 1
name: 赵腊月 count: 1
name: 过冬 count: 1
'''
#外键关联
先建立一张学习记录表与学生表关联,并往其插入几条数据
class Study_record(Base):__tablename__="study_record"id = Column(Integer,primary_key=True)day = Column(Integer,nullable=False)status = Column(String(32),DefaultClause('Y'))stu_id = Column(Integer,ForeignKey('student.stu_id')) #与student表建立关联student = relationship('Student',backref='study_record') #与student表建立相互反查的关系def __repr__(self):return ("day: %s status:%s"%(self.day,self.status))
Base.metadata.create_all(engine)
Session_class = sessionmaker(bind=engine)
Session = Session_class()
s1 = Study_record(day=1,status='N',stu_id=1)
s2 = Study_record(day=2,stu_id=1)
s3 = Study_record(day=1,stu_id=2)
s4 = Study_record(day=2,status='N',stu_id=2)
s5 = Study_record(day=1,stu_id=3)
s6 = Study_record(day=2,stu_id=3)
Session.add_all([s1,s2,s3,s4,s5,s6])
Session.commit()
反查示例:查询学习记录表中status='Y',day=1记录,然后反查学生表中对应的学生
all_study_record = Session.query(Study_record).filter(Study_record.status=='Y',Study_record.day==1).all()
for study_record in all_study_record:print(study_record.student)
#output:
'''
stu_id: 2 name: 徐有容 age: 18
stu_id: 3 name: 白落衡 age: 15
'''
#添加字段
def add_column(engine, table_name, column):column_name = column.compile(dialect=engine.dialect)column_type = column.type.compile(engine.dialect)engine.execute('ALTER TABLE %s ADD COLUMN %s %s' % (table_name, column_name, column_type))column = Column('new column', String(100))
add_column(engine, table_name, column)
#多外键关联
即当一张表中有多个外键来自另一张表的情况
这时在设置反查关联的时候,要添加相应的参数,
如:obj_name = relationship('obj_name',foregin_keys=[column_name(这个是外键字段名)])
否则,反查的时候会分不清通过哪个外键进行反查,于是报错。
#多对多外键关联
1.多对多关系
描述:一个学生会有很多老师来上课,一个老师会教授很多学生,学生和老师之间就是多对多关系。
显然这个时候在某一方设置外键已经无法满足需求了,于是就需要再单独建立一张外键表,其外键分别来自学生表、教师表,并组合成为一个复合主键。这个时候在学生表中查数据时便可以通过这张外键表查询教师表中对应学生的教师信息,反之亦可。
2.通过SQL alchemy建立多对多外键关联
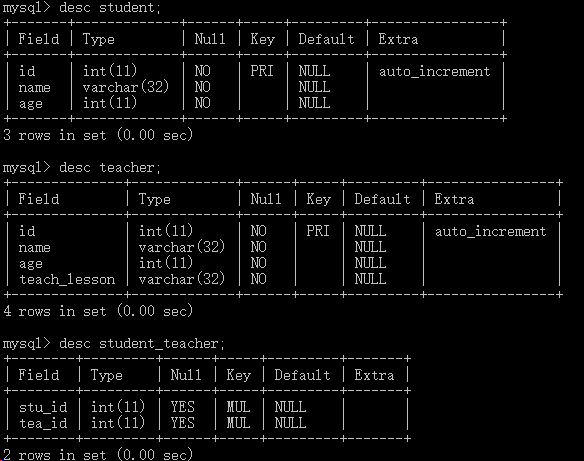
例如:建立上述例子中的学生表、教师表、教师-学生外键表
通过:teacher=relationship("Teacher",secondary='student_teacher',backref='student')
建立student表与teacher表的反查关系
# -*- coding:utf-8 -*-
#!/user/bin/env.python
#Author:Mr Wuimport sqlalchemy
from sqlalchemy import create_engine,func,Table
from sqlalchemy.orm import sessionmaker,relationship
from sqlalchemy.ext.declarative import declarative_base
from sqlalchemy import Column,Integer,String,DefaultClause,ForeignKeyengine = create_engine("mysql+pymysql://root:187847@localhost/testdb?charset=utf8")
Base = declarative_base()class Student(Base):'''建立学生表'''__tablename__="student"id = Column(Integer,primary_key=True)name = Column(String(32),nullable=False)age = Column(Integer,nullable=False)teacher = relationship("Teacher",secondary='student_teacher',backref='student')def __repr__(self):return ("name: %s age: %s"%(self.name,self.age))class Teacher(Base):'''建立教师表'''__tablename__="teacher"id = Column(Integer,primary_key=True)name = Column(String(32),nullable=False)age = Column(Integer,nullable=False)teach_lesson = Column(String(32),nullable=False)def __repr__(self):return ("name: %s age: %s teach_lesson: %s"%(self.name,self.age,self.teach_lesson))#建立student_teacher外键表
student_teacher = Table('student_teacher',Base.metadata,Column('stu_id',Integer,ForeignKey('student.id')),Column('tea_id',Integer,ForeignKey('teacher.id')),
)
Base.metadata.create_all(engine)
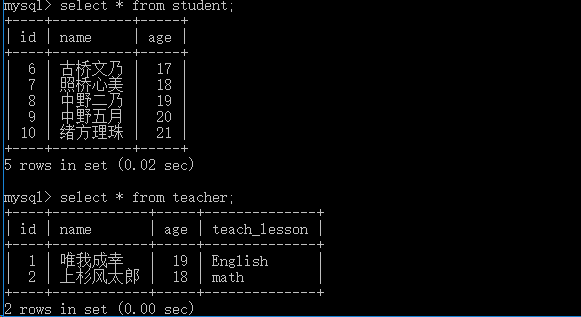
插入数据
Session_class = sessionmaker(bind=engine)
Session = Session_class()
s1 = Student(name='古桥文乃',age=17)
s2 = Student(name='照桥心美',age=18)
s3 = Student(name='绪方理珠',age=21)
s4 = Student(name="中野二乃",age=19)
s5 = Student(name='中野五月',age=20)
t1 = Teacher(name='上杉风太郎',age=18,teach_lesson='math')
t2 = Teacher(name='唯我成幸',age=19,teach_lesson='English')
t1.student = [s2,s4,s5] #关联教师、学生
t2.student = [s1,s2,s3] #关联教师、学生
Session.add_all([s1,s2,s3,s4,s5,t1,t2])
Session.commit()

查询示例
#查询上杉风太郎的学生的信息
teas_obj = Session.query(Teacher).filter(Teacher.name=='上杉风太郎').first()
for stu_obj in teas_obj.student:print(stu_obj)#output:
'''
name: 中野二乃 age: 19
name: 中野五月 age: 20
name: 照桥心美 age: 18
'''
多对多删除
#通过学生删除老师
stu_obj = Session.query(Student).filter(Student.name=='照桥心美').first()
tea_obj = Session.query(Teacher).filter(Teacher.name=='上杉风太郎').first()
stu_obj.teacher.remove(tea_obj)
#直接删除学生,会把学生跟所有老师的关联数据也自动删除
Session.delete(stu_obj)
Session.commit()


