本文主要是介绍【CesiumJS-5】绘制动态路线实现飞行航线、汽车轨迹、路径漫游等,希望对大家解决编程问题提供一定的参考价值,需要的开发者们随着小编来一起学习吧!
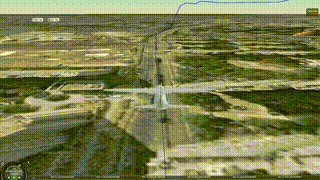
实现效果
前言
Cesium中,动态路线绘制的核心是借助CZML格式,CZML是一种用来描述动态场景的JSON数组,可以用来描述点、线、多边形、体、模型及其他图元,同时定义它们是怎样随时间变化的;
CZML主要做三件事:
1.添加模型信息
2.添加路径信息
3.计算速度,修改时间
CZML数据格式
[{"id": "document","version": "1.0","clock": {"interval": "2024-03-13T03:00:00Z/2024-03-13T03:12:50Z","currentTime": "2024-03-13T03:00:00Z","multiplier": 5}},{"id": "plane","availability": "2024-03-13T03:00:00Z/2024-03-13T03:12:50Z","viewFrom": {cartesian: [-2080, -1715, 779]},"model": {"gltf": "/model/plane.glb","scale": 2},"orientation": {"velocityReference": "#position"},"path": {"material": {"solidColor": {"color": {"interval": "2024-03-13T03:00:00Z/2024-03-13T03:12:50Z","rgba": [0, 0, 205, 255]}}},"width": [{"interval": "2024-03-13T03:00:00Z/2024-03-13T03:12:50Z","number": 2}],"show": [{"interval": "2024-03-13T03:00:00Z/2024-03-13T03:12:50Z","boolean": true}]},"position": {"interpolationAlgorithm": "LAGRANGE","interpolationDegree": 1,"epoch": "2024-03-13T03:00:00Z","cartographicDegrees": []}}
]
主要有两个对象组成:第一个对象声明czml,第二个对象生成模型。
1. 声明czml
{"id": "document","version": "1.0","clock": {"interval": "2024-03-13T03:00:00Z/2024-03-13T03:12:50Z","currentTime": "2024-03-13T03:00:00Z","multiplier": 5}}2. 设置相机位置
"viewFrom": {cartesian: [-2080, -1715, 779]},3. 生成场景模型,设置时间范围
{"id": "plane","availability": "2024-03-13T03:00:00Z/2024-03-13T03:12:50Z","model": {"gltf": "/model/plane.glb","scale": 2}}4. 设置模型运动方向
"orientation": {"velocityReference": "#position"},5. 生成动态路径
"path": {"material": {"solidColor": {"color": {"interval": "2024-03-13T03:00:00Z/2024-03-13T03:12:50Z","rgba": [0,0,205,255]}}},"width": [{"interval": "2024-03-13T03:00:00Z/2024-03-13T03:12:50Z","number": 2}],"show": [{"interval": "2024-03-13T03:00:00Z/2024-03-13T03:12:50Z","boolean": true}]},6. 设置运动路线
cartographicDegrees设置经纬度:4个一组分别是 时间,经度,纬度,高度
"position": {"interpolationAlgorithm": "LAGRANGE","interpolationDegree": 1,"epoch": "2024-03-13T03:00:00Z","cartographicDegrees": [0, 120.13125463180745, 30.316189813141357, 20]}
功能实现
本人在实现功能中没用json格式,而是直接用的数组对象变量,上述中仅做学习记录。
注意: czml只能识别ISO8601日期,需要使用Cesium内置方法转换时间;
1. 将当前时间作为开始时间并将js日期转为儒略日格式
const start = Cesium.JulianDate.fromDate(new Date());2. 创建czml数组
使用Cesium.JulianDate.toIso8601()方法将时间转为ISO8601日期格式
const czml = [{id: "document",version: "1.0",clock: {interval: `${Cesium.JulianDate.toIso8601(start, 0)}/${Cesium.JulianDate.toIso8601(Cesium.JulianDate.addSeconds(start, 450, new Cesium.JulianDate()), 0)}`,currentTime: `${Cesium.JulianDate.toIso8601(start, 0)}`,multiplier: 10,}},{id: "plane",availability: `${Cesium.JulianDate.toIso8601(start, 0)}/${Cesium.JulianDate.toIso8601(Cesium.JulianDate.addSeconds(start, 450, new Cesium.JulianDate()), 0)}`,model: {gltf: "/model/plane.glb",scale: 2},// viewFrom: {//   cartesian: [-2080, -1715, 779]// },orientation: {velocityReference: "#position"},path: {material: {solidColor: {color: {interval: `${Cesium.JulianDate.toIso8601(start, 0)}/${Cesium.JulianDate.toIso8601(Cesium.JulianDate.addSeconds(start, 450, new Cesium.JulianDate()), 0)}`,rgba: [0, 0, 205, 255]}}},width: [{interval: `${Cesium.JulianDate.toIso8601(start, 0)}/${Cesium.JulianDate.toIso8601(Cesium.JulianDate.addSeconds(start, 450, new Cesium.JulianDate()), 0)}`,number: 2}],show: [{interval: `${Cesium.JulianDate.toIso8601(start, 0)}/${Cesium.JulianDate.toIso8601(Cesium.JulianDate.addSeconds(start, 450, new Cesium.JulianDate()), 0)}`,boolean: true}]},position: {interpolationAlgorithm: "LAGRANGE",interpolationDegree: 1,epoch: `${Cesium.JulianDate.toIso8601(start, 0)}`,cartographicDegrees: [0, 120.13125463180745, 30.316189813141357, 5,10, 120.13111416662538, 30.315539106519307, 5,20, 120.1309786622693, 30.31489588182787, 5,30, 120.13084876734133, 30.314235695359727, 5,40, 120.13069473575192, 30.313540629197277, 5,50, 120.13054390032266, 30.312912654513724, 5,60, 120.13044947371688, 30.312385482730374, 5,70, 120.13030971147948, 30.311910736974383, 5,80, 120.13009317468772, 30.311390245082837, 5,90, 120.12978893985873, 30.310733495046055, 5,100, 120.12959024998796, 30.310326531696383, 10,110, 120.12938465577722, 30.309954975972268, 30,120, 120.12903852757415, 30.309336955328902, 60,130, 120.12871206396551, 30.308875801472478, 70,140, 120.12838069578686, 30.308490868344943, 70,150, 120.12810457466928, 30.308113523536672, 70,160, 120.12779772791689, 30.307774086249907, 80,170, 120.12737964279644, 30.307483823729378, 80,180, 120.1269732925855, 30.307160879171903, 80,190, 120.12647213239983, 30.30666310390423, 80,200, 120.12546262988464, 30.307181930544864, 80,210, 120.1245785033241, 30.307683795316315, 80,220, 120.12375576753382, 30.308035432883194, 100,230, 120.12308850447974, 30.308497699718018, 100,240, 120.12253685192415, 30.308860660895174, 100,250, 120.12209783635902, 30.309214249085528, 100,260, 120.12124539807733, 30.309730900111948, 120,270, 120.12062513785223, 30.30968143768237, 125,280, 120.11996146408914, 30.30903962813221, 130,290, 120.12080592297113, 30.308199027265523, 135,300, 120.1206419712799, 30.307743185311676, 140,310, 120.11991139765998, 30.306939478614392, 200,320, 120.11894945108537, 30.307236007284757, 220,330, 120.11843736124806, 30.307682602103153, 240,340, 120.11801295026378, 30.308682424137178, 260,350, 120.117608250043, 30.30896814314354, 280,360, 120.11756912872843, 30.309470200064347, 300,370, 120.11718042273918, 30.310442342271475, 300,380, 120.11602779574089, 30.3098989524904, 310,390, 120.11550616761767, 30.31093863353403, 310,400, 120.11644406776917, 30.31177509905328, 310,410, 120.11566744726449, 30.312255943277282, 320,420, 120.11627775321915, 30.312631949114188, 320,430, 120.11695495518998, 30.313251980473588, 330,440, 120.11755845523233, 30.313636377593916, 330,450, 120.11843011762987, 30.31389033163698, 340]}}
]
3. 加载CZML数据并添加到场景中
dataSources:是一个异步Promise,回调参数为我们传入的czml数据;
let dataSource = viewer.dataSources.add(Cesium.CzmlDataSource.load(czml));4. 相机跟随模型
dataSource.then(part => {// 根据id获取czml中的模型let e = part.entities.getById("plane");// 相机跟随模型viewer.trackedEntity = e;});5. 视角跟随模型
  dataSource.then(part => {// 根据id获取czml中的模型let e = part.entities.getById("plane");// 相机跟随模型viewer.trackedEntity = e;//++++++++++++++// 视角跟随模型let prePoint = null; // 前一个点viewer.scene.postRender.addEventListener(() => {if (e && viewer.clock.shouldAnimate) {// 获取当前时间的位置let curPoint = e.position.getValue(viewer.clock.currentTime);if (prePoint) {// 计算heading-代表 Z 轴旋转let heading = getHeading(prePoint, curPoint);// 计算pitch-代表 Y 轴朝向let pitch = Cesium.Math.toRadians(-30.0);let range = 100;viewer.camera.lookAt(curPoint, new Cesium.HeadingPitchRange(heading, pitch, range));}// 当前点在下一次渲染时为前一个点prePoint = Cesium.Cartesian3.clone(curPoint)}}) });function getHeading(pointA, pointB) {//建立以点A为原点,X轴为east,Y轴为north,Z轴朝上的坐标系const transform = Cesium.Transforms.eastNorthUpToFixedFrame(pointA);//向量ABconst positionvector = Cesium.Cartesian3.subtract(pointB, pointA, new Cesium.Cartesian3());//因transform是将A为原点的eastNorthUp坐标系中的点转换到世界坐标系的矩阵//AB为世界坐标中的向量//因此将AB向量转换为A原点坐标系中的向量,需乘以transform的逆矩阵。const vector = Cesium.Matrix4.multiplyByPointAsVector(Cesium.Matrix4.inverse(transform, new Cesium.Matrix4()), positionvector, new Cesium.Cartesian3());//归一化const direction = Cesium.Cartesian3.normalize(vector, new Cesium.Cartesian3());//headingconst heading = Math.atan2(direction.y, direction.x) - Cesium.Math.PI_OVER_TWO;return Cesium.Math.TWO_PI - Cesium.Math.zeroToTwoPi(heading);
}
这篇关于【CesiumJS-5】绘制动态路线实现飞行航线、汽车轨迹、路径漫游等的文章就介绍到这儿,希望我们推荐的文章对编程师们有所帮助!


