本文主要是介绍C++:探究纯虚析构函数以及实现数组的快速排序与链表的归并排序,希望对大家解决编程问题提供一定的参考价值,需要的开发者们随着小编来一起学习吧!
C++:探究纯虚析构函数以及实现数组的快速排序与链表的归并排序
标签: 数据结构 数组 链表 快速排序 归并排序 抽象类 虚继承
by 小威威
1.介绍
本篇博文将通过课后作业的(15 C++ Homework) D&A 5 Collection with Inheritance来讲解一些重要的排序与零散的知识。而且,本人以科学严谨的态度,对抽象类中析构函数的调用情况进行了分类讨论并一一试验,最终得出了“抽象类最好要定义纯虚析构函数”的结论,并不是凭空捏造,或者是从网上拷贝而来。但是,这仍然代表本人观点,不具有权威性,如有错误,欢迎大家批评指出。
2.题目背景
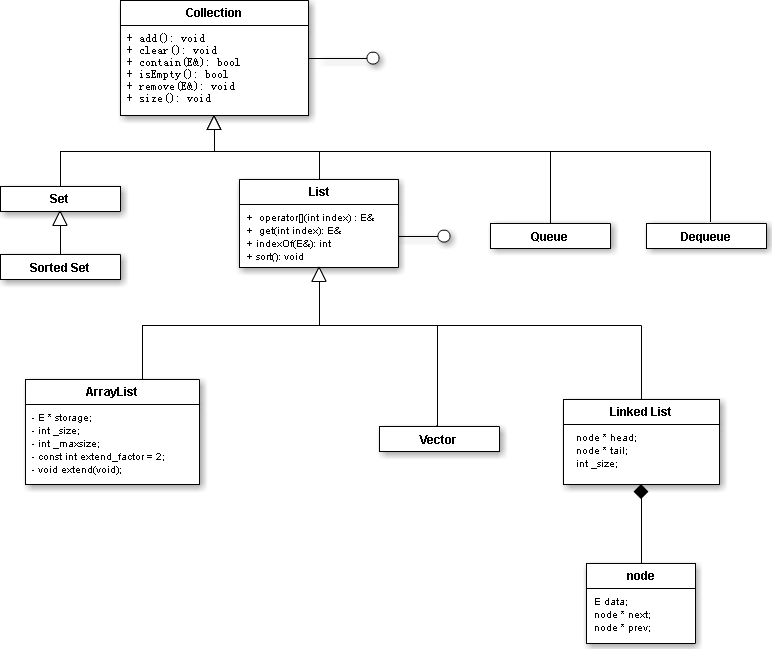
其实出题人的意思很简单,就是希望你用代码实现这张图中部分的内容(有方框的)。
现在我来简单的分析一下这张图(只介绍带有大方框的)。
1.直线加圆圈对应的方框是指提供接口的类,换句话说就是抽象类。
由图可知,Collection 与 List 是抽象类。
2.直线加空心三角形表达的是继承关系。
由图可知,List继承Collection,ArrayList与Linked List继承List。
3.直线加实心菱形代表的是被包含于。
由图可知,结构体node在Linked List中定义。
本题考查的知识点清单如下:
继承、成员函数的纯虚函数、析构函数的纯虚函数、抽象类、接口、预处理指令在头文件中的应用、数据结构(数组与链表)的各种操作、快速排序、归并排序、动态内存的分配与释放、多态等。
这里再重复一下C++中很重要的三个部分:
1.encapsulation(封装);2.inheritance(继承); 3.polymorphism(多态)。
3.这道题的坑:
(1)接口:
接口方便了基类的指针访问派生类的成员函数。成员函数一般都要定义成纯虚函数(除了构造函数),因此它们一般都是抽象类。而且接口类一般只提供接口,不提供实现,所以定义纯虚析构函数时不能用virtual 函数原型 = 0;的格式,而要用virtual ~类名 {}。但这并不意味着析构函数就不能用virtual 函数原型 = 0;的格式,当类包含实现时,如若在类的定义里用virtual ~类名 = 0;的格式,那么在实现中要重新定义析构函数。对于其他成员函数(除构造函数),用virtual 函数原型 = 0;的格式就行了。因为这些成员函数只提供接口,并不会调用,而抽象类虽然没有实例化对象,但是仍然会在删除子对象时调用抽象类的析构函数。
(2)纯虚析构函数
注:正如上面所说,抽象类的析构函数一定需要实现。所以我认为虚析构函数与纯虚析构函数应该是同一个概念,没什么区别。
对于一个抽象类,最好要定义纯虚析构函数(这个观点网上有争议,不过我个人更倾向于定义纯虚析构函数),虽然并不是必要的,但定义了肯定是最好的了。我的理由如下:
定义一个抽象类,一般是用于提供接口,以方便基类指针访问派生类中的成员。好,现在我分成两种情况来生成派生类对象,并用一些小代码来展现它们各自的析构函数的调用情况。
I.通过基类指针动态分配内存生成派生类对象;
———————————————-实例一————————————————–
# include <iostream>using namespace std;class Base {public:virtual void funA() = 0;~Base() {cout << "Calling for Base's destruction!\n";}
};class Derived : public Base {public:void funA() {}~Derived() {cout << "Calling for Derived's destruction\n";}
};int main(void) {Base *p1 = new Derived;delete p1;// Derived A;return 0;
}输出结果:
Calling for Base's destruction!
从代码的输出结果不难发现,如果通过基类指针动态分配内存生成派生类对象,当删去对象时,只会调用基类也就是抽象类的析构函数。
如果将析构函数变成纯虚析构函数呢?
———————————————-实例二————————————————–
# include <iostream>using namespace std;class Base {public:virtual void funA() = 0;virtual ~Base() {cout << "Calling for Base's destruction!\n";}
};class Derived : public Base {public:void funA() {}~Derived() {cout << "Calling for Derived's destruction\n";}
};int main(void) {Base *p1 = new Derived;delete p1;// Derived A;return 0;
}输出结果:
Calling for Derived's destruction
Calling for Base's destruction!
从输出结果可以得出结论:
通过基类指针动态分配内存生成派生类对象时,如若没有定义纯虚析构函数,那么只会调用基类的析构函数;如若定义了纯虚析构函数,不仅会调用派生类的析构函数,还会调用基类的析构函数(所以析构函数需要实现,否则会编译出错)。
那么对于积累是非抽象类的呢?情况如何?读者可以试一下~
而我实验的结果是无论基类是抽象类还是普通类,都满足上面的结论。
II.通过数据类型+变量名的方式生成派生类对象。
———————————————-实例三————————————————–
# include <iostream>using namespace std;class Base {public:virtual void funA() = 0;~Base() {cout << "Calling for Base's destruction!\n";}
};class Derived : public Base {public:void funA() {}~Derived() {cout << "Calling for Derived's destruction\n";}
};int main(void) {// Base *p1 = new Derived;// delete p1;Derived A;return 0;
}输出结果:
Calling for Derived's destruction
Calling for Base's destruction!
改成纯虚析构函数试试~
———————————————-实例四————————————————–
# include <iostream>using namespace std;class Base {public:virtual void funA() = 0;virtual ~Base() {cout << "Calling for Base's destruction!\n";}
};class Derived : public Base {public:void funA() {}~Derived() {cout << "Calling for Derived's destruction\n";}
};int main(void) {// Base *p1 = new Derived;// delete p1;Derived A;return 0;
}输出结果:
Calling for Derived's destruction
Calling for Base's destruction!
从输出结果可以得出结论:
如果通过数据类型+变量名的方式生成派生类对象,那么此时有无定义纯虚析构函数就没有太大的关系了(也许这就是网上的人认为抽象类不用定义纯虚析构函数的原因)。
总而言之,由上面的试验可知,定义纯虚构造函数还是比较好的,比较适用于两种生成对象的方法。
(3)重定义问题
在一项比较大的工程内,或者是比较复杂的代码题内,可能会出现多个文件调用同一个头文件的情况,这便会导致代码重定义问题。为了解决这一问题,我们需要在头文件中加入一些预编译指令来防止此类情况的发生。
如头文件List.hpp:
#ifndef LIST_H_
#define LIST_H_
class List : public Collection {(content)
};
#endif
在该头文件中,我加入了以下语句:
#ifndef LIST_H_
#define LIST_H_
#endif
如果这个头文件还没有被include,那么也就没有定义LIST_H_常量。
于是便会执行#ifndef与#endif之间的代码,其中便定义了LIST_H_常量。
假如这个这个头文件已经被include了,那么就一定定义了LIST_H_ 常量,那么也就不会执行#ifndef与#endif之间的代码,也就不会造成重定义的情况。
于是,为保险起见,最好头文件都加上这三句预编译指令。
(4)要自己实现快排,链表,数组,不能调用STL。
4.这道代码题的核心—->快排的实现以及链表的实现。
(1)对于快排的实现,我就不细讲了,挺简单的。可以看我以前的一篇文章学习:快速排序
(2)对于归并,只要了解了它的算法,我们自己就能实现!
推荐一篇博文:
递归算法学习系列二:归并排序
这篇博文我只推荐他对归并排序算法的讲解,但我并不推荐他的代码。毕竟他用的是数组的归并排序,显然就没快排快了。我们所要做的就是根据归并排序的算法用链表加以实现!
用链表实现归并排序的代码我会在后文给出。
5.代码实现
题目已给出main.cpp, ArrayList.hpp,LinkedList.hpp,要求我们实现Collection.hpp, List.hpp, ArrayList.cpp, LinkedList.cpp。
// main.cpp#include <iostream>
#include <cstdlib>
#include "Collection.hpp"
#include "List.hpp"
#include "LinkedList.hpp"
#include "ArrayList.hpp"
#include <exception>using std::cin;
using std::cout;
using std::endl;
using std::exception;class AlgorithmnForbidden : public exception {virtual const char *what() const throw() {return "Please do not use std::sort or std::list or std::vector .....";}
};class TEST {private:int *testData;int data_size;public:TEST() {
#if defined(_GLIBCXX_ALGORITHM) || defined(_GLIBCXX_LIST) || \defined(_GLIBCXX_VECTOR)//throw AlgorithmnForbidden();cout << "please do not use algorithm" << endl;
#endifcin >> data_size;cout << "test data size:" << data_size << endl;testData = new int[data_size];for (int i = 0; i < data_size; i++) {cin >> testData[i];}}~TEST() { delete[] testData; }void test_List(Collection *c) {cout << (c->isEmpty() ? "true" : "false") << endl;int n = data_size;for (int i = 0; i < n; i++) {c->add(testData[i]);}reinterpret_cast<List *>(c)->sort();for (int i = 0; i < n; i++) {cout << (*reinterpret_cast<List *>(c))[i] << " ";}cout << endl;// not emptycout << (c->isEmpty() ? "true" : "false") << endl;for (int i = 0; i < n / 2; i++) {cout << "(" << (c->contain(i) ? "true" : "false");cout << ","<< (reinterpret_cast<List *>(c)->indexOf(i) != -1 ? "true" : "false")<< ") ";c->remove(i);}cout << endl;for (int i = 0; i < c->size(); i++) {cout << (*reinterpret_cast<List *>(c))[i] << " ";}cout << endl;}void test_ArrayList() {Collection *c = new ArrayList();test_List(c);delete c;}void test_LinkedList() {Collection *c = new LinkedList();test_List(c);delete c;}void runAllTests() {cout << "Testing ArrayList:" << endl;test_ArrayList();cout << endl;cout << "Testing LinkedList:" << endl;test_LinkedList();}
};int main() {TEST t;t.runAllTests();return 0;
}// ArrayList.hpp
#ifndef ARRAYLIST_H_
#define ARRAYLIST_H_#include "List.hpp"class ArrayList : public List {public:ArrayList();~ArrayList();virtual void add(E e);virtual void clear(void);virtual bool contain(E e);virtual bool isEmpty(void);virtual void remove(E e);virtual E& operator[](int index);virtual E& get(int index);virtual int indexOf(E element);virtual void sort(void);virtual int size(void);private:E* storage;int _size;int _maxsize;static const int extend_factor = 2;void extend(void);
};#endif// LinkList.hpp#ifndef LINKEDLIST_H_
#define LINKEDLIST_H_#include "List.hpp"
#include <iostream>class LinkedList : public List {public:typedef struct node {E data;struct node* next;struct node* prev;node(E data, struct node* next = NULL, struct node* prev = NULL): data(data), next(next), prev(prev) {}} node;LinkedList();~LinkedList();virtual void add(E e);virtual void clear(void);virtual bool contain(E e);virtual bool isEmpty(void);virtual void remove(E e);virtual E& operator[](int index);virtual E& get(int index);virtual int indexOf(E element);virtual void sort(void);virtual int size(void);private:node* head;node* tail;int _size;
};#endif
对于Collection.hpp,根据最开始给出的那个图中对应方框内的内容进行定义。
#ifndef COLLECTION_H_
#define COLLECTION_H_
class Collection {protected:typedef int E;public:virtual ~Collection() {} // 一定要加上virtualvirtual void add(E e) = 0;virtual void clear(void) = 0;virtual bool contain(E e) = 0;virtual bool isEmpty(void) = 0;virtual void remove(E e) = 0;virtual int size(void) = 0;
};
#endif
对于List.hpp,也是如图中对应方框的内容进行定义。
#ifndef LIST_H_
#define LIST_H_
# include "Collection.hpp"
class List : public Collection {public:virtual ~List() {} // 一定要加上virtualvirtual E& operator[](int index) = 0;virtual E& get(int index) = 0;virtual int indexOf(E element) = 0;virtual void sort(void) = 0;
};
#endif
(1)ArrayList.cpp
对于ArrayList.cpp的实现,其实类似于实现vector类,因为这个array有extend的功能。
除了排序,我觉得需要有点小思维的就是remove函数。不难想到最普通的方法就是从头到尾遍历数组,除去相同元素,并且实现相同元素后面元素的前移。
但是我有一个更快,更巧的方法。由main.cpp可知, 在调用remove()函数之前,数组内的元素已经排完序,并且remove的数字是从小到大的。不难想到,它只会在数组的一端删去相同元素。所以我先将整个数组给倒过来,然后从后往前遍历。如果遍历到要删除的元素,直接_size–即可,因为只会从尾端删除元素,故不用考虑删除中间元素的情况。我的ArrayList::remove()是这样实现的。其实我的代码还可以改进,先判断最后一个元素是否是我们要删除的元素,如果不是,就不执行遍历,如果是,就执行遍历。还有再缩短时间的方法,就是加一个循环终止调节,这个条件可以是判断相邻元素是否都是我们要删除的元素。最后要将数组倒回来!!!不必调用quick_sort()函数。
extend()函数也是挺有意思。不过要注意分情况。如果storage为NULL,那就直接分配内存给它;如果不为空,要在分配内存之后将原数组中的数据复制到新内存中,然后把原数组的空间delete,以避免内存泄漏。
// ArrayList.cpp
# include "ArrayList.hpp"
# include <iostream>static int a = 0;
void quick_sort(int *pArr, int pbig, int psmall) {if (pbig >= psmall) return;int key = pbig;int len = psmall + 1;while (pbig != psmall) {for (; psmall > pbig; psmall--) {if (pArr[key] > pArr[psmall]) break;}for (; pbig < len; pbig++) {if (pbig == psmall) {int temp = pArr[key];pArr[key] = pArr[psmall];pArr[psmall] = temp;break;}if (pArr[key] < pArr[pbig]) break;}if (pbig != psmall) {int temp = pArr[psmall];pArr[psmall] = pArr[pbig];pArr[pbig] = temp;}}quick_sort(pArr, key, pbig-1);quick_sort(pArr, pbig+1, len-1);
}
ArrayList :: ArrayList() : _size(0), _maxsize(0), storage(NULL) {}
ArrayList :: ~ArrayList() { clear(); }
void ArrayList :: add(ArrayList::E e) {if (_size == _maxsize) extend();storage[_size] = e;_size++;
}
void ArrayList :: clear(void) {if (storage != NULL) delete[] storage;storage = NULL;_size = 0;_maxsize = 0;
}
bool ArrayList :: contain(ArrayList::E e) {for (int i = 0; i < _size; i++) {if (storage[i] == e) return true;}return false;
}
bool ArrayList :: isEmpty(void) {if (_size == 0) return true;return false;
}
void ArrayList :: remove(ArrayList::E e) {static int b = _size;a++;if (a == 1) {for (int i = 0, j = _size-1; i < j; i++, j--) {int temp = storage[i];storage[i] = storage[j];storage[j] = temp;}}for (int i = _size-1; i >= 0; i--) {if (storage[i] == e) _size--;}if (a == b/2) {for (int i = 0, j = _size-1; i < j; i++, j--) {int temp = storage[i];storage[i] = storage[j];storage[j] = temp;}}
}ArrayList::E& ArrayList :: operator[](int index) { return storage[index]; }
ArrayList::E& ArrayList :: get(int index) { return storage[index]; }
int ArrayList :: indexOf(ArrayList::E element) {for (int i = 0; i < _size; i++) {if (storage[i] == element) return i;}return -1;
}
void ArrayList :: sort(void) {if (storage != NULL) {quick_sort(storage, 0, _size-1);}
}
int ArrayList :: size(void) { return _size;}
void ArrayList :: extend(void) {_maxsize += extend_factor;if (storage == NULL) {storage = new E[_maxsize];} else {E* pArr = new E[_maxsize];pArr[_size] = pArr[_size+1] = 0;for (int i = 0; i < _size; i++) {pArr[i] = storage[i];}delete[] storage;storage = pArr;}
}
(2) Linkedlist.cpp
除了排序,我觉得remove()函数的实现需要点小思维。
不过链表的remove()函数实现比数组简单多了,因为这个链表是双向链表,操作起来较为方便。(双向链表的详细实现详见:实现双向链表, 单向链表的详细实现相见:16.03.11实验课总结, 单向链表入门:入门:链表的基本操作)
因为只会从一端删除元素,所以我们只需对链表进行遍历。循环中只需判断第一个结点中的数据是否等于我们要删除的,如果是,删除第一个结点,如果不是,直接break来终止循环。此处已经有了循环终止条件,就没有必要再设置一个新的了。
下面上LinkedList.cpp,重点在归并排序!
// LinkedList.cpp
# include "LinkedList.hpp"
static int a = 0;
void merge_sort(LinkedList::node** head, int _size) {if (*head == NULL || (*head)->next == NULL) return;int count = 1;LinkedList::node *p1 = *head;while (p1 != NULL) {if (count == _size/2) break;p1 = p1->next;count++;}LinkedList::node *p2 = p1->next;p1->next = NULL;p2->prev = NULL;merge_sort(head, count);merge_sort(&p2, _size-count);LinkedList::node *p3 = *head;LinkedList::node *p4 = p2;LinkedList::node *merge_list = new LinkedList::node(0);LinkedList::node *p5 = merge_list;int size = 1;while (size < _size) {p5->next = new LinkedList::node(0);p5->next->prev = p5;size++;p5 = p5->next;}p5 = merge_list;while (p3 != NULL && p4 != NULL) {if (p3->data > p4->data) {p5->data = p4->data;p4 = p4->next;} else {p5->data = p3->data;p3 = p3->next;}p5 = p5->next;}if (p3 == NULL) {while (p5 != NULL) {p5->data = p4->data;p5 = p5->next;p4 = p4->next;}} else if (p4 == NULL) {while (p5 != NULL) {p5->data = p3->data;p5 = p5->next;p3 = p3->next;}}while (*head != NULL) {LinkedList::node *p6 = (*head)->next;delete (*head);*head = p6;}while (p2 != NULL) {LinkedList::node *p7 = p2->next;delete p2;p2 = p7;}*head = merge_list;
}
LinkedList :: LinkedList() : head(NULL), tail(NULL), _size(0) {}
LinkedList :: ~LinkedList() { clear(); }
void LinkedList :: add(LinkedList::E e) {node *p1 = new node(e);if (head == NULL) {head = tail = p1;} else {tail->next = p1;p1->prev = tail;tail = p1;}_size++;
}
void LinkedList :: clear(void) {if (head != NULL) {node *p1;while (head != NULL) {p1 = head->next;delete head;head = p1;}}_size = 0;head = tail = NULL;
}
bool LinkedList :: contain(LinkedList::E e) {node *p1 = head;while (p1 != NULL) {if (e == p1->data) return true;p1 = p1->next;}return false;
}
bool LinkedList :: isEmpty(void) {if (_size == 0) return true;return false;
}
void LinkedList :: remove(LinkedList::E e) {while (head != NULL) {if (head->data == e) {node *temp = head;head = head->next;head->prev = NULL;delete temp;_size--;} else {break;}}
}
LinkedList::E& LinkedList :: operator[](int index) {node *p1 = head;while (index--) {p1 = p1->next;}return p1->data;
}
LinkedList::E& LinkedList :: get(int index) {return (*this)[index];
}
int LinkedList :: indexOf(LinkedList::E element) {node *p1 = head;int count = 0;int flag = 0;while (p1 != NULL) {if (p1->data == element) {flag = 1;break;}count++;p1 = p1->next;}if (flag == 1) return count;else return -1;
}
void LinkedList :: sort(void) {if (head == NULL) return;merge_sort(&head, _size);int count = 1;node *p1 = head;while (count < _size) {p1 = p1->next;count++;}tail = p1;
}
int LinkedList :: size(void) { return _size; }
6.知识的补充(From wikipedia)
True object-orient programming requires objects to support three qualities: encapsulation, inheritance, and polymorphism.Polymorphism enables one common interface for many implementations, and for objects to act differently under different circumstances.
C++ supports several kinds of static (compile-time) and dynamic (run-time) polymorphisms, supported by the language features described above. Compile-time polymorphism does not allow for certain run-time decisions, while run-time polymorphism typically incurs a performance penalty.
Static polymorphism is not true polymorphism including function overloading, operator overloading and templates which is not what we are going to work on(in this question).
Dynamic polymorphism:
Variable pointers (and references) to a base class type in C++ can refer to objects of any derived classes of that type in addition to objects exactly matching the variable type. This allows arrays and other kinds of containers to hold pointers to objects of differing types. Because assignment of values to variables usually occurs at run-time, this is necessarily a run-time phenomenon.
C++ also provides a dynamic_cast operator, which allows the program to safely attempt conversion of an object into an object of a more specific object type (as opposed to conversion to a more general type, which is always allowed). This feature relies on run-time type information (RTTI). Objects known to be of a certain specific type can also be cast to that type with static_cast, a purely compile-time construct that has no runtime overhead and does not require RTTI.
Ordinarily, when a function in a derived class overrides a function in a base class, the function to call is determined by the type of the object. A given function is overridden when there exists no difference in the number or type of parameters between two or more definitions of that function. Hence, at compile time, it may not be possible to determine the type of the object and therefore the correct function to call, given only a base class pointer; the decision is therefore put off until runtime. This is called dynamic dispatch. Virtual member functions or methods[43] allow the most specific implementation of the function to be called, according to the actual run-time type of the object. In C++ implementations, this is commonly done using virtual function tables. If the object type is known, this may be bypassed by prepending a fully qualified class name before the function call, but in general calls to virtual functions are resolved at run time.
In addition to standard member functions, operator overloads and destructors can be virtual. As a rule of thumb, if any function in the class is virtual, the destructor should be as well. (此处表示应该使用虚析构函数,没有强制)As the type of an object at its creation is known at compile time, constructors, and by extension copy constructors, cannot be virtual. Nonetheless a situation may arise where a copy of an object needs to be created when a pointer to a derived object is passed as a pointer to a base object. In such a case, a common solution is to create a clone() (or similar) virtual function that creates and returns a copy of the derived class when called.
A member function can also be made “pure virtual” by appending it with = 0 after the closing parenthesis and before the semicolon. A class containing a pure virtual function is called an abstract data type. Objects cannot be created from abstract data types; they can only be derived from. Any derived class inherits the virtual function as pure and must provide a non-pure definition of it (and all other pure virtual functions) before objects of the derived class can be created. A program that attempts to create an object of a class with a pure virtual member function or inherited pure virtual member function is ill-formed.
以上内容皆为本人观点,欢迎大家提出批评和指导,我们一起探讨!
这篇关于C++:探究纯虚析构函数以及实现数组的快速排序与链表的归并排序的文章就介绍到这儿,希望我们推荐的文章对编程师们有所帮助!


