本文主要是介绍iOS深入学习(UITableView系列4:使用xib自定义cell),希望对大家解决编程问题提供一定的参考价值,需要的开发者们随着小编来一起学习吧!
可以通过继承UITableViewCell重新自定义cell,可以像下面一样通过代码来自定义cell,但是手写代码总是很浪费时间,
| 1 2 3 4 5 6 7 8 9 10 11 12 13 14 15 16 17 18 19 20 21 22 23 24 25 26 27 28 29 30 31 32 33 34 | //CustomTableViewCell.h文件 @interface CustomTableViewCell:UITableViewCell @property (nonatomic, strong) UIImageView *headImageView; @property (nonatomic, strong) UILabel *nameLabel; @property (nonatomic, strong) UILabel *textLabel; @end //CustomTableViewCell.m文件 @implementation CustomTableViewCell - (id)initWithStyle:(UITableViewCellStyle)style reuseIdentifier:(NSString *)reuseIdentifier { self = [super initWithStyle:style reuseIdentifier:reuseIdentifier]; if (self) { // Initialization code _headImageView = [[UIImageView alloc] init]; [self.contentView addSubView:_headImageView]; _nameLabel = [[UILabel alloc] init]; /*省略Label的属性设置*/ [self.contentView addSubView:_nameLabel]; _textLabel = [[UILable alloc] init]; /*省略Label的属性设置*/ [self.contentView addSubView:_textLabel]; } return self; } - ( void )layoutSubviews { //省略布局代码 self.headImageView.frame = CGRectMake(.....); self.nameLabel.frame = CGRectMake(.....); self.textLabel.frame = CGRectMake(....); [super layoutSubviews]; } @end |
上面CustomTableViewCell的.h/.m文件中,我用了大段的代码来给自定义的cell布局,真的挺麻烦。然后在ViewController中使用的时候是这样的,
| 1 2 3 4 5 6 7 8 9 10 11 12 13 14 15 16 | - (UITableViewCell *)tableView:(UITableView *)tableView cellForRowAtIndexPath:(NSIndexPath *)indexPath { static NSString *simpleIdentify = @ "SimpleIdentify" ; CustomTableViewCell *cell = [tableView dequeueReusableCellWithIdentifier:simpleIdentify]; if (cell == nil) { cell = [[CustomTableViewCell alloc] initWithStyle:UITableViewCellStyleDefault reuseIdentifier:simpleIdentify]; } //_person就是UITableView的数据源,它里面存放的是Person数据模型, //Person包括头像headStr、name、speechText等属性 Person *person = [_persons objectAtIndex:indexPath.row]; cell.headImage.image = [UIImage imageNamed:person.headStr]; cell.nameLabel.text = person.name; cell.textLabel.text = person.speechText; return cell; } |
上面就是使用代码自定义cell所要做的工作,我们当cell显示没有达到预期的时候我们还要回头改变其中UI控件的坐标,或者更改控件属性,当然这只是要多花点时间,最终还是可以实现的。
但是。。。我们还是要试着提高自己的开发效率,使用越来越成熟的xib技术,可以很大地提高开发效率,当然也是要勤加练习,熟能生巧。
开始阅读下面的内容之前,我假设你已经看过我之前的博客-UITableView系列1,那篇博客是本篇博客的基础;如果你没有看过,那就看看吧,然后接着看本篇博客。
所以下面开始学习吧!Come on!
按照下面的步骤开始操作,
(1)新建一个空的(Empty)xib文件,File->New,在面板中选择User Interface->Empty,如下图,

将文件命名为CustomTableViewCell,表示自定义的cell意思。
(2)拖动一个TableViewCell到空的(Empty)xib文件中,如下图,

(3)修改CustomTableViewCell的高度为90,通过属性面板来设置,如下图,

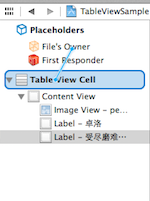
(4)拖一个UIIMageView到CustomTableViewCell的xib文件,设置该UIImageView控件的tag值为10;再拖两个UILabel到xib文件,设置tag分别为1和2,其布局方式如下图,

上面的几个步骤就进行了CustomTableViewCell的自定义,下面的步骤就是使用这个通过xib文件进行自定义的cell。
(5)选中CustomTableViewCell,点击左上角的File's Owner,如下图,

选中这个xib文件中的File's Owner是为了设置CustomTableViewCell的文件所有者,否则无法与.h/.m文件连线,接着看下一步。
(6)在右侧的面板,选择“Show the Identify Inpector”选项,如下图

这时候我们发现CustomTableViewCell的File's Owner为NSObject,因为我要在我的RootViewController中使用,所以我将"NSObject"替换为"RootViewController",表明这个cell的所有者是RootViewController。(PS:你需要将此处的NSObject改为你使用该CustomTableViewCell的ViewController文件名。)
(7)在使用该CustomTableViewCell的ViewController的头文件中写下如下代码,
| 1 2 3 4 5 6 | @interface RootViewController:UIViewController { } @property (nonatomic, strong) IBOutlet UITableViewCell *customCell; @end |
有人会奇怪这段话是什么意思,接着下面的步骤,你就会明白。
(8)在CustomTableViewCell.xib文件中,拖动File's Owner指向TableViewCell,如下图,
(9)在弹出的界面中选择customCell选项,如下图,

这就是为什么第(7)步骤要在RootViewController.h文件中声明一个IBOutlet关键字修饰的customCell变量的原因了。
(10)新建一个数据模型文件Person,继承自NSObject,其代码如下,
| 1 2 3 4 5 6 7 8 9 10 11 12 | //Person.h文件 @interface Person : NSObject @property (nonatomic, strong) NSString *name; @property (nonatomic, strong) NSString *headStr; @property (nonatomic, strong) NSString *speechText; @end //Person.m文件 #import "Person.h" @implementation Person @end |
之所以叫它模型文件,是因为该文件中的属性与CustomTableViewCell上面的控件所需的内容一致,以MVC的视角来看Person就是M(Model),CustomTableViewCell就是V(View),而RootViewController就是C(Controller)。
(11)在RootViewController中初始化TableView数据源_persons,代码如下,
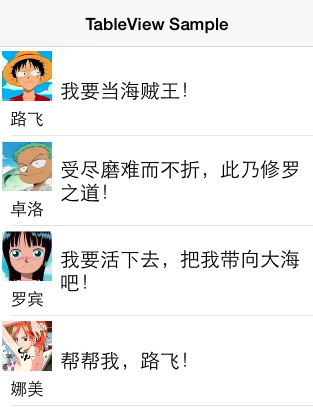
| 1 2 3 4 5 6 7 8 9 10 11 12 13 14 15 16 17 18 19 20 21 22 23 24 25 26 27 28 29 30 31 32 33 34 35 | @interface RootViewController ()<UITableViewDelegate,UITableViewDataSource> { NSArray *_persons; } @end @implementation RootViewController - ( void )viewDidLoad { [super viewDidLoad]; // Do any additional setup after loading the view from its nib. Person *p0 = [[Person alloc] init]; p0.name = @ "路飞" ; p0.headStr = @ "person0" ; p0.speechText = @ "我要当海贼王!" ; Person *p1 = [[Person alloc] init]; p1.name = @ "卓洛" ; p1.headStr = @ "person1" ; p1.speechText = @ "受尽磨难而不折,此乃修罗之道!" ; Person *p2 = [[Person alloc] init]; p2.name = @ "罗宾" ; p2.headStr = @ "person2" ; p2.speechText = @ "我要活下去,把我带向大海吧!" ; Person *p3 = [[Person alloc] init]; p3.name = @ "娜美" ; p3.headStr = @ "person3" ; p3.speechText = @ "帮帮我,路飞!" ; _persons = [NSArray arrayWithObjects:p0,p1,p2,p3, nil]; } @end |
因为我是海贼迷,所以找了路飞、卓洛、娜美、罗宾的图片当做头像,你可以到网上down几张,改名为person0.png、person1.png、person2.png、person3.png。
(12)在-tableView:cellForRowAtIndexPath:中使用CustomTableViewCell.xib创建cell,代码如下,
| 1 2 3 4 5 6 7 8 9 10 11 12 13 14 15 16 17 18 19 20 21 22 23 24 25 26 27 28 | #pragma mark - UITableView methods - (NSInteger)tableView:(UITableView *)tableView numberOfRowsInSection:(NSInteger)section { return [_persons count]; } - (UITableViewCell *)tableView:(UITableView *)tableView cellForRowAtIndexPath:(NSIndexPath *)indexPath { static NSString *simpleIdentify = @ "SimpleIdentify" ; UITableViewCell *cell = [tableView dequeueReusableCellWithIdentifier:simpleIdentify]; NSArray *nib = [[NSBundle mainBundle] loadNibNamed:@ "CustomTableViewCell" owner:self options:nil]; if ([nib count]>0) { self.customCell = [nib objectAtIndex:0]; cell = self.customCell; } //获取数据源中_person数组中的元素,对应每一个cell Person *person = [_persons objectAtIndex:indexPath.row]; //通过tag值来获取UIImageView和UILabel UIImageView *headImageView = (UIImageView *)[cell.contentView viewWithTag:0]; UILabel *nameLabel = (UILabel *)[cell.contentView viewWithTag:1]; UILabel *textLabel = (UILabel *)[cell.contentView viewWithTag:2]; headImageView.image = [UIImage imageNamed:person.headStr]; nameLabel.text = person.name; textLabel.text = person.speechText; return cell; } |
最终的效果图如下,
总结:上面的步骤看起来复杂,但是当你习惯xib来编程的时候,使用鼠标拖拉空间,微调界面,那种感觉就像自己不是纯粹的程序员,还是一个设计师。
我把源代码放到了Github上面,有兴趣的朋友可以去下载看看。或者在Mac终端,输入git clone https://github.com/pythonhater/TableViewSamples.git,即可获得源代码。
这篇关于iOS深入学习(UITableView系列4:使用xib自定义cell)的文章就介绍到这儿,希望我们推荐的文章对编程师们有所帮助!


