本文主要是介绍Python 一步一步教你用pyglet仿制鸿蒙系统里的时钟,希望对大家解决编程问题提供一定的参考价值,需要的开发者们随着小编来一起学习吧!
目录
鸿蒙时钟
1. 绘制圆盘
2. 创建表类
3. 绘制刻度
4. 刻度数值
5. 添加指针
6. 转动指针
7. 联动时间
8. 时钟走动
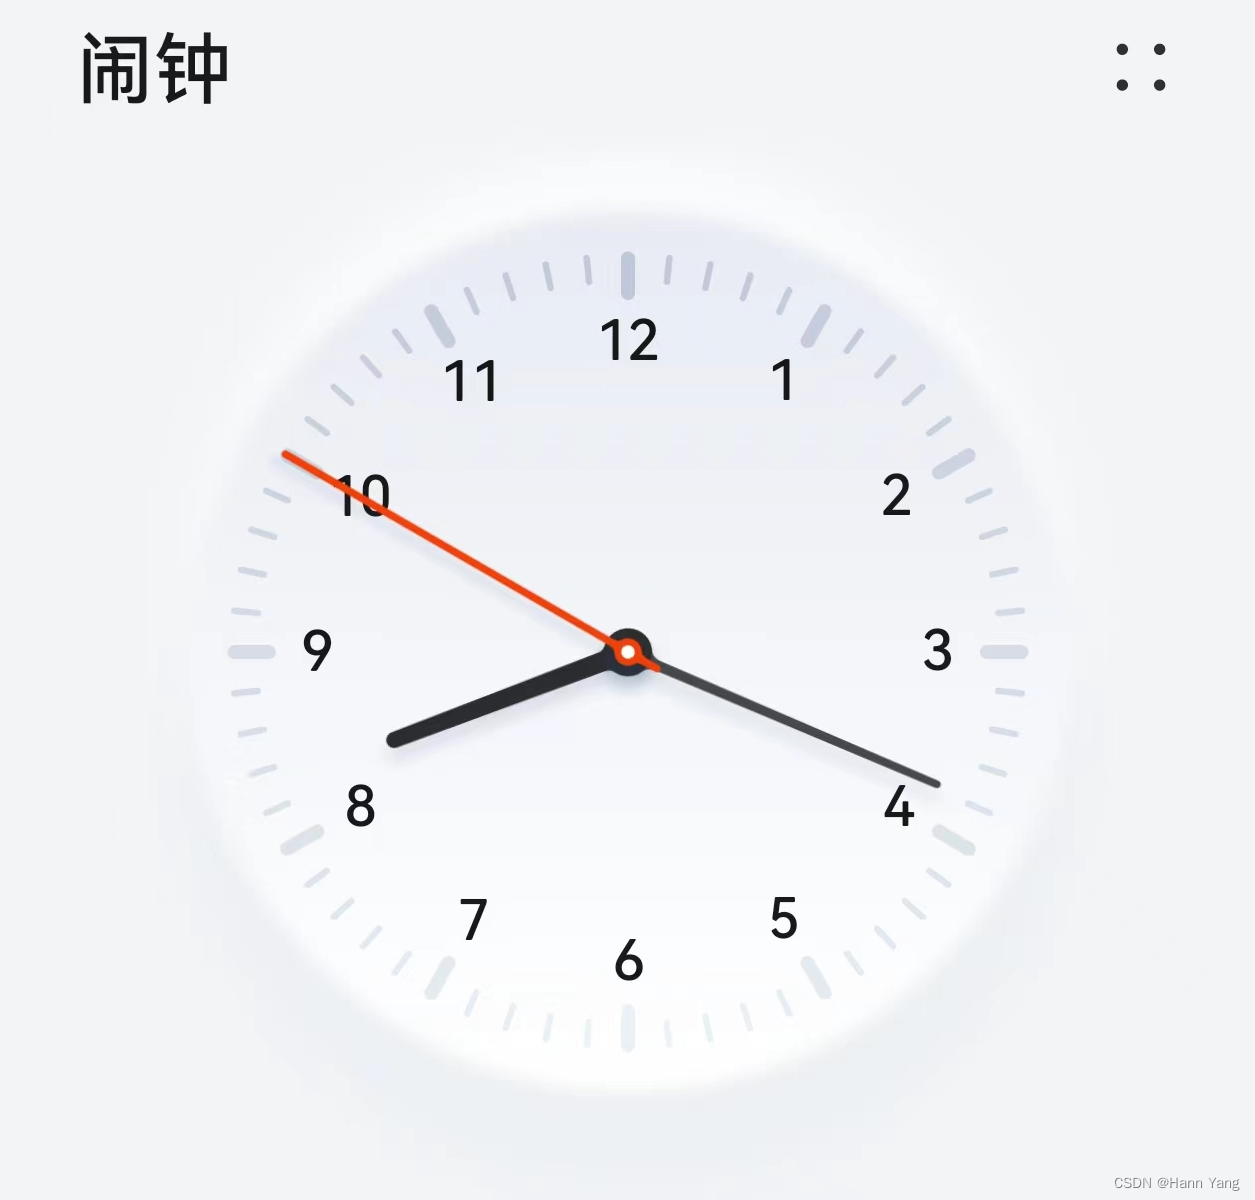
鸿蒙时钟
本篇将用python pyglet库复刻华为手机鸿蒙系统闹钟程序的时钟,先在上图中抓取出时分秒针及刻度、表盘的颜色RGB值:
bHour = (42, 43, 48, 255)
bMinute = (70, 71, 75, 255)
rSecond = (240, 70, 20, 255)
gScale = 215, 220, 230
wBackground = 248, 250, 252
1. 绘制圆盘
首先要画一圆Circle,并用直线Line等分成60份。
self.circle = pyglet.shapes.Circle(x, y, R, color=wBackground, batch=batch)
self.scales = [pyglet.shapes.Line(x, y, x+R*cos(i*Pi/30), y+R*sin(i*Pi/30),
width=2, color=gScales, batch=batch) for i in range(60)]
直线除圆心外的另一端点的坐标计算公式,如下图所示:

代码:
import pyglet
from math import pi, sin, coswindow = pyglet.window.Window(800, 500, caption='圆盘')
pyglet.gl.glClearColor(1, 1, 1, 1)
batch = pyglet.graphics.Batch()R = 200
wBackground = 248, 250, 252
gScales = 215, 220, 230class Watch:def __init__(self, x, y):self.circle = pyglet.shapes.Circle(x, y, R, color=wBackground, batch=batch)self.scales = [pyglet.shapes.Line(x, y, x+R*cos(i*pi/30), y+R*sin(i*pi/30),width=2, color=gScales, batch=batch) for i in range(60)]@window.event
def on_draw():window.clear()batch.draw()watch = Watch(window.width/2, window.height/2)pyglet.app.run()
2. 创建表类
改造这个Watch类,可设置圆心和半径,并让它成为pyglet.window.Window的子类。

import pyglet
from math import sin, cos, piwBackground = (248, 250, 252, 255)
gScales = (215, 220, 230, 255)class Watch(pyglet.window.Window):  def __init__(self, x, y, R=200, width=800, height=500, caption='圆盘'): super().__init__(width, height, caption=caption)pyglet.gl.glClearColor(1, 1, 1, 1)self.batch = pyglet.graphics.Batch()self.circle = pyglet.shapes.Circle(x, y, R,  color=wBackground, batch=self.batch)self.scales = [pyglet.shapes.Line(x, y, x+R*cos(i*pi/30), y+R*sin(i*pi/30),  width=2, color=gScales, batch=self.batch) for i in range(60)]def on_draw(self):self.clear()self.batch.draw()def run(self):pyglet.app.run()watch = Watch(500, 300, 150)
watch.run()
3. 绘制刻度
扩大圆面并缩短和加粗直线,表盘和刻度的大致轮廓就出现了。

代码:
import pyglet
from math import sin, cos, piwBackground = (248, 250, 252, 255)
gScales = (215, 220, 230, 255)class Watch(pyglet.window.Window):  def __init__(self, x, y, R=200, width=800, height=500, caption='刻度'): super().__init__(width, height, caption=caption)pyglet.gl.glClearColor(1, 1, 1, 1)self.batch = pyglet.graphics.Batch()self.circle = pyglet.shapes.Circle(x, y, R*1.05,  color=wBackground, batch=self.batch)self.scales = [pyglet.shapes.Line(x+R*cos(i*pi/30), y+R*sin(i*pi/30),x+R*0.95*cos(i*pi/30), y+0.95*R*sin(i*pi/30),width=3, color=gScales, batch=self.batch) for i in range(60)]for i, scale in enumerate(self.scales):if i%5==0:scale.width, scale.x2, scale.y2 = 5, x+R*0.92*cos(i*pi/30), y+0.92*R*sin(i*pi/30)def on_draw(self):self.clear()self.batch.draw()def run(self):pyglet.app.run()watch = Watch(400, 250)
watch.run()
4. 刻度数值
在整点的刻度值边上用标签标注上1~12的数字。
self.labels = [pyglet.text.Label(str((2-i)%12+1), font_size=24, color=(0,0,0,255),
x=x+R*0.82*cos(i*pi/6), y=y+0.82*R*sin(i*pi/6)+5, anchor_x='center',
anchor_y='center', batch=self.batch) for i in range(12)]

代码:
import pyglet
from math import sin, cos, piwBackground = (248, 250, 252, 255)
gScales = (215, 220, 230, 255)
rSecond = (240, 70, 20, 255)class Watch(pyglet.window.Window): def __init__(self, x, y, R=200, width=800, height=500, caption='指针'): super().__init__(width, height, caption=caption)pyglet.gl.glClearColor(1, 1, 1, 1)self.batch = pyglet.graphics.Batch()self.circle = pyglet.shapes.Circle(x, y, R*1.05, color=wBackground, batch=self.batch)self.scales = [pyglet.shapes.Line(x+R*cos(i*pi/30), y+R*sin(i*pi/30),x+R*0.95*cos(i*pi/30), y+0.95*R*sin(i*pi/30),width=3, color=gScales, batch=self.batch) for i in range(60)]for i,scale in enumerate(self.scales):if i%5==0:scale.width, scale.x2, scale.y2 = 5, x+R*0.92*cos(i*pi/30), y+0.92*R*sin(i*pi/30)self.labels = [pyglet.text.Label(str((2-i)%12+1), font_size=R*0.12, color=(0,0,0,255),x=x+R*0.82*cos(i*pi/6), y=y+0.82*R*sin(i*pi/6)-R*0.06, anchor_x='center',batch=self.batch) for i in range(12)]def on_draw(self):self.clear()self.batch.draw()def run(self):pyglet.app.run()watch = Watch(400, 250)
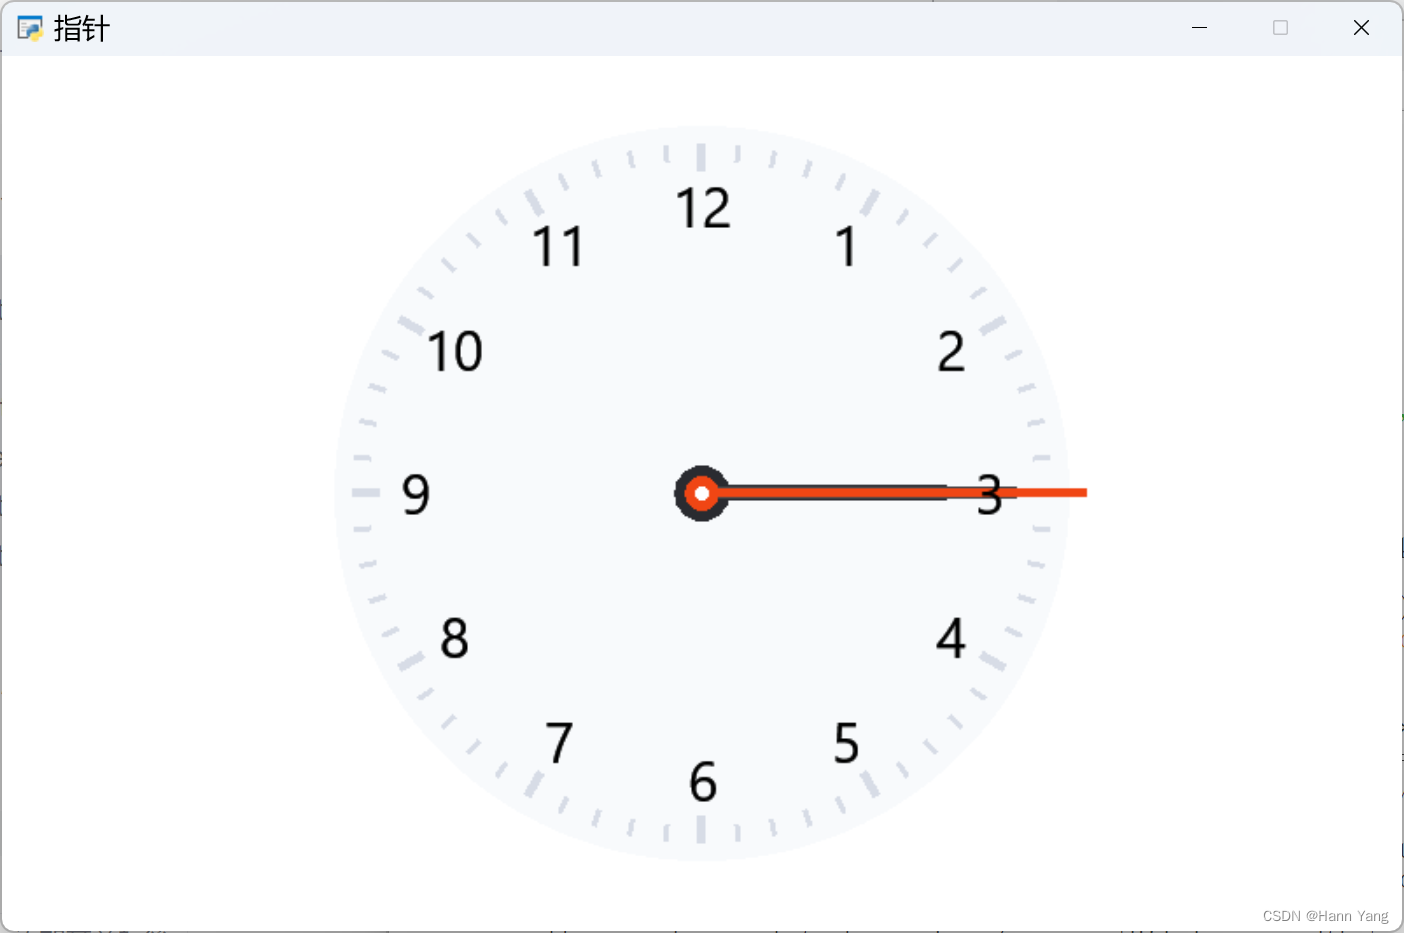
watch.run()5. 添加指针
时、分、秒针,用三个圆三条直线来表示。
self.circle1 = pyglet.shapes.Circle(x, y, R*0.08, color=bHour)
self.hour = pyglet.shapes.Line(x, y, x+R*0.7, y, width=9, color=bHour)
self.minute = pyglet.shapes.Line(x, y, x+R*0.9, y, width=7, color=bMinute)
self.second = pyglet.shapes.Line(x, y, x+R*1.1, y, width=5, color=rSecond)
self.circle2 = pyglet.shapes.Circle(x, y, R*0.05, color=rSecond)
self.circle3 = pyglet.shapes.Circle(x, y, R*0.02, color=wWhite)
不用担心秒针长过表盘圆面,转动前会作“移动”处理。
代码:
import pyglet
from math import sin, cos, piwBackground = (248, 250, 252, 255)
gScales = (215, 220, 230, 255)
rSecond = (240, 70, 20, 255)
bMinute = (70, 71, 75, 255)
bHour = (42, 43, 48, 255)
wWhite = (255, 255, 255, 255)class Watch(pyglet.window.Window): def __init__(self, x, y, R=200, width=800, height=500, caption='指针'): super().__init__(width, height, caption=caption)pyglet.gl.glClearColor(1, 1, 1, 1)self.batch = pyglet.graphics.Batch()self.circle = pyglet.shapes.Circle(x, y, R*1.05, color=wBackground, batch=self.batch)self.scales = [pyglet.shapes.Line(x+R*cos(i*pi/30), y+R*sin(i*pi/30),x+R*0.95*cos(i*pi/30), y+0.95*R*sin(i*pi/30),width=3, color=gScales, batch=self.batch) for i in range(60)]for i,scale in enumerate(self.scales):if i%5==0:scale.width, scale.x2, scale.y2 = 5, x+R*0.92*cos(i*pi/30), y+0.92*R*sin(i*pi/30)self.labels = [pyglet.text.Label(str((2-i)%12+1), font_size=R*0.12, color=(0,0,0,255),x=x+R*0.82*cos(i*pi/6), y=y+0.82*R*sin(i*pi/6)-R*0.06, anchor_x='center',batch=self.batch) for i in range(12)]self.circle1 = pyglet.shapes.Circle(x, y, R*0.08, color=bHour, batch=self.batch)self.hour = pyglet.shapes.Line(x, y, x+R*0.7, y, width=9, color=bHour, batch=self.batch)self.minute = pyglet.shapes.Line(x, y, x+R*0.9, y, width=7, color=bMinute, batch=self.batch)self.second = pyglet.shapes.Line(x, y, x+R*1.1, y, width=5, color=rSecond, batch=self.batch)self.circle2 = pyglet.shapes.Circle(x, y, R*0.05, color=rSecond, batch=self.batch)self.circle3 = pyglet.shapes.Circle(x, y, R*0.02, color=wWhite, batch=self.batch)def on_draw(self):self.clear()self.batch.draw()def run(self):pyglet.app.run()watch = Watch(400, 250)
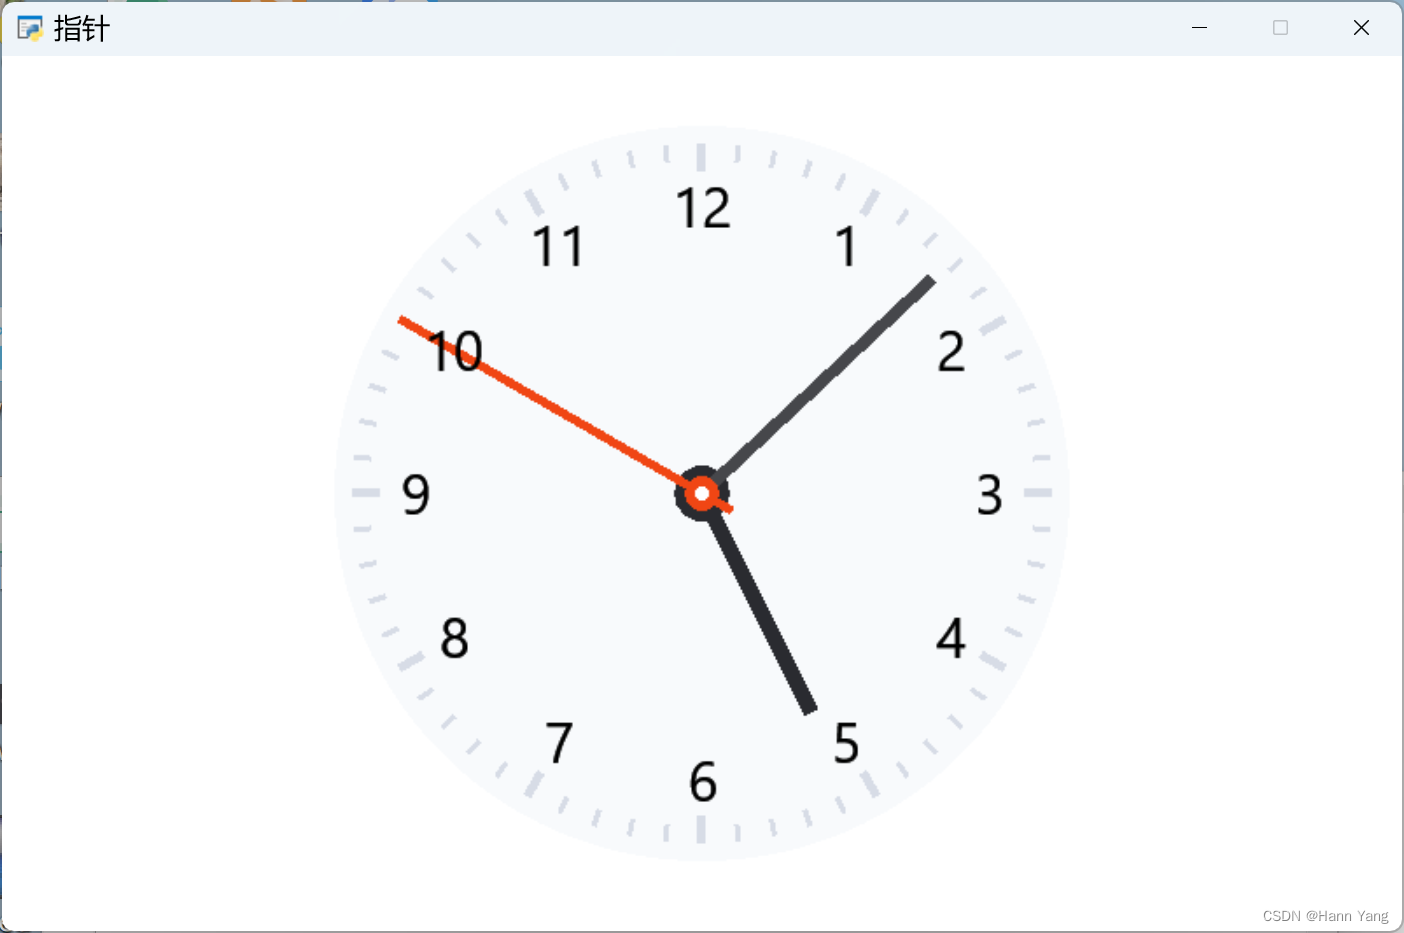
watch.run()6. 转动指针
时、分、秒针的转动运用Line控件的旋转属性.rotation,这种方法要比修改端点坐标要方便。
默认的旋转中心是直线的左端点,属性.anchor_position可以修改中心坐标。
self.second.anchor_position = (R*0.1, 0)
self.second.rotation = 210
self.minute.rotation = 24
self.hour.rotation = 160

代码:
import pyglet
from math import sin, cos, piwBackground = (248, 250, 252, 255)
gScales = (215, 220, 230, 255)
rSecond = (240, 70, 20, 255)
bMinute = (70, 71, 75, 255)
bHour = (42, 43, 48, 255)
wWhite = (255, 255, 255, 255)class Watch(pyglet.window.Window): def __init__(self, x, y, R=200, width=800, height=500, caption='指针'): super().__init__(width, height, caption=caption)pyglet.gl.glClearColor(1, 1, 1, 1)self.batch = pyglet.graphics.Batch()self.circle = pyglet.shapes.Circle(x, y, R*1.05, color=wBackground, batch=self.batch)self.scales = [pyglet.shapes.Line(x+R*cos(i*pi/30), y+R*sin(i*pi/30),x+R*0.95*cos(i*pi/30), y+0.95*R*sin(i*pi/30),width=3, color=gScales, batch=self.batch) for i in range(60)]for i,scale in enumerate(self.scales):if i%5==0:scale.width, scale.x2, scale.y2 = 5, x+R*0.92*cos(i*pi/30), y+0.92*R*sin(i*pi/30)self.labels = [pyglet.text.Label(str((2-i)%12+1), font_size=R*0.12, color=(0,0,0,255),x=x+R*0.82*cos(i*pi/6), y=y+0.82*R*sin(i*pi/6)-R*0.06, anchor_x='center',batch=self.batch) for i in range(12)]self.circle1 = pyglet.shapes.Circle(x, y, R*0.08, color=bHour, batch=self.batch)self.hour = pyglet.shapes.Line(x, y, x+R*0.7, y, width=9, color=bHour, batch=self.batch)self.minute = pyglet.shapes.Line(x, y, x+R*0.9, y, width=7, color=bMinute, batch=self.batch)self.second = pyglet.shapes.Line(x, y, x+R*1.1, y, width=5, color=rSecond, batch=self.batch)self.circle2 = pyglet.shapes.Circle(x, y, R*0.05, color=rSecond, batch=self.batch)self.circle3 = pyglet.shapes.Circle(x, y, R*0.02, color=wWhite, batch=self.batch)self.second.anchor_position = (R*0.1, 0)self.second.rotation = 210self.minute.rotation = 24self.hour.rotation = 160def on_draw(self):self.clear()self.batch.draw()def run(self):pyglet.app.run()watch = Watch(400, 250)
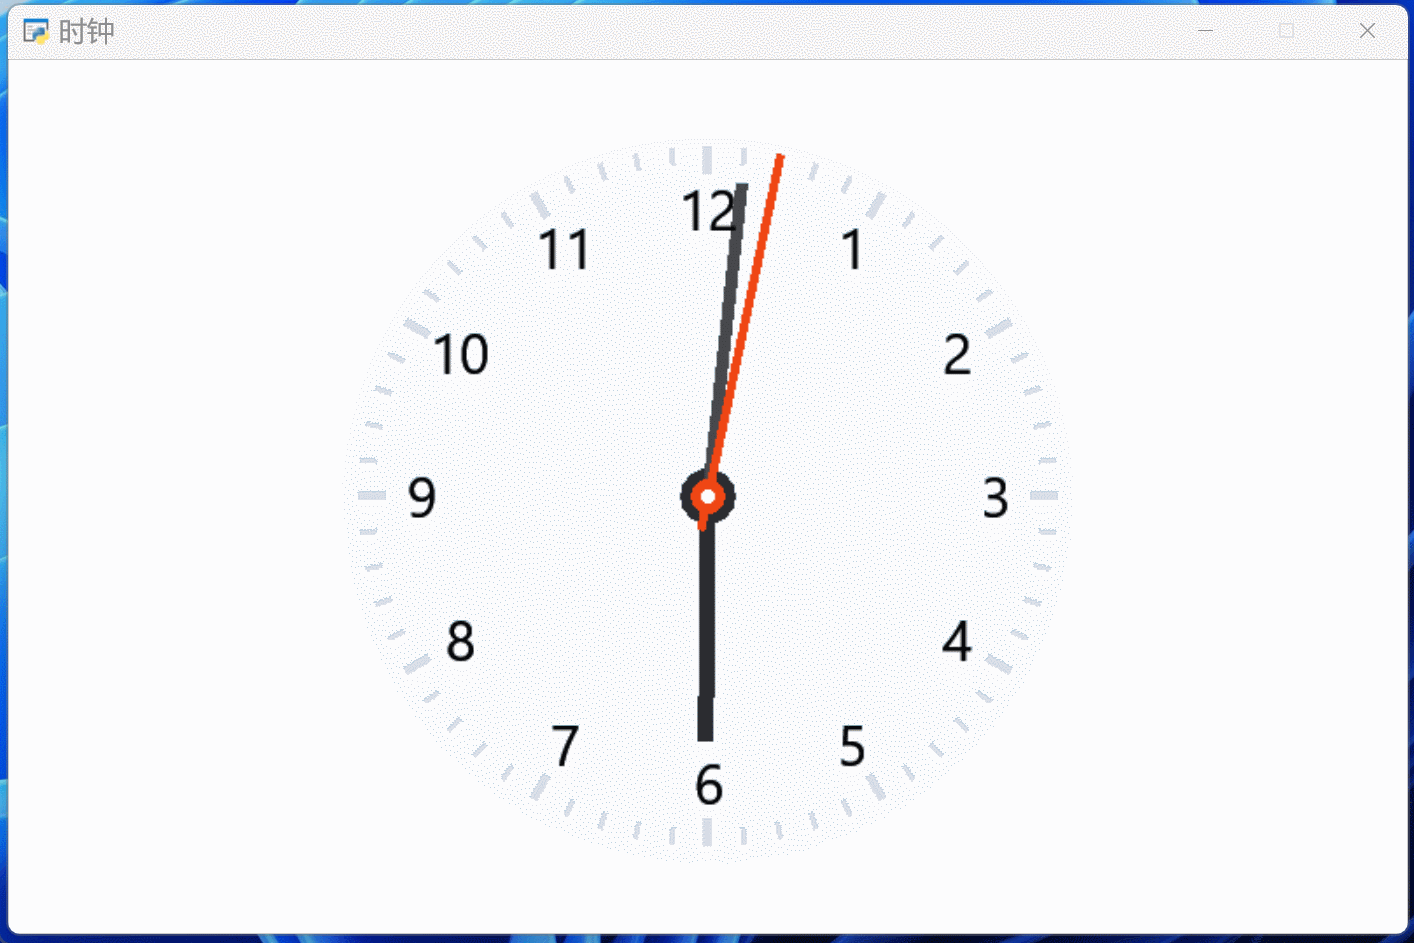
watch.run()7. 联动时间
联动系统时钟,使用datetime.now()获取当前时间的时、分、秒的值。
now = datetime.now()
h, m, s = now.hour, now.minute, now.second
self.second.rotation = -90 + s*6
self.minute.rotation = -90 + m*6 + s/10
self.hour.rotation = -90 + h%12*30 + m/2
代码:
import pyglet
from math import sin, cos, pi
from datetime import datetimewBackground = (248, 250, 252, 255)
gScales = (215, 220, 230, 255)
rSecond = (240, 70, 20, 255)
bMinute = (70, 71, 75, 255)
bHour   = (42, 43, 48, 255)
wWhite  = (255, 255, 255, 255)class Watch(pyglet.window.Window):  def __init__(self, x, y, R=200, width=800, height=500, caption='指针'): super().__init__(width, height, caption=caption)pyglet.gl.glClearColor(1, 1, 1, 1)self.batch = pyglet.graphics.Batch()self.circle = pyglet.shapes.Circle(x, y, R*1.05, color=wBackground, batch=self.batch)self.scales = [pyglet.shapes.Line(x+R*cos(i*pi/30), y+R*sin(i*pi/30),x+R*0.95*cos(i*pi/30), y+0.95*R*sin(i*pi/30),width=3, color=gScales, batch=self.batch) for i in range(60)]for i,scale in enumerate(self.scales):if i%5==0:scale.width, scale.x2, scale.y2 = 5, x+R*0.92*cos(i*pi/30), y+0.92*R*sin(i*pi/30)self.labels = [pyglet.text.Label(str((2-i)%12+1), font_size=R*0.12, color=(0,0,0,255),x=x+R*0.82*cos(i*pi/6), y=y+0.82*R*sin(i*pi/6)-R*0.06, anchor_x='center',batch=self.batch) for i in range(12)]self.circle1 = pyglet.shapes.Circle(x, y, R*0.08, color=bHour, batch=self.batch)self.hour = pyglet.shapes.Line(x, y, x+R*0.7, y, width=9, color=bHour, batch=self.batch)self.minute = pyglet.shapes.Line(x, y, x+R*0.9, y, width=7, color=bMinute, batch=self.batch)self.second = pyglet.shapes.Line(x, y, x+R*1.1, y, width=5, color=rSecond, batch=self.batch)self.circle2 = pyglet.shapes.Circle(x, y, R*0.05, color=rSecond, batch=self.batch)self.circle3 = pyglet.shapes.Circle(x, y, R*0.02, color=wWhite, batch=self.batch)self.second.anchor_position = (R*0.1, 0)self.update()def update(self):now = datetime.now()h, m, s = now.hour, now.minute, now.secondself.second.rotation = -90 + s*6self.minute.rotation = -90 + m*6 + s/10self.hour.rotation = -90 + h%12*30 + m/2def on_draw(self):self.clear()self.batch.draw()def run(self):pyglet.app.run()watch = Watch(400, 250)
watch.run()
8. 运行时钟
使用pyglet.clock.schedule_interval(self.update, 0.2)每秒更新5次。
总得来说,本次复刻比较完美,但直线控件在非水平或垂直状态,特别是小夹角时锯齿很严重。
完整代码:
import pyglet
from math import sin, cos, pi
from datetime import datetimeclass Watch(pyglet.window.Window):  def __init__(self, x, y, R=200, width=800, height=500, caption='时钟'): super().__init__(width, height, caption=caption)wBackground = (248, 250, 252, 255)gScales = (215, 220, 230, 255)rSecond = (240, 70, 20, 255)bMinute = (70, 71, 75, 255)bHour   = (42, 43, 48, 255)wWhite  = (255, 255, 255, 255)pyglet.gl.glClearColor(1, 1, 1, 1)self.batch = pyglet.graphics.Batch()self.circle = pyglet.shapes.Circle(x, y, R*1.05, color=wBackground, batch=self.batch)self.scales = [pyglet.shapes.Line(x+R*cos(i*pi/30), y+R*sin(i*pi/30),x+R*0.95*cos(i*pi/30), y+0.95*R*sin(i*pi/30),width=3, color=gScales, batch=self.batch) for i in range(60)]for i,scale in enumerate(self.scales):if i%5==0:scale.width, scale.x2, scale.y2 = 5, x+R*0.92*cos(i*pi/30), y+0.92*R*sin(i*pi/30)self.labels = [pyglet.text.Label(str((2-i)%12+1), font_size=R*0.12, color=(0,0,0,255),x=x+R*0.82*cos(i*pi/6), y=y+0.82*R*sin(i*pi/6)-R*0.06, anchor_x='center',batch=self.batch) for i in range(12)]self.circle1 = pyglet.shapes.Circle(x, y, R*0.08, color=bHour, batch=self.batch)self.hour = pyglet.shapes.Line(x, y, x+R*0.7, y, width=9, color=bHour, batch=self.batch)self.minute = pyglet.shapes.Line(x, y, x+R*0.9, y, width=7, color=bMinute, batch=self.batch)self.second = pyglet.shapes.Line(x, y, x+R*1.1, y, width=5, color=rSecond, batch=self.batch)self.circle2 = pyglet.shapes.Circle(x, y, R*0.05, color=rSecond, batch=self.batch)self.circle3 = pyglet.shapes.Circle(x, y, R*0.02, color=wWhite, batch=self.batch)self.second.anchor_position = (R*0.1, 0)self.update(self.event)pyglet.clock.schedule_interval(self.update, 0.2)def update(self, event):now = datetime.now()h, m, s = now.hour, now.minute, now.secondself.second.rotation = -90 + s*6self.minute.rotation = -90 + m*6 + s/10self.hour.rotation = -90 + h%12*30 + m/2def on_draw(self):self.clear()self.batch.draw()def run(self):pyglet.app.run()watch = Watch(400, 250)
watch.run()
完
这篇关于Python 一步一步教你用pyglet仿制鸿蒙系统里的时钟的文章就介绍到这儿,希望我们推荐的文章对编程师们有所帮助!


