本文主要是介绍【Vue H5项目实战】从0到1的自助点餐系统—— 项目页面布局(Vue3.2 + Vite + TS + Vant + Pinia + Nodejs + MongoDB),希望对大家解决编程问题提供一定的参考价值,需要的开发者们随着小编来一起学习吧!
目录
- 前言
- 一、布局分析
- 二、布局设计
- 2.1、整体设计
- 2.2、Swipe 轮播图
- 2.3、Header 标题栏
- 2.4、Nav 标签导航栏
- 2.5、Goods 商品页面
- 💡 资源下载与学习
前言
H5 项目基于 Web 技术,可以在智能手机、平板电脑等移动设备上的浏览器中运行,无需下载和安装任何应用程序,且H5 项目的代码和资源可以集中在服务器端进行管理,只需更新服务器上的代码,即可让所有顾客访问到最新的系统版本。
本系列将以肯德基自助点餐页面为模板,搭建一款自助点餐系统,第一次开发移动端h5项目,免不了有所差错和不足,欢迎各位大佬指正。
项目代码正在gitee同步更新中,项目地址:https://gitee.com/airheaven/kfg-vue,学习前请大家给个star哦
一、布局分析
在上一章,我们已经搭建好了项目的基础框架并使用了vm作为移动端的适配方案,下一步,我们开始设计布局,打开肯德基点餐小程序,分析这个页面的布局。

页面可以分为:
- 轮播图:循环播放商品图和活动;
- Header:用于存放标题文字,比如店名、地址等内容,可以做一个折叠面板;
- 标签页:用于在不同的内容区域之间进行切换,可以放:菜单、评价、关于我们等;
- 侧边导航:垂直展示的导航栏,用于在不同的内容区域之间进行切换,是菜单标签页里的内容;
- 内容区域:瀑布流滚动加载,展示长列表,当列表即将滚动到底部时,会触发事件并加载更多列表项,是菜单标签页里的内容。
二、布局设计
2.1、整体设计
分析完布局,我们可以开始行动了,首先删除之前测试使用的Father.vue和Todolist.vue,然后新建一些文件夹,并分别新建Goods.vue、Header.vue、Nav.vue、Swipe.vue如下:

Goods.vue中放商品列表:
<template><div>商品列表</div>
</template>
<script setup lang="ts"></script>
<style lang="less"></style>Header.vue中放标题栏:
<template><div class="content-wrapper"><div class="icon"><van-icon name="shopping-cart"></van-icon></div><div class="name"><h3>乐天城肯德基一店</h3></div></div>
</template>
<script setup lang="ts"></script>
<style></style>
Nav.vue中放标签导航栏:
<template><div>这里是标签导航栏</div>
</template>
<script setup lang="ts"></script>
<style></style>
Swipe.vue中放一个简单的轮播图demo:
<template><div><van-swipe class="my-swipe" :autoplay="4000" indicator-color="white"><van-swipe-item>1</van-swipe-item><van-swipe-item>2</van-swipe-item><van-swipe-item>3</van-swipe-item><van-swipe-item>4</van-swipe-item></van-swipe></div>
</template>
<script setup lang="ts"></script>
<style lang="less">
* {margin: 0vw;.my-swipe {.van-swipe-item {color: #fff;border-radius: 4%;font-size: 10vw;line-height: 30vh;text-align: center;background-color: #d76d30;}}
}
</style>我们在App.vue中将这几个组件引入进行初步排列:
<template><!-- swipe轮播图 --><Swipe></Swipe><!-- header标题栏 --><Header></Header><!-- navigation导航页 --><Nav></Nav><!-- content内容页 包括侧边导航和主体 --><router-view v-slot="{ Component }"><keep-alive><component :is="Component" /></keep-alive></router-view>
</template><script setup lang="ts">
// useRouter的使用
// import { useRouter } from "vue-router";
import Swipe from "@/components/swipe/Swipe.vue";
import Header from "@/components/header/Header.vue";
import Nav from "@/components/nav/Nav.vue";
// const router = useRouter();
</script>
<style></style>除此之外,还要在router中配置路由,默认路由首先指向商品页面Goods.vue,在src/router/index.ts配置如下:
// src/router/index.ts
/*** createRouter 这个为创建路由的方法* createWebHashHistory 这个就是vue2中路由的模式,*                      这里的是hash模式,这个还可以是createWebHistory等* RouteRecordRaw 这个为要添加的路由记录,也可以说是routes的ts类型*/
import { createRouter, createWebHashHistory, RouteRecordRaw } from "vue-router";
// 路由记录,这个跟vue2中用法一致,就不做过多解释了
const routes: Array<RouteRecordRaw> = [{path: "/",name: "Goods",component: () => import("@/components/goods/Goods.vue"),alias: "/goods",meta: {title: "商品页面",},},
];const router = createRouter({history: createWebHashHistory(),routes,
});
export default router;如此,布局就基本完成了,npm run dev运行后显示,而后我们来设计一下各个部分的组件。

2.2、Swipe 轮播图
首先我们要实现的是最顶端的轮播图,我们可以使用Vant中的Swipe组件,:autoplay设置为3000,即3秒自动切换下一张,设置lazy-render懒加载,在懒加载模式下,只会渲染当前页和下一页,可以实现延迟加载页面可视区域外的内容,从而使页面加载更流畅。。
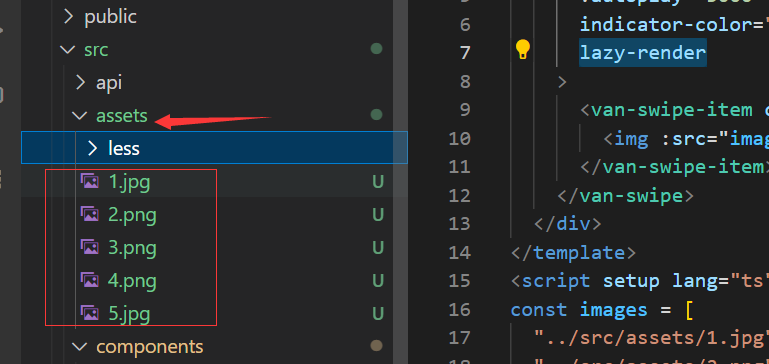
将要展示的静态图像copy到src/asserts文件夹中
 然后修改Swipe.vue,读取图像:
<template><div><van-swipeclass="my-swipe":autoplay="3000"indicator-color="white"lazy-render><van-swipe-item class="img_box" v-for="image in images" :key="image"><img :src="image" /></van-swipe-item></van-swipe></div>
</template>
<script setup lang="ts">
const images = ["../src/assets/1.jpg","../src/assets/2.png","../src/assets/3.png","../src/assets/4.png",
];
</script>
<style scoped lang="less">
* {margin: 0vw;.my-swipe {width: 100vw;overflow: hidden;border-radius: 0% 0% 4% 4%;  //上方下圆img {display: block;max-width: 100vw;margin: auto; // 居中显示图片}}
}
</style>
显示如下:

2.3、Header 标题栏
标题栏主体内容主要分为4部分进行设计,我们首先设计了一个滚动通知,利用swipe组件完成,然后左侧一个图标、一个餐厅主名字(名字后面接一个可切换餐厅地点的图标)和餐厅描述,切换餐厅时弹出popup组件用以选择,通过一个show组件进行绑定,弹出层的内容和这里的其他细节我们后面继续设计,这里给出一个大致的框架,供大家参考学习和扩展(如还可以扩展读取地理信息计算距离,预约用餐时间,更改为外卖模式等等)

Header.vue代码如下:
<template><!-- 滚动活动 --><van-notice-bar :scrollable="false" left-icon="volume-o" mode="closeable"><van-swipeverticalclass="notice-swipe":autoplay="3000":touchable="false":show-indicators="false"><van-swipe-item class="img_box" v-for="text in texts" :key="text">{{ text }}</van-swipe-item></van-swipe></van-notice-bar><!-- 主体内容 开始 --><div class="content-container"><van-icon name="hot" color="#ee0a24" size="10vw" /><div><div class="content-shop"><div class="content-shopname">乐天城肯德基一店</div><van-iconname="arrow-down"size="4vw"color="#ee0a24"@click="selectPlace"/><van-popupv-model:show="show"closeableposition="bottom":style="{ height: '30%' }">这里显示可选餐厅列表</van-popup></div><div>武汉市洪山区珞喻路4号</div></div><!-- <van-icon name="todo-list" color="#ee0a24" size="4vw">预约</van-icon> --></div><!-- 主体内容 结束 -->
</template>
<script setup lang="ts">
import { ref, Ref } from "vue";
const texts: Ref<string[]> = ref(["肯德基疯狂星期四,热辣香骨鸡买一送十!","超级巨无霸三层汉堡,第二份半价!","肯德基8元早餐,新品酷炫来袭!",
]);
const show = ref(false);
const selectPlace = () => {show.value = true;
};
</script>
<style scoped lang="less">
.content-container {display: flex;align-items: center;height: 15vw;background-color: white;.content-shop {display: flex;position: relative;align-items: center;justify-content: center;.content-shopname {font-size: 5vw;text-align: center;}}
}
.notice-swipe {height: 40px;line-height: 40px;
}
</style>
2.4、Nav 标签导航栏
标签导航栏使用到router-link进行路由改变和跳转,Nav.vue代码如下:
<template><div class="nav"><router-link class="nav-item" to="/goods">我要点餐<i class="line"></i></router-link><router-link class="nav-item" to="/kitchen">自在厨房<i class="line"></i></router-link><router-link class="nav-item" to="/about">关于我们<i class="line"></i></router-link></div>
</template>
<script setup lang="ts"></script>
<style scoped lang="less">
.nav {display: flex;width: 100vw;height: 3vh;font-size: 1.5vh;line-height: 3vh;border-bottom: 1px solid #e4e4e4;background-color: white;.nav-item {flex: 1;text-align: center;text-decoration: none;color: #666666;position: relative;}.line {width: 5vw;height: 0.4vh;display: inline-block;background: #ffbb22;position: absolute;left: 50%;bottom: 0;margin-left: -10px;}
}
</style>router-link可以指向另外两项(自在厨房和关于我们),所以我们需要在component中新建两个文件夹并新建文件,分别是Kitchen.vue和About.vue,将其简单初始化一下,然后在router/index.ts中添加路由:
{path: "/",name: "Kitchen",component: () => import("@/components/kitchen/Kitchen.vue"),alias: "/kitchen",meta: {title: "自在厨房",},},{path: "/",name: "About",component: () => import("@/components/about/About.vue"),alias: "/about",meta: {title: "关于我们",},},
成功添加后,效果如下:

2.5、Goods 商品页面
下面我们设计主要的商品页面,商品页面主要分为侧边导航栏和一个可以下滑的商品列表,侧边导航栏点击后,触发对应事件,商品列表自动下滑到对应的位置(这一步后面做)。
首先简单搭建页面,代码如下:
<template><div class="content-container"><van-sidebar class="content-menu" v-model="active" @change="onChange"><van-sidebar-itemv-for="(item, index) in menuClass"class="content-menu-menuitem":key="index":title="item"@click="menuNav(index)"/></van-sidebar><van-listclass="content-list"v-model:loading="loading":finished="finished"finished-text="没有更多了"@load="onLoad"><van-cell v-for="item in list" :key="item" :title="item" /></van-list></div>
</template>
<script setup lang="ts">
import { ref, Ref } from "vue";
import { showToast } from "vant";
const active = ref(0);
const onChange = (index: number) => showToast(`标签名 ${index + 1}`);
const menuClass: Ref<string[]> = ref(["人气热卖","单人餐","多人餐","全鸡","炸鸡小食","汉堡卷","饮品","甜品","冰淇淋","儿童餐","玩具",
]);
const list: Ref<number[]> = ref([]);
const loading: Ref<boolean> = ref(false);
const finished = ref(false);const onLoad = () => {// 异步更新数据// setTimeout 仅做示例,真实场景中一般为 ajax 请求setTimeout(() => {for (let i = 0; i < 50; i++) {list.value.push(list.value.length + 1);}// 加载状态结束loading.value = false;// 数据全部加载完成if (list.value.length >= 40) {finished.value = true;}}, 1000);
};const menuNav = (index: number) => {console.log(index);
};
</script>
<style lang="less">
.content-container {display: flex;height: 80vh;.content-menu {width: 20vw;align-items: center;overflow-y: auto;height: 80vh;.content-menu-menuitem {padding: 0;font-size: 1.5vh;line-height: 7vh;text-align: center;height: 7vh;}}
}
</style>
运行效果如下:

当然,这个页面都还没有写逻辑,我们将在后面依次完善。Node.js和MongoDB也将在后续进行搭建。
💡 资源下载与学习
本部分的代码已上传至CSDN:类肯德基自助点餐系统02 - 页面布局(Vue3.2 + Vite + TS + Vant + Pinia + MongoDB)
项目代码正在gitee同步更新中,请大家给个star🌟,项目地址:https://gitee.com/airheaven/kfg-vue
🎉 支持我:点赞👍+收藏⭐️+留言📝
这篇关于【Vue H5项目实战】从0到1的自助点餐系统—— 项目页面布局(Vue3.2 + Vite + TS + Vant + Pinia + Nodejs + MongoDB)的文章就介绍到这儿,希望我们推荐的文章对编程师们有所帮助!


