本文主要是介绍SpringBoot 自定义线程池以及多线程间的异步调用(@Async、@EnableAsync),希望对大家解决编程问题提供一定的参考价值,需要的开发者们随着小编来一起学习吧!
SpringBoot 自定义线程池以及多线程间的异步调用(@Async、@EnableAsync)
- 1. 前言
- 2. 举例说明
- 2.1 例1——异步不生效例子
- 2.1.1 案例介绍
- 2.1.2 观察效果
- 2.1.3 问题原因及解决办法
- 2.1.4 附代码
- 2.2 例2——解决2.1的异步不生效例子
- 2.2.1 解决方案1
- 2.2.1.1 代码
- 2.2.1.2 效果
- 2.2.2 解决方案2——两个异步类里互相调用异步方法
- 2.2.2.1 代码
- 2.2.2.2 效果
- 2.2.3 解决方案3——通过上下文获取自己的代理对象调用异步方法
- 2.2.3.1 代码
- 2.2.3.2 效果
- 2.2.4 解决方案4——开启cglib代理,手动获取Spring代理类
- 2.2.4.1 代码
- 2.2.4.2 效果
- 2.3 例3——使用定义线程池的异步
- 2.3.1 为什么要自定义线程池?
- 2.3.2 关于 SimpleAsyncTaskExecutor 源码
- 小结——@Async实现异步的默认使用
- 2.3.3 自定义线程池
- 2.3.3.1 方案介绍
- 2.3.3.2 观察效果
- 2.3.3.3 附代码
- 2.3.3.4 推荐线程池文章
- 2.4 例4——优化2.3.3(打印线程池的运行状况)
- 2.4.1 改进点
- 2.4.2 运行效果
- 2.4.3 代码
- 2.5 小总结
- 导致异步失效的可能情况
- 3. 项目代码
1. 前言
- 异步调用?
异步调用是相对于同步调用而言的,同步调用是指程序按代码逻辑的预定顺序一步步执行,每一步必须等到上一步执行完后才能执行,异步调用则无需等待上一步程序执行完即可执行,可以理解为单线程和多线程的区别。 - 怎么实现异步?
对,多线程方式!那么我们今天来介绍多线程方式外的SpringBoot通过两个注解来实现异步的方式。 - 通过基于spring的两个注解@EnableAsync 和 @Async,实现SpringBoot的异步调用,帮助我们更方便的将业务逻辑提交到线程池中异步执行,怎么应用,请继续往下……;
2. 举例说明
2.1 例1——异步不生效例子
2.1.1 案例介绍
- 一共涉及3个Java文件,一个启动类,一个异步任务类,一个Controller
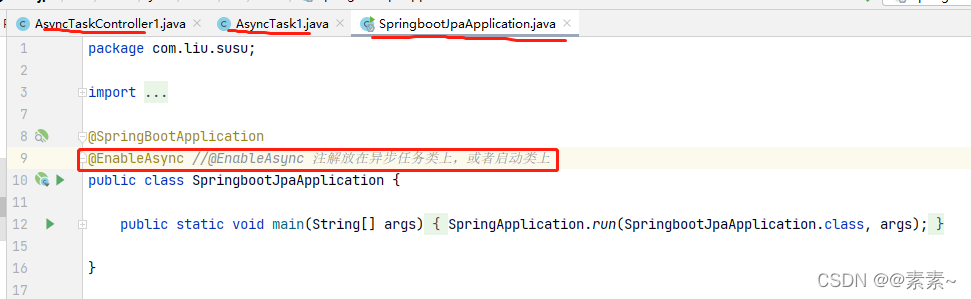
- 先说启动类:别忘了
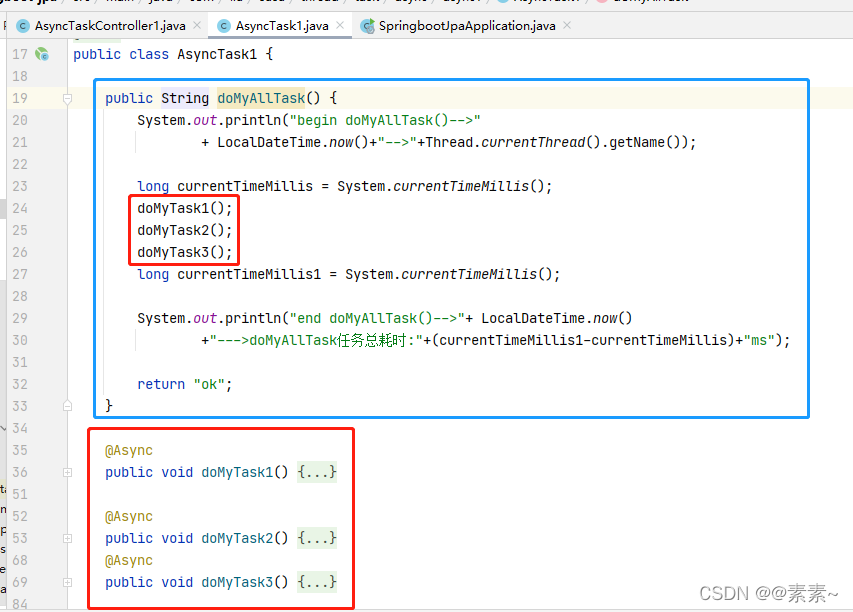
@EnableAsync注解,此注解可以添加到异步任务类上,但是后面不值一个异步任务类,为了方便,添加到启动类上了。 - 再说异步任务类:一个三个异步方法,还有一个方法 doMyAllTask() 的内部是调用3个异步方法的方法;
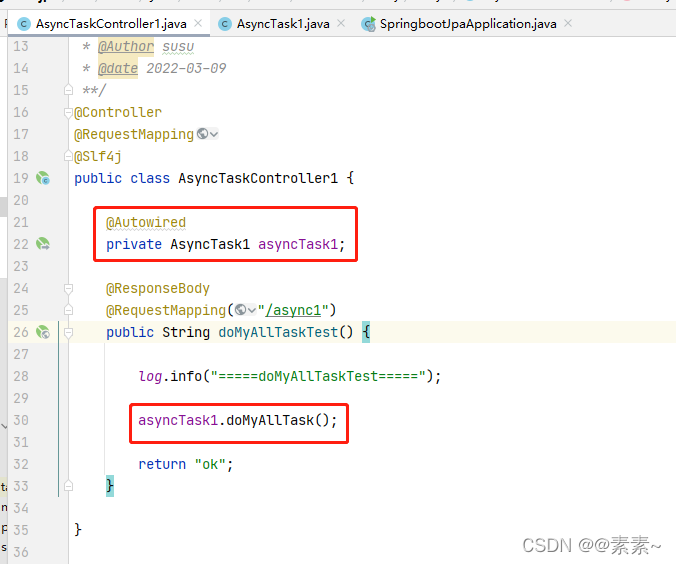
- 再说 controller 是测试 doMyAllTask() 内调用的异步方法是否异步执行了。
- 代码如图:
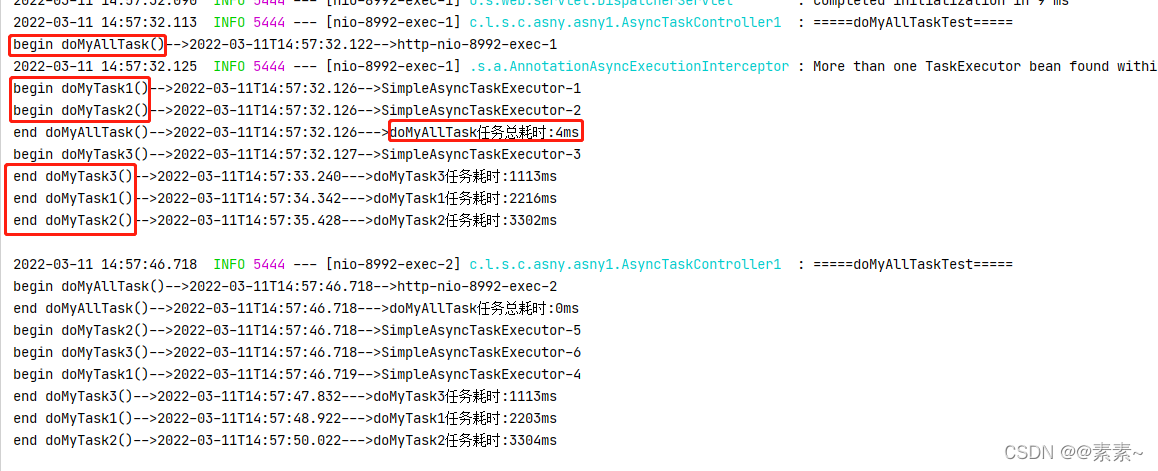
2.1.2 观察效果
- 启动,调链接:http://localhost:8992/async1 ,观察效果:
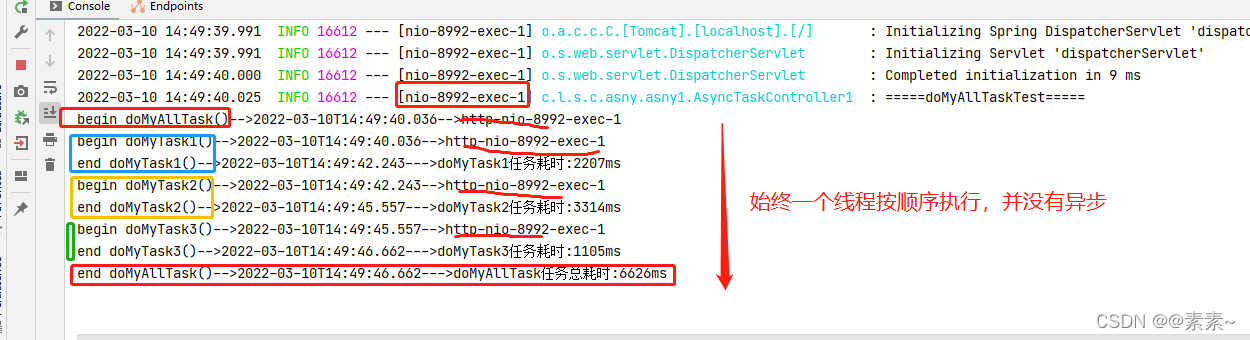
- 欸,为啥没有异步呢?明明该加的注解都加了呢,为什么呢,看下面导致问题的原因!
2.1.3 问题原因及解决办法
- 问题原因:
在spring中像@Async和@Transactional、cache等注解本质使用的是动态代理,其实Spring容器在初始化的时候Spring容器会将含有AOP注解的类对象“替换”为代理对象(简单这么理解),那么注解失效的原因就很明显了,就是因为调用方法的是对象本身而不是代理对象,因为没有经过Spring容器,那么解决方法也会沿着这个思路来解决。 - 解决办法:
将要异步执行的方法单独抽取成一个类,原理就是当你把执行异步的方法单独抽取成一个类的时候,这个类肯定是被Spring管理的,其他Spring组件需要调用的时候肯定会注入进去,这时候实际上注入进去的就是代理类了。
2.1.4 附代码
- 启动类代码:略
- AsyncTask1 代码:
package com.liu.susu.thread.task.async.async1;import org.springframework.scheduling.annotation.Async;
import org.springframework.stereotype.Component;
import org.springframework.stereotype.Service;import java.time.LocalDateTime;/*** @FileName AsyncTask1* @Description* @Author susu* @date 2022-03-09**/
@Service
@Component
public class AsyncTask1 {public String doMyAllTask() {System.out.println("begin doMyAllTask()-->"+ LocalDateTime.now()+"-->"+Thread.currentThread().getName());long currentTimeMillis = System.currentTimeMillis();doMyTask1();doMyTask2();doMyTask3();long currentTimeMillis1 = System.currentTimeMillis();System.out.println("end doMyAllTask()-->"+ LocalDateTime.now()+"--->doMyAllTask任务总耗时:"+(currentTimeMillis1-currentTimeMillis)+"ms");return "ok";}@Asyncpublic void doMyTask1() {System.out.println("begin doMyTask1()-->"+ LocalDateTime.now()+"-->"+Thread.currentThread().getName());long currentTimeMillis = System.currentTimeMillis();try {Thread.sleep(2200);} catch (InterruptedException e) {e.printStackTrace();}long currentTimeMillis1 = System.currentTimeMillis();System.out.println("end doMyTask1()-->"+ LocalDateTime.now()+"--->doMyTask1任务耗时:"+(currentTimeMillis1-currentTimeMillis)+"ms");}@Asyncpublic void doMyTask2() {System.out.println("begin doMyTask2()-->"+ LocalDateTime.now()+"-->"+Thread.currentThread().getName());long currentTimeMillis = System.currentTimeMillis();try {Thread.sleep(3300);} catch (InterruptedException e) {e.printStackTrace();}long currentTimeMillis1 = System.currentTimeMillis();System.out.println("end doMyTask2()-->"+ LocalDateTime.now()+"--->doMyTask2任务耗时:"+(currentTimeMillis1-currentTimeMillis)+"ms");}@Asyncpublic void doMyTask3() {System.out.println("begin doMyTask3()-->"+ LocalDateTime.now()+"-->"+Thread.currentThread().getName());long currentTimeMillis = System.currentTimeMillis();try {Thread.sleep(1100);} catch (InterruptedException e) {e.printStackTrace();}long currentTimeMillis1 = System.currentTimeMillis();System.out.println("end doMyTask3()-->"+ LocalDateTime.now()+"--->doMyTask3任务耗时:"+(currentTimeMillis1-currentTimeMillis)+"ms");}}- AsyncTaskController1 代码:
package com.liu.susu.controller.asny.asny1;import com.liu.susu.thread.task.async.async1.AsyncTask1;
import lombok.extern.slf4j.Slf4j;
import org.springframework.beans.factory.annotation.Autowired;
import org.springframework.stereotype.Controller;
import org.springframework.web.bind.annotation.RequestMapping;
import org.springframework.web.bind.annotation.ResponseBody;/*** @FileName AsyncTaskController* @Description* @Author susu* @date 2022-03-09**/
@Controller
@RequestMapping
@Slf4j
public class AsyncTaskController1 {@Autowiredprivate AsyncTask1 asyncTask1;@ResponseBody@RequestMapping("/async1")public String doMyAllTaskTest() {log.info("=====doMyAllTaskTest=====");asyncTask1.doMyAllTask();return "ok";}}
2.2 例2——解决2.1的异步不生效例子
2.2.1 解决方案1
- 根据上面 2.1.3 的问题分析,我们直接把异步方法抽取成独立的一个类,在controller里调用异步方法。
2.2.1.1 代码
异步任务类 AsyncTask2.java 只要异步方法,在 AsyncTaskController2.java 里调用3个任务的异步方法
- 代码如图:
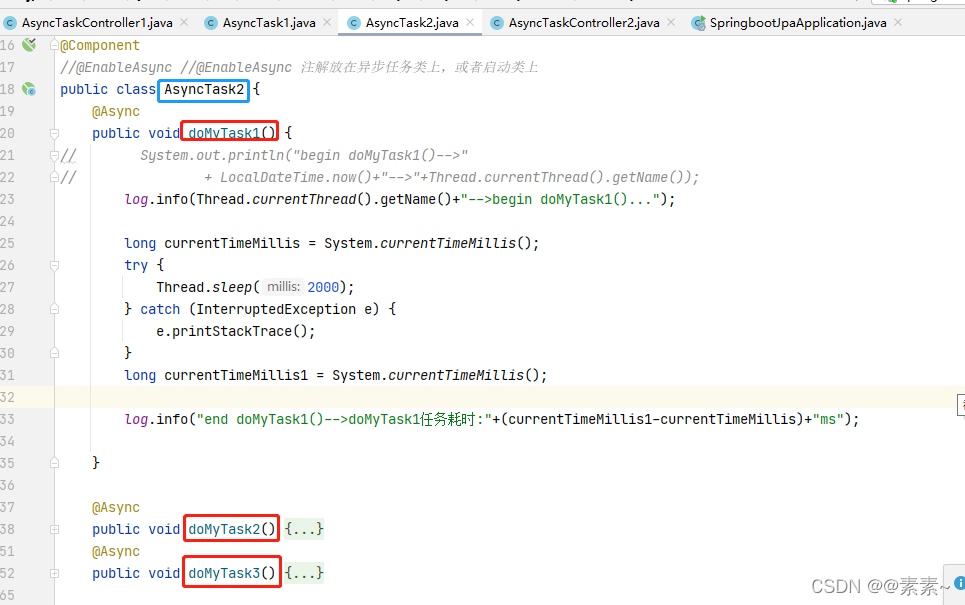
- 完整代码如下:
- AsyncTask2.java
package com.liu.susu.thread.task.async.async1;import lombok.extern.slf4j.Slf4j;
import org.springframework.scheduling.annotation.Async;
import org.springframework.stereotype.Component;import java.time.LocalDateTime;/*** @FileName AsyncTask1* @Description* @Author susu* @date 2022-03-09**/
@Slf4j
@Component
//@EnableAsync //@EnableAsync 注解放在异步任务类上,或者启动类上
public class AsyncTask2 {@Asyncpublic void doMyTask1() {
//        System.out.println("begin doMyTask1()-->"
// + LocalDateTime.now()+"-->"+Thread.currentThread().getName());log.info(Thread.currentThread().getName()+"-->begin doMyTask1()...");long currentTimeMillis = System.currentTimeMillis();try {Thread.sleep(2000);} catch (InterruptedException e) {e.printStackTrace();}long currentTimeMillis1 = System.currentTimeMillis();log.info("end doMyTask1()-->doMyTask1任务耗时:"+(currentTimeMillis1-currentTimeMillis)+"ms");}@Asyncpublic void doMyTask2() {log.info(Thread.currentThread().getName()+"-->begin doMyTask2()...");long currentTimeMillis = System.currentTimeMillis();try {Thread.sleep(3000);} catch (InterruptedException e) {e.printStackTrace();}long currentTimeMillis1 = System.currentTimeMillis();log.info("end doMyTask2()-->doMyTask2任务耗时:"+(currentTimeMillis1-currentTimeMillis)+"ms");}@Asyncpublic void doMyTask3() {log.info(Thread.currentThread().getName()+"-->begin doMyTask3()...");long currentTimeMillis = System.currentTimeMillis();try {Thread.sleep(1500);} catch (InterruptedException e) {e.printStackTrace();}long currentTimeMillis1 = System.currentTimeMillis();log.info("end doMyTask3()-->doMyTask3任务耗时:"+(currentTimeMillis1-currentTimeMillis)+"ms");}}- AsyncTaskController2.java
package com.liu.susu.controller.asny.asny1;import com.liu.susu.thread.task.async.async1.AsyncTask2;
import lombok.extern.slf4j.Slf4j;
import org.springframework.beans.factory.annotation.Autowired;
import org.springframework.stereotype.Controller;
import org.springframework.web.bind.annotation.RequestMapping;
import org.springframework.web.bind.annotation.ResponseBody;/*** @FileName AsyncTaskController2* @Description* @Author susu* @date 2022-03-09**/
@Controller
@RequestMapping
@Slf4j
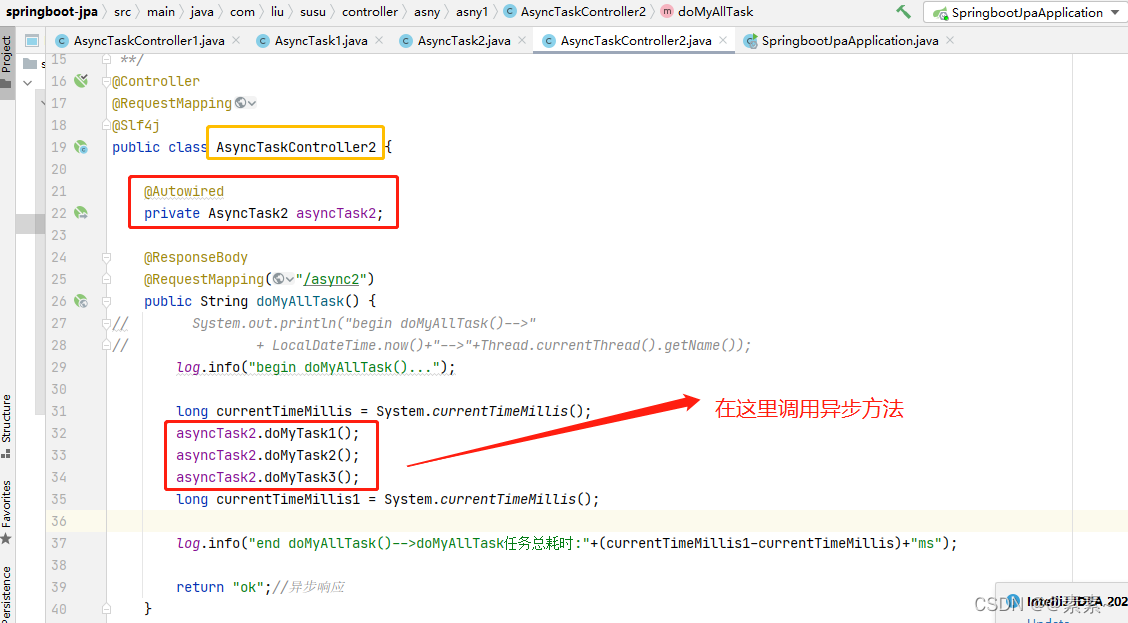
public class AsyncTaskController2 {@Autowiredprivate AsyncTask2 asyncTask2;@ResponseBody@RequestMapping("/async2")public String doMyAllTask() {
// System.out.println("begin doMyAllTask()-->"
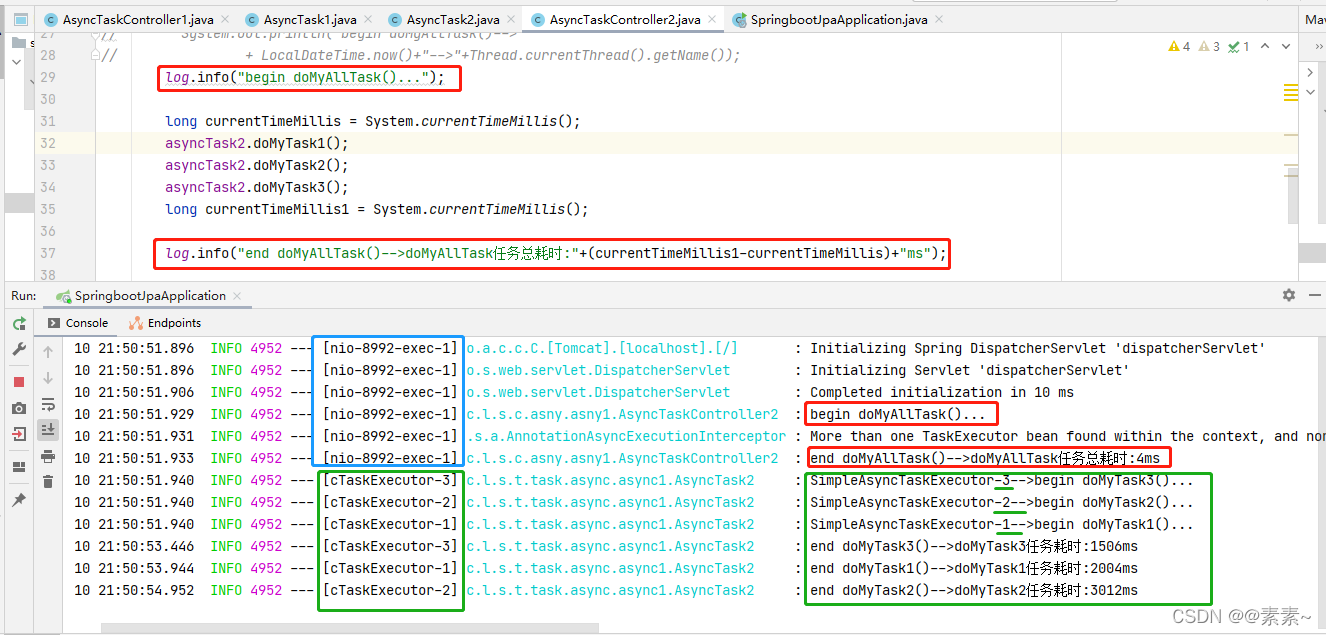
// + LocalDateTime.now()+"-->"+Thread.currentThread().getName());log.info("begin doMyAllTask()...");long currentTimeMillis = System.currentTimeMillis();asyncTask2.doMyTask1();asyncTask2.doMyTask2();asyncTask2.doMyTask3();long currentTimeMillis1 = System.currentTimeMillis();log.info("end doMyAllTask()-->doMyAllTask任务总耗时:"+(currentTimeMillis1-currentTimeMillis)+"ms");return "ok";//异步响应}}2.2.1.2 效果
- 再观察后台日志效果,异步生效!,如图:
2.2.2 解决方案2——两个异步类里互相调用异步方法
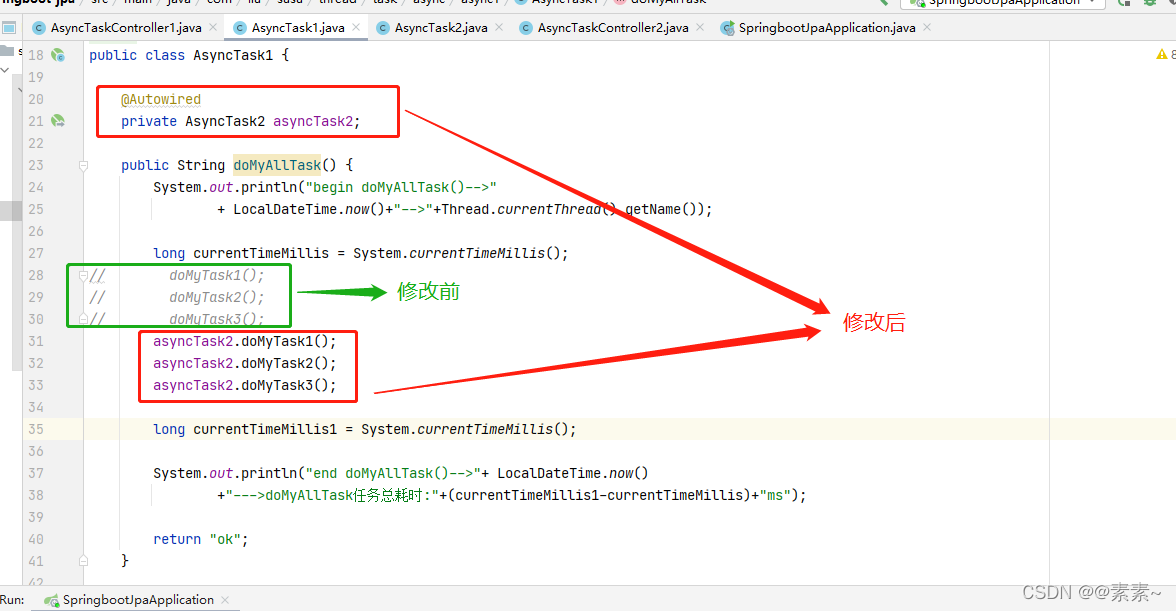
- 根据上述的解决方案,我们想想如果把例1 AsyncTask1.java 中的 doMyAllTask() 方法调用本来的异步方法,改写成调用 AsyncTask2.java 中的异步方法可行吗?应该可行,因为调用异步方法的方法和异步方法只要不在一个类里即可,如果你不放心,不妨一试!
2.2.2.1 代码
- 修改代码:
2.2.2.2 效果
- 也实现了异步,如图:

- 根据上面的效果我们可以看到,异步类里的普通方法可以调用异步方法,但是不能调用同类中的异步方法,否则异步不生效。
2.2.3 解决方案3——通过上下文获取自己的代理对象调用异步方法
- 上面的方法是我们想到的最简单的解决方案,你肯定想知道如果不拆行不行,对吧?行!往下继续…
2.2.3.1 代码
- 在2.1 例1的基础上,其他都不用修改,只需修改通过代理调用即可,修改代码如下:
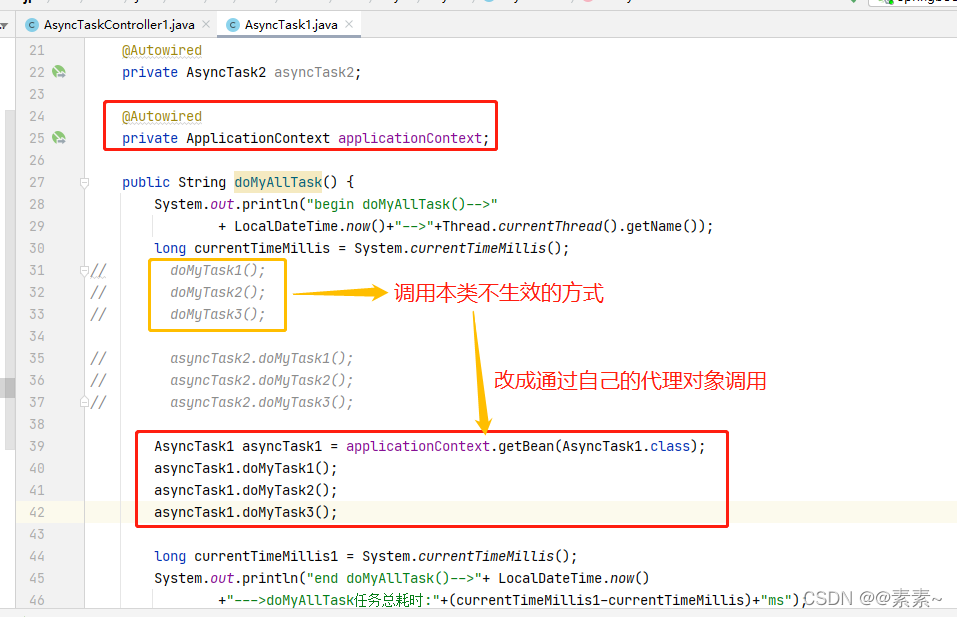
- 完整代码:
package com.liu.susu.thread.task.async.async1;import org.springframework.beans.factory.annotation.Autowired;
import org.springframework.context.ApplicationContext;
import org.springframework.scheduling.annotation.Async;
import org.springframework.stereotype.Component;
import org.springframework.stereotype.Service;import java.time.LocalDateTime;/*** @FileName AsyncTask1* @Description* @Author susu* @date 2022-03-09**/
@Service
@Component
public class AsyncTask1 {@Autowiredprivate AsyncTask2 asyncTask2;@Autowiredprivate ApplicationContext applicationContext;public String doMyAllTask() {System.out.println("begin doMyAllTask()-->"+ LocalDateTime.now()+"-->"+Thread.currentThread().getName());long currentTimeMillis = System.currentTimeMillis();
//        doMyTask1();
//        doMyTask2();
//        doMyTask3();//        asyncTask2.doMyTask1();
//        asyncTask2.doMyTask2();
//        asyncTask2.doMyTask3();AsyncTask1 asyncTask1 = applicationContext.getBean(AsyncTask1.class);asyncTask1.doMyTask1();asyncTask1.doMyTask2();asyncTask1.doMyTask3();long currentTimeMillis1 = System.currentTimeMillis();System.out.println("end doMyAllTask()-->"+ LocalDateTime.now()+"--->doMyAllTask任务总耗时:"+(currentTimeMillis1-currentTimeMillis)+"ms");return "ok";}@Asyncpublic void doMyTask1() {System.out.println("begin doMyTask1()-->"+ LocalDateTime.now()+"-->"+Thread.currentThread().getName());long currentTimeMillis = System.currentTimeMillis();try {Thread.sleep(2200);} catch (InterruptedException e) {e.printStackTrace();}long currentTimeMillis1 = System.currentTimeMillis();System.out.println("end doMyTask1()-->"+ LocalDateTime.now()+"--->doMyTask1任务耗时:"+(currentTimeMillis1-currentTimeMillis)+"ms");}@Asyncpublic void doMyTask2() {System.out.println("begin doMyTask2()-->"+ LocalDateTime.now()+"-->"+Thread.currentThread().getName());long currentTimeMillis = System.currentTimeMillis();try {Thread.sleep(3300);} catch (InterruptedException e) {e.printStackTrace();}long currentTimeMillis1 = System.currentTimeMillis();System.out.println("end doMyTask2()-->"+ LocalDateTime.now()+"--->doMyTask2任务耗时:"+(currentTimeMillis1-currentTimeMillis)+"ms");}@Asyncpublic void doMyTask3() {System.out.println("begin doMyTask3()-->"+ LocalDateTime.now()+"-->"+Thread.currentThread().getName());long currentTimeMillis = System.currentTimeMillis();try {Thread.sleep(1100);} catch (InterruptedException e) {e.printStackTrace();}long currentTimeMillis1 = System.currentTimeMillis();System.out.println("end doMyTask3()-->"+ LocalDateTime.now()+"--->doMyTask3任务耗时:"+(currentTimeMillis1-currentTimeMillis)+"ms");}}
2.2.3.2 效果
- 启动,执行观察一下效果,显然异步生效:
2.2.4 解决方案4——开启cglib代理,手动获取Spring代理类
- 在2.2.3解决方案3上再修改成另外一个方案
- 开启cglib代理,手动获取Spring代理类,从而调用同类下的异步方法。
2.2.4.1 代码
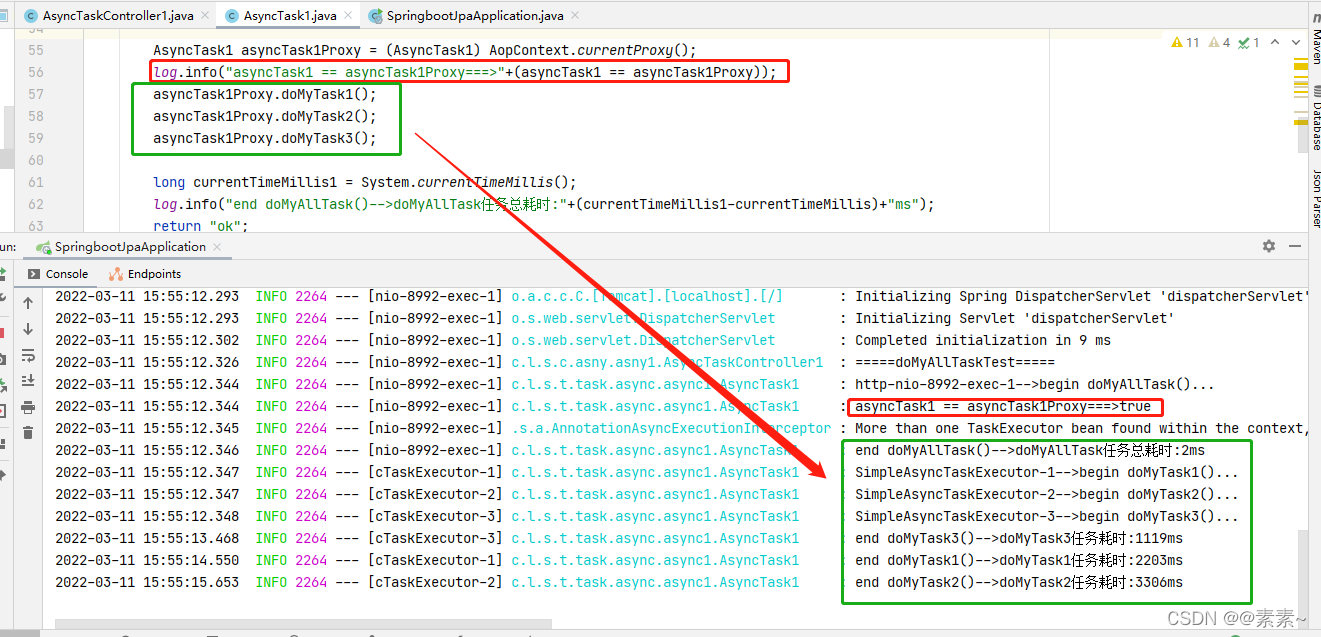
- 修改核心代码前,我们先把打印语句给修改成log日志,打印语句看着确实有点难受…
- 修改后代码如下:
主要是:AsyncTask1 asyncTask1 = applicationContext.getBean(AsyncTask1.class);换成AsyncTask1 asyncTask1Proxy = (AsyncTask1) AopContext.currentProxy(); - 并且注意类上别忘了加注解:
@Transactional(value = "transactionManager", readOnly = false, propagation = Propagation.REQUIRED, rollbackFor = Throwable.class)
否则,报错 :
Cannot find current proxy: Set 'exposeProxy' property on Advised to 'true' to make it available, and ensure
- 启动类上别忘了加注解:
@EnableAspectJAutoProxy(exposeProxy = true)

2.2.4.2 效果
- 观察效果也实现了异步
- 参考:
SpringBoot中异步请求和异步调用(看这一篇就够了).
2.3 例3——使用定义线程池的异步
2.3.1 为什么要自定义线程池?
- 根据我们上面的好几个例子,你应该发现了
SimpleAsyncTaskExecutor,如果我们不自定义异步方法的线程池,则默认使用的是 SimpleAsyncTaskExecutor。而SimpleAsyncTaskExecutor 不是真的线程池,这个类不重用线程,每次调用都会创建一个新的线程。并发大的时候会产生严重的性能问题。 - 不妨看个效果:
看出来了吧,上面我一共调用了3次,每次都会开启新的线程
2.3.2 关于 SimpleAsyncTaskExecutor 源码
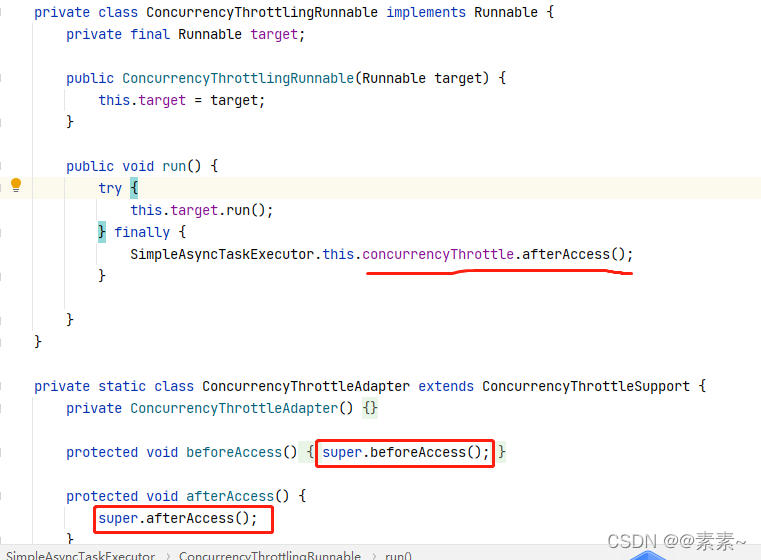
- 我们简单看一下源码
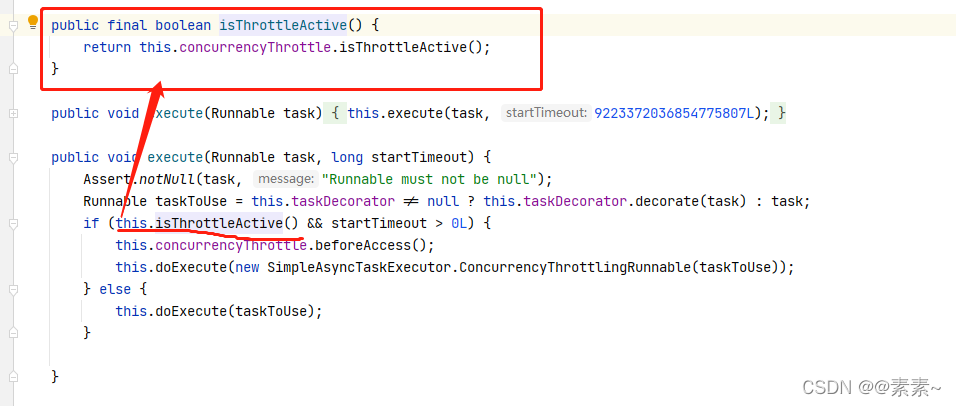
- (1)看是否开启限流,开启不开启调用的方法不一样,后面处理线程肯定也就不一样了
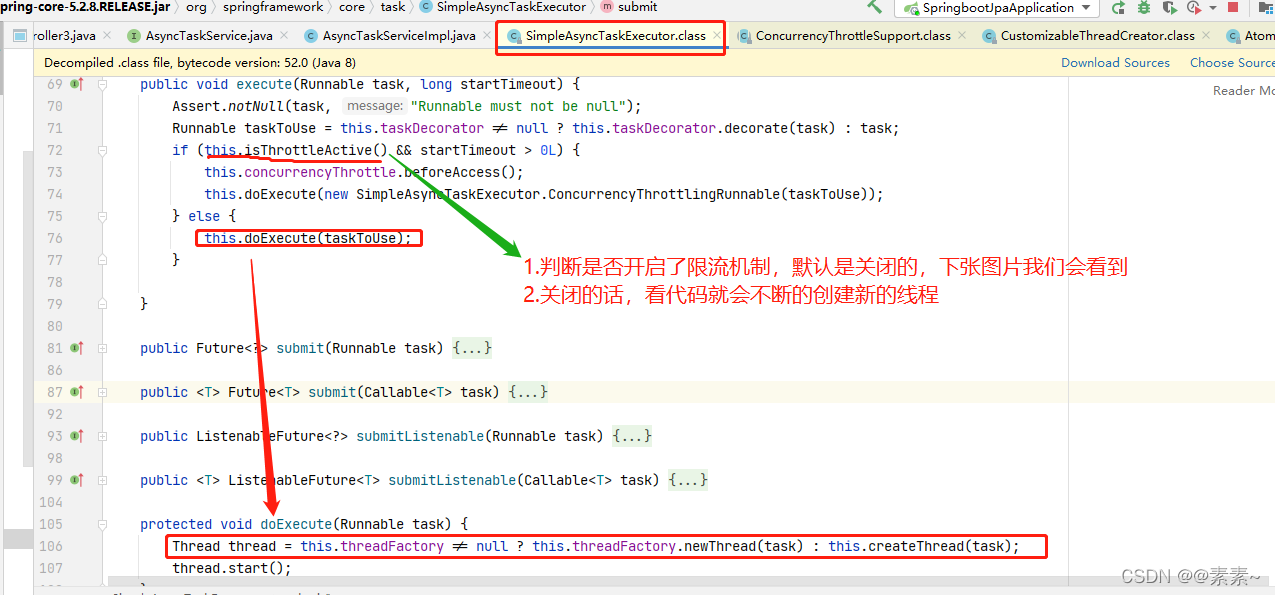
- (2)根据代码去找是否开启限流是哪个属性来控制的
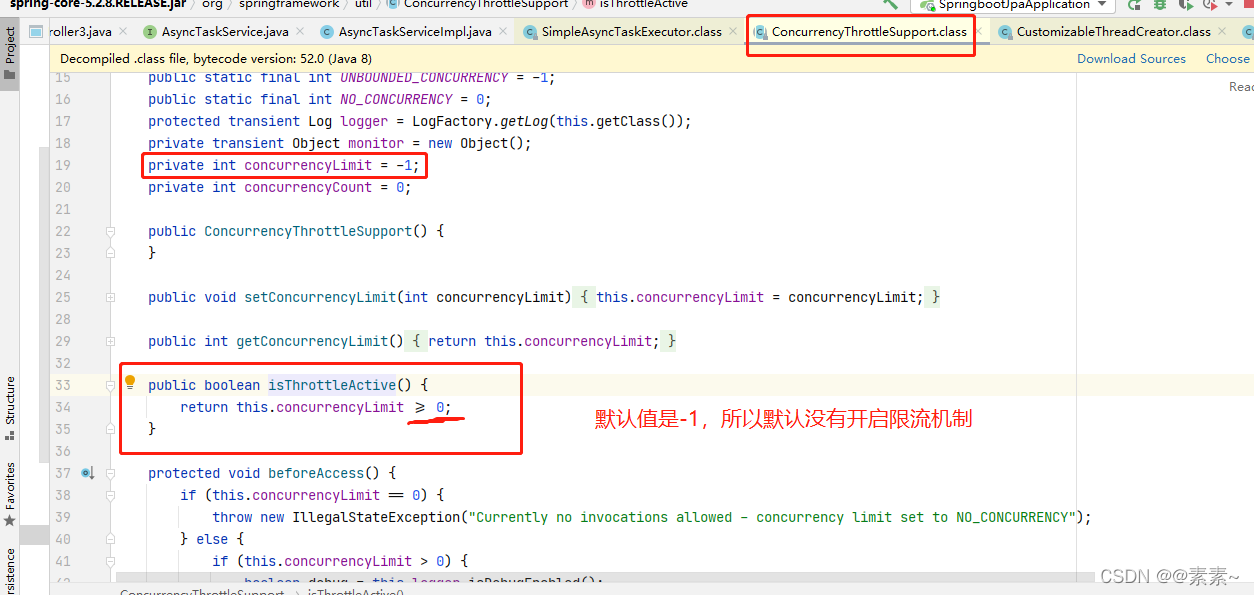
- (3)找到控制开启限流的属性
concurrencyLimit(ConcurrencyThrottleSupport 类中),可以看到默认值是-1,所以默认是没有开启限流的,根据我们上面源码可以看出,如果没有开启限制则会不断创建新的线程。
这就解释了我们上面看到的效果——为什么测试多次每次都在创建新的线程。
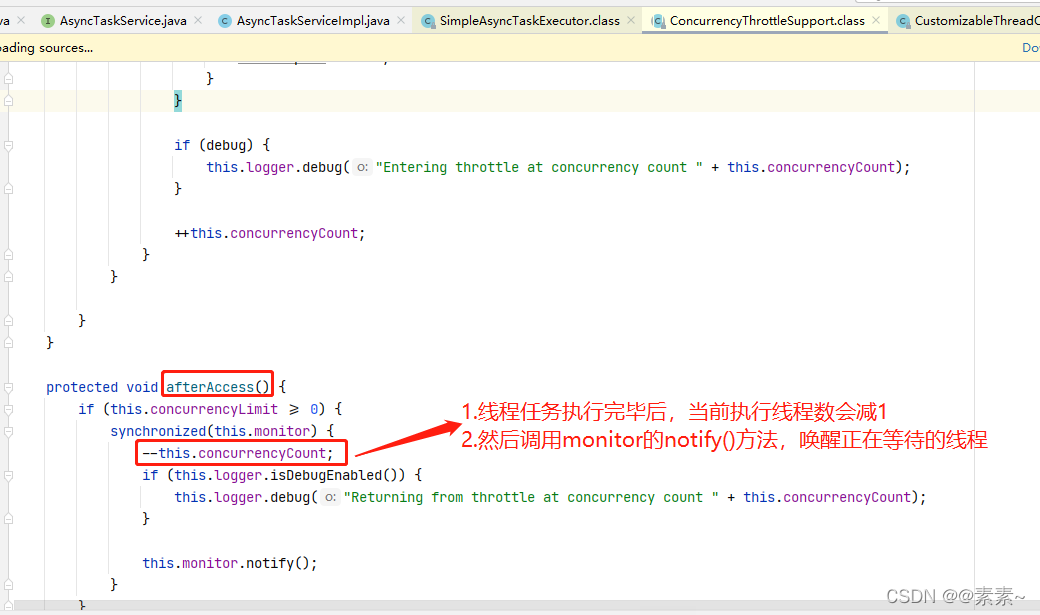
- (4)对于开启限流的处理
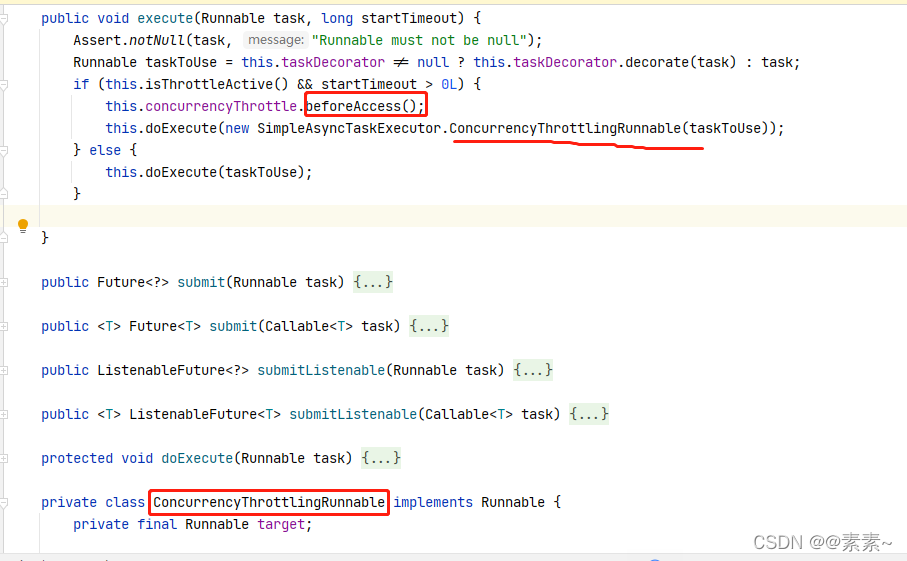
–》执行前根据限流进行处理
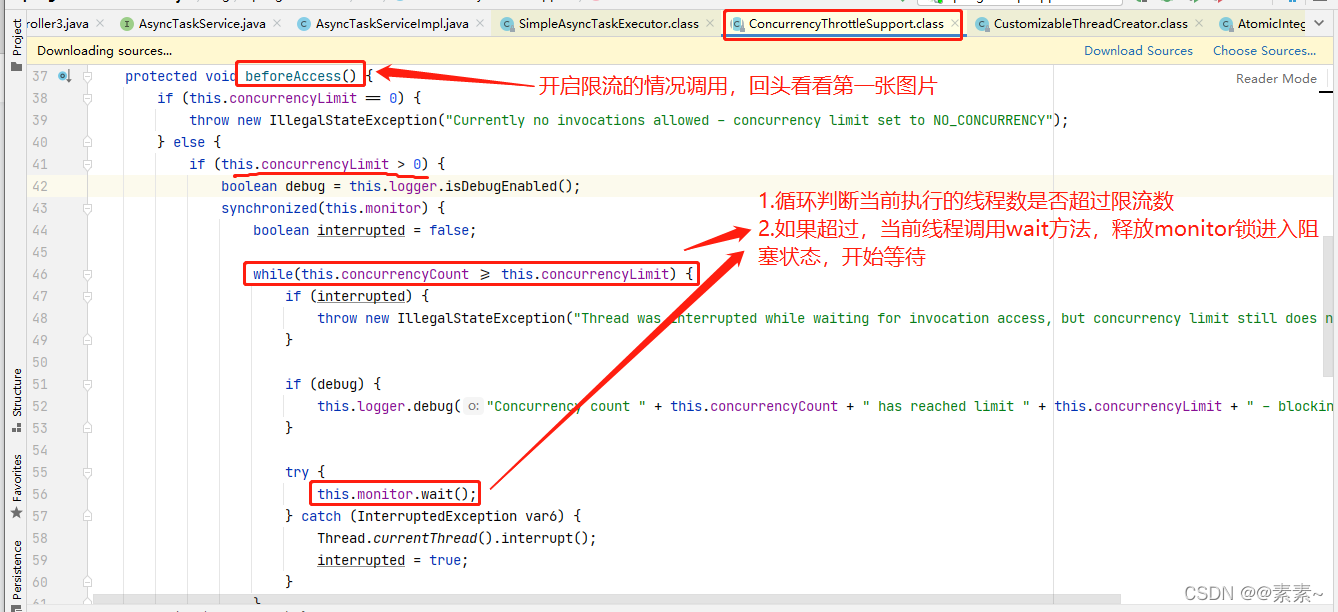
–》执行后,对当前线程数进行-1操作,然后唤醒正在等待的线程
小结——@Async实现异步的默认使用
- @Async 实现异步默认使用的线程池是 SimpleAsyncTaskExecutor ,SimpleAsyncTaskExecutor 提供了限流机制,通过 concurrencyLimit 属性的值来控制是否开启限流,但是默认情况下该值是-1,没有开启限流,上面我们源码介绍的时候已经有说,此处就不啰嗦了。
- 在没有开启限流的情况下,SimpleAsyncTaskExecutor 是来一个任务就创建一个新的线程来处理任务,如果系统这样一直不断地创建线程,最终可能会导致OOM(
OutOfMemoryError:unable to create new native thread),原因就是创建线程数量过多,导致系统占用内存过高。 - 那么对 SimpleAsyncTaskExecutor 进行重新设置属性值,开启限流机制,不就行了?我没试,你感兴趣的话,可以试试。
- 不过,基于 SimpleAsyncTaskExecutor 的默认设置,SimpleAsyncTaskExecutor 并非属于严格意义上的线程池,达不到线程复用的功能,所以,我们是不建议使用的。
2.3.3 自定义线程池
- 基于上述各案例的分析,我们采用自定义线程池来实现异步任务
2.3.3.1 方案介绍
- 首先一个线程池配置类,一个任务接口和对应的实现类(这个跟上面一样,就是把异步任务类加了一层接口,没别的),一个controller测试
- 代码设计如下:

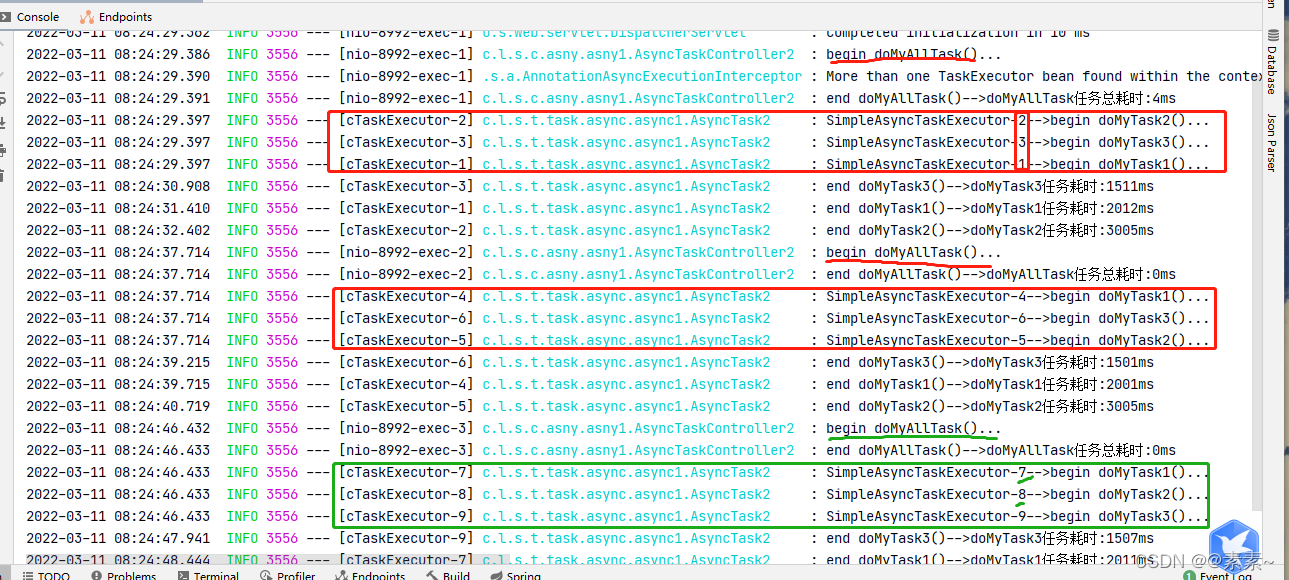
2.3.3.2 观察效果
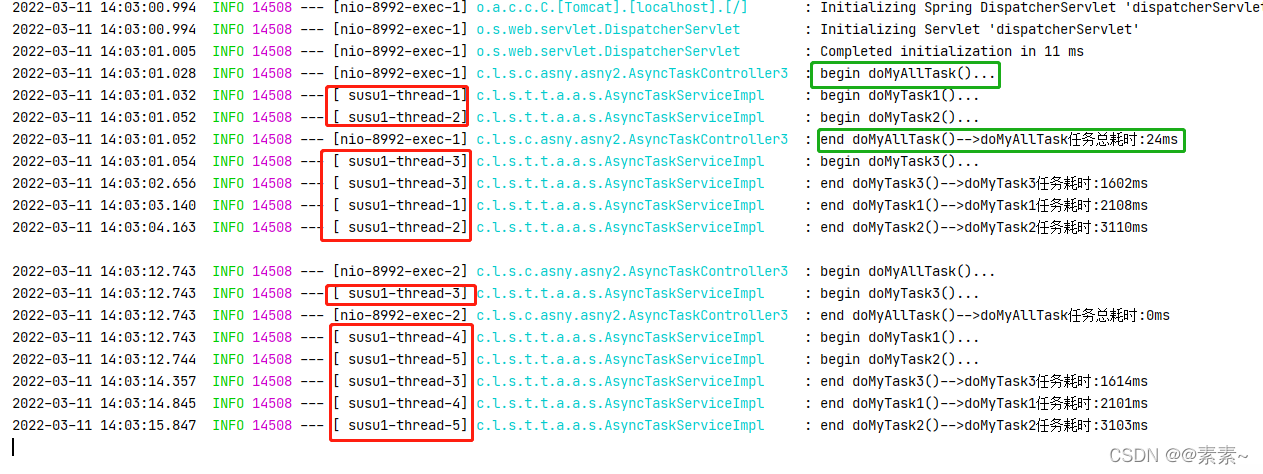
- 观察效果可以看到,我们配置的线程池生效了,异步也实现了,没啥可说的了,自己慢慢品吧
2.3.3.3 附代码
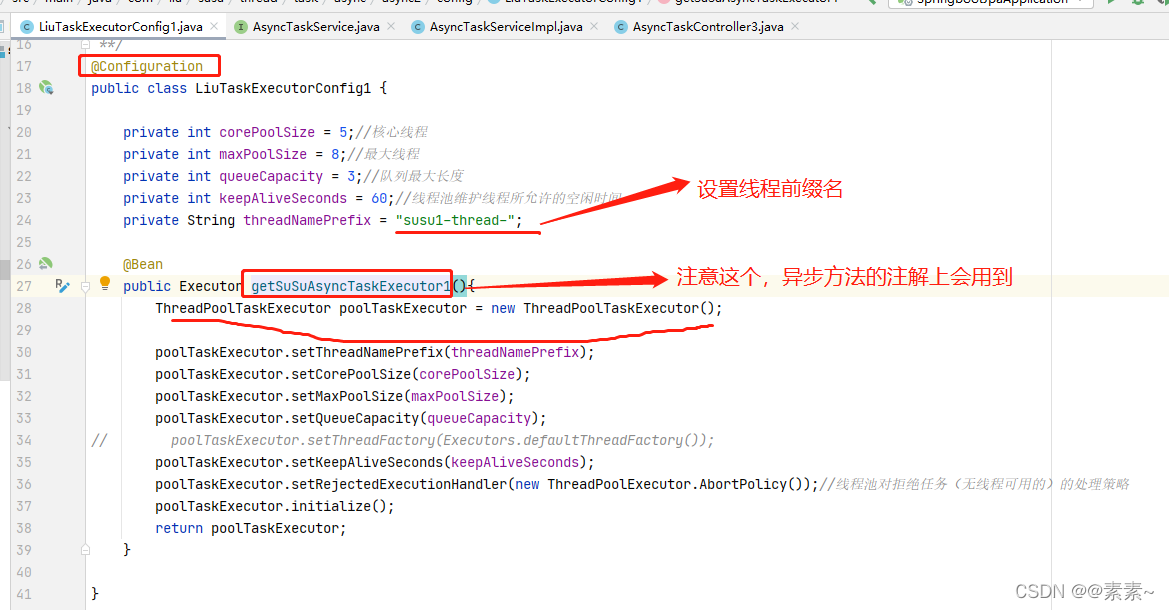
- LiuTaskExecutorConfig1.java
package com.liu.susu.thread.task.async.async2.config;import org.springframework.context.annotation.Bean;
import org.springframework.context.annotation.Configuration;
import org.springframework.scheduling.concurrent.ThreadPoolTaskExecutor;import java.util.concurrent.Executor;
import java.util.concurrent.Executors;
import java.util.concurrent.ThreadPoolExecutor;/*** @FileName LiuTaskExecutorConfig* @Description* @Author susu* @date 2022-03-09**/
@Configuration
public class LiuTaskExecutorConfig1 {private int corePoolSize = 5;//核心线程private int maxPoolSize = 8;//最大线程private int queueCapacity = 3;//队列最大长度private int keepAliveSeconds = 60;//线程池维护线程所允许的空闲时间private String threadNamePrefix = "susu1-thread-";@Beanpublic Executor getSuSuAsyncTaskExecutor1(){ThreadPoolTaskExecutor poolTaskExecutor = new ThreadPoolTaskExecutor();poolTaskExecutor.setThreadNamePrefix(threadNamePrefix);poolTaskExecutor.setCorePoolSize(corePoolSize);poolTaskExecutor.setMaxPoolSize(maxPoolSize);poolTaskExecutor.setQueueCapacity(queueCapacity);
// poolTaskExecutor.setThreadFactory(Executors.defaultThreadFactory());poolTaskExecutor.setKeepAliveSeconds(keepAliveSeconds);poolTaskExecutor.setRejectedExecutionHandler(new ThreadPoolExecutor.AbortPolicy());//线程池对拒绝任务(无线程可用的)的处理策略poolTaskExecutor.initialize();return poolTaskExecutor;}}- AsyncTaskService.java
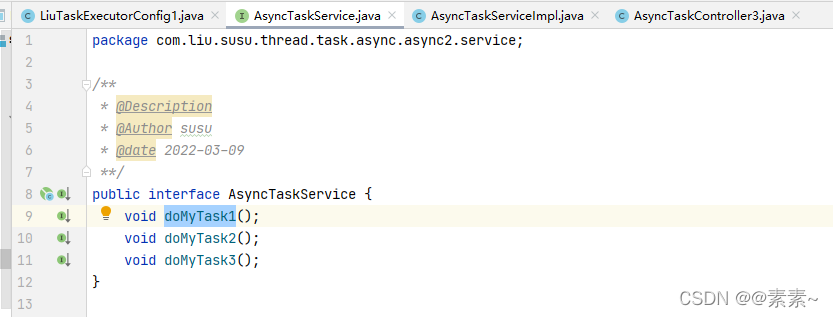
package com.liu.susu.thread.task.async.async2.service;/*** @Description* @Author susu* @date 2022-03-09**/
public interface AsyncTaskService {void doMyTask1();void doMyTask2();void doMyTask3();
}- AsyncTaskServiceImpl.java
package com.liu.susu.thread.task.async.async2.service;import lombok.extern.slf4j.Slf4j;
import org.springframework.scheduling.annotation.Async;
import org.springframework.stereotype.Service;/*** @FileName AsyncTaskServiceImpl* @Description* @Author susu* @date 2022-03-09**/
@Service
@Slf4j
public class AsyncTaskServiceImpl implements AsyncTaskService{private final String ASYNC_TASK_EXECUTOR = "getSuSuAsyncTaskExecutor1";@Override
// @Async("getSuSuAsyncTaskExecutor1")@Async(ASYNC_TASK_EXECUTOR)public void doMyTask1() {log.info("begin doMyTask1()...");long currentTimeMillis = System.currentTimeMillis();try {Thread.sleep(2100);} catch (InterruptedException e) {e.printStackTrace();}long currentTimeMillis1 = System.currentTimeMillis();log.info("end doMyTask1()-->doMyTask1任务耗时:"+(currentTimeMillis1-currentTimeMillis)+"ms");}@Override@Async(ASYNC_TASK_EXECUTOR)public void doMyTask2() {log.info("begin doMyTask2()...");long currentTimeMillis = System.currentTimeMillis();try {Thread.sleep(3100);} catch (InterruptedException e) {e.printStackTrace();}long currentTimeMillis1 = System.currentTimeMillis();log.info("end doMyTask2()-->doMyTask2任务耗时:"+(currentTimeMillis1-currentTimeMillis)+"ms");}@Override@Async(ASYNC_TASK_EXECUTOR)public void doMyTask3() {log.info("begin doMyTask3()...");long currentTimeMillis = System.currentTimeMillis();try {Thread.sleep(1600);} catch (InterruptedException e) {e.printStackTrace();}long currentTimeMillis1 = System.currentTimeMillis();log.info("end doMyTask3()-->doMyTask3任务耗时:"+(currentTimeMillis1-currentTimeMillis)+"ms");}}- AsyncTaskController3.java
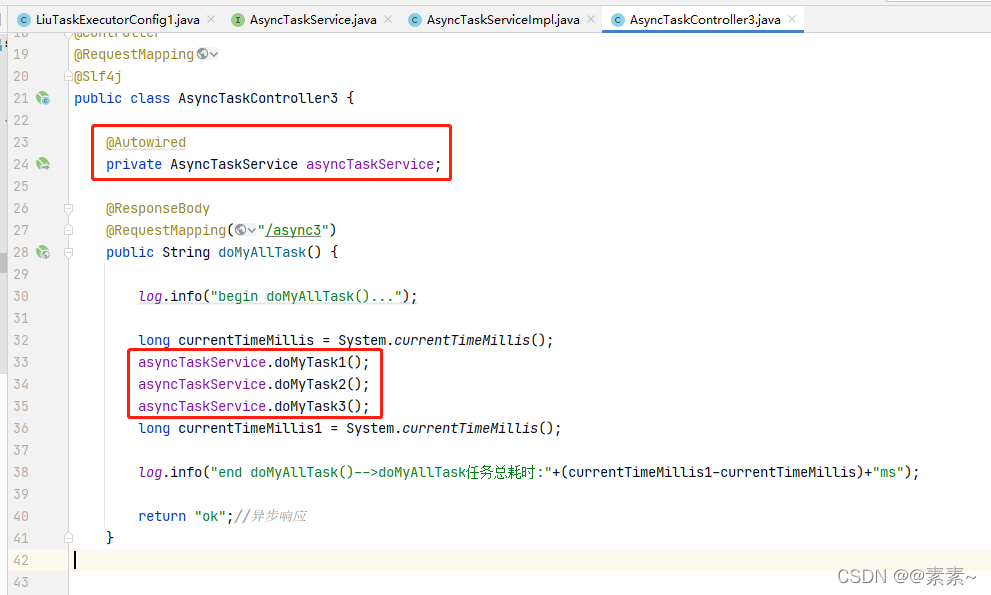
package com.liu.susu.controller.asny.asny2;import com.liu.susu.thread.task.async.async2.service.AsyncTaskService;
import lombok.extern.slf4j.Slf4j;
import org.springframework.beans.factory.annotation.Autowired;
import org.springframework.stereotype.Controller;
import org.springframework.web.bind.annotation.RequestMapping;
import org.springframework.web.bind.annotation.ResponseBody;import java.time.LocalDateTime;/*** @FileName AsyncTaskController3* @Description* @Author susu* @date 2022-03-09**/
@Controller
@RequestMapping
@Slf4j
public class AsyncTaskController3 {@Autowiredprivate AsyncTaskService asyncTaskService;@ResponseBody@RequestMapping("/async3")public String doMyAllTask() {log.info("begin doMyAllTask()...");long currentTimeMillis = System.currentTimeMillis();asyncTaskService.doMyTask1();asyncTaskService.doMyTask2();asyncTaskService.doMyTask3();long currentTimeMillis1 = System.currentTimeMillis();log.info("end doMyAllTask()-->doMyAllTask任务总耗时:"+(currentTimeMillis1-currentTimeMillis)+"ms");return "ok";//异步响应}}
2.3.3.4 推荐线程池文章
- 忘了线程参数设置的等可以参考这个文章:
详解Java多线程之线程池.
2.4 例4——优化2.3.3(打印线程池的运行状况)
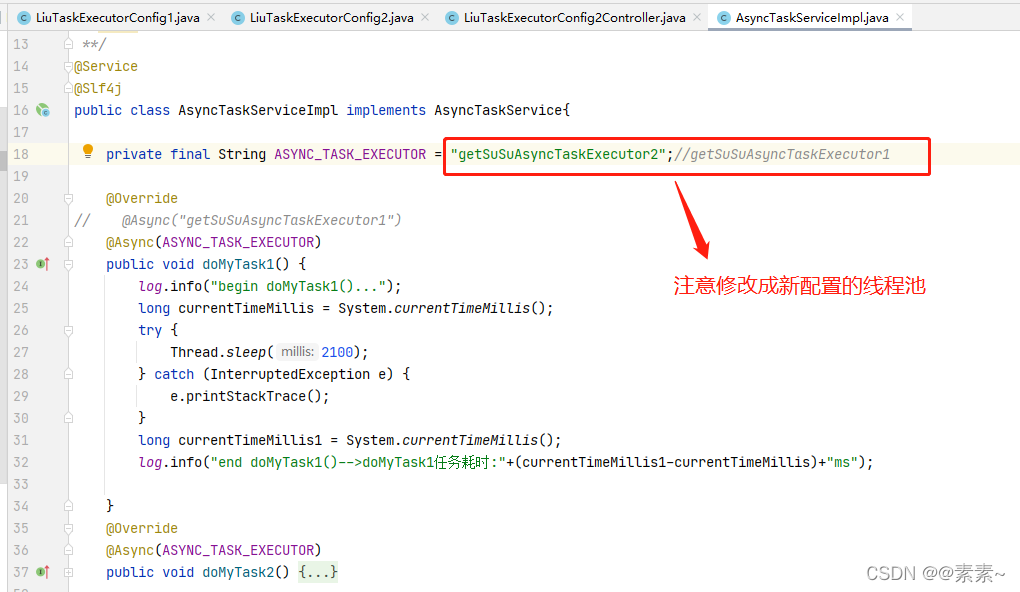
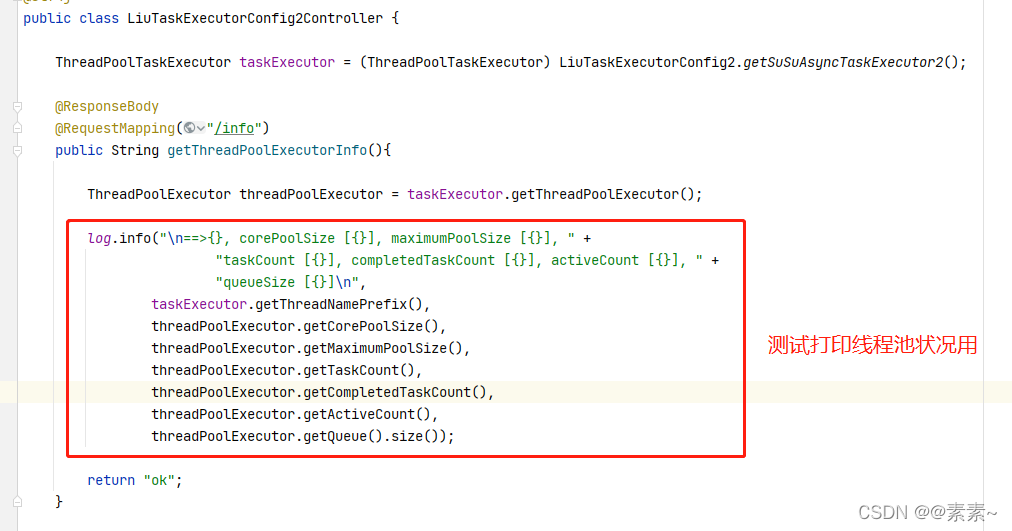
- 下面这个介绍主要是基于上面2.3.4的例子来说的。用于方便我们关注线程池的运行时状况的,可以观察有多少线程在执行,多少在队列中等待…这里我修改了一下线程池配置类,为了便于观察直接重新新建一个配置类 LiuTaskExecutorConfig2.java
2.4.1 改进点
- 都看到这里了,应该很好理解了,直接给图吧
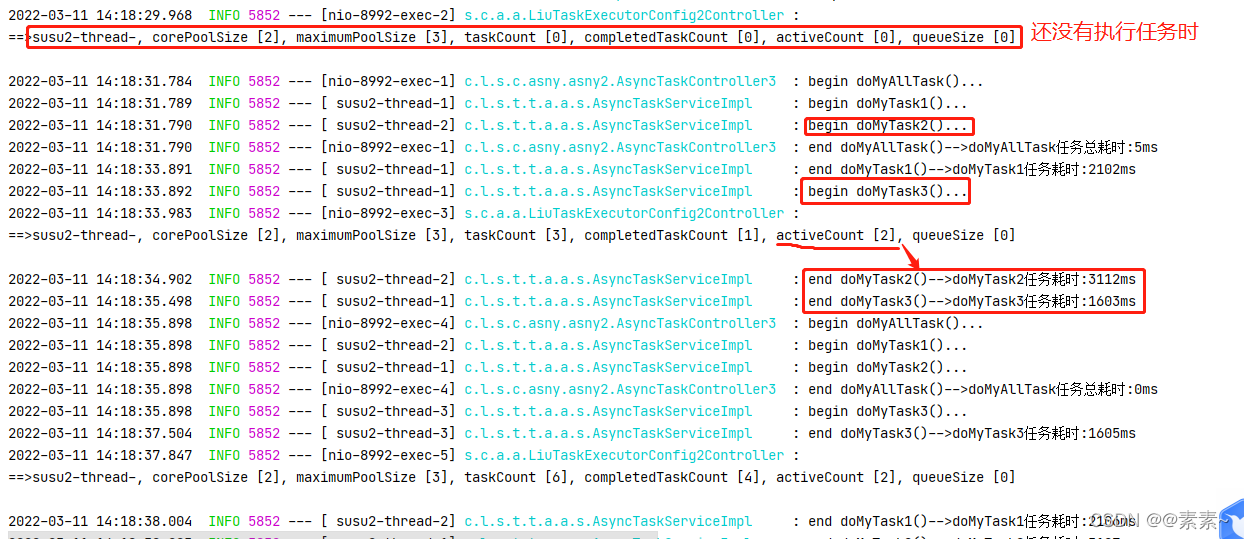
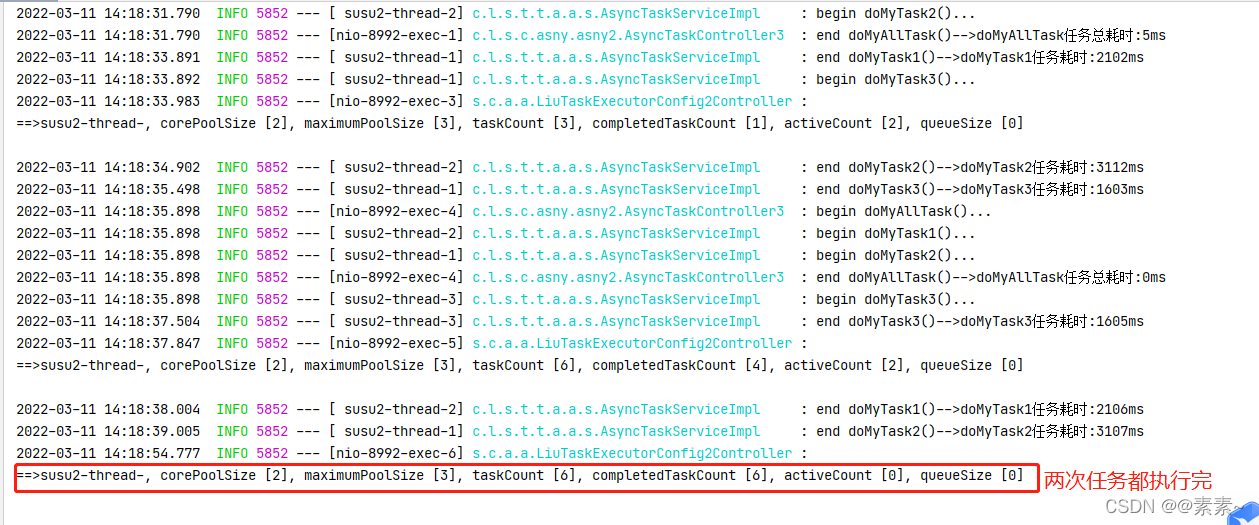
2.4.2 运行效果
- 直接给图:
2.4.3 代码
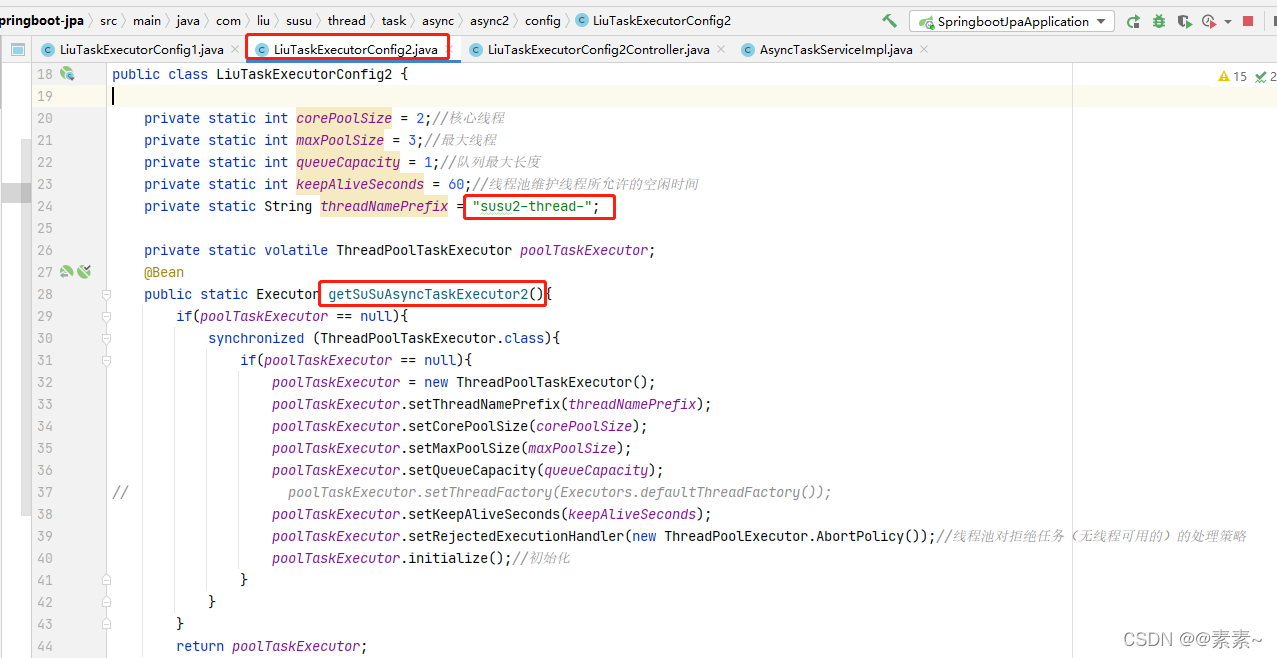
- LiuTaskExecutorConfig2.java
package com.liu.susu.thread.task.async.async2.config;import org.springframework.context.annotation.Bean;
import org.springframework.context.annotation.Configuration;
import org.springframework.scheduling.concurrent.ThreadPoolTaskExecutor;import java.util.concurrent.Executor;
import java.util.concurrent.Executors;
import java.util.concurrent.ThreadPoolExecutor;/*** @FileName LiuTaskExecutorConfig2* @Description* @Author susu* @date 2022-03-09**/
@Configuration
public class LiuTaskExecutorConfig2 {private static int corePoolSize = 2;//核心线程private static int maxPoolSize = 3;//最大线程private static int queueCapacity = 1;//队列最大长度private static int keepAliveSeconds = 60;//线程池维护线程所允许的空闲时间private static String threadNamePrefix = "susu2-thread-";private static volatile ThreadPoolTaskExecutor poolTaskExecutor;@Beanpublic static Executor getSuSuAsyncTaskExecutor2(){if(poolTaskExecutor == null){synchronized (ThreadPoolTaskExecutor.class){if(poolTaskExecutor == null){poolTaskExecutor = new ThreadPoolTaskExecutor();poolTaskExecutor.setThreadNamePrefix(threadNamePrefix);poolTaskExecutor.setCorePoolSize(corePoolSize);poolTaskExecutor.setMaxPoolSize(maxPoolSize);poolTaskExecutor.setQueueCapacity(queueCapacity);
// poolTaskExecutor.setThreadFactory(Executors.defaultThreadFactory());poolTaskExecutor.setKeepAliveSeconds(keepAliveSeconds);poolTaskExecutor.setRejectedExecutionHandler(new ThreadPoolExecutor.AbortPolicy());//线程池对拒绝任务(无线程可用的)的处理策略poolTaskExecutor.initialize();//初始化}}}return poolTaskExecutor;}}- LiuTaskExecutorConfig2Controller.java
package com.liu.susu.controller.asny.asny2;import com.liu.susu.thread.task.async.async2.config.LiuTaskExecutorConfig2;
import lombok.extern.slf4j.Slf4j;
import org.springframework.scheduling.concurrent.ThreadPoolTaskExecutor;
import org.springframework.stereotype.Controller;
import org.springframework.web.bind.annotation.RequestMapping;
import org.springframework.web.bind.annotation.ResponseBody;import java.util.concurrent.ThreadPoolExecutor;/*** @FileName PoolTestController* @Description* @Author susu* @date 2022-03-09**/
@Controller
@Slf4j
public class LiuTaskExecutorConfig2Controller {ThreadPoolTaskExecutor taskExecutor = (ThreadPoolTaskExecutor) LiuTaskExecutorConfig2.getSuSuAsyncTaskExecutor2();@ResponseBody@RequestMapping("/info")public String getThreadPoolExecutorInfo(){ThreadPoolExecutor threadPoolExecutor = taskExecutor.getThreadPoolExecutor();log.info("\n==>{}, corePoolSize [{}], maximumPoolSize [{}], " +"taskCount [{}], completedTaskCount [{}], activeCount [{}], " +"queueSize [{}]\n",taskExecutor.getThreadNamePrefix(),threadPoolExecutor.getCorePoolSize(),threadPoolExecutor.getMaximumPoolSize(),threadPoolExecutor.getTaskCount(),threadPoolExecutor.getCompletedTaskCount(),threadPoolExecutor.getActiveCount(),threadPoolExecutor.getQueue().size());return "ok";}}
2.5 小总结
导致异步失效的可能情况
- @Async、@EnableAsync 这两个注解是否缺失
@EnableAsync注解加在启动类或者异步任务类上,为了方便可以直接放到启动类上;@Async注解加在异步方法上。 - 在同一个异步任务类,如果方法 A 调用本类中其他带有 @Async 注解方法,则,方法 A 无法异步(异步失效);
但是可以调用其他异步类里的异步方法(@Async 注解方法),这种情况,异步生效。 - 任务类或配置类记得
@Component或@Configuration注解;
好了,就介绍这么多吧,公司打着酱油写作文章,惭愧呀,惭愧,嗯就这样吧,还得继续!有写的不合适的地方还需各位提出,互相交流!
3. 项目代码
down下之后,找对应的包即可:

- Csdn上项目代码:
Java多线程之定时任务 以及 SpringBoot多线程实现定时任务. - 码云上项目代码:
https://gitee.com/liuersusu/springboot_jpa. - GitHub 上项目代码:
https://github.com/liuersusu/springboot_jpa.
这篇关于SpringBoot 自定义线程池以及多线程间的异步调用(@Async、@EnableAsync)的文章就介绍到这儿,希望我们推荐的文章对编程师们有所帮助!


