本文主要是介绍使用Arduino UNO和蓝牙模块制作智能小车,希望对大家解决编程问题提供一定的参考价值,需要的开发者们随着小编来一起学习吧!
目录
概述
1 硬件结构
1.1 硬件组成
1.2 蓝牙模块介绍
1.3 控制板IO引脚定义
2 机械结构
3 固件设计
4 App设计
5 参考文献
概述
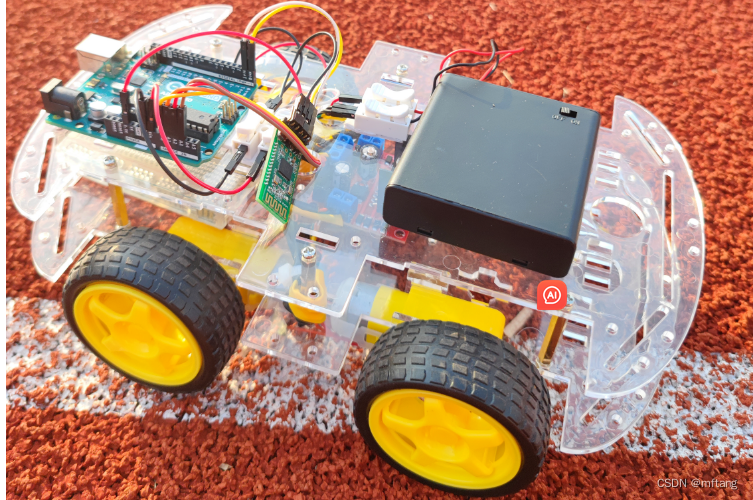
本文主要介绍使用Arduino UNO作为主板,用于控制电机和接收蓝牙模块数据。蓝牙模块用于从手机App上接收控制信号,使用L298N作为驱动板设计一台智能小车,可通过手机上的App来控制小车的运行状态。
项目代码 git 地址:Arduino_project: 基于Arduino板卡的开源项目 (gitee.com)
1 硬件结构
1.1 硬件组成
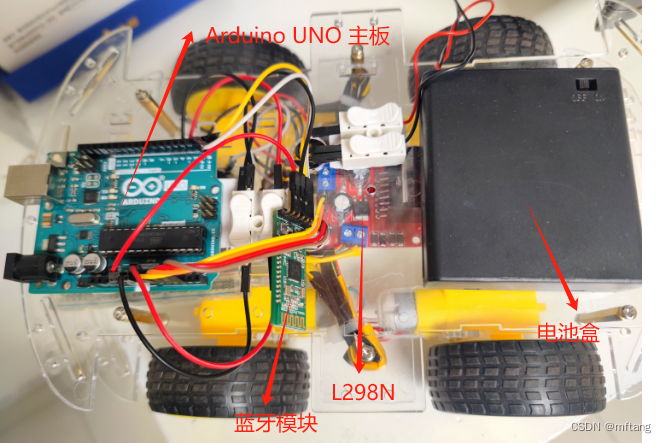
本系统硬件结构是以Arduino为主控板,蓝牙模块上RX和TX与Arduino上的TX和RX相连。L298N作为电源管理模块和驱动模块,分别为控制板、蓝牙模块提供电源。电池模块提供整个系统的工作电压,采用可充电的锂电池,单个电池电压为: 3.7V, 电池盒中总共装载4节锂电池。硬件列表如下。
| 名称 | 功能介绍 | 注释 |
| Arduino UNO | 控制板 | 处理蓝牙数据和控制电机 |
| L298N | 驱动模块 | 驱动四个电机:正转、反转、停止 |
| HC-05 蓝牙模块 | 接收/发送控信号 | 传送App发送的信号 |
| 3.7V 锂电池 | 系统供电 | 4节锂电池构成供电盒 |
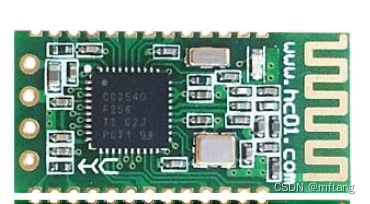
1.2 蓝牙模块介绍
HC-08蓝牙串口通信模块是新一代的基于Bluetooth Specification V4.0 BLE 蓝牙协议的数传模块。无线工作频段为 2.4GHz ISM,调制方式是 GFSK。模块最大发射功率为4dBm,接收灵敏度-93dBm,空旷环境下和 手机可以实现 80 米超远距离通信。
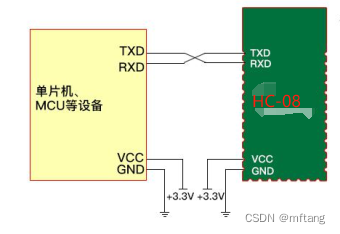
其和MCU之间通过串口通信,软件设计也简单便捷,且不需要考虑蓝牙协议栈问题,非常适合做速成产品。
蓝牙模块与MCU之间连接图:
1.3 控制板IO引脚定义
引脚功能定义如下:
| 控制板引脚 | 功能 | 介绍 |
| AI-0 | 连接控制板: IN-1 | 左侧电机控制信号引脚 |
| AI-1 | 连接控制板: IN-2 | 左侧电机控制信号引脚 |
| AI-2 | 连接控制板: IN-3 | 右侧电机控制信号引脚 |
| AI-3 | 连接控制板: IN-4 | 右侧电机控制信号引脚 |
| RX/TX | 连接HC-08蓝牙模块 TX/RX |
2 机械结构
系统采用集成底盘结构,四个电机固定在最底层底板上,L298N放在最底层的顶层板上,顶层板用于支撑控制板和电池模块。其具体框架结构如下:
3 固件设计
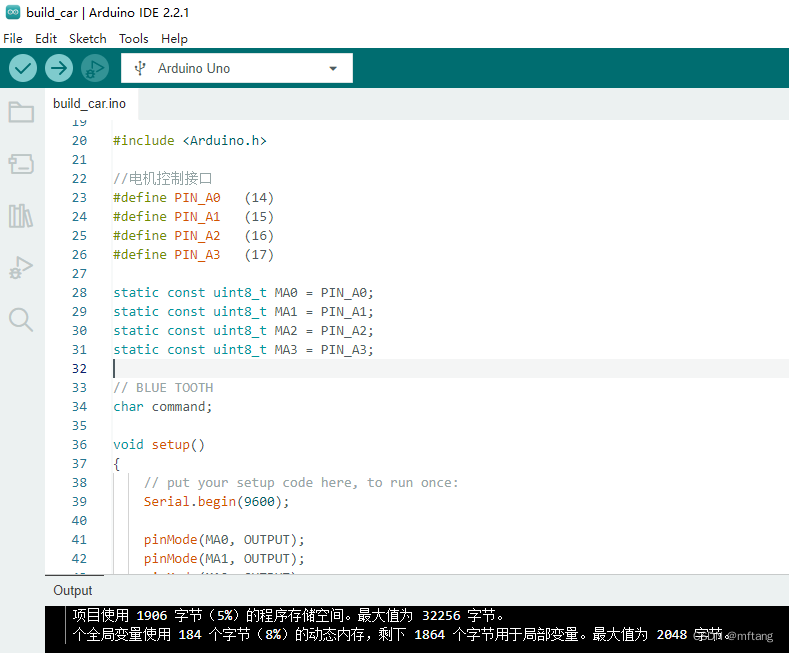
固件主要使用电机控制和蓝牙模块数据的发送和接收。其具体代码如下,工程采用Arduino IDE开发:
系统代码:
// ATMEL ATMEGA8 & 168 / ARDUINO
//
//                  +-\/-+
//            PC6  1|    |28  PC5 (AI 5)
//      (D 0) PD0  2|    |27  PC4 (AI 4)
//      (D 1) PD1  3|    |26  PC3 (AI 3)
//      (D 2) PD2  4|    |25  PC2 (AI 2)
// PWM+ (D 3) PD3  5|    |24  PC1 (AI 1)
//      (D 4) PD4  6|    |23  PC0 (AI 0)
//            VCC  7|    |22  GND
//            GND  8|    |21  AREF
//            PB6  9|    |20  AVCC
//            PB7 10|    |19  PB5 (D 13)
// PWM+ (D 5) PD5 11|    |18  PB4 (D 12)
// PWM+ (D 6) PD6 12|    |17  PB3 (D 11) PWM
//      (D 7) PD7 13|    |16  PB2 (D 10) PWM
//      (D 8) PB0 14|    |15  PB1 (D 9)  PWM
//                  +----+#include <Arduino.h>//电机控制接口
#define PIN_A0   (14)
#define PIN_A1   (15)
#define PIN_A2   (16)
#define PIN_A3   (17)static const uint8_t MA0 = PIN_A0;
static const uint8_t MA1 = PIN_A1;
static const uint8_t MA2 = PIN_A2;
static const uint8_t MA3 = PIN_A3;// BLUE TOOTH
char command;void setup()
{// put your setup code here, to run once:Serial.begin(9600);pinMode(MA0, OUTPUT);pinMode(MA1, OUTPUT);pinMode(MA2, OUTPUT);pinMode(MA3, OUTPUT);
}void loop()
{while(Serial.available()){command =Serial.read();switch(command ){case 0x18:    //前进digitalWrite(MA0, LOW);digitalWrite(MA1, HIGH);digitalWrite(MA2, LOW);digitalWrite(MA3, HIGH);break;case 0x52:    //后退digitalWrite(MA0, HIGH);digitalWrite(MA1, LOW);digitalWrite(MA2, HIGH);digitalWrite(MA3, LOW);break;case 0x08:    // 左转digitalWrite(MA0, HIGH);digitalWrite(MA1, LOW);digitalWrite(MA2, LOW);digitalWrite(MA3, HIGH);break;case 0x5a:     //右转digitalWrite(MA0, LOW);digitalWrite(MA1, HIGH);digitalWrite(MA2, HIGH);digitalWrite(MA3, LOW);break;case 0x45: default:digitalWrite(MA0, LOW);digitalWrite(MA1, LOW);digitalWrite(MA2, LOW);digitalWrite(MA3, LOW);break;        }}
}
4 App设计
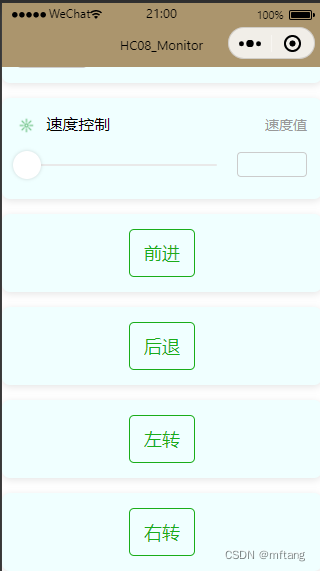
使用微信小程序开发App,其特点是集成在微信App内,不用单独安装,搜索到该App既可以使用。该程序主要实现4个按钮,实现小车前进、后退、左转、右转功能。
App UI:
开发工具:
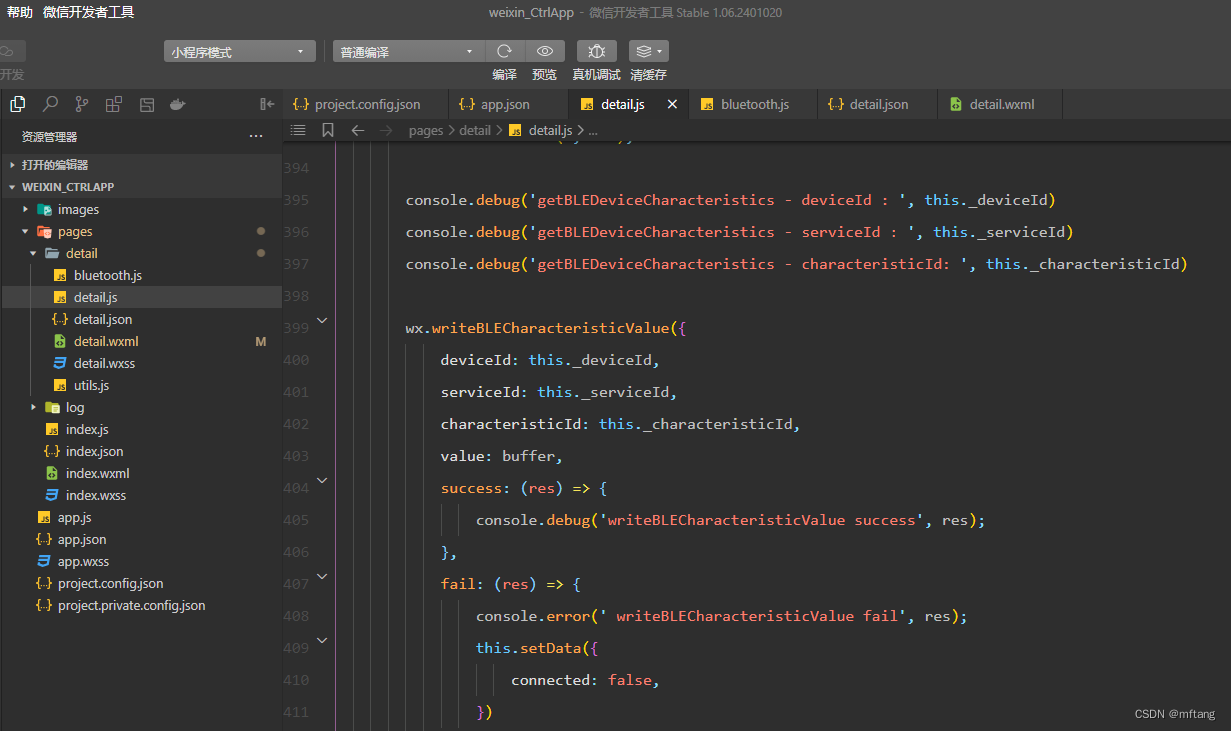
核心代码如下:
const utils = require('utils.js')
const ble = require('bluetooth.js')
Page({/*** 页面的初始数据*/data: {pageload: false,connected: false,send_hex: false,send_string: true,send_string_val: 'Hex',recv_string: true,recv_string_val: 'Hex',recv_value: '',send_number: 0,recv_number: 0,recv_hex: true,try_cnt:0,deviceArray: []},/*** 生命周期函数--监听页面加载*/onLoad: function (options) {var that = this; console.log(options);this.setData({pageload:true,connected: false,deviceId: options.id,try_cnt:0,deviceName: options.name});console.log("detail:  onLoad");wx.stopBluetoothDevicesDiscovery({success: function (res) {console.log('停止搜索设备', res)}})that.closeBLEConnection(that.data.deviceId);that.createBLEConnection(that.data.deviceId, that.data.deviceName); }, onHide () {var that = this;// Do something when hide.// 断开连接console.log("detail:  onHide");},onShow:function(){      // var that = this; // connect bluetooth// that.closeBLEConnection(that.data.deviceId);// that.createBLEConnection(that.data.deviceId, that.data.deviceName); },onUnload() {var that = this;this.setData({pageload:true,connected: false,try_cnt:0,});console.log("page:  onUnload  ");that.offBLEMonitor();that.closeBLEConnection(that.data.deviceId);that.closeBluetoothAdapter();wx.showToast({title: '断开蓝牙',icon: 'success',duration: 2000})  },DisConnectTap:function(){var that = this;that.setData({pageload:true,connected: false,try_cnt:0,});ble.openBluetoothAdapter(that.data.deviceId, that.data.deviceName);that.createBLEConnection(that.data.deviceId, that.data.deviceName); },RecvCleanTap: function () {this.setData({recv_value: '',recv_number: 0});},  /*** 创建连接* @param {*} deviceId * @param {*} name */createBLEConnection(deviceId, name) {wx.createBLEConnection({deviceId,  success: (res) => {console.log('createBLEConnection - success: ', res)this.getBLEDeviceServices(deviceId)              },fail: (res) => {console.error('createBLEConnection - fail: ', res)if(res.errCode == 10006 ){this.createBLEConnection(deviceId, name)}else{ble.openBluetoothAdapter(deviceId, name)this.createBLEConnection(deviceId, name)}this.setData({connected: false,})               } })},getBLEDeviceServices(deviceId) {var that = this;wx.getBLEDeviceServices({deviceId,success: (res) => {console.log('getBLEDeviceServices - success: ', res)for (let i = 0; i < res.services.length; i++) {var ergodic_UUID =res.services[i].uuid;      //取出服务里面的UUIDvar UUID_slice = ergodic_UUID.slice(4, 8);   //截取4到8位console.log('getBLEDeviceServices, service ID =  ', res.services[i].uuid);if ( res.services[i].isPrimary && (UUID_slice == "FFE0") ) {that.setData({serviceId: res.services[i].uuid,});break;}}wx.getConnectedBluetoothDevices({services: res.services,success: (res) => {                         console.log("getConnectedBluetoothDevices - success:  " +  res)},fail: (res) => {console.error('getConnectedBluetoothDevices - fail: ', res)ble.openBluetoothAdapter(deviceId, that.data.deviceName)}                    })that.getBLEDeviceCharacteristics(deviceId, that.data.serviceId);},fail: (res) => {console.error('getBLEDeviceServices - fail: ', res)// try it againble.openBluetoothAdapter(deviceId, that.data.deviceName)that.monitor_connected();} });},getBLEDeviceCharacteristics(deviceId, serviceId) {var that = this;let falg = false;wx.getBLEDeviceCharacteristics({deviceId,serviceId,success: (res) => {that.setData({connected: true,})                console.log('getBLEDeviceCharacteristics success', res.characteristics)for (let i = 0; i < res.characteristics.length; i++) {let item = res.characteristics[i]console.log('getBLEDeviceCharacteristics, Characteristics ID =  ', item.uuid)// 该特征值:可读if (item.properties.read) {wx.readBLECharacteristicValue({deviceId,serviceId,characteristicId: item.uuid,})}// 该特征值:可写if (item.properties.write) {this.setData({canWrite: true})this._deviceId = deviceIdthis._serviceId = serviceIdthis._characteristicId = item.uuidthis.writeValue()}if (item.properties.notify || item.properties.indicate) {that.setData({characteristicId: item.uuid});falg = true;break;}}if( falg ){console.debug('getBLEDeviceCharacteristics - deviceId : ', deviceId)console.debug('getBLEDeviceCharacteristics - serviceId : ', serviceId)console.debug('getBLEDeviceCharacteristics - characteristicId: ', that.data.characteristicId)// read device character value that.readBLECharacteristicValue(deviceId, serviceId, that.data.characteristicId)   that.notifyBLECharacteristicValueChange(deviceId, serviceId, that.data.characteristicId) }},fail: (res) => {console.error('getBLEDeviceCharacteristics -- fail: ', res)this.setData({connected: false,})if (res.errCode === 10006){that.offBLEMonitor();that.createBLEConnection(deviceId, that.data.deviceName); }}})},readBLECharacteristicValue(deviceId,serviceId, characteristicId ){wx.readBLECharacteristicValue({// 这里的 deviceId 需要已经通过 createBLEConnection 与对应设备建立链接deviceId,// 这里的 serviceId 需要在 getBLEDeviceServices 接口中获取serviceId,// 这里的 characteristicId 需要在 getBLEDeviceCharacteristics 接口中获取characteristicId,success (res) {console.log('readBLECharacteristicValue:', res.errCode)}})},notifyBLECharacteristicValueChange(deviceId,serviceId, characteristicId ){var that = this;wx.notifyBLECharacteristicValueChange({state: true,    // enable notifydeviceId,serviceId,characteristicId,success: (res) => {console.info('notifyBLECharacteristicValueChange success: ', res.errMsg)// read data here // 操作之前先监听,保证第一时间获取数据wx.onBLECharacteristicValueChange(function(res) {that.data.connected = true; console.info('onBLECharacteristicValueChange', res);console.info(`characteristic ${res.characteristicId} has changed, now is ${res.value}`);var result = res.value;var hex = utils.buf2hex(result);var _hex_ss =  utils.hex2string(hex);console.info("hex: " + hex);console.info("string: " + _hex_ss);var recv_number_1 = that.data.recv_number + _hex_ss.length / 2;var recv_number = Math.round(recv_number_1);that.setData({recv_number: recv_number,recv_value: that.data.recv_value + _hex_ss,});let _ss = that.data.recv_valueif( _ss.includes("TM(C):") && _ss.includes("HM:") && _ss.includes("\n")){let buff =  _ss.split(' ')console.log( _ss )console.log(buff)that.data.recv_value = "";that.data.recv_number = 0;that.setData({temphtValue: buff[2],humidityValue: buff[4],});}      that.monitor_connected();})                                 },fail: (res) => {console.error('notifyBLECharacteristicValueChange fail: ', res)that.monitor_connected();}})    },monitor_connected_action(){var that = this;let deviceId = that.data.deviceId;wx.onBLEConnectionStateChange(function(res) {// 该方法回调中可以用于处理连接意外断开等异常情况console.log( "onBLEConnectionStateChange ----- " +  `device ${res.deviceId} state has changed, connected: ${res.connected}`)if( res.deviceId == deviceId && res.connected == false ){    wx.closeBLEConnection({deviceId,success: (res) => {console.debug('detail: closeBLEConnection success', res);  that.offBLEMonitor();that.createBLEConnection(deviceId, that.data.deviceName); },fail: (res) => {                     console.error('detail: closeBLEConnection fail', res);  if (res.errCode === 10006) {that.offBLEMonitor();that.createBLEConnection(deviceId, that.data.deviceName); }}})that.setData({try_cnt: that.data.try_cnt + 1,})}else{that.data.try_cnt  = 0;}})   },monitor_connected(){var that = this;setTimeout(that.monitor_connected_action, 200);},writeValue( val ) {// 向蓝牙设备发送一个0x00的16进制数据let buffer = new ArrayBuffer(1);let dataView = new DataView(buffer);dataView.setUint8(0, val);console.debug('getBLEDeviceCharacteristics - deviceId : ', this._deviceId)console.debug('getBLEDeviceCharacteristics - serviceId : ', this._serviceId)console.debug('getBLEDeviceCharacteristics - characteristicId: ', this._characteristicId)wx.writeBLECharacteristicValue({deviceId: this._deviceId,serviceId: this._serviceId,characteristicId: this._characteristicId,value: buffer,success: (res) => {console.debug('writeBLECharacteristicValue success', res);  },fail: (res) => {console.error(' writeBLECharacteristicValue fail', res);  this.setData({connected: false,}) }})},closeBluetoothAdapter() {wx.closeBluetoothAdapter({           success (res) {console.log(res)}        })this.setData({connected: false,}),         this._discoveryStarted = false},closeBLEConnection( deviceId ) {wx.closeBLEConnection({deviceId,success: (res) => {console.debug('detail: closeBLEConnection success', res);  },fail: (res) => {console.error('detail: closeBLEConnection fail', res);  }})this.setData({connected: false,canWrite: false,})},run_up:function(){var that = this;var val = 0x18 ;      that.writeValue( val );   }, run_down:function(){var that = this;var val = 0x52;      that.writeValue( val );   },run_left:function(){var that = this;var val = 0x08;      that.writeValue( val );   },run_right:function(){var that = this;var val = 0x5a;      that.writeValue( val );   },whiteLightValueSliderChange:function(e){var that = this;// 向蓝牙设备发送一个0x00的16进制数据var val = Math.random() * 255 | 0;      that.writeValue( val );   },offBLEMonitor(){this.setData({connected: false,}), wx.offBLEPeripheralConnectionStateChanged();wx.offBLEConnectionStateChange();wx.offBLECharacteristicValueChange();wx.offBLEMTUChange();}
})
5 参考文献
1)使用Arduino UNO硬件平台制作智能小车-CSDN博客
2)汇承HC-08蓝牙串口模块使用规格书(含指令集).pdf
3)概览 | 微信开放文档 (qq.com)
4)Arduino 实验室 – Arduino中文站,提供丰富的Arduino教程和DIY资讯 (nxez.com)
这篇关于使用Arduino UNO和蓝牙模块制作智能小车的文章就介绍到这儿,希望我们推荐的文章对编程师们有所帮助!


