本文主要是介绍spring-security入门demo(二),用户名、密码、角色查询数据库获得,希望对大家解决编程问题提供一定的参考价值,需要的开发者们随着小编来一起学习吧!
上一篇中,我们通过编程的方式,在代码中写死了用户名、密码等信息,这种方式在实际使用中是很不方便的,那么如何关联上mysql查询用户名、密码呢?这章我们就来说说这个问题
1.准备工作
1.1.创建数据库、表
SET NAMES utf8mb4;
SET FOREIGN_KEY_CHECKS = 0;-- ----------------------------
-- Table structure for t_account
-- ----------------------------
DROP TABLE IF EXISTS `t_account`;
CREATE TABLE `t_account`  (`id` int(0) NOT NULL AUTO_INCREMENT,`account` varchar(255) CHARACTER SET utf8 COLLATE utf8_general_ci DEFAULT NULL,`password` char(255) CHARACTER SET utf8 COLLATE utf8_general_ci DEFAULT NULL,`role_id` int(0) NOT NULL,PRIMARY KEY (`id`) USING BTREE
) ENGINE = InnoDB CHARACTER SET = utf8 COLLATE = utf8_general_ci ROW_FORMAT = Dynamic;-- ----------------------------
-- Records of t_account  插入两条记录,密码都是123456
-- ----------------------------
INSERT INTO `t_account` VALUES (1, 'test1', 'e10adc3949ba59abbe56e057f20f883e', 1);
INSERT INTO `t_account` VALUES (2, 'why', 'e10adc3949ba59abbe56e057f20f883e', 2);-- ----------------------------
-- Table structure for t_role
-- ----------------------------
DROP TABLE IF EXISTS `t_role`;
CREATE TABLE `t_role`  (`id` int(0) NOT NULL,`role_name` varchar(255) CHARACTER SET utf8 COLLATE utf8_general_ci NOT NULL,`role_desc` varchar(255) CHARACTER SET utf8 COLLATE utf8_general_ci NOT NULL,PRIMARY KEY (`id`) USING BTREE
) ENGINE = InnoDB CHARACTER SET = utf8 COLLATE = utf8_general_ci ROW_FORMAT = Dynamic;
-- ----------------------------
-- Records of t_role 插入两个角色用于测试
-- ----------------------------
INSERT INTO `t_role` VALUES (1, '省级管理员', '省级管理员');
INSERT INTO `t_role` VALUES (2, '普通管理员', '普通管理员');
1.2.准备相应的jar包
mysql 驱动包
druid 数据库连接池包
spring-boot 依赖包
spring-security 依赖包
spring-web 依赖包
fastjson 依赖包
--- 这些jar 我们将通过maven工具导入
2.具体操作
2.1目录结构

2.1编写pom文件
<?xml version="1.0" encoding="UTF-8"?>
<project xmlns="http://maven.apache.org/POM/4.0.0" xmlns:xsi="http://www.w3.org/2001/XMLSchema-instance"xsi:schemaLocation="http://maven.apache.org/POM/4.0.0 https://maven.apache.org/xsd/maven-4.0.0.xsd"><modelVersion>4.0.0</modelVersion><parent><groupId>org.springframework.boot</groupId><artifactId>spring-boot-starter-parent</artifactId><version>2.6.3</version><relativePath/> <!-- lookup parent from repository --></parent><groupId>com.nxt.hy</groupId><artifactId>springsecuritytest03</artifactId><version>0.0.1-SNAPSHOT</version><name>springsecuritytest03</name><description>Demo project for Spring Boot</description><properties><java.version>1.8</java.version></properties><dependencies><dependency><groupId>org.springframework.boot</groupId><artifactId>spring-boot-starter-web</artifactId></dependency><dependency><groupId>org.springframework.boot</groupId><artifactId>spring-boot-starter-security</artifactId></dependency><dependency><groupId>mysql</groupId><artifactId>mysql-connector-java</artifactId><scope>runtime</scope></dependency><dependency><groupId>org.projectlombok</groupId><artifactId>lombok</artifactId><optional>true</optional></dependency><!-- 阿里数据库连接池 --><dependency><groupId>com.alibaba</groupId><artifactId>druid-spring-boot-starter</artifactId><version>1.2.6</version></dependency><dependency><groupId>org.mybatis.spring.boot</groupId><artifactId>mybatis-spring-boot-starter</artifactId><version>2.2.2</version></dependency><!-- 阿里JSON解析器 --><dependency><groupId>com.alibaba</groupId><artifactId>fastjson</artifactId><version>1.2.76</version></dependency></dependencies><build><plugins><plugin><groupId>org.springframework.boot</groupId><artifactId>spring-boot-maven-plugin</artifactId></plugin></plugins></build>
</project>
2.2 编写配置文件yml,主要是数据库连接配置
mybatis:configuration:log-impl: org.apache.ibatis.logging.stdout.StdOutImpl
spring:datasource:name: druidtype: com.alibaba.druid.pool.DruidDataSourcedruid:driver-class-name: com.mysql.jdbc.Driverurl: jdbc:mysql://localhost:3306/springtest?useUnicode=true&characterEncoding=UTF-8username: rootpassword: 123456
2.3 编写核心配置类
package com.nxt.hy.springsecuritytest03.config;import com.nxt.hy.springsecuritytest03.auth.MyAuthenticationProvider;
import com.nxt.hy.springsecuritytest03.service.MyUserDetailService;
import org.springframework.beans.factory.annotation.Autowired;
import org.springframework.context.annotation.Bean;
import org.springframework.context.annotation.Configuration;
import org.springframework.security.config.annotation.authentication.builders.AuthenticationManagerBuilder;
import org.springframework.security.config.annotation.web.builders.HttpSecurity;
import org.springframework.security.config.annotation.web.builders.WebSecurity;
import org.springframework.security.config.annotation.web.configuration.WebSecurityConfigurerAdapter;
import org.springframework.security.crypto.password.NoOpPasswordEncoder;
import org.springframework.security.crypto.password.PasswordEncoder;/*** @author wang'hai'yang* @Description:* @date 2022/2/1610:01*/
@Configuration
public class MySecurityConfig extends WebSecurityConfigurerAdapter {@AutowiredMyUserDetailService userDetailsService;@AutowiredMyAuthenticationProvider authenticationProvider;@Beanpublic PasswordEncoder passwordEncoder(){//暂时不加密,要加密的话,可以return new BCryptPasswordEncoder();return NoOpPasswordEncoder.getInstance();}@Overridepublic void configure(WebSecurity web) throws Exception {//放行静态资源web.ignoring().antMatchers("/js/**", "/css/**","/images/**");}@Overrideprotected void configure(HttpSecurity http) throws Exception {http.authorizeRequests()  //允许基于使用HttpServletRequest限制访问//所有请求都需要认证.anyRequest().authenticated().and()//表单登录.formLogin()//登录页面和处理接口.loginPage("/login.html")
//                .loginProcessingUrl("/login")
//                认证成功处理地址.successForwardUrl("/login/index.html")
//                认证失败处理地址.failureForwardUrl("/login/error.html").permitAll().and()//关闭跨站请求伪造的防护,这里是为了前期开发方便.csrf().disable();}@Overrideprotected void configure(AuthenticationManagerBuilder auth) throws Exception {
//        设置用户名 、角色 查询逻辑auth.userDetailsService(userDetailsService);
//        设置自定义校验逻辑auth.authenticationProvider(authenticationProvider);}
}
2.4 编写认证处理类
package com.nxt.hy.springsecuritytest03.auth;import com.nxt.hy.springsecuritytest03.service.MyUserDetailService;
import com.nxt.hy.springsecuritytest03.sign.MD5;
import org.springframework.beans.factory.annotation.Autowired;
import org.springframework.security.authentication.AuthenticationProvider;
import org.springframework.security.authentication.UsernamePasswordAuthenticationToken;
import org.springframework.security.core.Authentication;
import org.springframework.security.core.AuthenticationException;
import org.springframework.security.core.userdetails.UserDetails;
import org.springframework.stereotype.Component;/*** @author wang'hai'yang* @Description:认证是由 AuthenticationManager 来管理的,但是真正进行认证的是 AuthenticationManager 中定义的 AuthenticationProvider。AuthenticationManager 中可以定义有多个 AuthenticationProvider。当我们使用 authentication-provider 元素来定义一个 AuthenticationProvider 时,如果没有指定对应关联的 AuthenticationProvider 对象,Spring Security 默认会使用 DaoAuthenticationProvider。DaoAuthenticationProvider 在进行认证的时候需要一个 UserDetailsService 来获取用户的信息 UserDetails,其中包括用户名、密码和所拥有的权限等。所以如果我们需要改变认证的方式,我们可以实现自己的 AuthenticationProvider;如果需要改变认证的用户信息来源,我们可以实现 UserDetailsService。实现了自己的 AuthenticationProvider 之后,我们可以在配置文件中这样配置来使用我们自己的 AuthenticationProvider。其中 MyAuthenticationProvider  就是我们自己的 AuthenticationProvider 实现类对应的 bean。* @date 2022/2/1917:10*/
@Component
public class MyAuthenticationProvider implements AuthenticationProvider {@AutowiredMyUserDetailService userDetailsService;@Overridepublic Authentication authenticate(Authentication authentication) throws AuthenticationException {String username = authentication.getName();String password = authentication.getCredentials().toString();UserDetails userDetails = userDetailsService.loadUserByUsername(username);if(MD5.md5(password).equals(userDetails.getPassword())){return new UsernamePasswordAuthenticationToken(username,password,userDetails.getAuthorities());}return null;}/*** description: 要保证这个方法返回true* @author:  wang'hai'yang* @param:      * @return:  * @date:    2022/2/19 17:29*/@Overridepublic boolean supports(Class<?> authentication) {return UsernamePasswordAuthenticationToken.class.equals(authentication);}
}
2.5 编写用户信息处理类
package com.nxt.hy.springsecuritytest03.service;import com.nxt.hy.springsecuritytest03.domain.Role;
import com.nxt.hy.springsecuritytest03.domain.User;
import org.springframework.beans.factory.annotation.Autowired;
import org.springframework.security.core.GrantedAuthority;
import org.springframework.security.core.authority.SimpleGrantedAuthority;
import org.springframework.security.core.userdetails.UserDetails;
import org.springframework.security.core.userdetails.UserDetailsService;
import org.springframework.security.core.userdetails.UsernameNotFoundException;
import org.springframework.stereotype.Service;import java.util.ArrayList;
import java.util.List;/*** @author wang'hai'yang* @Description: DaoAuthenticationProvider 在进行认证的时候需要一个 UserDetailsService 来获取用户的信息 UserDetails,其中包括用户名、密码和所拥有的权限等* @date 2022/2/1915:01*/
@Service
public class MyUserDetailService implements UserDetailsService {@AutowiredRoleMapper roleMapper;@AutowiredUserMapper userMapper;@Overridepublic UserDetails loadUserByUsername(String username) throws UsernameNotFoundException {User loginUser = userMapper.selectUserByAccount(username);System.out.println(loginUser.getUsername() +" : username");List<Role> roles = roleMapper.getRolesByUsername(username);List<GrantedAuthority> authorities = new ArrayList<>();for (int i = 0; i < roles.size(); i++) {authorities.add(new SimpleGrantedAuthority("ROLE_"+roles.get(i).getName()));}loginUser.setAuthorities(authorities);return loginUser;}
}
2.6 编写查询Mapper接口
package com.nxt.hy.springsecuritytest03.service;import com.nxt.hy.springsecuritytest03.domain.User;
import org.apache.ibatis.annotations.Mapper;
import org.apache.ibatis.annotations.Select;/*** @author wang'hai'yang* @Description:* @date 2022/2/816:36*/
@Mapper
public interface UserMapper {@Select("select id ,account username ,password from t_account where account = #{account}")public User selectUserByAccount(String account);@Select("select id ,account username ,password from t_account where account = #{account} and password =#{password}")public User selectUserByPassword(String account, String password);
}package com.nxt.hy.springsecuritytest03.service;import com.nxt.hy.springsecuritytest03.domain.Role;
import org.apache.ibatis.annotations.Mapper;
import org.apache.ibatis.annotations.Param;
import org.apache.ibatis.annotations.Select;import java.util.List;/*** @author wang'hai'yang* @Description:* @date 2022/2/1915:36*/
@Mapper
public interface RoleMapper {@Select("select r.role_name,r.id from t_role  r,t_account a where r.id = a.role_id and account = #{username}")List<Role> getRolesByUsername(@Param("username") String username);}
2.7 编写认证成功或者失败处理URL
package com.nxt.hy.springsecuritytest03.controller;import com.nxt.hy.springsecuritytest03.utils.Message;
import org.springframework.web.bind.annotation.RequestMapping;
import org.springframework.web.bind.annotation.RestController;/*** @author wang'hai'yang* @Description:* @date 2022/1/1915:14*/
@RestController
public class LoginController {/*** description: 认证成功处理逻辑* @author:  wang'hai'yang* @param:      * @return:  * @date:    2022/2/22 11:32*/@RequestMapping("/login/index.html")public String index(){return Message.success();}/*** description:  认证失败处理逻辑* @author:  wang'hai'yang* @param:      * @return:  * @date:    2022/2/22 11:32*/@RequestMapping("/login/error.html")public String error(){return Message.error();}
}
2.7 启动类
package com.nxt.hy.springsecuritytest03;import org.springframework.boot.SpringApplication;
import org.springframework.boot.autoconfigure.SpringBootApplication;@SpringBootApplication
public class Springsecuritytest03Application {public static void main(String[] args) {SpringApplication.run(Springsecuritytest03Application.class, args);}}
2.8 大功告成
运行启动类,访问 http://localhost:8080/login.html,显示如图

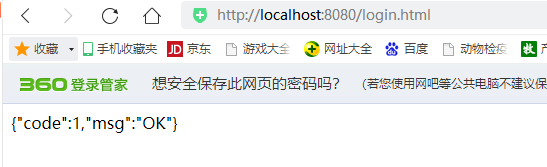
输入用户名test1,密码123456,显示如图:
这篇关于spring-security入门demo(二),用户名、密码、角色查询数据库获得的文章就介绍到这儿,希望我们推荐的文章对编程师们有所帮助!


