#coding=utf-8
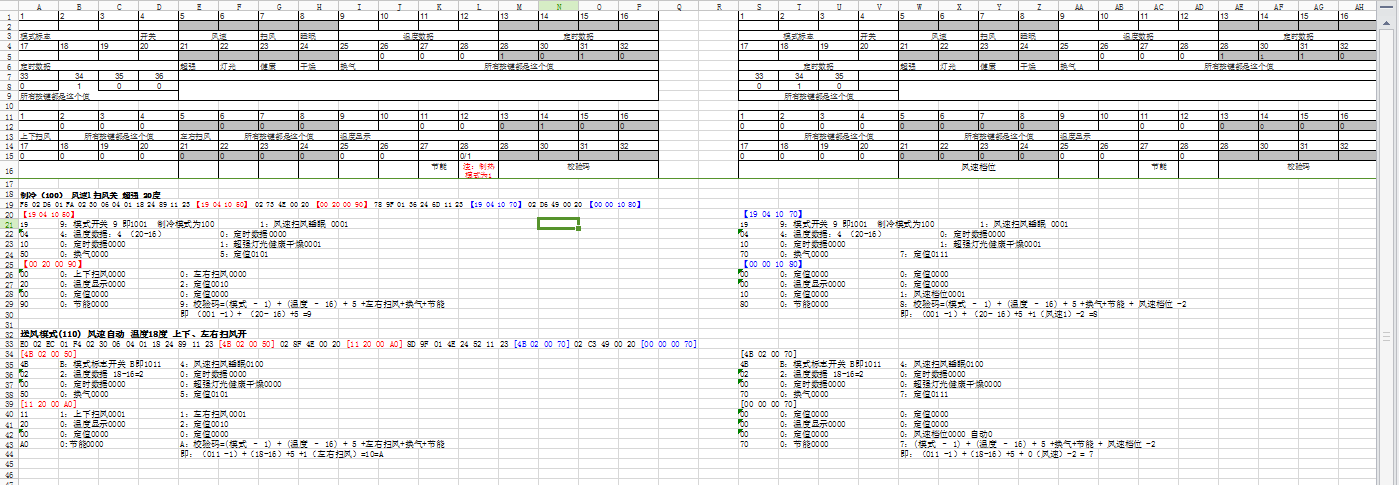
#说明:格力空调红外拼码Python脚本程序
#对应的码库为格力9,inst值:100032
startLevel = (9000,4500) #起始码
linkLevel = (550,20000) #连接码
lowLevel = (550,550) #低电平
highLevel = (550,1660) #高电平
#模式标志
modeFlag = 4
def modeCodeFunc(m):
global modeFlag
modeCode = (lowLevel+lowLevel+lowLevel, #自动
highLevel+lowLevel+lowLevel, #制冷
lowLevel+highLevel+lowLevel, #加湿
highLevel+highLevel+lowLevel,#送风
lowLevel+lowLevel+highLevel) #制热
if m > modeCode.__len__()-1:
print "模式参数必须小于" +str(modeCode.__len__())
return modeCode[0]
modeFlag = m
return modeCode[m]
#开关
keyFlag = 0
def keyCodeFunc(k):
global keyFlag
keyCode = (lowLevel, #关
highLevel) #开
keyFlag = k
return keyCode[k]
#风速
fanSpeedFlag =0
def fanSpeedCodeFunc(f):
global fanSpeedFlag
fanSpeedCode = (lowLevel+lowLevel, #自动
highLevel+lowLevel, #一档
lowLevel+highLevel, #二档
highLevel+highLevel) #三档
if f>fanSpeedCode.__len__()-1:
print "风速参数必须小于"+str(fanSpeedCode.__len__())
return fanSpeedCode[0]
fanSpeedFlag = f
return fanSpeedCode[f]
#扫风
#fanScanFlag = 0
def fanScanCodeFunc(f):
fanScanCode = (lowLevel,highLevel)
fanScanFlag = f
if f>fanScanCode.__len__()-1:
print "扫风参数必须小于"+str(fanScanCode.__len__())
return fanScanCode[0]
return fanScanCode[f]
def getSleepCode(s):
sleepCode = (lowLevel,highLevel)
if s>sleepCode.__len__()-1:
print "睡眠参数必须小于"+str(sleepCode.__len__())
return sleepCode[0]
return sleepCode[s]
tempFlag = 16
def tempertureCodeFunc(t):
global tempFlag
tempFlag = t
tempCode = ()# lowLevel+lowLevel+lowLevel+lowLevel
dat = t - 16
#print dat
print bin(dat)
for i in range(0, 4, 1):
x = dat & 1
#print x,
if x == 1:
tempCode += highLevel
elif x == 0:
tempCode += lowLevel
dat = dat >> 1
return tempCode
#定时数据
def getTimerCode():
timerCode = lowLevel+lowLevel+lowLevel+lowLevel+\
lowLevel+lowLevel+lowLevel+lowLevel
return timerCode
#超强、灯光、健康、干燥、换气
def getOtherCode(strong, light, health, dry, breath):
otherFuncCode = ()
if True==strong:
otherFuncCode = highLevel
else:
otherFuncCode = lowLevel
if True==light:
otherFuncCode += highLevel
else:
otherFuncCode += lowLevel
if True==health:
otherFuncCode += highLevel
else:
otherFuncCode += lowLevel
if True==dry:
otherFuncCode += highLevel
else:
otherFuncCode += lowLevel
if True==breath:
otherFuncCode += highLevel
else:
otherFuncCode += lowLevel
return otherFuncCode
#前35位结束码后七位结束码
#所有按键都是
#000 1010
def getFirstCodeEnd():
firstCodeEnd = lowLevel+lowLevel+lowLevel+highLevel+lowLevel+highLevel+lowLevel
return firstCodeEnd
#连接码
def getLinkCode():
linkCode = lowLevel+highLevel+lowLevel+linkLevel
return linkCode
#上下扫风
fanUpAndDownFlag = 1;
fanLeftAndRightFlag = 1;
def fanUpAndDownCodeFunc(f):
global fanUpAndDownFlag
fanUpAndDownCode = (lowLevel+lowLevel+lowLevel+lowLevel,
highLevel+lowLevel+lowLevel+lowLevel)
fanUpAndDownFlag = f
fanScanCodeFunc(fanUpAndDownFlag or fanLeftAndRightFlag)
return fanUpAndDownCode[f]
#左右扫风
def fanLeftAndRightCodeFunc(f):
global fanLeftAndRightFlag
fanLeftAndRightCode =(lowLevel+lowLevel+lowLevel+lowLevel,
highLevel+lowLevel+lowLevel+lowLevel)
fanLeftAndRightFlag = f
fanScanCodeFunc(fanUpAndDownFlag or fanLeftAndRightFlag)
return fanLeftAndRightCode[f]
#0000
#0100
#0000
#0000
#0000
def getOtherFunc2():
otherFunc2 = lowLevel+lowLevel+lowLevel+lowLevel
otherFunc2 += lowLevel+highLevel+lowLevel+lowLevel
otherFunc2+= lowLevel+lowLevel+lowLevel+lowLevel+\
lowLevel+lowLevel+lowLevel+lowLevel+\
lowLevel+lowLevel+lowLevel+lowLevel
return otherFunc2
def getCheckoutCode():
#校验码 = (模式 – 1) + (温度 – 16) + 5 + 左右扫风 + 换气 + 节能 - 开关
# 取二进制后四位,再逆序
dat = (modeFlag - 1) + (tempFlag - 16) + 5 + fanLeftAndRightFlag + 0 + 0 - keyFlag
print(dat)
code = ()
for i in range(0, 4, 1):
x = dat & 1
if 1 == x:
code += highLevel
elif 0 == x:
code += lowLevel
dat = dat >> 1
#print code
return code
def getSecondCodeEnd():
secondCodeEnd = (550,40000)
return secondCodeEnd
if __name__ == "__main__":
print("格力空调遥控器红外编码-长码")
print("100032-格力9")
code = startLevel #起始码
code += modeCodeFunc(1) #模式:0自动,1制冷,2加湿,3送风,4加热
code += keyCodeFunc(1) #开关:0关,1开
code += fanSpeedCodeFunc(0) #风速:0自动,1一档,2二档,3三档
code += fanScanCodeFunc(0) #扫风:0关,1开-设置上下扫风和左右扫风的时候会自动设置为1
code += getSleepCode(0) #睡眠
code += tempertureCodeFunc(16) #温度
code += getTimerCode() #定时
code += getOtherCode(False,True,False,False,False) #其他-超强、灯光、健康、干燥、换气
code += getFirstCodeEnd() #剩余的编码
code += getLinkCode() #连接码
code += fanUpAndDownCodeFunc(0) #上下扫风
code += fanLeftAndRightCodeFunc(1) #左右扫风
code += getOtherFunc2() #固定码
code += getCheckoutCode() #校验码
code += getSecondCodeEnd() #结束码
print "电平码:"
print code


