本文主要是介绍包教包会,一步步封装实现自己的网络请求框架 1.0,希望对大家解决编程问题提供一定的参考价值,需要的开发者们随着小编来一起学习吧!
一、前言
现如今 Android 领域流行的网络请求框架基本都是用 Retrofit 加 RxJava 来搭配构建的,而以 ViewModel + LiveData + Retrofit + RxJava 来构建请求框架的例子要相对少得多。而本文就是以这四者作为基础组件,介绍如何一步步封装实现自己的网络请求框架(本文实现的例子不仅仅只是一个网络请求框架,同时也是在介绍应用的架构模式),希望对你有所帮助
目前已实现的功能或者说特色包含以下几点:
1、网络请求结果基于观察者模式进行传递,回调操作与 UI 层的生命周期相绑定,避免了内存泄漏
2、数据加载时的 startLoading 与加载结束后的 dismissLoading 操作都是自动调用的,具体实现都封装在基类中。当然,子类也可以实现自己的特定实现。例如,本文提供的例子中,BaseActivity 实现的加载对话框是 ProgressDialog ,子 Activity 可以自主实现其他弹窗形式
3、当网络请求结果为非成功状态时(网络请求失败或者业务请求失败),默认操作是用 Toast 提示失败原因,支持自定义实现失败时的操作
4、逻辑操作与 UI 层相分离,基于观察者模式来实现消息驱动 UI 变化。提供了在 ViewModel 中操作 UI 变化的能力,包括使 Activity / Fragment 弹出对话框、Toast 消息、finishActivity 等 UI 操作,但 ViewModel 不持有 Activity / Fragment 的引用,而是基于消息驱动实现,从而避免了内存泄漏
源码点击这里查看:ReactiveHttp
二、封装 BaseViewModel 与 BaseActivity
ViewModel 与 LiveData 都是 Android Jetpack 架构组件之一。ViewModel 被设计用来存储和管理 UI 相关数据,以便数据能在界面销毁时(比如屏幕旋转)保存数据,而与 ViewModel 相挂钩的 LiveData 是一个用于保存可以被观察的值的数据持有类,且遵循应用组件的生命周期,只有在组件的生命周期处于活跃状态时才会收到数据更新通知
既然是消息驱动,那么自然需要一个用于抽象消息类型的 Event 类
public class BaseEvent {private int action;public BaseEvent(int action) {this.action = action;}public int getAction() {return action;}}public class BaseActionEvent extends BaseEvent {public static final int SHOW_LOADING_DIALOG = 1;public static final int DISMISS_LOADING_DIALOG = 2;public static final int SHOW_TOAST = 3;public static final int FINISH = 4;public static final int FINISH_WITH_RESULT_OK = 5;private String message;public BaseActionEvent(int action) {super(action);}public String getMessage() {return message;}public void setMessage(String message) {this.message = message;}}
复制代码
BaseActionEvent 即用于向 View 层传递 Action 的 Model,在 ViewModel 通过向 View 层传递不同的消息类型,从而触发相对应的操作。因此,BaseViewModel 需要向子类提供默认的实现
public interface IViewModelAction {void startLoading();void startLoading(String message);void dismissLoading();void showToast(String message);void finish();void finishWithResultOk();MutableLiveData<BaseActionEvent> getActionLiveData();}
复制代码
public class BaseViewModel extends ViewModel implements IViewModelAction {private MutableLiveData<BaseActionEvent> actionLiveData;protected LifecycleOwner lifecycleOwner;public BaseViewModel() {actionLiveData = new MutableLiveData<>();}@Overridepublic void startLoading() {startLoading(null);}@Overridepublic void startLoading(String message) {BaseActionEvent baseActionEvent = new BaseActionEvent(BaseActionEvent.SHOW_LOADING_DIALOG);baseActionEvent.setMessage(message);actionLiveData.setValue(baseActionEvent);}@Overridepublic void dismissLoading() {actionLiveData.setValue(new BaseActionEvent(BaseActionEvent.DISMISS_LOADING_DIALOG));}@Overridepublic void showToast(String message) {BaseActionEvent baseActionEvent = new BaseActionEvent(BaseActionEvent.SHOW_TOAST);baseActionEvent.setMessage(message);actionLiveData.setValue(baseActionEvent);}@Overridepublic void finish() {actionLiveData.setValue(new BaseActionEvent(BaseActionEvent.FINISH));}@Overridepublic void finishWithResultOk() {actionLiveData.setValue(new BaseActionEvent(BaseActionEvent.FINISH_WITH_RESULT_OK));}@Overridepublic MutableLiveData<BaseActionEvent> getActionLiveData() {return actionLiveData;}void setLifecycleOwner(LifecycleOwner lifecycleOwner) {this.lifecycleOwner = lifecycleOwner;}}
复制代码
那作为消息发送方的 BaseViewModel 的具体实现就完成了,之后是消息的接收方 BaseActivity / BaseFragment
BaseActivity 通过监听 BaseViewModel 中 actionLiveData 的数据变化从而在网络请求开始加载时 startLoading,在加载结束时 dismissLoading
一般一个 Activity 对应一个 ViewModel,少部分情况是会对应多个 ViewModel,因此 initViewModel() 声明为了抽象方法,而 initViewModelList() 默认返回了 null
@SuppressLint("Registered")
public abstract class BaseActivity extends AppCompatActivity {private ProgressDialog loadingDialog;@Overrideprotected void onCreate(@Nullable Bundle savedInstanceState) {super.onCreate(savedInstanceState);initViewModelEvent();}protected abstract ViewModel initViewModel();protected List<ViewModel> initViewModelList() {return null;}private void initViewModelEvent() {List<ViewModel> viewModelList = initViewModelList();if (viewModelList != null && viewModelList.size() > 0) {observeEvent(viewModelList);} else {ViewModel viewModel = initViewModel();if (viewModel != null) {List<ViewModel> modelList = new ArrayList<>();modelList.add(viewModel);observeEvent(modelList);}}}private void observeEvent(List<ViewModel> viewModelList) {for (ViewModel viewModel : viewModelList) {if (viewModel instanceof IViewModelAction) {IViewModelAction viewModelAction = (IViewModelAction) viewModel;viewModelAction.getActionLiveData().observe(this, baseActionEvent -> {if (baseActionEvent != null) {switch (baseActionEvent.getAction()) {case BaseActionEvent.SHOW_LOADING_DIALOG: {startLoading(baseActionEvent.getMessage());break;}case BaseActionEvent.DISMISS_LOADING_DIALOG: {dismissLoading();break;}case BaseActionEvent.SHOW_TOAST: {showToast(baseActionEvent.getMessage());break;}case BaseActionEvent.FINISH: {finish();break;}case BaseActionEvent.FINISH_WITH_RESULT_OK: {setResult(RESULT_OK);finish();break;}}}});}}}@Overrideprotected void onDestroy() {super.onDestroy();dismissLoading();}protected void startLoading() {startLoading(null);}protected void startLoading(String message) {if (loadingDialog == null) {loadingDialog = new ProgressDialog(this);loadingDialog.setCancelable(false);loadingDialog.setCanceledOnTouchOutside(false);}loadingDialog.setTitle(message);loadingDialog.show();}protected void dismissLoading() {if (loadingDialog != null && loadingDialog.isShowing()) {loadingDialog.dismiss();}}protected void showToast(String message) {Toast.makeText(this, message, Toast.LENGTH_SHORT).show();}protected void finishWithResultOk() {setResult(RESULT_OK);finish();}protected BaseActivity getContext() {return BaseActivity.this;}protected void startActivity(Class cl) {startActivity(new Intent(this, cl));}public void startActivityForResult(Class cl, int requestCode) {startActivityForResult(new Intent(this, cl), requestCode);}@RequiresApi(api = Build.VERSION_CODES.JELLY_BEAN_MR1)protected boolean isFinishingOrDestroyed() {return isFinishing() || isDestroyed();}}
复制代码
三、封装 Retrofit 与 RxJava
在前言中说了,框架默认实现了请求失败时的操作(Toast 提示失败原因),也支持自定义回调接口。因此,需要两个回调接口,一个只包含请求成功时的回调接口,另一个多包含了一个请求失败时的回调接口
public interface RequestCallback<T> {void onSuccess(T t);}public interface RequestMultiplyCallback<T> extends RequestCallback<T> {void onFail(BaseException e);}
复制代码
此外,为了在网络请求成功但业务逻辑请求失败时(例如,请求参数缺失、Token失效等),可以抛出详细的失败信息,需要自定义 BaseException
public class BaseException extends RuntimeException {private int errorCode = HttpCode.CODE_UNKNOWN;public BaseException() {}public BaseException(int errorCode, String errorMessage) {super(errorMessage);this.errorCode = errorCode;}public int getErrorCode() {return errorCode;}}
复制代码
实现具体的异常类
public class ParamterInvalidException extends BaseException {public ParamterInvalidException() {super(HttpCode.CODE_PARAMETER_INVALID, "参数有误");}}public class TokenInvalidException extends BaseException {public TokenInvalidException() {super(HttpCode.CODE_TOKEN_INVALID, "Token失效");}}···
复制代码
为了提升性能,Retrofit 一般是设计成单例模式。为了应对应用中 BaseUrl 可能有多个的情况(本文提供的Demo就是如此),此处使用 Map 来存储多个 Retrofit 实例
public class RetrofitManagement {private static final long READ_TIMEOUT = 6000;private static final long WRITE_TIMEOUT = 6000;private static final long CONNECT_TIMEOUT = 6000;private final Map<String, Object> serviceMap = new ConcurrentHashMap<>();private RetrofitManagement() {}public static RetrofitManagement getInstance() {return RetrofitHolder.retrofitManagement;}private static class RetrofitHolder {private static final RetrofitManagement retrofitManagement = new RetrofitManagement();}private Retrofit createRetrofit(String url) {OkHttpClient.Builder builder = new OkHttpClient.Builder().readTimeout(READ_TIMEOUT, TimeUnit.MILLISECONDS).writeTimeout(WRITE_TIMEOUT, TimeUnit.MILLISECONDS).connectTimeout(CONNECT_TIMEOUT, TimeUnit.MILLISECONDS).addInterceptor(new HttpInterceptor()).addInterceptor(new HeaderInterceptor()).addInterceptor(new FilterInterceptor()).retryOnConnectionFailure(true);if (BuildConfig.DEBUG) {HttpLoggingInterceptor httpLoggingInterceptor = new HttpLoggingInterceptor();httpLoggingInterceptor.setLevel(HttpLoggingInterceptor.Level.BODY);builder.addInterceptor(httpLoggingInterceptor);builder.addInterceptor(new ChuckInterceptor(ContextHolder.getContext()));}OkHttpClient client = builder.build();return new Retrofit.Builder().client(client).baseUrl(url).addConverterFactory(GsonConverterFactory.create()).addCallAdapterFactory(RxJava2CallAdapterFactory.create()).build();}<T> ObservableTransformer<BaseResponseBody<T>, T> applySchedulers() {return observable -> observable.subscribeOn(Schedulers.io()).unsubscribeOn(Schedulers.io()).observeOn(AndroidSchedulers.mainThread()).flatMap(result -> {switch (result.getCode()) {case HttpCode.CODE_SUCCESS: {return createData(result.getData());}case HttpCode.CODE_TOKEN_INVALID: {throw new TokenInvalidException();}case HttpCode.CODE_ACCOUNT_INVALID: {throw new AccountInvalidException();}default: {throw new ServerResultException(result.getCode(), result.getMsg());}}});}private <T> Observable<T> createData(T t) {return Observable.create(new ObservableOnSubscribe<T>() {@Overridepublic void subscribe(ObservableEmitter<T> emitter) {try {emitter.onNext(t);emitter.onComplete();} catch (Exception e) {emitter.onError(e);}}});}<T> T getService(Class<T> clz) {return getService(clz, HttpConfig.BASE_URL_WEATHER);}<T> T getService(Class<T> clz, String host) {T value;if (serviceMap.containsKey(host)) {Object obj = serviceMap.get(host);if (obj == null) {value = createRetrofit(host).create(clz);serviceMap.put(host, value);} else {value = (T) obj;}} else {value = createRetrofit(host).create(clz);serviceMap.put(host, value);}return value;}}
复制代码
此外还需要一个自定义的 Observer 来对数据请求结果进行自定义回调
public class BaseSubscriber<T> extends DisposableObserver<T> {private BaseViewModel baseViewModel;private RequestCallback<T> requestCallback;public BaseSubscriber(BaseViewModel baseViewModel) {this.baseViewModel = baseViewModel;}BaseSubscriber(BaseViewModel baseViewModel, RequestCallback<T> requestCallback) {this.baseViewModel = baseViewModel;this.requestCallback = requestCallback;}@Overridepublic void onNext(T t) {if (requestCallback != null) {requestCallback.onSuccess(t);}}@Overridepublic void onError(Throwable e) {e.printStackTrace();if (requestCallback instanceof RequestMultiplyCallback) {RequestMultiplyCallback callback = (RequestMultiplyCallback) requestCallback;if (e instanceof BaseException) {callback.onFail((BaseException) e);} else {callback.onFail(new BaseException(HttpCode.CODE_UNKNOWN, e.getMessage()));}} else {if (baseViewModel == null) {Toast.makeText(ContextHolder.getContext(), e.getMessage(), Toast.LENGTH_SHORT).show();} else {baseViewModel.showToast(e.getMessage());}}}@Overridepublic void onComplete() {}}
复制代码
四、BaseRemoteDataSource 与 BaseRepo
上文所介绍的 RequestCallback、RetrofitManagement 与 BaseSubscriber 还是一个个单独的个体,还需要一个链接器来将之串起来,这个链接器的实现类即 BaseRemoteDataSource
在这里,对 BaseRemoteDataSource 的定位是将之当成一个接口实现者,即在 RemoteDataSource 中实际调用各个请求接口,并通过 RxJava 来控制 loading 弹出以及销毁的时机
一般而言,BaseRemoteDataSource 的实现类中声明的是具有相关逻辑的接口。例如,对于登录模块,可声明一个 LoginDataSource,对于设置模块,可以声明一个 SettingsDataSource
public abstract class BaseRemoteDataSource {private CompositeDisposable compositeDisposable;private BaseViewModel baseViewModel;public BaseRemoteDataSource(BaseViewModel baseViewModel) {this.compositeDisposable = new CompositeDisposable();this.baseViewModel = baseViewModel;}protected <T> T getService(Class<T> clz) {return RetrofitManagement.getInstance().getService(clz);}protected <T> T getService(Class<T> clz, String host) {return RetrofitManagement.getInstance().getService(clz, host);}private <T> ObservableTransformer<BaseResponseBody<T>, T> applySchedulers() {return RetrofitManagement.getInstance().applySchedulers();}protected <T> void execute(Observable observable, RequestCallback<T> callback) {execute(observable, new BaseSubscriber<>(baseViewModel, callback), true);}protected <T> void execute(Observable observable, RequestMultiplyCallback<T> callback) {execute(observable, new BaseSubscriber<>(baseViewModel, callback), true);}public void executeWithoutDismiss(Observable observable, Observer observer) {execute(observable, observer, false);}private void execute(Observable observable, Observer observer, boolean isDismiss) {Disposable disposable = (Disposable) observable.throttleFirst(500, TimeUnit.MILLISECONDS).subscribeOn(Schedulers.io()).unsubscribeOn(Schedulers.io()).observeOn(AndroidSchedulers.mainThread()).compose(applySchedulers()).compose(isDismiss ? loadingTransformer() : loadingTransformerWithoutDismiss()).subscribeWith(observer);addDisposable(disposable);}private void addDisposable(Disposable disposable) {compositeDisposable.add(disposable);}public void dispose() {if (!compositeDisposable.isDisposed()) {compositeDisposable.dispose();}}private void startLoading() {if (baseViewModel != null) {baseViewModel.startLoading();}}private void dismissLoading() {if (baseViewModel != null) {baseViewModel.dismissLoading();}}private <T> ObservableTransformer<T, T> loadingTransformer() {return observable -> observable.subscribeOn(AndroidSchedulers.mainThread()).unsubscribeOn(AndroidSchedulers.mainThread()).observeOn(AndroidSchedulers.mainThread()).doOnSubscribe(disposable -> startLoading()).doFinally(this::dismissLoading);}private <T> ObservableTransformer<T, T> loadingTransformerWithoutDismiss() {return observable -> observable.subscribeOn(AndroidSchedulers.mainThread()).unsubscribeOn(AndroidSchedulers.mainThread()).observeOn(AndroidSchedulers.mainThread()).doOnSubscribe(disposable -> startLoading());}}
复制代码
除了 BaseRemoteDataSource 外,还需要一个 BaseRepo。对 BaseRepo 的定位是将其当做一个接口调度器,其持有 BaseRemoteDataSource 的实例并中转 ViewModel 的接口调用请求,并可以在 BaseRepo 分担一部分数据处理逻辑
public class BaseRepo<T> {protected T remoteDataSource;public BaseRepo(T remoteDataSource) {this.remoteDataSource = remoteDataSource;}}
复制代码
这样,ViewModel 不关心接口的实际调用实现,方便以后更换 BaseRemoteDataSource 的实现方式,且将一部分的数据处理逻辑放到了 BaseRepo ,有利于逻辑的复用
五、实践操作(1)-请求天气数据
上文讲了一些基础组件的逻辑实现以及对其的定位,此小节就以一个请求天气数据的接口为例,来介绍如何具体实现一个网络请求的整体流程
首先是声明接口
public interface ApiService {@Headers({HttpConfig.HTTP_REQUEST_TYPE_KEY + ":" + HttpConfig.HTTP_REQUEST_WEATHER})@GET("onebox/weather/query")Observable<BaseResponseBody<Weather>> queryWeather(@Query("cityname") String cityName);}
复制代码
增加的头部信息是为了标明该接口的请求类型,因为本文作为 demo 的几个接口所用到的 baseUrl 以及 请求key 并不相同,因此通过声明头部来为接口动态指定请求参数,而这就需要用到 Retrofit 的拦截器了
public class FilterInterceptor implements Interceptor {@NonNull@Overridepublic Response intercept(@NonNull Chain chain) throws IOException {Request originalRequest = chain.request();HttpUrl.Builder httpBuilder = originalRequest.url().newBuilder();Headers headers = originalRequest.headers();if (headers != null && headers.size() > 0) {String requestType = headers.get(HttpConfig.HTTP_REQUEST_TYPE_KEY);if (!TextUtils.isEmpty(requestType)) {switch (requestType) {case HttpConfig.HTTP_REQUEST_WEATHER: {httpBuilder.addQueryParameter(HttpConfig.KEY, HttpConfig.KEY_WEATHER);break;}case HttpConfig.HTTP_REQUEST_QR_CODE: {httpBuilder.addQueryParameter(HttpConfig.KEY, HttpConfig.KEY_QR_CODE);break;}case HttpConfig.HTTP_REQUEST_NEWS: {httpBuilder.addQueryParameter(HttpConfig.KEY, HttpConfig.KEY_NEWS);break;}}}}Request.Builder requestBuilder = originalRequest.newBuilder().removeHeader(HttpConfig.HTTP_REQUEST_TYPE_KEY).url(httpBuilder.build());return chain.proceed(requestBuilder.build());}}
复制代码
声明 BaseRemoteDataSource 的实现类 WeatherDataSource
public class WeatherDataSource extends BaseRemoteDataSource implements IWeatherDataSource {public WeatherDataSource(BaseViewModel baseViewModel) {super(baseViewModel);}@Overridepublic void queryWeather(String cityName, RequestCallback<Weather> responseCallback) {execute(getService(ApiService.class).queryWeather(cityName), responseCallback);}}
复制代码
声明 BaseRepo 的实现类 WeatherRepo
public class WeatherRepo extends BaseRepo<IWeatherDataSource> {public WeatherRepo(IWeatherDataSource remoteDataSource) {super(remoteDataSource);}public MutableLiveData<Weather> queryWeather(String cityName) {MutableLiveData<Weather> weatherMutableLiveData = new MutableLiveData<>();remoteDataSource.queryWeather(cityName, new RequestCallback<Weather>() {@Overridepublic void onSuccess(Weather weather) {weatherMutableLiveData.setValue(weather);}});return weatherMutableLiveData;}}
复制代码
还需要一个 WeatherViewModel,View 层通过调用 queryWeather() 方法在请求成功时触发 weatherLiveData 更新数据,View 层已事先监听 weatherLiveData,并在数据更新时就可以立即收到最新数据
public class WeatherViewModel extends BaseViewModel {private MutableLiveData<Weather> weatherLiveData;private WeatherRepo weatherRepo;public WeatherViewModel() {weatherLiveData = new MutableLiveData<>();weatherRepo = new WeatherRepo(new WeatherDataSource(this));}public void queryWeather(String cityName) {weatherRepo.queryWeather(cityName).observe(lifecycleOwner, new Observer<Weather>() {@Overridepublic void onChanged(@Nullable Weather weather) {weatherLiveData.setValue(weather);}});}public MutableLiveData<Weather> getWeatherLiveData() {return weatherLiveData;}
}
复制代码
在 QueryWeatherActivity 中打印出接口的请求结果
public class QueryWeatherActivity extends BaseActivity {private static final String TAG = "QueryWeatherActivity";private WeatherViewModel weatherViewModel;private EditText et_cityName;private TextView tv_weather;@Overrideprotected void onCreate(Bundle savedInstanceState) {super.onCreate(savedInstanceState);setContentView(R.layout.activity_query_weather);et_cityName = findViewById(R.id.et_cityName);tv_weather = findViewById(R.id.tv_weather);}@Overrideprotected ViewModel initViewModel() {weatherViewModel = LViewModelProviders.of(this, WeatherViewModel.class);weatherViewModel.getWeatherLiveData().observe(this, this::handlerWeather);return weatherViewModel;}private void handlerWeather(Weather weather) {StringBuilder result = new StringBuilder();for (Weather.InnerWeather.NearestWeather nearestWeather : weather.getData().getWeather()) {result.append("\n\n").append(new Gson().toJson(nearestWeather));}tv_weather.setText(result.toString());}public void queryWeather(View view) {tv_weather.setText(null);weatherViewModel.queryWeather(et_cityName.getText().toString());}}
复制代码

也许有人会觉得为了请求一个接口需要建立三个实现类(WeatherDataSource、WeatherRepo、WeatherViewModel)以及一个接口(IQrCodeDataSource)有点繁琐,但这是想要划分职责并实现逻辑与UI相隔离的必然结果。WeatherDataSource 用来实现接口的实际调用,只负责请求数据并传递请求结果。WeatherRepo 用来屏蔽 WeatherViewModel 对 WeatherDataSource 的感知,并承担起一部分数据处理逻辑。WeatherViewModel 用于实现逻辑与 UI 的隔离,并保障数据不因为页面重建而丢失。这样,Activity 就可以尽量只承担数据呈现的职责,而不必掺杂数据处理逻辑
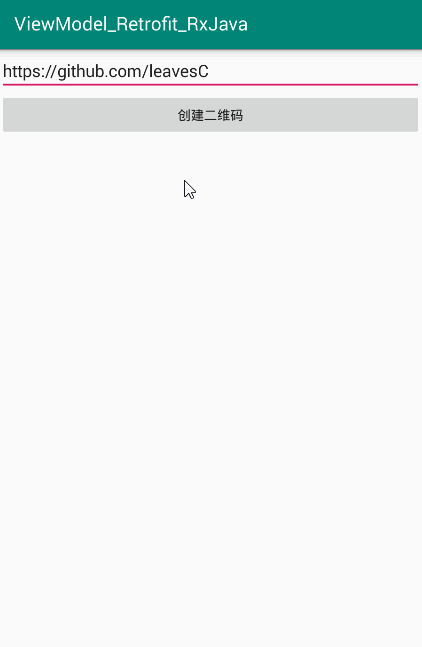
六、实践操作(2)-请求生成二维码
此处再来看一个例子,用于生成指定内容的二维码
public class QrCodeDataSource extends BaseRemoteDataSource implements IQrCodeDataSource {public QrCodeDataSource(BaseViewModel baseViewModel) {super(baseViewModel);}@Overridepublic void createQrCode(String text, int width, RequestCallback<QrCode> callback) {execute(getService(ApiService.class, HttpConfig.BASE_URL_QR_CODE).createQrCode(text, width), callback);}}
复制代码
此处接口请求回来的只是一段 base64 编码的字符串,而外部希望获取到的自然是一个可以直接使用的 Bitmap ,因此可以在 Repo 中先对数据进行转换后再传递到外部
public class QrCodeRepo extends BaseRepo<IQrCodeDataSource> {public QrCodeRepo(IQrCodeDataSource remoteDataSource) {super(remoteDataSource);}public MutableLiveData<QrCode> createQrCode(String text, int width) {MutableLiveData<QrCode> liveData = new MutableLiveData<>();remoteDataSource.createQrCode(text, width, new RequestCallback<QrCode>() {@SuppressLint("CheckResult")@Overridepublic void onSuccess(QrCode qrCode) {Observable.create(new ObservableOnSubscribe<Bitmap>() {@Overridepublic void subscribe(@NonNull ObservableEmitter<Bitmap> emitter) throws Exception {Bitmap bitmap = base64ToBitmap(qrCode.getBase64_image());emitter.onNext(bitmap);emitter.onComplete();}}).subscribeOn(Schedulers.io()).observeOn(AndroidSchedulers.mainThread()).subscribe(new Consumer<Bitmap>() {@Overridepublic void accept(@NonNull Bitmap bitmap) throws Exception {qrCode.setBitmap(bitmap);liveData.setValue(qrCode);}});}});return liveData;}private static Bitmap base64ToBitmap(String base64String) {byte[] decode = Base64.decode(base64String, Base64.DEFAULT);return BitmapFactory.decodeByteArray(decode, 0, decode.length);}}
复制代码
public class QrCodeViewModel extends BaseViewModel {private MutableLiveData<QrCode> qrCodeLiveData;private QrCodeRepo qrCodeRepo;public QrCodeViewModel() {qrCodeLiveData = new MutableLiveData<>();qrCodeRepo = new QrCodeRepo(new QrCodeDataSource(this));}public void createQrCode(String text, int width) {qrCodeRepo.createQrCode(text, width).observe(lifecycleOwner, new Observer<QrCode>() {@Overridepublic void onChanged(@Nullable QrCode qrCode) {qrCodeLiveData.setValue(qrCode);}});}public MutableLiveData<QrCode> getQrCodeLiveData() {return qrCodeLiveData;}}复制代码
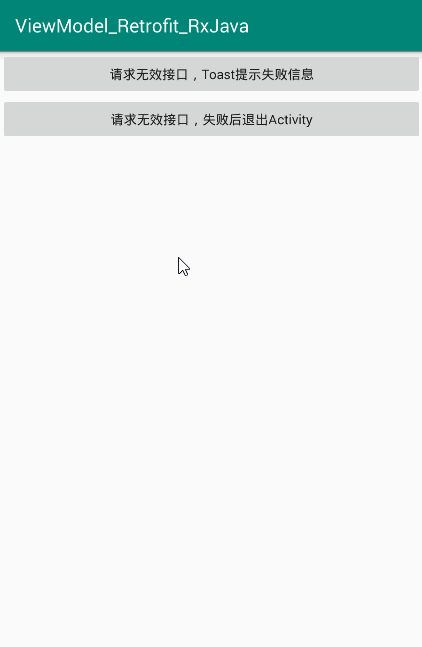
七、实践操作(3)-请求失败示例
前言说了,本文封装的网络框架当网络请求结果为非成功状态时(网络请求失败或者业务请求失败),默认操作是用 Toast 提示失败原因,也支持自定义实现失败时的操作。此处就来看当请求失败时如何进行处理
此处需要声明两个并不存在的接口
public interface ApiService {@GET("leavesC/test1")Observable<BaseResponseBody<String>> test1();@GET("leavesC/test2")Observable<BaseResponseBody<String>> test2();}复制代码
public class FailExampleDataSource extends BaseRemoteDataSource implements IFailExampleDataSource {public FailExampleDataSource(BaseViewModel baseViewModel) {super(baseViewModel);}@Overridepublic void test1(RequestCallback<String> callback) {execute(getService(ApiService.class).test1(), callback);}@Overridepublic void test2(RequestCallback<String> callback) {execute(getService(ApiService.class).test2(), callback);}}
复制代码
public class FailExampleRepo extends BaseRepo<IFailExampleDataSource> {public FailExampleRepo(IFailExampleDataSource remoteDataSource) {super(remoteDataSource);}public MutableLiveData<String> test1() {MutableLiveData<String> newsPackMutableLiveData = new MutableLiveData<>();remoteDataSource.test1(new RequestCallback<String>() {@Overridepublic void onSuccess(String newsPack) {newsPackMutableLiveData.setValue(newsPack);}});return newsPackMutableLiveData;}public void test2(RequestMultiplyCallback<String> callback) {remoteDataSource.test2(callback);}}
复制代码
test1() 方法用的是基础类的默认失败回调,即直接 Toast 提示失败信息。而 test2() 方法则是自定义了请求失败时的回调操作
public class FailExampleViewModel extends BaseViewModel {private MutableLiveData<String> test1LiveData = new MutableLiveData<>();private MutableLiveData<String> test2LiveData = new MutableLiveData<>();private FailExampleRepo failExampleRepo = new FailExampleRepo(new FailExampleDataSource(this));public void test1() {failExampleRepo.test1().observe(lifecycleOwner, new Observer<String>() {@Overridepublic void onChanged(@Nullable String s) {test1LiveData.setValue(s);}});}public void test2() {failExampleRepo.test2(new RequestMultiplyCallback<String>() {@Overridepublic void onFail(BaseException e) {showToast("test2方法请求失败:" + e.getMessage());finish();}@Overridepublic void onSuccess(String s) {test2LiveData.setValue(s);}});}}
复制代码
八、学习笔记分享
为了方便大家更深入的学习Android相关源码已经第三框架。我整理了一份《Android相关源码解析》和《设计思想解读开源框架》,有需要的伙伴可以点赞+关注后,私信我领取!
有需要的伙伴可以点赞+关注后,可以点击这里领取!
这篇关于包教包会,一步步封装实现自己的网络请求框架 1.0的文章就介绍到这儿,希望我们推荐的文章对编程师们有所帮助!


