本文主要是介绍TensorFlow2实战-系列教程4:数据增强:keras工具包/Data Augmentation,希望对大家解决编程问题提供一定的参考价值,需要的开发者们随着小编来一起学习吧!
🧡💛💚TensorFlow2实战-系列教程 总目录
有任何问题欢迎在下面留言
本篇文章的代码运行界面均在Jupyter Notebook中进行
本篇文章配套的代码资源已经上传
对于图像数据,将其进行翻转、放缩、平移、旋转操作就可以得到一组新的数据:
1、展示输入输出
import matplotlib.pyplot as plt
from PIL import Image
%matplotlib inline
from keras.preprocessing import image
import keras.backend as K
import os
import glob
import numpy as np
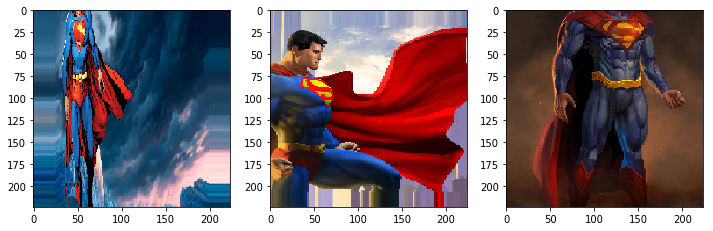
def print_result(path):name_list = glob.glob(path)fig = plt.figure(figsize=(12,16))for i in range(3):img = Image.open(name_list[i])sub_img = fig.add_subplot(131+i)sub_img.imshow(img)
img_path = './img/superman/*'
in_path = './img/'
out_path = './output/'
name_list = glob.glob(img_path)
print(name_list)
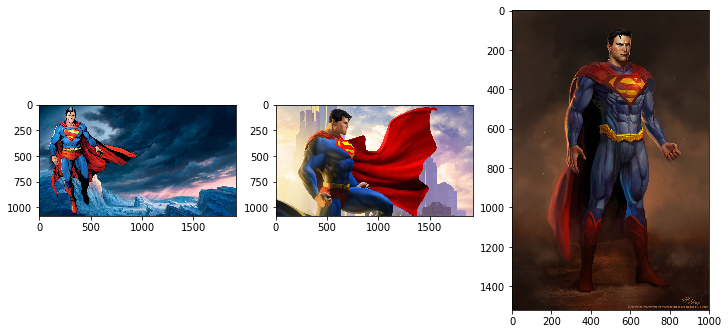
print_result(img_path)
- img_path 就是存放3张图像数据的路径,in_path 、out_path 暂时没用到
- name_list 查看一下三张数据的路径字符信息
- print_result就是一个专门用来打印3张图像的函数
打印结果:
[‘./img/superman\00000008.jpg’,
‘./img/superman\00000009.jpg’,
‘./img/superman\00000010.jpg’]
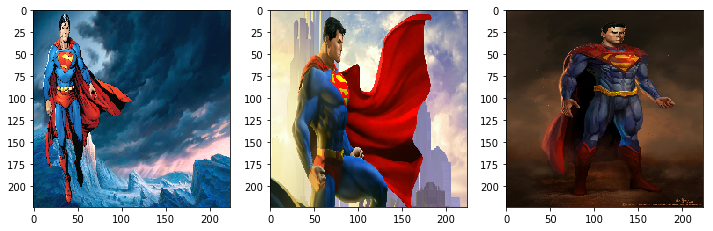
2、调整图像大小
datagen = image.ImageDataGenerator()
gen_data = datagen.flow_from_directory(in_path, batch_size=1, shuffle=False,  save_to_dir=out_path+'resize',save_prefix='gen', target_size=(224, 224))
- 创建一个数据增强的实例
- 指定参数加载图像数据
- save_to_dir=out_path+‘resize’,用到了前面的输出路径
- 指定了target_size参数后图像都会被重置成这个尺寸
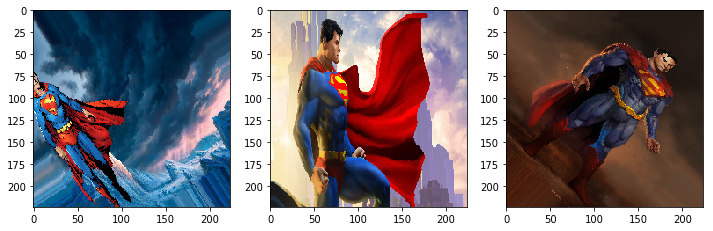
for i in range(3):gen_data.next()
print_result(out_path+'resize/*')
从数据生成器中获取数据,将图像打印出来
打印结果:

3、旋转图像
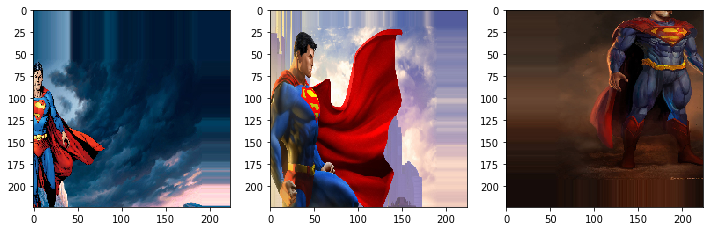
datagen = image.ImageDataGenerator(rotation_range=45)
gen = image.ImageDataGenerator()
data = gen.flow_from_directory(in_path, batch_size=1, class_mode=None, shuffle=True, target_size=(224, 224))
np_data = np.concatenate([data.next() for i in range(data.n)])
datagen.fit(np_data)
gen_data = datagen.flow_from_directory(in_path, batch_size=1, shuffle=False, save_to_dir=out_path+'rotation_range',save_prefix='gen', target_size=(224, 224))
for i in range(3):gen_data.next()
print_result(out_path+'rotation_range/*')
- 创建一个旋转的数据增强实例,
- 创建一个数据增强实例,实际上就是直接加载数据
- 将加载的图像数据重置尺寸
- 将重置尺寸的图像转换成ndarray格式
- 将旋转数据增强应用到重置尺寸的图像数据中
- 使用数据增强生成器重新从目录加载数据
- 保存加载的数据
- 使用for循环:
- 生成并处理三个图像,由于设置了 save_to_dir,这些图像将被保存。
- 打印三个图像
打印结果:
Found 3 images belonging to 1 classes.
Found 3 images belonging to 1 classes.
4、平移变换
datagen = image.ImageDataGenerator(width_shift_range=0.3,height_shift_range=0.3)
gen = image.ImageDataGenerator()
data = gen.flow_from_directory(in_path, batch_size=1, class_mode=None, shuffle=True, target_size=(224, 224))
np_data = np.concatenate([data.next() for i in range(data.n)])
datagen.fit(np_data)
gen_data = datagen.flow_from_directory(in_path, batch_size=1, shuffle=False, save_to_dir=out_path+'shift',save_prefix='gen', target_size=(224, 224))
for i in range(3):gen_data.next()
print_result(out_path+'shift/*')
与3中不同的是,这段代码是进行平移变换进行数据增强,指定了平移变换的参数,width_shift_range=0.3,height_shift_range=0.3,这两个参数分别表示会在水平方向和垂直方向±30%的范围内随机移动
打印结果:
Found 3 images belonging to 1 classes.
Found 3 images belonging to 1 classes.
datagen = image.ImageDataGenerator(width_shift_range=-0.3,height_shift_range=0.3)
gen = image.ImageDataGenerator()
data = gen.flow_from_directory(in_path, batch_size=1, class_mode=None, shuffle=True, target_size=(224, 224))
np_data = np.concatenate([data.next() for i in range(data.n)])
datagen.fit(np_data)
gen_data = datagen.flow_from_directory(in_path, batch_size=1, shuffle=False, save_to_dir=out_path+'shift2',save_prefix='gen', target_size=(224, 224))
for i in range(3):gen_data.next()
print_result(out_path+'shift2/*')
由于是随机的,这两段代码完全一样,但是结果却不同
打印结果:
Found 3 images belonging to 1 classes.
Found 3 images belonging to 1 classes.

5、缩放
datagen = image.ImageDataGenerator(zoom_range=0.5)
gen = image.ImageDataGenerator()
data = gen.flow_from_directory(in_path, batch_size=1, class_mode=None, shuffle=True, target_size=(224, 224))
np_data = np.concatenate([data.next() for i in range(data.n)])
datagen.fit(np_data)
gen_data = datagen.flow_from_directory(in_path, batch_size=1, shuffle=False, save_to_dir=out_path+'zoom',save_prefix='gen', target_size=(224, 224))
for i in range(3):gen_data.next()
print_result(out_path+'zoom/*')
这段代码与3中不同的就是,这里指定缩放参数来进行缩放数据增强
打印结果:
Found 3 images belonging to 1 classes.
Found 3 images belonging to 1 classes.
6、channel_shift
datagen = image.ImageDataGenerator(channel_shift_range=15)
gen = image.ImageDataGenerator()
data = gen.flow_from_directory(in_path, batch_size=1, class_mode=None, shuffle=True, target_size=(224, 224))
np_data = np.concatenate([data.next() for i in range(data.n)])
datagen.fit(np_data)
gen_data = datagen.flow_from_directory(in_path, batch_size=1, shuffle=False, save_to_dir=out_path+'channel',save_prefix='gen', target_size=(224, 224))
for i in range(3):gen_data.next()
print_result(out_path+'channel/*')
这段代码与3中不同的就是,这里指定通道偏移参数来进行通道偏移数据增强
打印结果:
Found 3 images belonging to 1 classes.
Found 3 images belonging to 1 classes.
7、水平翻转
datagen = image.ImageDataGenerator(horizontal_flip=True)
gen = image.ImageDataGenerator()
data = gen.flow_from_directory(in_path, batch_size=1, class_mode=None, shuffle=True, target_size=(224, 224))
np_data = np.concatenate([data.next() for i in range(data.n)])
datagen.fit(np_data)
gen_data = datagen.flow_from_directory(in_path, batch_size=1, shuffle=False, save_to_dir=out_path+'horizontal',save_prefix='gen', target_size=(224, 224))
for i in range(3):gen_data.next()
print_result(out_path+'horizontal/*')
这段代码与3中不同的就是,这里指定水平翻转参数来进行水平翻转数据增强

8、rescale重新缩放
datagen = image.ImageDataGenerator(rescale= 1/255)
gen = image.ImageDataGenerator()
data = gen.flow_from_directory(in_path, batch_size=1, class_mode=None, shuffle=True, target_size=(224, 224))
np_data = np.concatenate([data.next() for i in range(data.n)])
datagen.fit(np_data)
gen_data = datagen.flow_from_directory(in_path, batch_size=1, shuffle=False, save_to_dir=out_path+'rescale',save_prefix='gen', target_size=(224, 224))
for i in range(3):gen_data.next()
print_result(out_path+'rescale/*')
这段代码与3中不同的就是,这里指定rescale重新缩放参数来进行rescale重新缩放数据增强
通常用于归一化图像数据。将图像像素值从 [0, 255] 缩放到 [0, 1] 范围,有助于模型的训练
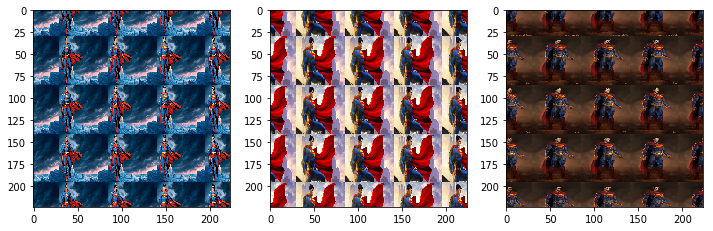
9、填充方法
- ‘constant’: kkkkkkkk|abcd|kkkkkkkk (cval=k)
- ‘nearest’: aaaaaaaa|abcd|dddddddd
- ‘reflect’: abcddcba|abcd|dcbaabcd
- ‘wrap’: abcdabcd|abcd|abcdabcd
datagen = image.ImageDataGenerator(fill_mode='wrap', zoom_range=[4, 4])
gen = image.ImageDataGenerator()
data = gen.flow_from_directory(in_path, batch_size=1, class_mode=None, shuffle=True, target_size=(224, 224))
np_data = np.concatenate([data.next() for i in range(data.n)])
datagen.fit(np_data)
gen_data = datagen.flow_from_directory(in_path, batch_size=1, shuffle=False, save_to_dir=out_path+'fill_mode',save_prefix='gen', target_size=(224, 224))
for i in range(3):gen_data.next()
print_result(out_path+'fill_mode/*')
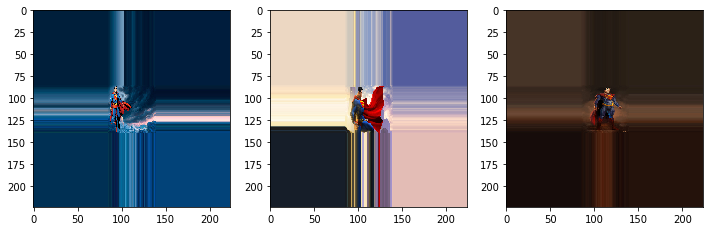
fill_mode='wrap':当应用几何变换后,图像中可能会出现一些新的空白区域。fill_mode定义了如何填充这些空白区域。在这种情况下,使用'wrap'模式,意味着空白区域将用图像边缘的像素“包裹”填充。zoom_range=[4, 4]:这设置了图像缩放的范围。在这里,它被设置为在 4 倍范围内进行随机缩放。由于最小和最大缩放因子相同,这将导致所有图像都被放大 4 倍
用原图像填充,任何超出原始图像边界的区域将被图像的对边界像素填充
datagen = image.ImageDataGenerator(fill_mode='nearest', zoom_range=[4, 4])
gen = image.ImageDataGenerator()
data = gen.flow_from_directory(in_path, batch_size=1, class_mode=None, shuffle=True, target_size=(224, 224))
np_data = np.concatenate([data.next() for i in range(data.n)])
datagen.fit(np_data)
gen_data = datagen.flow_from_directory(in_path, batch_size=1, shuffle=False, save_to_dir=out_path+'nearest',save_prefix='gen', target_size=(224, 224))
for i in range(3):gen_data.next()
print_result(out_path+'nearest/*')
使用最近点填充,每个空白区域的像素将取其最近的非空白区域的像素值
这篇关于TensorFlow2实战-系列教程4:数据增强:keras工具包/Data Augmentation的文章就介绍到这儿,希望我们推荐的文章对编程师们有所帮助!


