本文主要是介绍跟着cherno手搓游戏引擎【5】layer(层)、Glad,希望对大家解决编程问题提供一定的参考价值,需要的开发者们随着小编来一起学习吧!
编写基类层:
Layer.h:提供Attach链接、Detach解绑、Update刷新、Event事件、GetName方法
#pragma once
#include"YOTO/Core.h"
#include"YOTO/Event/Event.h"
namespace YOTO {class YOTO_API Layer{public:Layer(const std::string& name = "Layer");virtual ~Layer();virtual void OnAttach(){}virtual void OnDetach() {}virtual void OnUpdate() {}virtual void OnEvent(Event& event) {}inline const std::string& GetName() const { return m_DebugName; }protected:std::string m_DebugName;};}
Layer.cpp:随便写写
#include "ytpch.h"
#include "Layer.h"
namespace YOTO {Layer::Layer(const std::string &debugName):m_DebugName(debugName){}Layer::~Layer(){}
}
编写层栈:
LayerStack.h:建立用来存储层的栈(用vector)
#pragma once
#include"YOTO/Core.h"
#include"Layer.h"
#include<vector>
namespace YOTO {class  YOTO_API LayerStack{public:LayerStack();~LayerStack();void PushLayer(Layer* layer);void PushOverlay(Layer* layer);void PopLayer(Layer* layer);void PopOverLay(Layer* layer);std::vector<Layer*>::iterator begine() { return m_Layers.begin(); }std::vector<Layer*>::iterator end() { return m_Layers.end(); }private:std::vector<Layer*>m_Layers;std::vector<Layer*>::iterator m_LayerInsert;};}
LayerStack.cpp:看注释,需要解释的有点多
#include "ytpch.h"
#include "LayerStack.h"
namespace YOTO {LayerStack::LayerStack() {m_LayerInsert = m_Layers.begin();}LayerStack::~LayerStack() {for (Layer* layer : m_Layers)delete layer;}//普通push在队列最左(查找时候性能更优)void LayerStack::PushLayer(Layer* layer) {// emplace在vector容器指定位置之前插入一个新的元素。返回插入元素的位置// 插入 1 2 3,vector是 3 2 1m_LayerInsert = m_Layers.emplace(m_LayerInsert, layer);}//在最右插入void LayerStack::PushOverlay(Layer* overlay) {//m_LayerInsert = m_Layers.begin();//如果报错,则把这个注释取消m_Layers.emplace_back(overlay);}//查找void LayerStack::PopLayer(Layer* layer) {auto it = std::find(m_Layers.begin(), m_Layers.end(), layer);if (it != m_Layers.end()) {m_Layers.erase(it);m_LayerInsert--;	// 指向Begin}}void LayerStack::PopOverlay(Layer* overlay) {auto it = std::find(m_Layers.begin(), m_Layers.end(), overlay);if (it != m_Layers.end())m_Layers.erase(it);}
}
YOTO.h:加一个Layer.h
#pragma once
#include "YOTO/Application.h"
#include"YOTO/Layer.h"
#include "YOTO/Log.h"
//入口点
#include"YOTO/EntryPoint.h"
Application.h:Stack实例,Push方法添加层。
#pragma once
#include"Core.h"
#include"Event/Event.h"
#include"Event/ApplicationEvent.h"
#include "YOTO/Window.h"
#include"YOTO/LayerStack.h"
namespace YOTO {class YOTO_API Application{public:Application();virtual ~Application();void Run();void OnEvent(Event &e);void PushLayer(Layer* layer);void PushOverlay(Layer* layer);private:bool  OnWindowClosed(WindowCloseEvent& e);std::unique_ptr<Window>  m_Window;bool m_Running = true;LayerStack m_LayerStack;};//在客户端定义Application* CreateApplication();
}
Application.cpp:添加Push即可。
#include"ytpch.h"
#include "Application.h"#include"Log.h"
#include<GLFW/glfw3.h>
namespace YOTO {
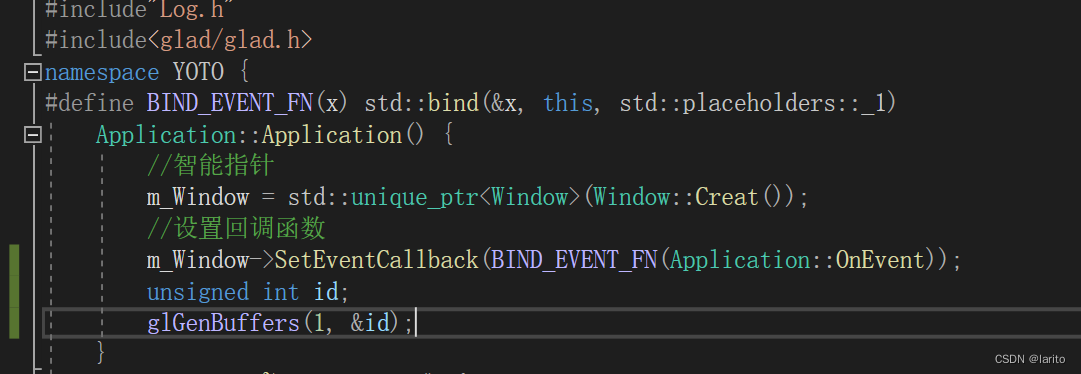
#define BIND_EVENT_FN(x) std::bind(&x, this, std::placeholders::_1)Application::Application() {//智能指针m_Window = std::unique_ptr<Window>(Window::Creat());//设置回调函数m_Window->SetEventCallback(BIND_EVENT_FN(Application::OnEvent));}Application::~Application() {}/// <summary>/// 所有的Window事件都会在这触发,作为参数e/// </summary>/// <param name="e"></param>void Application::OnEvent(Event& e) {//根据事件类型绑定对应事件EventDispatcher dispatcher(e);dispatcher.Dispatch<WindowCloseEvent>(BIND_EVENT_FN(Application::OnWindowClosed));//输出事件信息YT_CORE_INFO("{0}",e);for (auto it = m_LayerStack.end(); it != m_LayerStack.begin();) {(*--it)->OnEvent(e);if (e.m_Handled)break;}}bool Application::OnWindowClosed(WindowCloseEvent& e) {m_Running = false;return true;}void Application::Run() {WindowResizeEvent e(1280, 720);if (e.IsInCategory(EventCategoryApplication)) {YT_CORE_TRACE(e);}if (e.IsInCategory(EventCategoryInput)) {YT_CORE_ERROR(e);}while (m_Running){glClearColor(1,0,1,1);glClear(GL_COLOR_BUFFER_BIT);for (Layer* layer : m_LayerStack) {layer->OnUpdate();}m_Window->OnUpdate();}}void Application::PushLayer(Layer* layer) {m_LayerStack.PushLayer(layer);}void Application::PushOverlay(Layer* layer) {m_LayerStack.PushOverlay(layer);}
}SandboxApp.cpp:创建测试Layer,在构造方法中Push加入
#include<YOTO.h>
#include<stdio.h>class ExampleLayer:public YOTO::Layer
{
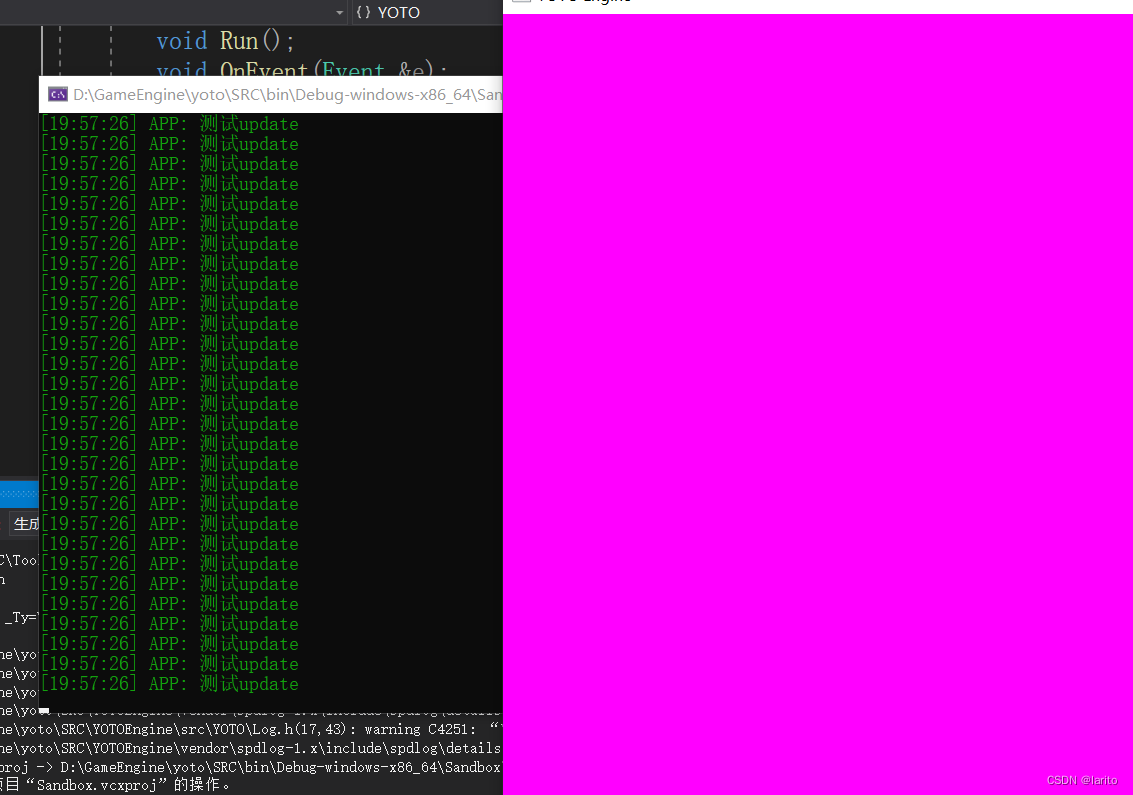
public:ExampleLayer():Layer("Example") {}void OnUpdate()override {YT_CLIENT_INFO("测试update");}void OnEvent(YOTO::Event& e)override {YT_CLIENT_TRACE("测试event{0}",e);}private:};class Sandbox:public YOTO::Application
{
public:Sandbox() {PushLayer(new ExampleLayer());}~Sandbox() {}private:};YOTO::Application* YOTO::CreateApplication() {printf("helloworld");return new Sandbox();
}
测试:
这个问题,是因为没改SRC下的premake5.lua

添加buildoptions:"\MDd"和buildoptions:"\MD"在YOTOEngine和Sandbox下。
workspace "YOTOEngine"		-- sln文件名architecture "x64"	configurations{"Debug","Release","Dist"}
-- https://github.com/premake/premake-core/wiki/Tokens#value-tokens
-- 组成输出目录:Debug-windows-x86_64
outputdir = "%{cfg.buildcfg}-%{cfg.system}-%{cfg.architecture}"IncludeDir={}
IncludeDir["GLFW"]="YOTOEngine/vendor/GLFW/include"include "YOTOEngine/vendor/GLFW"project "YOTOEngine"		--Hazel项目location "YOTOEngine"--在sln所属文件夹下的Hazel文件夹kind "SharedLib"--dll动态库language "C++"targetdir ("bin/" .. outputdir .. "/%{prj.name}") -- 输出目录objdir ("bin-int/" .. outputdir .. "/%{prj.name}")-- 中间目录pchheader "ytpch.h"pchsource "YOTOEngine/src/ytpch.cpp"-- 包含的所有h和cpp文件files{"%{prj.name}/src/**.h","%{prj.name}/src/**.cpp"}-- 包含目录includedirs{"%{prj.name}/src","%{prj.name}/vendor/spdlog-1.x/include","%{IncludeDir.GLFW}"}links{"GLFW","opengl32.lib"}-- 如果是window系统filter "system:windows"cppdialect "C++17"-- On:代码生成的运行库选项是MTD,静态链接MSVCRT.lib库;-- Off:代码生成的运行库选项是MDD,动态链接MSVCRT.dll库;打包后的exe放到另一台电脑上若无这个dll会报错staticruntime "On"	systemversion "latest"	-- windowSDK版本-- 预处理器定义defines{"YT_PLATFORM_WINDOWS","YT_BUILD_DLL","YT_ENABLE_ASSERTS",}-- 编译好后移动Hazel.dll文件到Sandbox文件夹下postbuildcommands{("{COPY} %{cfg.buildtarget.relpath} ../bin/" .. outputdir .. "/Sandbox")}-- 不同配置下的预定义不同filter "configurations:Debug"defines "YT_DEBUG"buildoptions"/MDd"symbols "On"filter "configurations:Release"defines "YT_RELEASE"buildoptions"/MD"optimize "On"filter "configurations:Dist"defines "YT_DIST"buildoptions"/MD"optimize "On"project "Sandbox"location "Sandbox"kind "ConsoleApp"language "C++"targetdir ("bin/" .. outputdir .. "/%{prj.name}")objdir ("bin-int/" .. outputdir .. "/%{prj.name}")files{"%{prj.name}/src/**.h","%{prj.name}/src/**.cpp"}-- 同样包含spdlog头文件includedirs{"YOTOEngine/vendor/spdlog-1.x/include","YOTOEngine/src"}-- 引用hazellinks{"YOTOEngine","GLFW","opengl32.lib"}filter "system:windows"cppdialect "C++17"staticruntime "On"systemversion "latest"defines{"YT_PLATFORM_WINDOWS"}filter "configurations:Debug"defines "YT_DEBUG"buildoptions"/MDd"symbols "On"filter "configurations:Release"defines "YT_RELEASE"buildoptions"/MD"optimize "On"filter "configurations:Dist"defines "YT_DIST"buildoptions"/MD"optimize "On"
改变窗口大小:
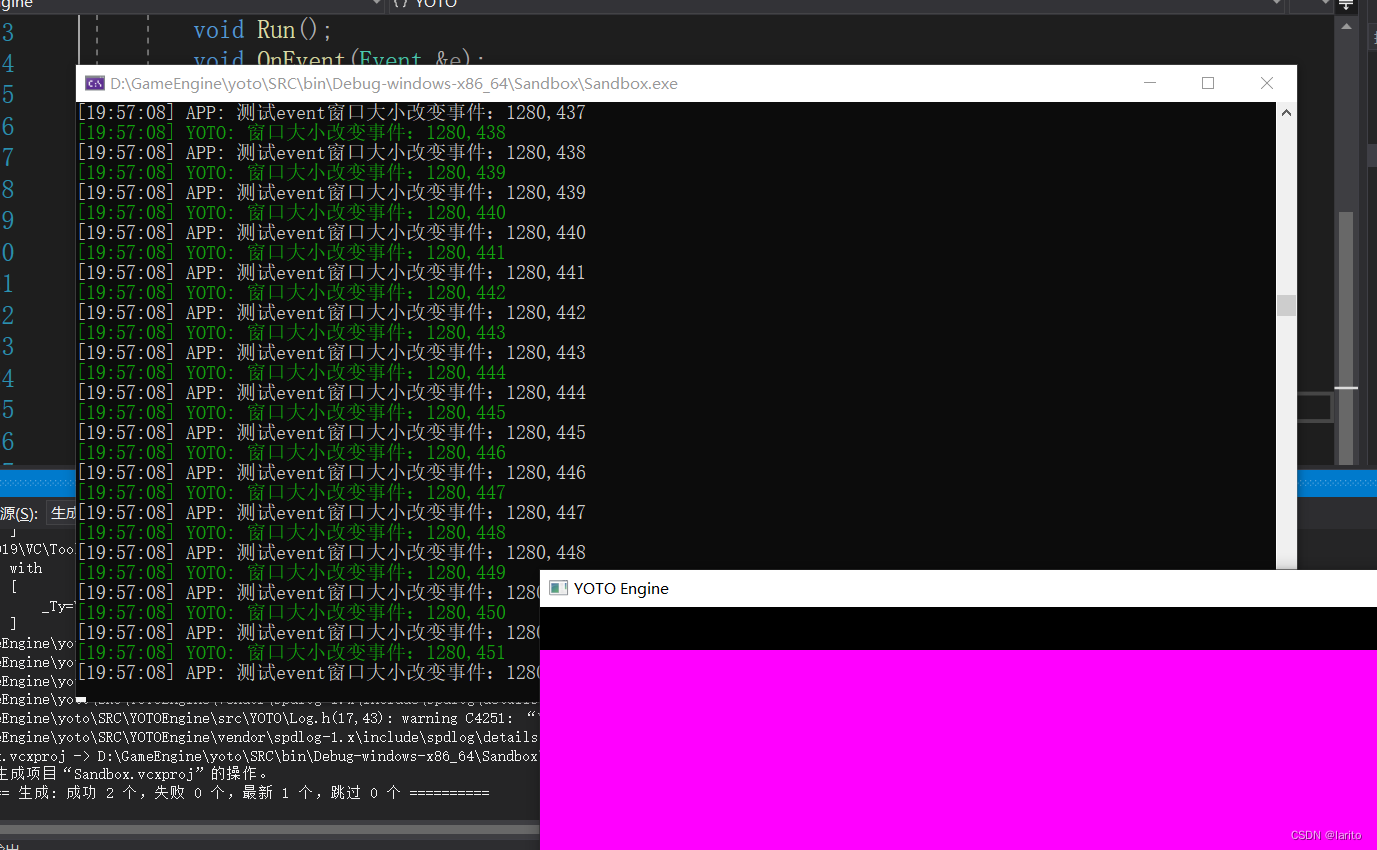
cool!
Glad下载:
glad.dav1d.de,配置如下,点击Generate生成
 点击zip下载
在如下位置创建Glad文件夹,并将下载的include和src拖入

Glad配置:
在Glad文件夹下创建premake5.lua:把glad,KHR,src包含进来
project "Glad"kind "StaticLib"language "C"staticruntime "off"warnings "off"targetdir ("bin/" .. outputdir .. "/%{prj.name}")objdir ("bin-int/" .. outputdir .. "/%{prj.name}")files{"include/glad/glad.h","include/KHR/khrplatform.h","src/glad.c"}includedirs{"include"-- 为了glad.c直接#include <glad/glad.h>,而不用#include <include/glad/glad.h}filter "system:windows"systemversion "latest"filter { "system:windows", "configurations:Debug-AS" } runtime "Debug"symbols "on"sanitize { "Address" }flags { "NoRuntimeChecks", "NoIncrementalLink" }filter "configurations:Debug"defines "YT_DEBUG"buildoptions "/MTd"symbols "On"filter "configurations:Release"defines "YT_RELEASE"buildoptions "/MT"symbols "On"filter "configurations:Dist"defines "YT_DIST"buildoptions "/MT"symbols "On"
同时修改SRC下的premake5.lua:和GLFW类似
workspace "YOTOEngine"		-- sln文件名architecture "x64"	configurations{"Debug","Release","Dist"}
-- https://github.com/premake/premake-core/wiki/Tokens#value-tokens
-- 组成输出目录:Debug-windows-x86_64
outputdir = "%{cfg.buildcfg}-%{cfg.system}-%{cfg.architecture}"
-- 包含相对解决方案的目录
IncludeDir={}
IncludeDir["GLFW"]="YOTOEngine/vendor/GLFW/include"
IncludeDir["Glad"]="YOTOEngine/vendor/Glad/include"
include "YOTOEngine/vendor/GLFW"
include "YOTOEngine/vendor/Glad"project "YOTOEngine"		--YOTOEngine项目location "YOTOEngine"--在sln所属文件夹下的YOTOEngine文件夹kind "SharedLib"--dll动态库language "C++"targetdir ("bin/" .. outputdir .. "/%{prj.name}") -- 输出目录objdir ("bin-int/" .. outputdir .. "/%{prj.name}")-- 中间目录pchheader "ytpch.h"pchsource "YOTOEngine/src/ytpch.cpp"-- 包含的所有h和cpp文件files{"%{prj.name}/src/**.h","%{prj.name}/src/**.cpp"}-- 包含目录includedirs{"%{prj.name}/src","%{prj.name}/vendor/spdlog-1.x/include","%{IncludeDir.GLFW}","%{IncludeDir.Glad}"}links{"GLFW",-- GLFW.lib库链接到YOTOEngine项目中"Glad",-- Glad.lib库链接到YOTOEngine项目中"opengl32.lib"}-- 如果是window系统filter "system:windows"cppdialect "C++17"-- On:代码生成的运行库选项是MTD,静态链接MSVCRT.lib库;-- Off:代码生成的运行库选项是MDD,动态链接MSVCRT.dll库;打包后的exe放到另一台电脑上若无这个dll会报错staticruntime "On"	systemversion "latest"	-- windowSDK版本-- 预处理器定义defines{"YT_PLATFORM_WINDOWS","YT_BUILD_DLL","YT_ENABLE_ASSERTS","GLFW_INCLUDE_NONE"-- 让GLFW不包含OpenGL}-- 编译好后移动Hazel.dll文件到Sandbox文件夹下postbuildcommands{("{COPY} %{cfg.buildtarget.relpath} ../bin/" .. outputdir .. "/Sandbox")}-- 不同配置下的预定义不同filter "configurations:Debug"defines "YT_DEBUG"buildoptions"/MDd"symbols "On"filter "configurations:Release"defines "YT_RELEASE"buildoptions"/MD"optimize "On"filter "configurations:Dist"defines "YT_DIST"buildoptions"/MD"optimize "On"project "Sandbox"location "Sandbox"kind "ConsoleApp"language "C++"targetdir ("bin/" .. outputdir .. "/%{prj.name}")objdir ("bin-int/" .. outputdir .. "/%{prj.name}")files{"%{prj.name}/src/**.h","%{prj.name}/src/**.cpp"}-- 同样包含spdlog头文件includedirs{"YOTOEngine/vendor/spdlog-1.x/include","YOTOEngine/src"}-- 引用YOTOEnginelinks{"YOTOEngine","GLFW","opengl32.lib"}filter "system:windows"cppdialect "C++17"staticruntime "On"systemversion "latest"defines{"YT_PLATFORM_WINDOWS"}filter "configurations:Debug"defines "YT_DEBUG"buildoptions"/MDd"symbols "On"filter "configurations:Release"defines "YT_RELEASE"buildoptions"/MD"optimize "On"filter "configurations:Dist"defines "YT_DIST"buildoptions"/MD"optimize "On"
生成:
测试:
写一段测试代码在Application.cpp
能run,没问题

cool!
这篇关于跟着cherno手搓游戏引擎【5】layer(层)、Glad的文章就介绍到这儿,希望我们推荐的文章对编程师们有所帮助!


