本文主要是介绍手摸手系列之SpringBoot+Vue2项目整合高德地图实现车辆实时定位功能,希望对大家解决编程问题提供一定的参考价值,需要的开发者们随着小编来一起学习吧!
前言
最近在做一个物流内陆运输的项目,其中的一个关键功能是根据车辆的GPS数据在页面上实时显示车辆位置信息。由于我们已经获得了第三方提供的GPS数据,所以接下来的任务是将这些数据整合到我们的系统中,并利用高德地图API来展示车辆的实时位置。接下来,来看看怎么样来一步步实现吧。
一、后端工作:将第三方提供的GPS数据进一步整合优化后,再返回给前端
1. 第三方提供的接口文档
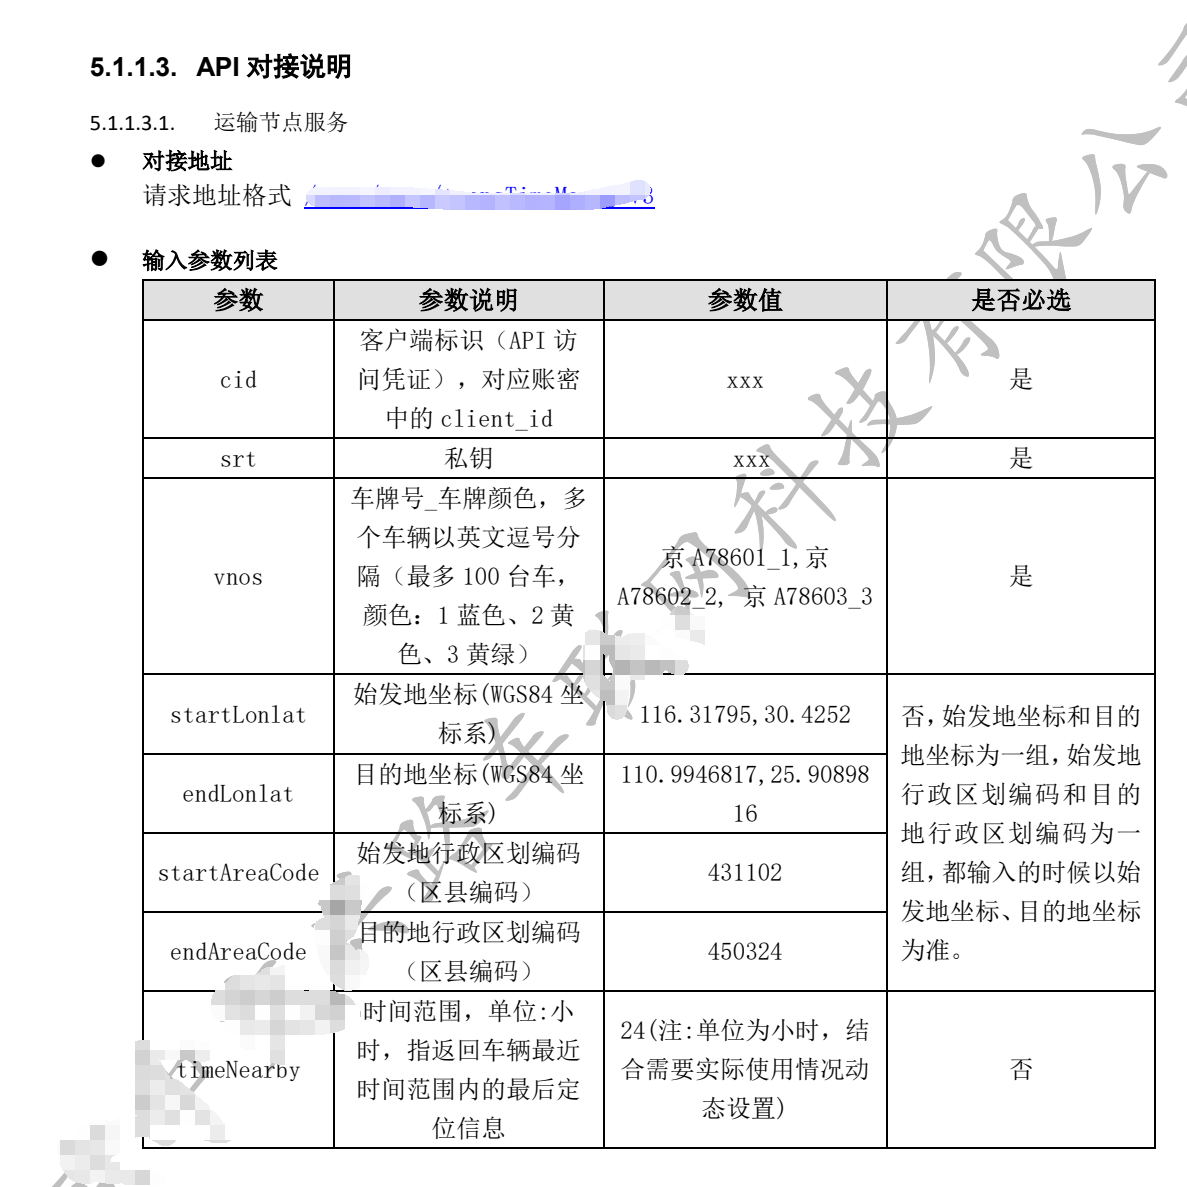
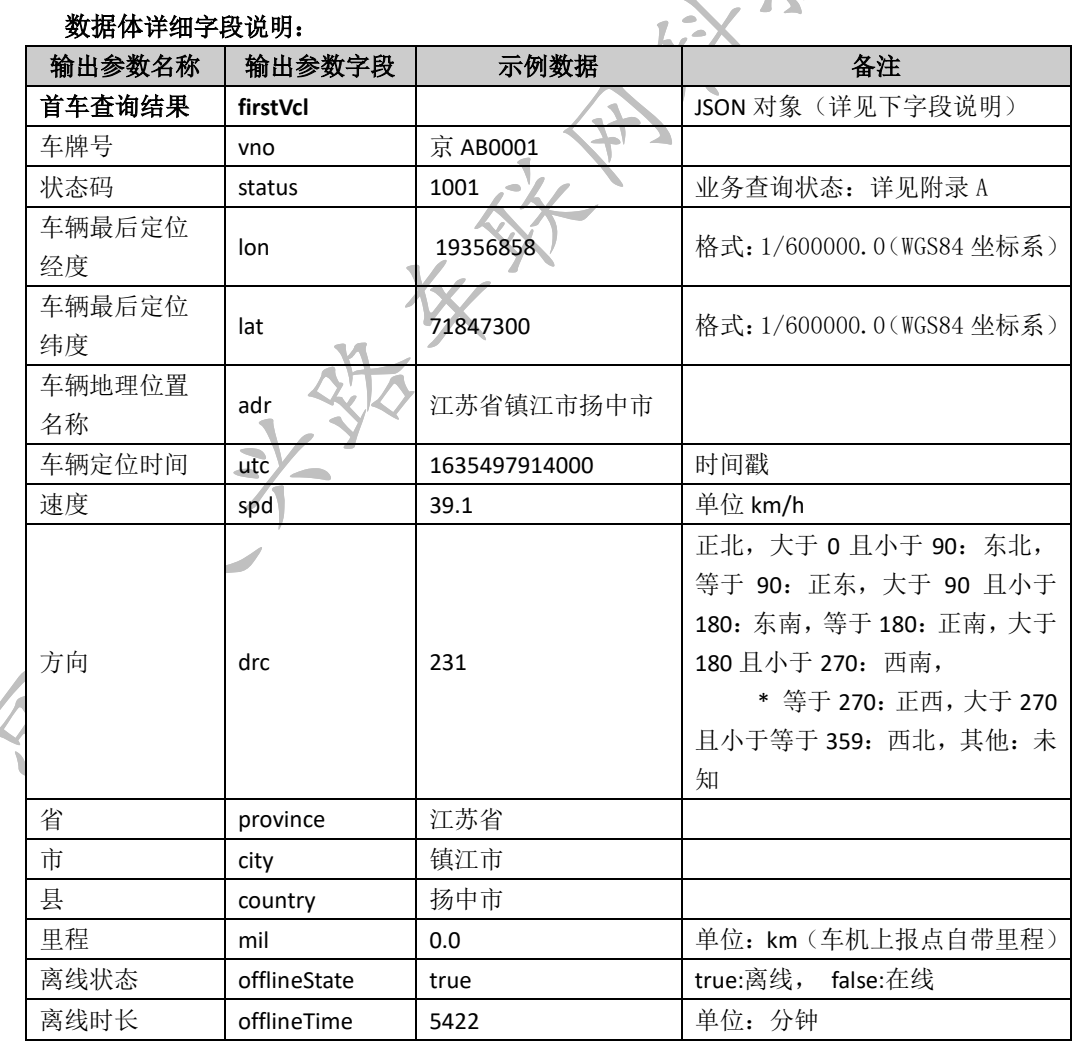
第三方的返回数据示例:
{"status": 1001,"result": {"firstVcl": {"lat": "22088888","lon": "96332278","adr": "山东省济南市历城区中电四齐鲁安替制药临建区,西南方向,159.0米","utc": "1703843972000","spd": "0.0","drc": "278","province": "山东省","city": "济南市","country": "历城区","mil": "488206.2","vno": "鲁AL8560","status": "1001","offlineState": false,"offlineTime": "","runDistance": "","remainDistance": "","estimateArriveTime": ""},"others": []}
}
2. 后端主要代码
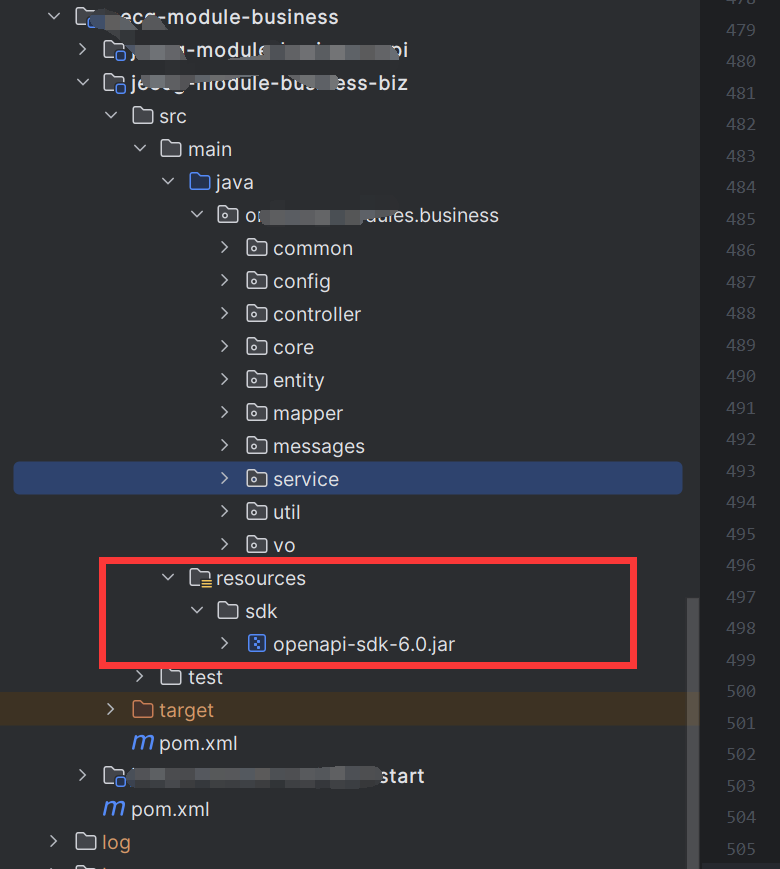
需要先将第三方提供的SDK包整合进项目里。在resources下新建目录sdk,然后将sdk.jar拷贝进去:
然后在pom.xml中加入依赖:
<dependency><groupId>com.openapi.sdk</groupId><artifactId>openapi-sdk</artifactId><version>6.0</version><scope>system</scope><systemPath>${project.basedir}/src/main/resources/sdk/openapi-sdk-6.0.jar</systemPath>
</dependency>
最后重要的一步,在spring-boot-maven-plugin插件设置加上includeSystemScope:
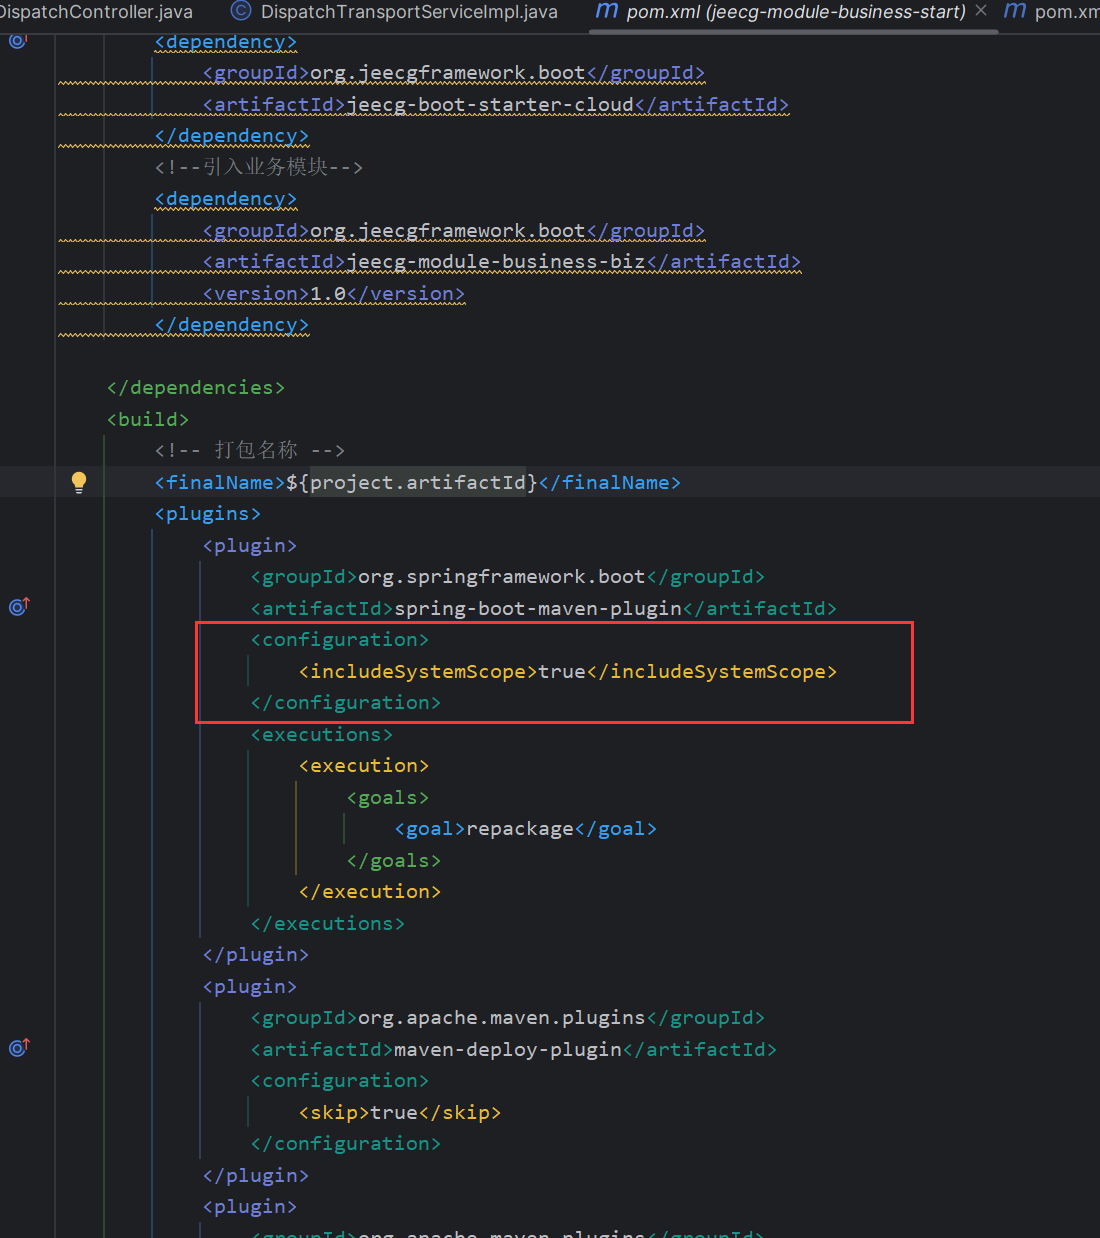
includeSystemScope:scope为system的maven默认是不打包进去的,所以导致上面说的,项目打包完成后,对应的lib目录下并没有外部提供的xxx-api-sdk。使用该配置,将指定maven把scope为system的依赖 同样打到jar包中去。
然后就可以直接使用SDK中的postHttps(url, map)等方法了。
下面是主要的Java代码:
/*** 厂外物流-在途监控类服务** 运输节点服务** @param vnos 车牌号_车牌颜色,多* 个车辆以英文逗号分* 隔(最多 100 台车,* 颜色:1 蓝色、2 黄* 色、3 黄绿)京 A78601_1,京* A78602_2, 京 A78603_3* @return 陆运单列表*/
@ApiOperation(value = "运输节点服务", notes = "运输节点服务")
@RequestMapping(value = "/getDataV2")
public Result<?> getDataV2(@RequestParam("vnos") String vnos,@RequestParam(value = "timeNearby", required = false) String timeNearby) {return dispatchTransportService.getDataV2(vnos, timeNearby);
}
/*** 厂外物流-在途监控类服务* <p>* 运输节点服务** @param vnos       车牌号_车牌颜色,多*                   个车辆以英文逗号分*                   隔(最多 100 台车,*                   颜色:1 蓝色、2 黄*                   色、3 黄绿)京 A78601_1,京*                   A78602_2, 京 A78603_3* @param timeNearby* @return 陆运单列表*/
@Override
public Result<?> getDataV2(String vnos, String timeNearby) {try {Map<String, String> map = new HashMap<>();map.put("cid", "xxxxxxxxxxxxxxxxxxxxxxxxxxxxxxxx");map.put("srt", "yyyyyyyyyyyyyyyyyyyyyyyyyyyyyyyy"); // 私钥用于 SDK 生成签名,不会在请求中传输map.put("vnos", vnos);if (isNotBlank(timeNearby)) {map.put("timeNearby", timeNearby);}String url = "https://aaaaaaaaa.99999.com/bbbbb/ccccc/getDataV2";DataExchangeService des = new DataExchangeService(5000, 8000);log.info("请求地址:" + url);// 通过 https 方式调用,此方法内部会使用私钥生成签名参数 sign,私钥不会发送String res = des.postHttps(url, map);log.info("返回:" + res);JSONObject returnJson = new JSONObject();if (isNotBlank(res)) {JSONObject jsonObject = JSONObject.parseObject(res);if (jsonObject.containsKey("status")) {String code = jsonObject.getString("status");if (code.equals("1001")) {String data = jsonObject.getString("result");returnJson = JSONObject.parseObject(data);} else {return Result.error("未获取到车辆" + (vnos.substring(0, vnos.indexOf("_"))) + "位置信息!");}}}return Result.ok(returnJson);} catch (Exception e) {log.error("e:" + e.getMessage());return Result.error("获取车辆定位出现异常:" + e.getMessage());}
}
返回前端的数据格式如下:
{"status": 1001,"result": {"firstVcl": {"lat": "2968514","lon": "85692278","adr": "山东省济南市历城区中电四齐鲁安替制药临建区,西南方向,159.0米","utc": "1703843972000","spd": "0.0","drc": "278","province": "山东省","city": "济南市","country": "历城区","mil": "488206.2","vno": "鲁AX9999","status": "1001","offlineState": false,"offlineTime": "","runDistance": "","remainDistance": "","estimateArriveTime": ""},"others": []}
}
二、前端工作:接收后端返回数据,整合高德地图展示数据
1. 先去高德开放平台申请key
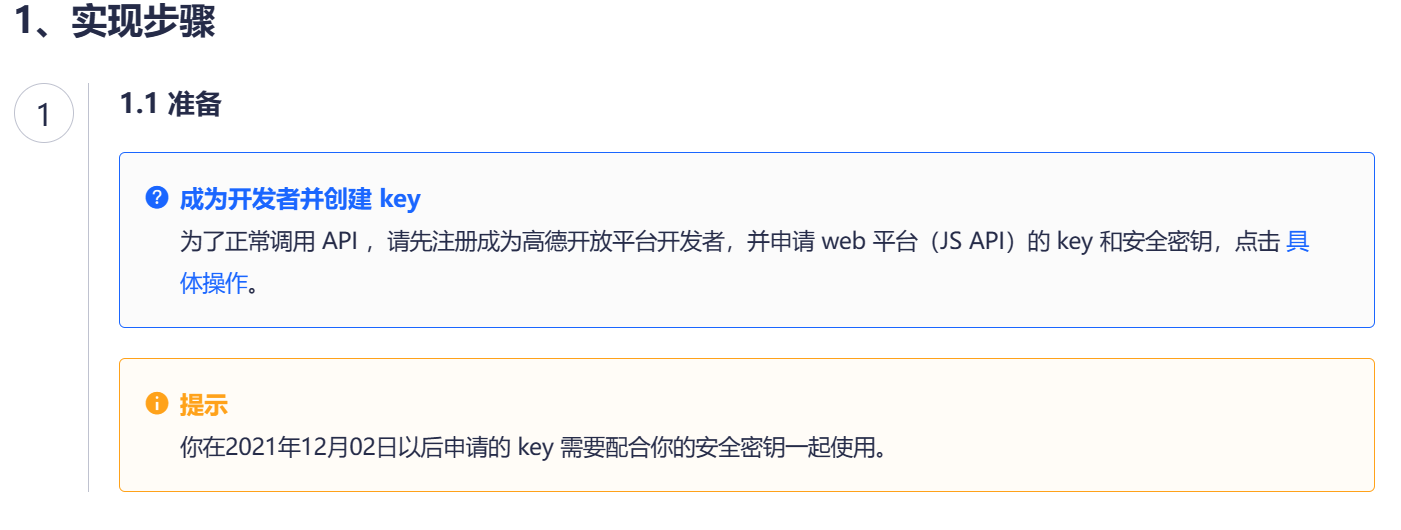
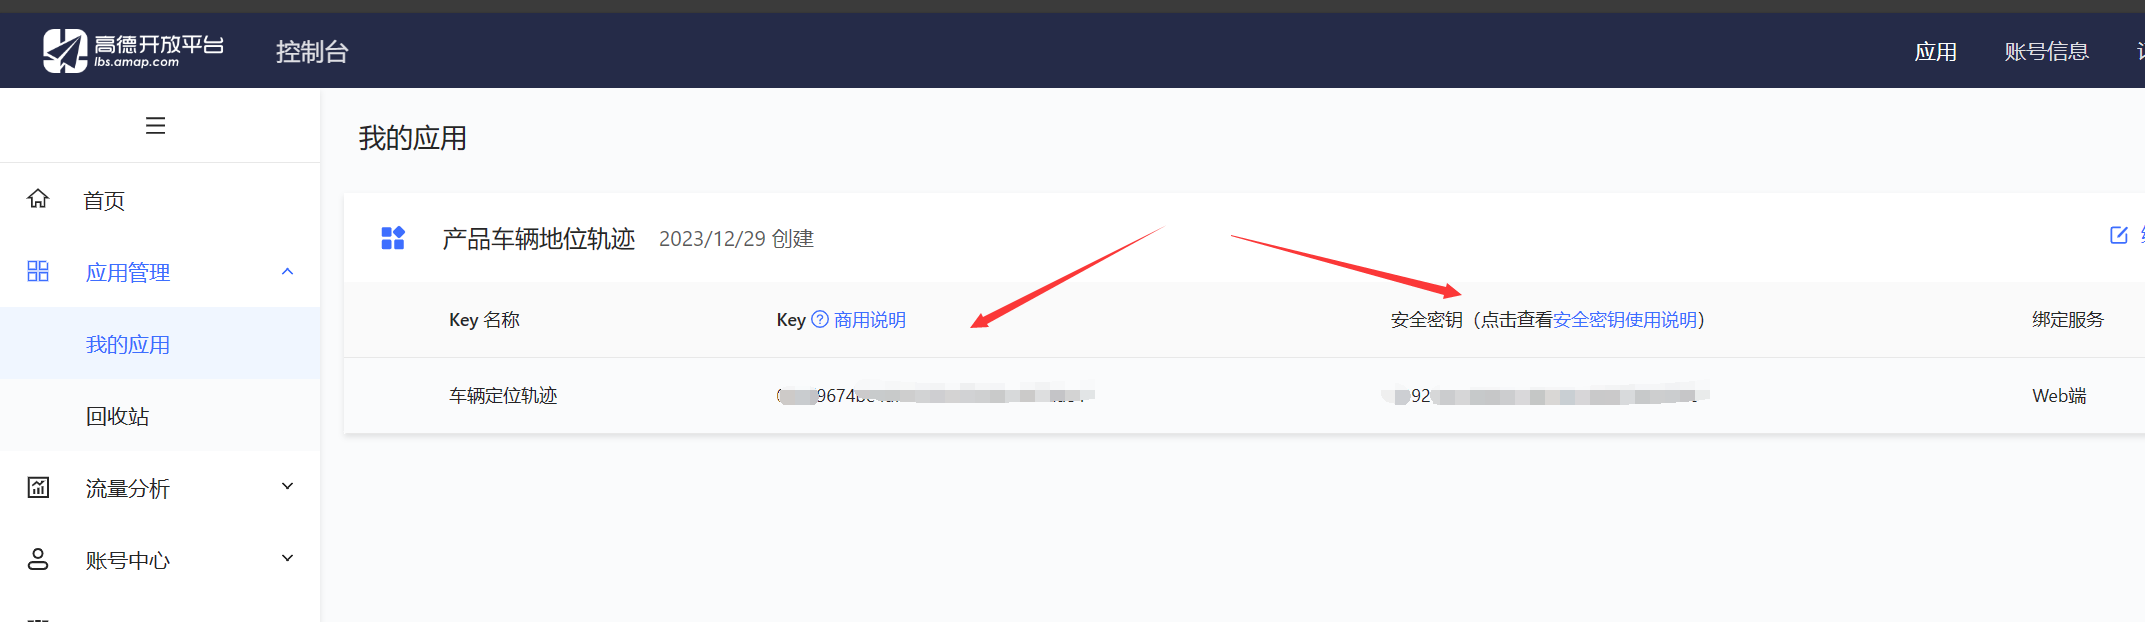
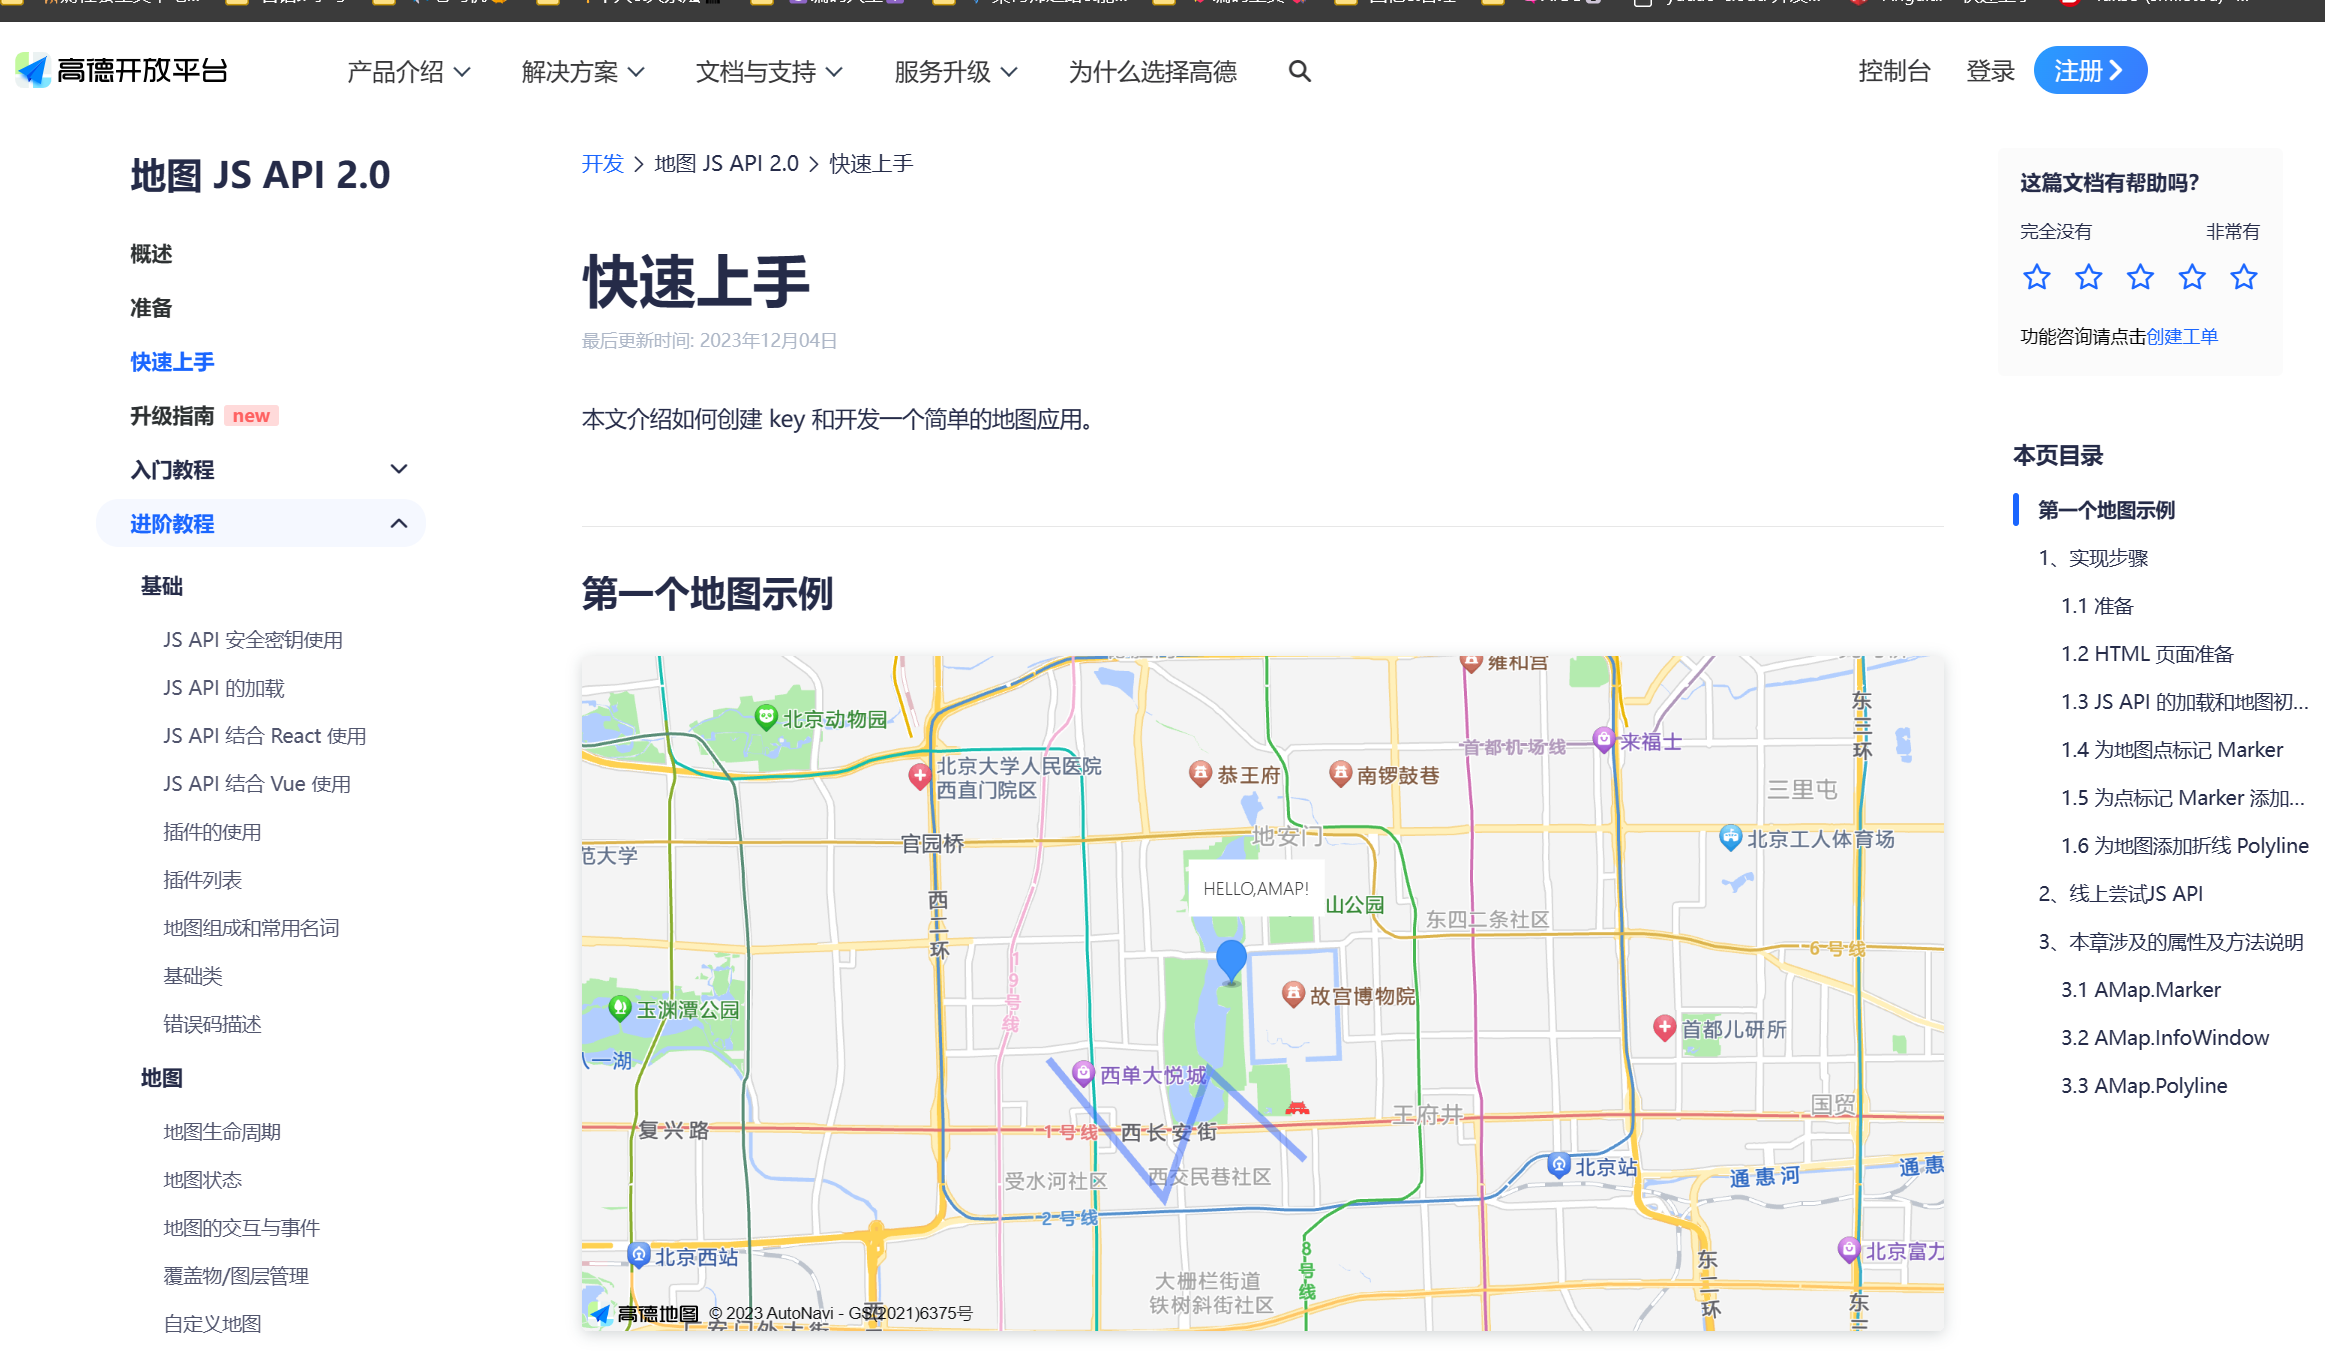
👉高德的地图JS API 2.0非常详细,只需要看文档就可以完成各种需要的功能,不需要再看其他人的博客了,以免被误导。
2. 新建地图组件MapContainer.vue
<template><div><div id="container"></div><div class="info"><h3>{{ firstVcl.vno }} <a-switch style='margin-left: 80px' size="small" checked-children="开" un-checked-children="关" default-checked @change='isRealtime'/>实时刷新<a-tooltip slot="suffix" title="开启后默认每15秒获取最新位置信息!"><a-icon type="question-circle" theme="twoTone"/></a-tooltip></h3><hr><p style='margin-top: 3px'><span style='font-weight: bold'>定位时间:</span>{{ this.formatDate(firstVcl.utc?Number(firstVcl.utc):new Date().getTime(), 'yyyy-MM-dd hh:mm:ss') }}</p><p><span style='font-weight: bold'>最后定位经度:</span>{{ firstVcl.lon.toFixed(6) }}</p><p><span style='font-weight: bold'>最后定位纬度:</span>{{ firstVcl.lat.toFixed(6) }}</p><p><span style='font-weight: bold'>地理位置名称:</span>{{ firstVcl.adr }}</p><p><span style='font-weight: bold'>方向:</span>{{ getDrc() }}</p><p><span style='font-weight: bold'>里程:</span>{{ firstVcl.mil ? firstVcl.mil : 0 }} km</p><p><span style='font-weight: bold'>速度:</span>{{ firstVcl.spd ? firstVcl.spd : 0 }} km/h</p><!--			<p><span style='font-weight: bold'>已行驶距离:</span>{{ firstVcl.runDistance ? firstVcl.runDistance : 0 }} km</p>--><!--			<p><span style='font-weight: bold'>剩余运距:</span>{{ firstVcl.remainDistance ? firstVcl.remainDistance : 0 }} km</p>--><!--			<p><span style='font-weight: bold'>预计到达时间:</span>{{ firstVcl.estimateArriveTime ? this.formatDate(Number(firstVcl.estimateArriveTime), 'yyyy-MM-dd hh:mm:ss') : '' }}</p>--><p><span style='font-weight: bold'>离线状态:</span>{{ getOfflineState() }}</p><p><span style='font-weight: bold'>离线时长:</span>{{ firstVcl.offlineTime }}</p></div></div>
</template>
<script>import AMapLoader from "@amap/amap-jsapi-loader";import { getAction } from '@/api/manage'import BigNumber from 'bignumber.js'// 设置安全密钥window._AMapSecurityConfig = {securityJsCode: 'xxxxxxxxxxxxxxxxxxxx0704b5080',}export default {name: "MapContainer",props: {carModel: {type: Object,default: {}}},data() {return {firstVcl: {},map : null,marker : null,overlays : [],myTimer : null,placeSearch : null,stopTimer: false,url: {getDataV2: '/business/dispatch/getDataV2'}}},mounted() {this.initAMap()// 通过 $once 来监听定时器,在 beforeDestroy 钩子可以被清除。this.$once('hook:beforeDestroy', () => {clearInterval(this.myTimer)})},unmounted() {this.stopTimer = truethis.map.destroy()},beforeDestroy() {this.stopTimer = truethis.map.destroy()},methods: {isRealtime(value) {if (value === true) {this.stopTimer = falsethis.realtimeRefresh(this.firstVcl.vno)} else if (value === false) {this.stopTimer = true}},/*** 实时刷新*/realtimeRefresh(carNum) {this.myTimer = setInterval(() => {// 停止定时器if (this.stopTimer === true) {console.log('停止实时刷新!!!')clearInterval(this.myTimer)return}const carType = '2' // 默认黄牌车let params = {vnos: carNum + '_' + carType,timeNearby: '30'}getAction(this.url.getDataV2, params).then((res) => {if (res.success) {console.log(res.result.records || res.result)let data = res.result.records || res.resultthis.firstVcl = data.firstVclif (data.firstVcl && data.firstVcl.lon) {this.firstVcl.lon = new BigNumber(data.firstVcl.lon).div(600000.0).toNumber()}if (data.firstVcl && data.firstVcl.lat) {this.firstVcl.lat = new BigNumber(data.firstVcl.lat).div(600000.0).toNumber()}var position = new AMap.LngLat(this.firstVcl.lon, this.firstVcl.lat) //传入经纬度this.map.setCenter(position) //设置地图中心点if (this.marker) {this.marker.setPosition([this.firstVcl.lon, this.firstVcl.lat]); //更新点标记位置}} else {// 失败this.$message.warning(res.message || res)}}).finally(() => {})},15000)},initAMap() {this.firstVcl = Object.assign({}, this.carModel.firstVcl)this.realtimeRefresh(this.firstVcl.vno)AMapLoader.load({key: "yyyyyyyyyyyyyyyyyybe1b7dae4", // 申请好的Web端开发者Key,首次调用 load 时必填version: "2.0", // 指定要加载的 JSAPI 的版本,缺省时默认为 1.4.15plugins: ['AMap.ToolBar', 'AMap.Scale', 'AMap.MapType'], // 需要使用的的插件列表,如比例尺'AMap.Scale'等}).then((AMap) => {this.map = new AMap.Map("container", {mapStyle: "amap://styles/fresh", // 设置地图的显示样式// 设置地图容器idviewMode: "3D", // 是否为3D地图模式zoom: 13, // 初始化地图级别center: [this.firstVcl.lon, this.firstVcl.lat], // 初始化地图中心点位置resizeEnable: true});this.map.addControl(new AMap.ToolBar()); // 缩略地图控件this.map.addControl(new AMap.Scale()); // 比例尺this.map.addControl(new AMap.MapType()); // 图层切换// 创建一个 Iconvar startIcon = new AMap.Icon({// 图标尺寸size: new AMap.Size(32, 32),// 图标的取图地址image: require("../../../assets/汽车1.png"),// 图标所用图片大小imageSize: new AMap.Size(32, 32),// 图标取图偏移量// imageOffset: new AMap.Pixel(-9, -3)});// 将 Icon 实例添加到 marker 上:this.marker = new AMap.Marker({position: [this.firstVcl.lon, this.firstVcl.lat], //点标记的位置offset: new AMap.Pixel(0, 0), //设置点标记偏移量anchor: "bottom-center", //设置锚点方位icon: startIcon, //添加 Icon 实例zooms: [2, 18], //点标记显示的层级范围,超过范围不显示});// 设置鼠标划过点标记显示的文字提示this.marker.setTitle(this.firstVcl.vno);// 设置label标签// label默认蓝框白底左上角显示,样式className为:amap-marker-labelthis.marker.setLabel({direction:'top',offset: new AMap.Pixel(0, 0),  //设置文本标注偏移量content: `<div>${this.firstVcl.vno}</div>`, //设置文本标注内容});// 加入到map对象中绘制this.map.add(this.marker);}).catch((e) => {console.log(e);});},/*** 正北,大于 0 且小于 90:东北,* 等于 90:正东,大于 90 且小于* 180:东南,等于 180:正南,大于* 180 且小于 270:西南,*  * 等于 270:正西,大于 270* 且小于等于 359:西北,其他:未* 知* @returns {string}*/getDrc() {if (this.firstVcl.drc) {let drc = Number(this.firstVcl.drc);if (drc > 0 && drc < 90) {return '东北'} else if (drc === 90) {return '正东'} else if (drc > 90 && drc < 180) {return '东南'} else if (drc === 180) {return '正南'} else if (drc > 180 && drc < 270) {return '西南'} else if (drc === 270) {return '正西'} else if (drc > 270 && drc <= 359) {return '西北'}}return '未知'},getOfflineState() {if (this.firstVcl.offlineState) {return '离线'} else {return '在线'}},/*** 时间格式化* @param value* @param fmt* @returns {*}*/formatDate (value, fmt) {let regPos = /^\d+(\.\d+)?$/if (regPos.test(value)) {//如果是数字let getDate = new Date(value)let o = {'M+': getDate.getMonth() + 1,'d+': getDate.getDate(),'h+': getDate.getHours(),'m+': getDate.getMinutes(),'s+': getDate.getSeconds(),'q+': Math.floor((getDate.getMonth() + 3) / 3),'S': getDate.getMilliseconds()}if (/(y+)/.test(fmt)) {fmt = fmt.replace(RegExp.$1, (getDate.getFullYear() + '').substr(4 - RegExp.$1.length))}for (let k in o) {if (new RegExp('(' + k + ')').test(fmt)) {fmt = fmt.replace(RegExp.$1, (RegExp.$1.length === 1) ? (o[k]) : (('00' + o[k]).substr(('' + o[k]).length)))}}return fmt} else {//TODOvalue = value.trim()return value.substr(0, fmt.length)}}}
};
</script>
<style scoped>
#container {width: 100%;height: 800px;
}
.info {position: absolute;width: 300px;top: 75px;left: 20px;z-index: 1000; /* 为确保 info 在地图上方 */padding: 10px;background-color: rgba(255, 255, 255, 0.9); /* 设置一个半透明的背景色 */
}
.info p {margin: 2px;
}
</style>
3. 在父组件VehicleLocationAndTrackingModal中引入地图组件
<template><z-c-modal:title="'陆运单 ' + title":width="width":visible="visible"@cancel="handleCancel"switchFullscreen:destroyOnClose="true"cancelText="关闭"><template slot='footer'><a-button type="primary" @click="handleCancel">关闭</a-button></template><a-card :body-style='{padding: 0}' :bordered='false'><a-tabs v-model='activeKey' default-active-key='1' @change='callbacktab'><a-tab-pane key='1' :forceRender='true' tab='车辆定位'><map-container ref='carLocationRef' :car-model='transport.carModel'/></a-tab-pane><a-tab-pane key='2' :forceRender='true' tab='轨迹回放'>
<!--					<aexg-list ref='aexgList' />--></a-tab-pane></a-tabs></a-card></z-c-modal>
</template>
<script>
import CarLocationMap from '@/views/dispatchManage/component/CarLocationMap.vue'
import ZCModal from '@/components/jeecg/ZCModal/index.vue'
import MapContainer from '@/views/dispatchManage/component/MapContainer.vue'
import BigNumber from 'bignumber.js'
export default {name: 'VehicleLocationAndTrackingModal',components: { ZCModal, CarLocationMap, MapContainer },data() {return {activeKey: '1',transport: {},title: '',width: 1180,visible: false,confirmLoading: false,disableSubmit: false}},methods: {add(record) {this.transport = Object.assign({}, record)if (this.transport.carModel) {let lon = 116.397428if (this.transport.carModel.firstVcl && this.transport.carModel.firstVcl.lon) {lon = new BigNumber(this.transport.carModel.firstVcl.lon).div(600000.0).toNumber();}this.transport.carModel.firstVcl.lon = lonlet lat = 39.90923if (this.transport.carModel.firstVcl && this.transport.carModel.firstVcl.lat) {lat = new BigNumber(this.transport.carModel.firstVcl.lat).div(600000.0).toNumber();}this.transport.carModel.firstVcl.lat = lat}this.visible = true},callbacktab(key) {console.log(key)},close() {this.visible = false},handleCancel () {this.close()}}
}
</script><style scoped lang='less'>
@import '~@assets/less/common.less';
/deep/ .ant-modal-body {padding:0 12px !important;
}
/deep/ .ant-tabs-nav-wrap {margin-top: -5px;
}
</style>
三、最终的展示效果:
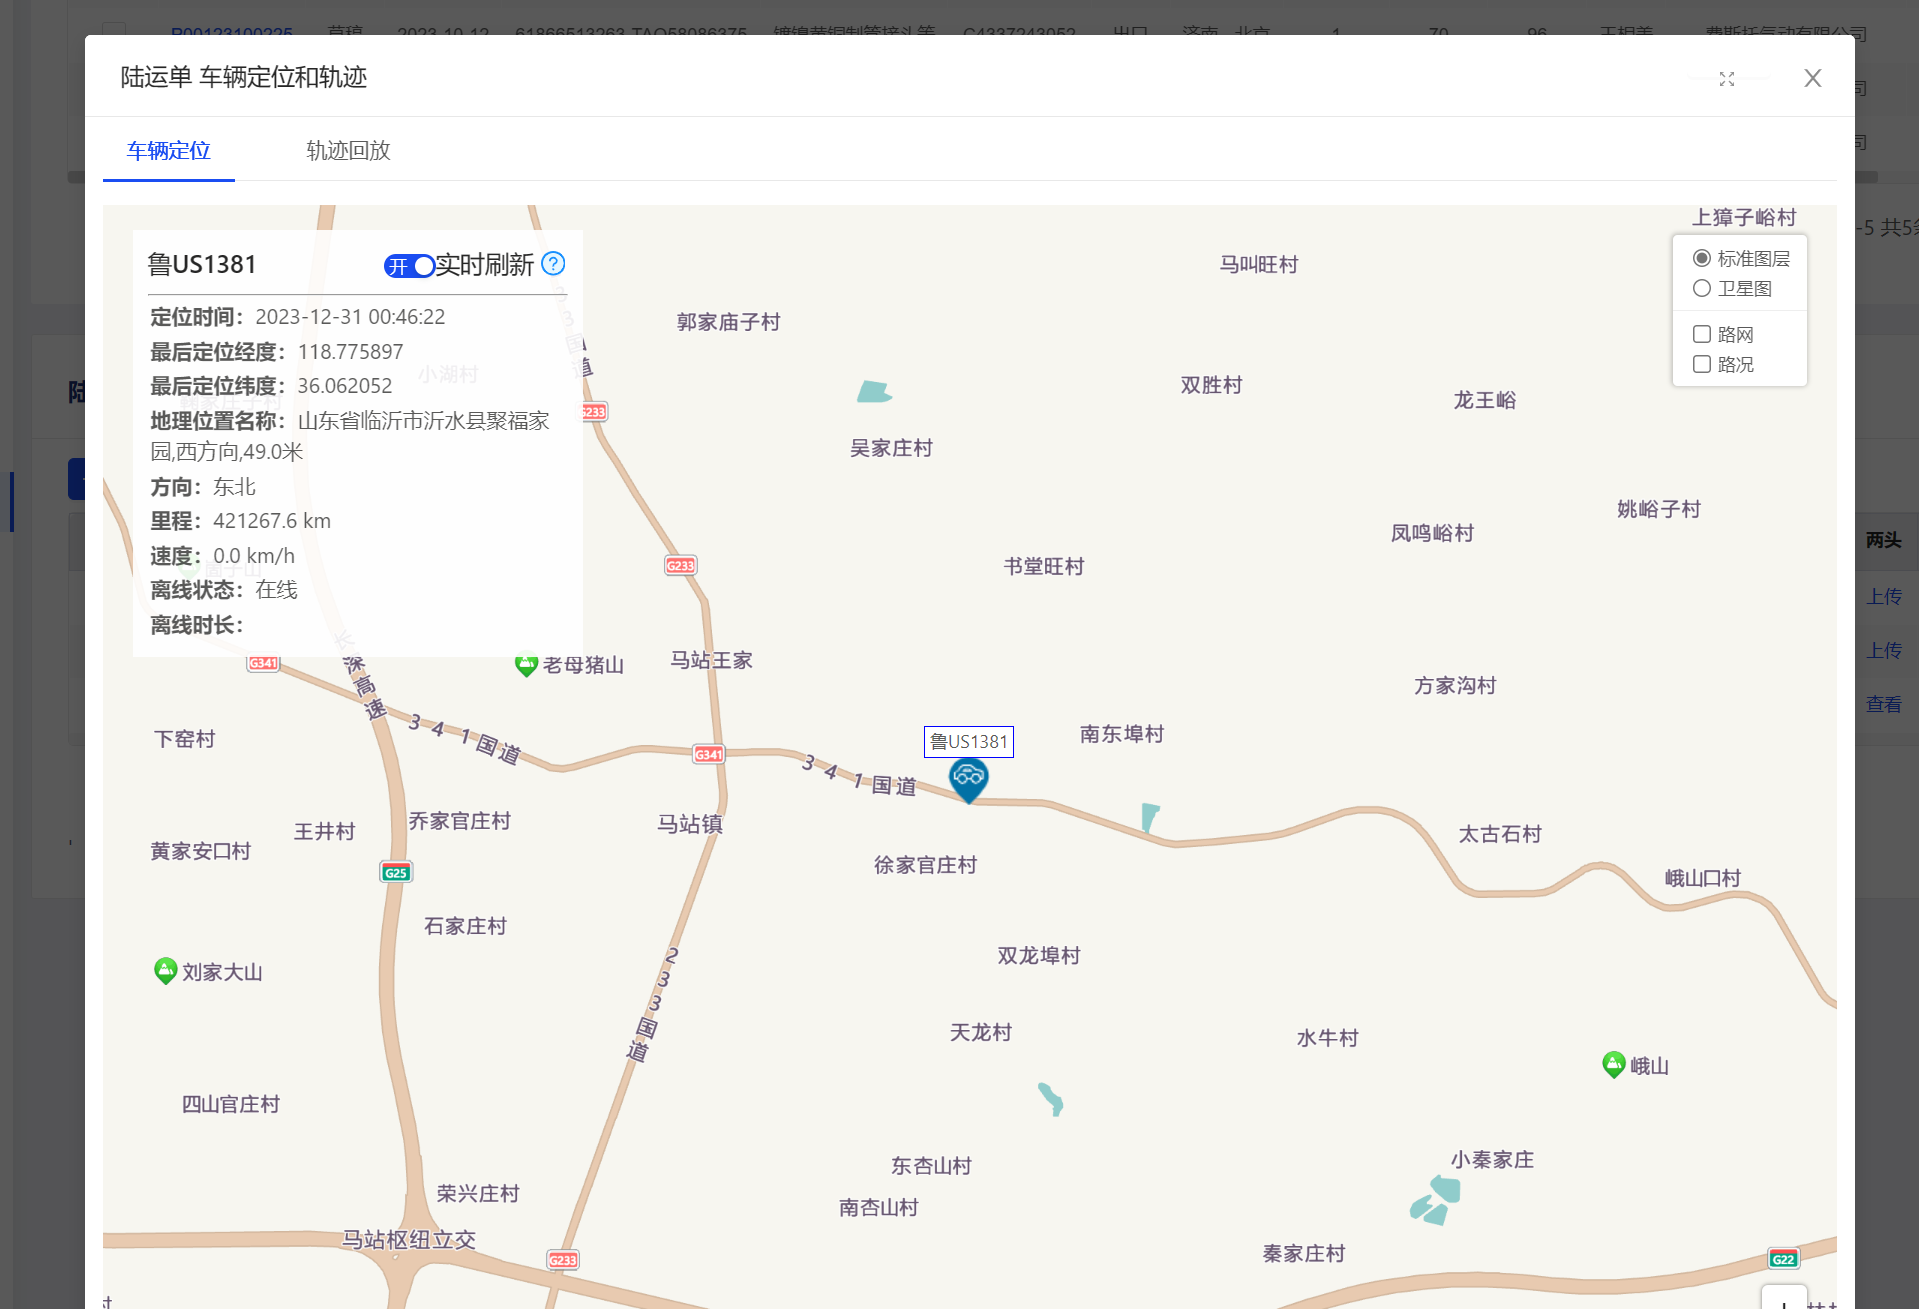
总结
Vue整合高德地图总的来说还是非常简单的,下一篇我们继续来介绍如何实现展示车辆的某段时间的运行轨迹。
这篇关于手摸手系列之SpringBoot+Vue2项目整合高德地图实现车辆实时定位功能的文章就介绍到这儿,希望我们推荐的文章对编程师们有所帮助!


