本文主要是介绍android自定义控件类型,Android自定义控件 | 小红点的三种实现(上),希望对大家解决编程问题提供一定的参考价值,需要的开发者们随着小编来一起学习吧!
小红点用于通知未读消息,在应用中到处可见。本文将介绍三种实现方案。分别是:多控件方案、单控件绘制方案、容器控件绘制方案。不知道你会更偏向哪种方案?
Demo 使用 Kotlin 编写,Kotlin系列教程可以点击这里
多控件方案
多控件最容易想到的方案:TextView作为主体控件,View作为附属小红点控件相互叠加。效果如下:

布局文件如下:
android:layout_width="wrap_content"
android:layout_height="wrap_content">
android:id="@+id/tvMsg"
android:layout_width="match_parent"
android:layout_height="wrap_content"
android:text="消息"
android:textSize="20sp"/>
android:layout_width="6dp"
android:layout_height="6dp"
android:background="@drawable/red_shape"
app:layout_constraintEnd_toEndOf="@id/tvMsg"
app:layout_constraintTop_toTopOf="@id/tvMsg" />
复制代码
其中red_shape是一个红色圆形shape资源文件,代码如下:
android:shape="oval">
android:height="20dp"/>
复制代码
若要显示未读消息数,可以将View换成TextView。
这个方案最大的优点是简单直观,如果项目赶,没有太多时间深思,用这交差也不错。
但它的缺点是增加了控件的数量,如果一个页面中有3个小红点,就增加3个控件。
有什么办法可以两个控件合成一个控件?
单控件绘制方案
是不是可以自定义一个TextView,在右上角绘制一个红圈。
绘制分为两步:
绘制红色背景
绘制消息数
绘制背景
Canvas有现成的 API 绘制圆圈:
public class Canvas extends BaseCanvas {
/**
* Draw the specified circle using the specified paint. If radius is <= 0, then nothing will be
* drawn. The circle will be filled or framed based on the Style in the paint.
*
* @param cx The x-coordinate of the center of the cirle to be drawn
* @param cy The y-coordinate of the center of the cirle to be drawn
* @param radius The radius of the cirle to be drawn
* @param paint The paint used to draw the circle
*/
public void drawCircle(float cx, float cy, float radius, @NonNull Paint paint) {
super.drawCircle(cx, cy, radius, paint);
}
}
复制代码
只需计算出圆心坐标和半径,然后在onDraw()中调用该 API 即可绘制。
背景的圆心应该是消息数的中心点,背景的半径依赖于消息数的长短,比如,9 条未读消息就比 999 条的背景要小一圈。
绘制消息数
先绘制背景,再绘制消息数,是为了不让其被背景挡住。
Canvas有现成的 API 绘制文字:
public class Canvas extends BaseCanvas {
/**
* Draw the text, with origin at (x,y), using the specified paint. The origin is interpreted
* based on the Align setting in the paint.
*
* @param text The text to be drawn
* @param x The x-coordinate of the origin of the text being drawn
* @param y The y-coordinate of the baseline of the text being drawn
* @param paint The paint used for the text (e.g. color, size, style)
*/
public void drawText(@NonNull String text, float x, float y, @NonNull Paint paint) {
super.drawText(text, x, y, paint);
}
}
复制代码
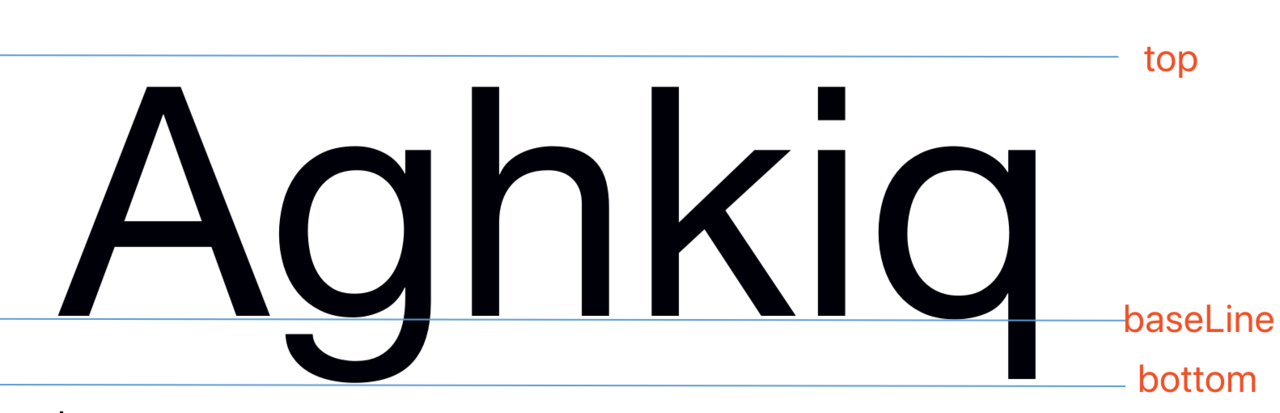
其中第三个参数y是指文字基线的纵坐标,如下图所示:
画文字的关键是求出基线在父控件中的纵坐标,当前 case 的示意图如下:
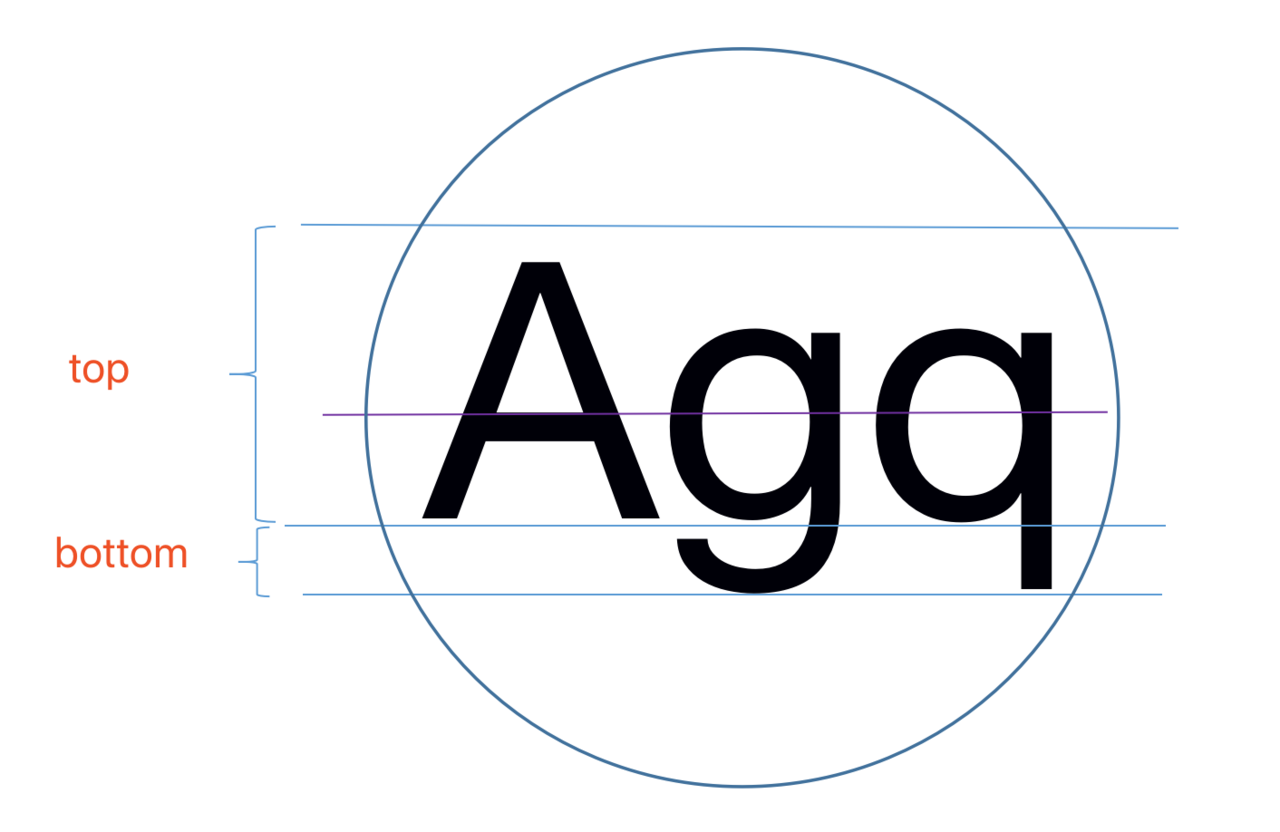
圆圈代表小红点的背景,紫线是圆圈的直径,也是文字的中轴线。小红点绘制在控件的右上角,圆圈的上边和右边分别贴住控件的上边和右边,所以圆圈顶部切线的纵坐标为 0。问题变成已知半径raduis,top,bottom,求 baseLine 纵坐标?(top是负值,bottom为正值)
分解一下计算步骤:
raduis:紫线的纵坐标
(bottom - top) / 2:文字区域总高度的一半
radius + (bottom - top) / 2:文字底部的纵坐标
文字底部的纵坐标减掉 bottom 的值就是基线的纵坐标:
baseline = radius + (bottom - top) / 2 - bottom
然后只要在自定义控件的onDraw()中先绘制背景再绘制消息数即可,自定义控件完整代码如下:
//'自定义TextView'
open class TagTextView @JvmOverloads constructor(context: Context, attrs: AttributeSet? = null, defStyleAttr: Int = 0) : AppCompatTextView(context, attrs, defStyleAttr) {
//'消息数字体大小'
var tagTextSize: Float = 0F
set(value) {
field = value
textPaint.textSize = value
}
//'消息数字体颜色'
var tagTextColor: Int = Color.parseColor("#FFFFFF")
set(value) {
field = value
textPaint.color = value
}
//'背景色'
var tagBgColor: Int = Color.parseColor("#FFFF5183")
set(value) {
field = value
bgPaint.color = value
}
//'消息数字体'
var tagTextTypeFace: Typeface? = null
//'消息数'
var tagText: String? = null
//'背景和消息数的间距'
var tagTextPaddingTop: Float = 5f
var tagTextPaddingBottom: Float = 5f
var tagTextPaddingStart: Float = 5f
var tagTextPaddingEnd: Float = 5f
//'消息数字体区域'
private var textRect: Rect = Rect()
//'消息数画笔'
private var textPaint: Paint = Paint()
//'背景画笔'
private var bgPaint: Paint = Paint()
init {
//'构建消息数画笔'
textPaint.apply {
color = tagTextColor
textSize = tagTextSize
isAntiAlias = true
textAlign = Paint.Align.CENTER
style = Paint.Style.FILL
tagTextTypeFace?.let { typeface = tagTextTypeFace }
}
//'构建背景画笔'
bgPaint.apply {
isAntiAlias = true
style = Paint.Style.FILL
color = tagBgColor
}
}
override fun onDraw(canvas: Canvas?) {
super.onDraw(canvas)
//'只有当消息数不为空时才绘制小红点'
tagText?.takeIf { it.isNotEmpty() }?.let { text ->
textPaint.apply {
//'1.获取消息数区域大小'
getTextBounds(text, 0, text.length, textRect)
fontMetricsInt.let {
//'背景宽=消息数区域宽+边距'
val bgWidth = (textRect.right - textRect.left) + tagTextPaddingStart + tagTextPaddingEnd
//'背景高=消息数区域高+边距'
val bgHeight = tagTextPaddingBottom + tagTextPaddingTop + it.bottom - it.top
//'取宽高中的较大值作为半径'
val radius = if (bgWidth > bgHeight) bgWidth / 2 else bgHeight / 2
val centerX = width - radius
val centerY = radius
//'2.绘制背景'
canvas?.drawCircle(centerX, centerY, radius, bgPaint)
//'3.绘制基线'
val baseline = radius + (it.bottom - it.top) / 2 - it.bottom
canvas?.drawText(text, width - radius, baseline, textPaint)
}
}
}
}
}
复制代码
然后就能像这样使用自定义控件:
在布局文件中声明
xmlns:app="http://schemas.android.com/apk/res-auto"
android:layout_width="match_parent"
android:layout_height="match_parent">
android:id="@+id/ttv"
android:layout_width="wrap_content"
android:layout_height="wrap_content"
android:padding="8dp"
android:text="bug"/>
复制代码在 Activity 中引用并设置参数:
class TagTextViewActivity:AppCompatActivity() {
override fun onCreate(savedInstanceState: Bundle?) {
super.onCreate(savedInstanceState)
setContentView(R.layout.tag_textview_activity)
ttv.tagText = "+99"
ttv.tagTextSize = dip(8F)
ttv.tagTextColor = Color.YELLOW
}
}
复制代码
把小红点的显示细节隐藏在一个自定义View中,这样布局文件和业务层代码会更加简洁清晰。
但这个方案也有以下缺点:
控件类型绑定:若当前界面分别有一个TextView、ImageView和Button需要显示小红点,那就需要分别构建三种类型的自定义View。
控件需留 padding:小红点是控件的一部分,为了不让小红点与控件本体内容重叠,控件需给小红点留有 padding,即控件占用空间会变大,在布局文件中可能引起连锁反应,使得其他控件位置也需要跟着微调。
于是乎就有了第三种方案~~
容器控件绘制方案
第三种方案较前两种略复杂,限于篇幅就留到下一篇接着讲。
这篇关于android自定义控件类型,Android自定义控件 | 小红点的三种实现(上)的文章就介绍到这儿,希望我们推荐的文章对编程师们有所帮助!


