本文主要是介绍基于QTreeWidget实现带Checkbox的多级组织结构选择树,希望对大家解决编程问题提供一定的参考价值,需要的开发者们随着小编来一起学习吧!
基于QTreeWidget实现带Checkbox的多级组织结构选择树
采用基于QWidget+Mingw实现的原生的组织结构树
通过QTreeWidget控件实现的带Checkbox多级组织结构树。
Qt相关系列文章:
一、Qt实现的聊天画面消息气泡
二、基于QTreeWidget实现多级组织结构
三、基于QTreeWidget实现带Checkbox的多级组织结构选择树
基于QTreeWidget实现带Checkbox的多级组织结构选择树代码已上传到【https://gitee.com/duyanjun/QT_tree_checkDemo.git】
目录
- 基于QTreeWidget实现带Checkbox的多级组织结构选择树
- 1、效果图
- 2、运行
- 2.1、从git导入
- 2.2、修改头像图片的路径
- 2.3、运行
- 2.4、实现
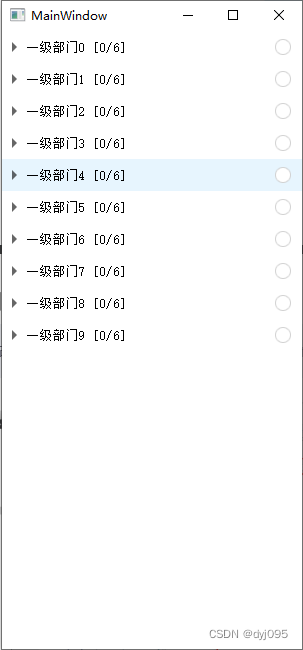
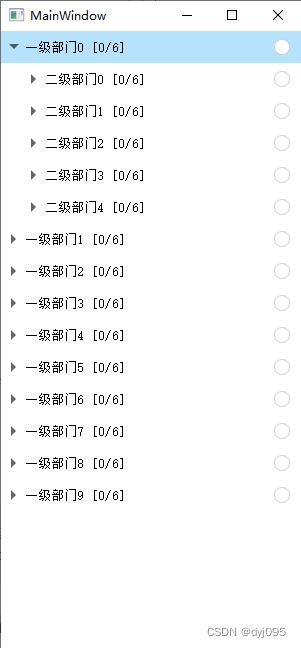
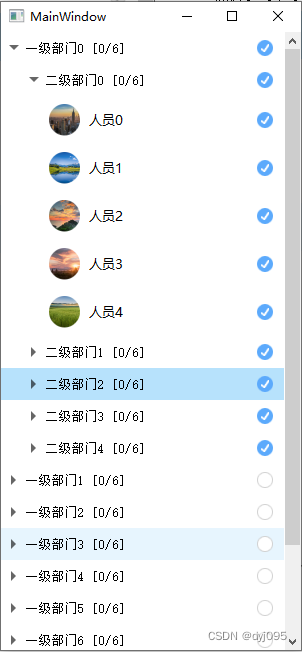
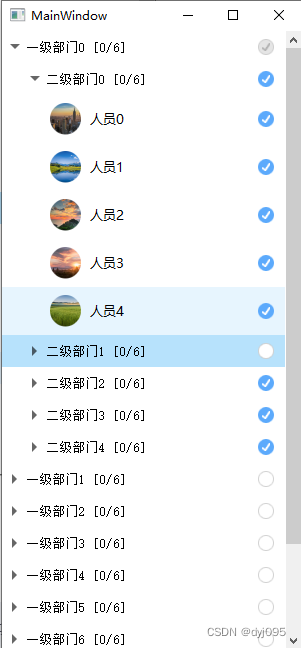
1、效果图
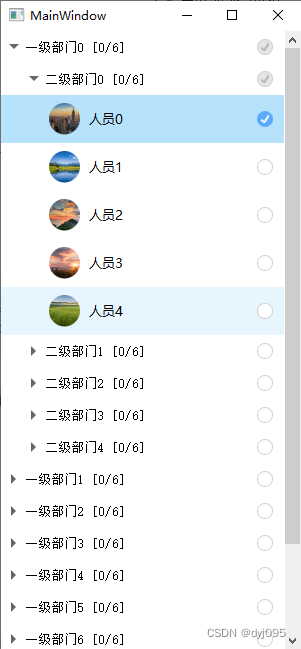
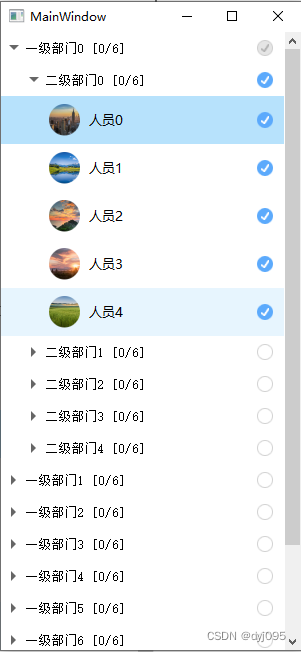
1、支持带复选框多级部门、人员,复选框未选中、选中、半选中状态以及样式自定义,本例中样式中圆形框;
2、每一子级相对上级部门有缩进;
3、支持点击上级部门复选框,关联的下级部门、人员节点也会自动选中/非选中;
4、如果上级部门节点处于选中状态时,取消选中其中部分下级子节点时,上级部门节点的选中状态会自动变更为半选中状态;
2、运行
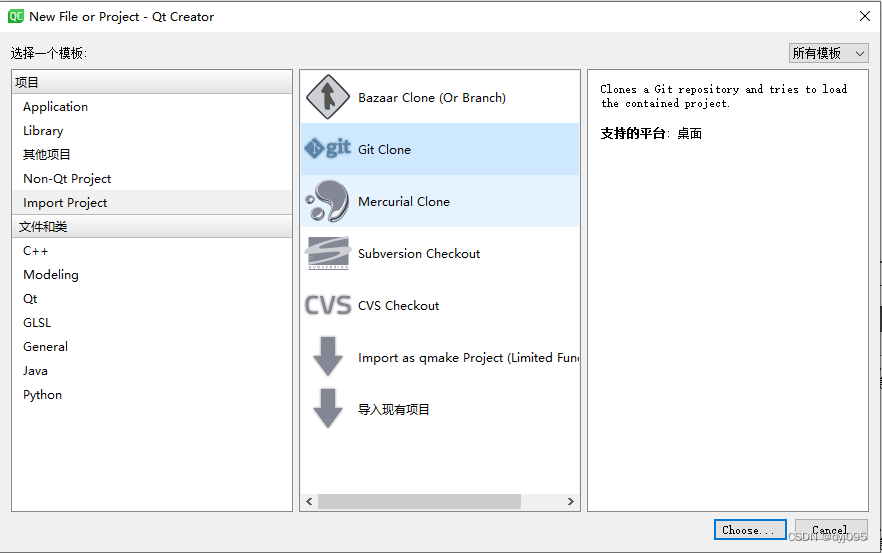
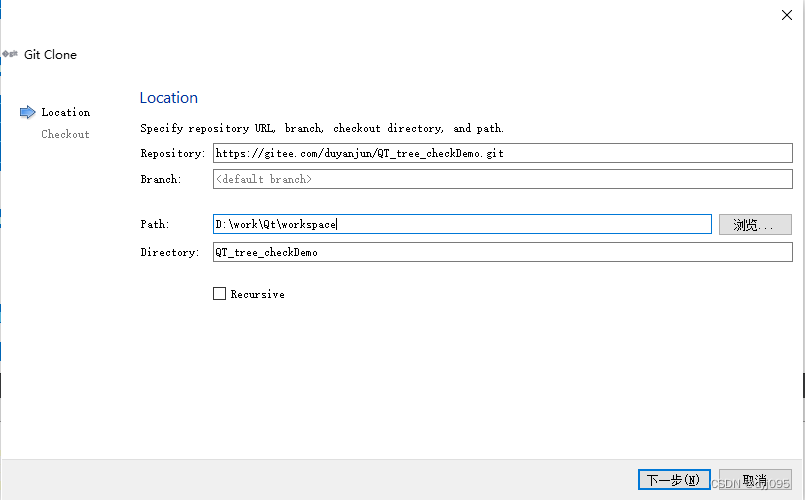
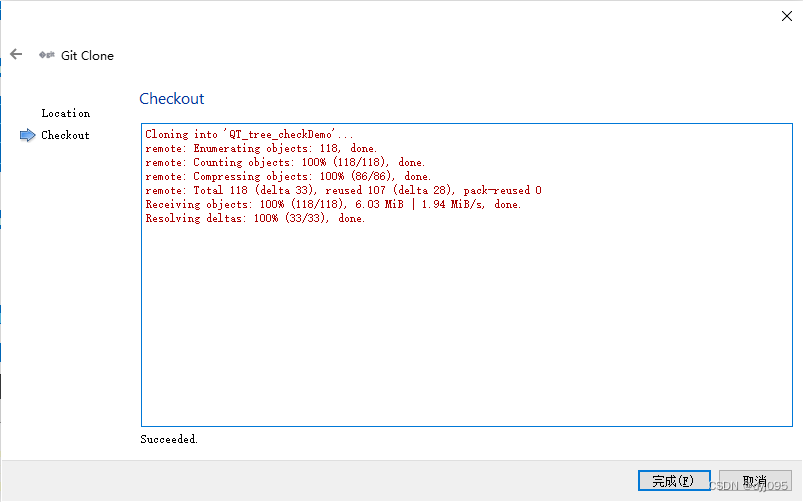
2.1、从git导入
文件 -> 新建文件或项目 -> Import Project -> Git Clone
【https://gitee.com/duyanjun/QT_tree_checkDemo.git】
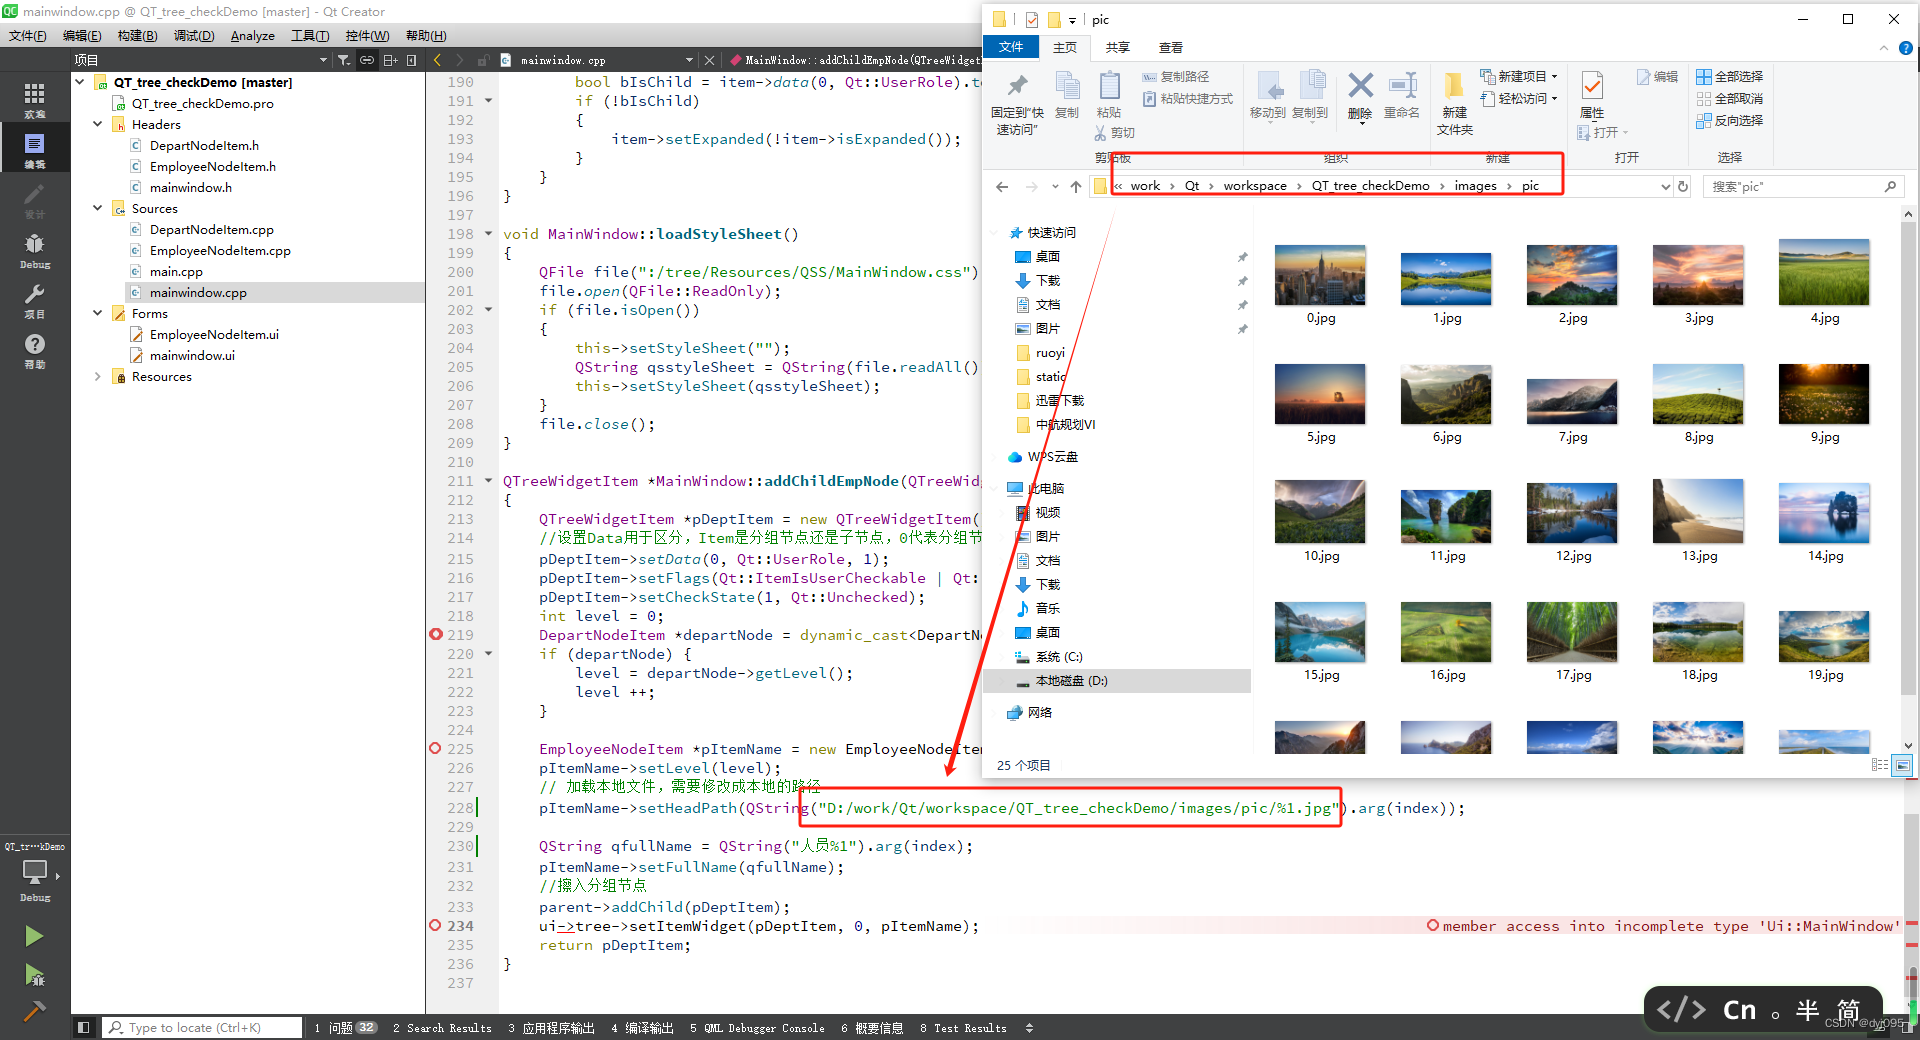
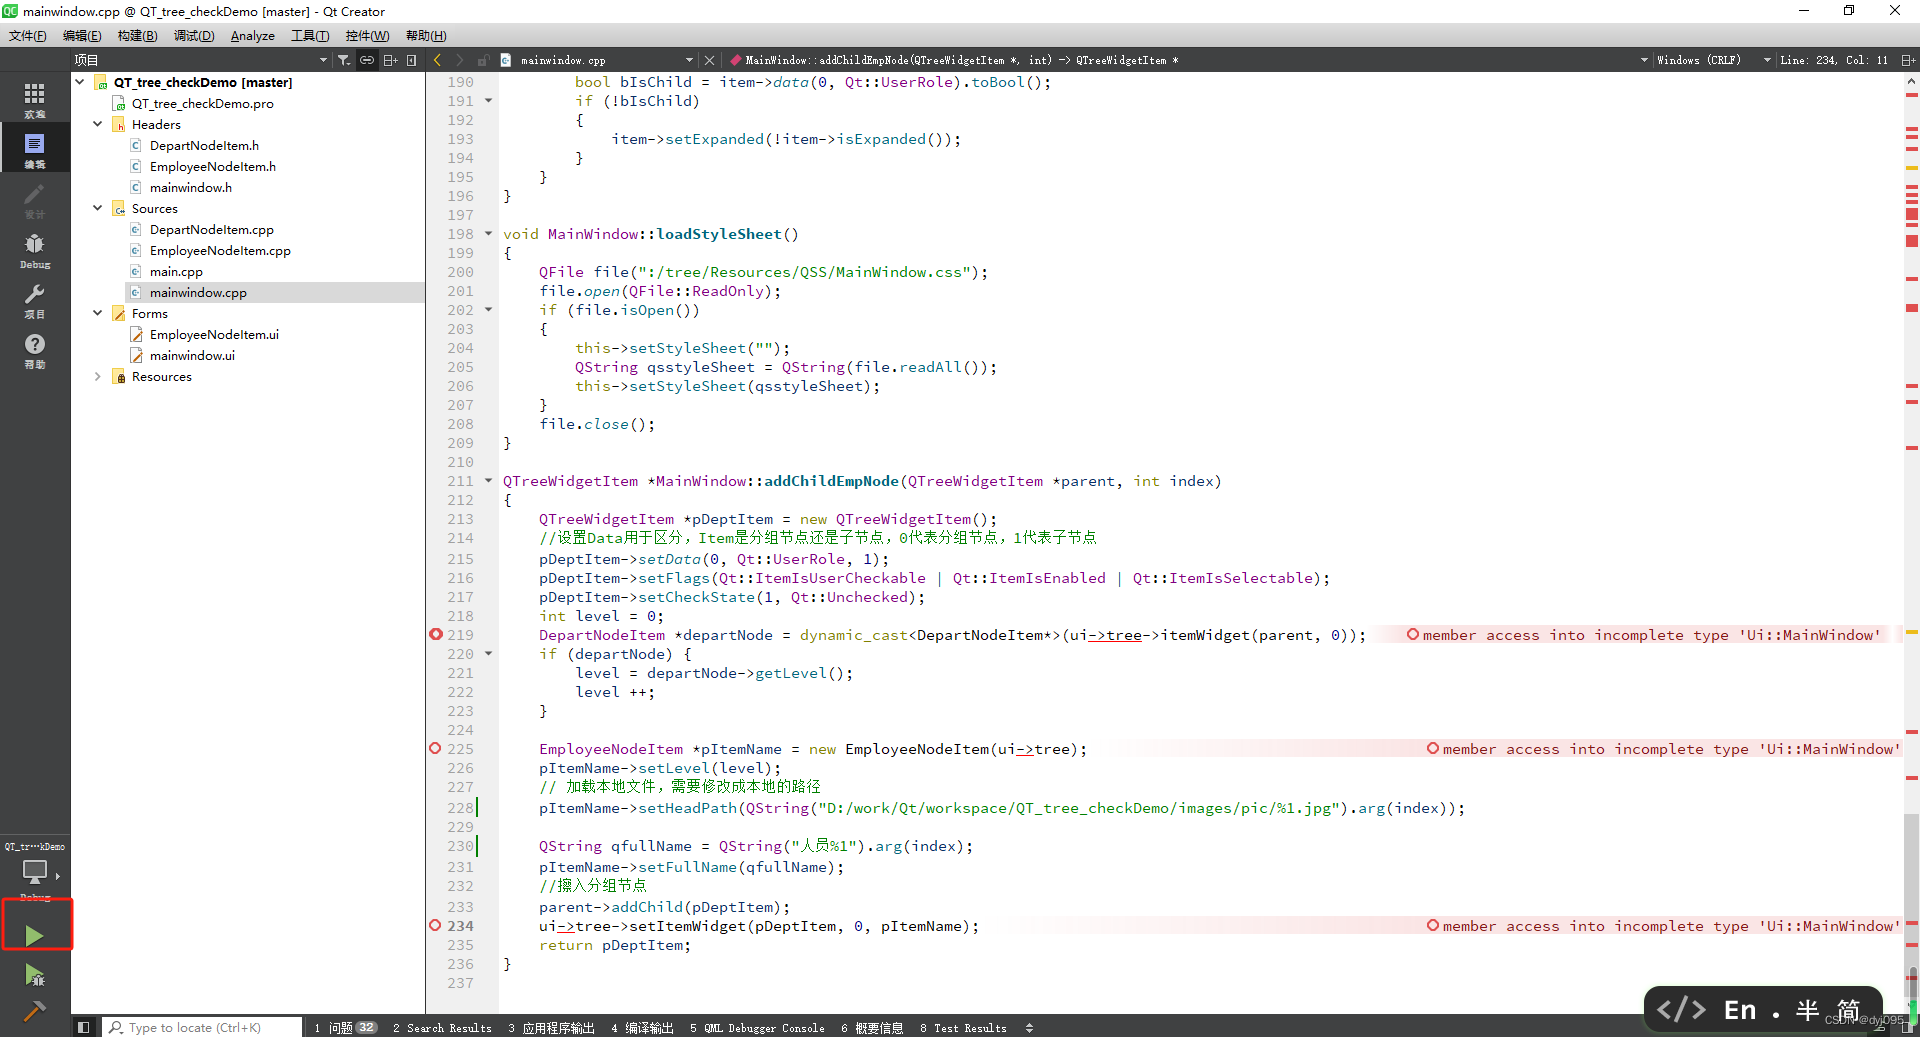
2.2、修改头像图片的路径
运行本Demo需要修改mainwindow.cpp第228行代码中的images目录的绝对路径;
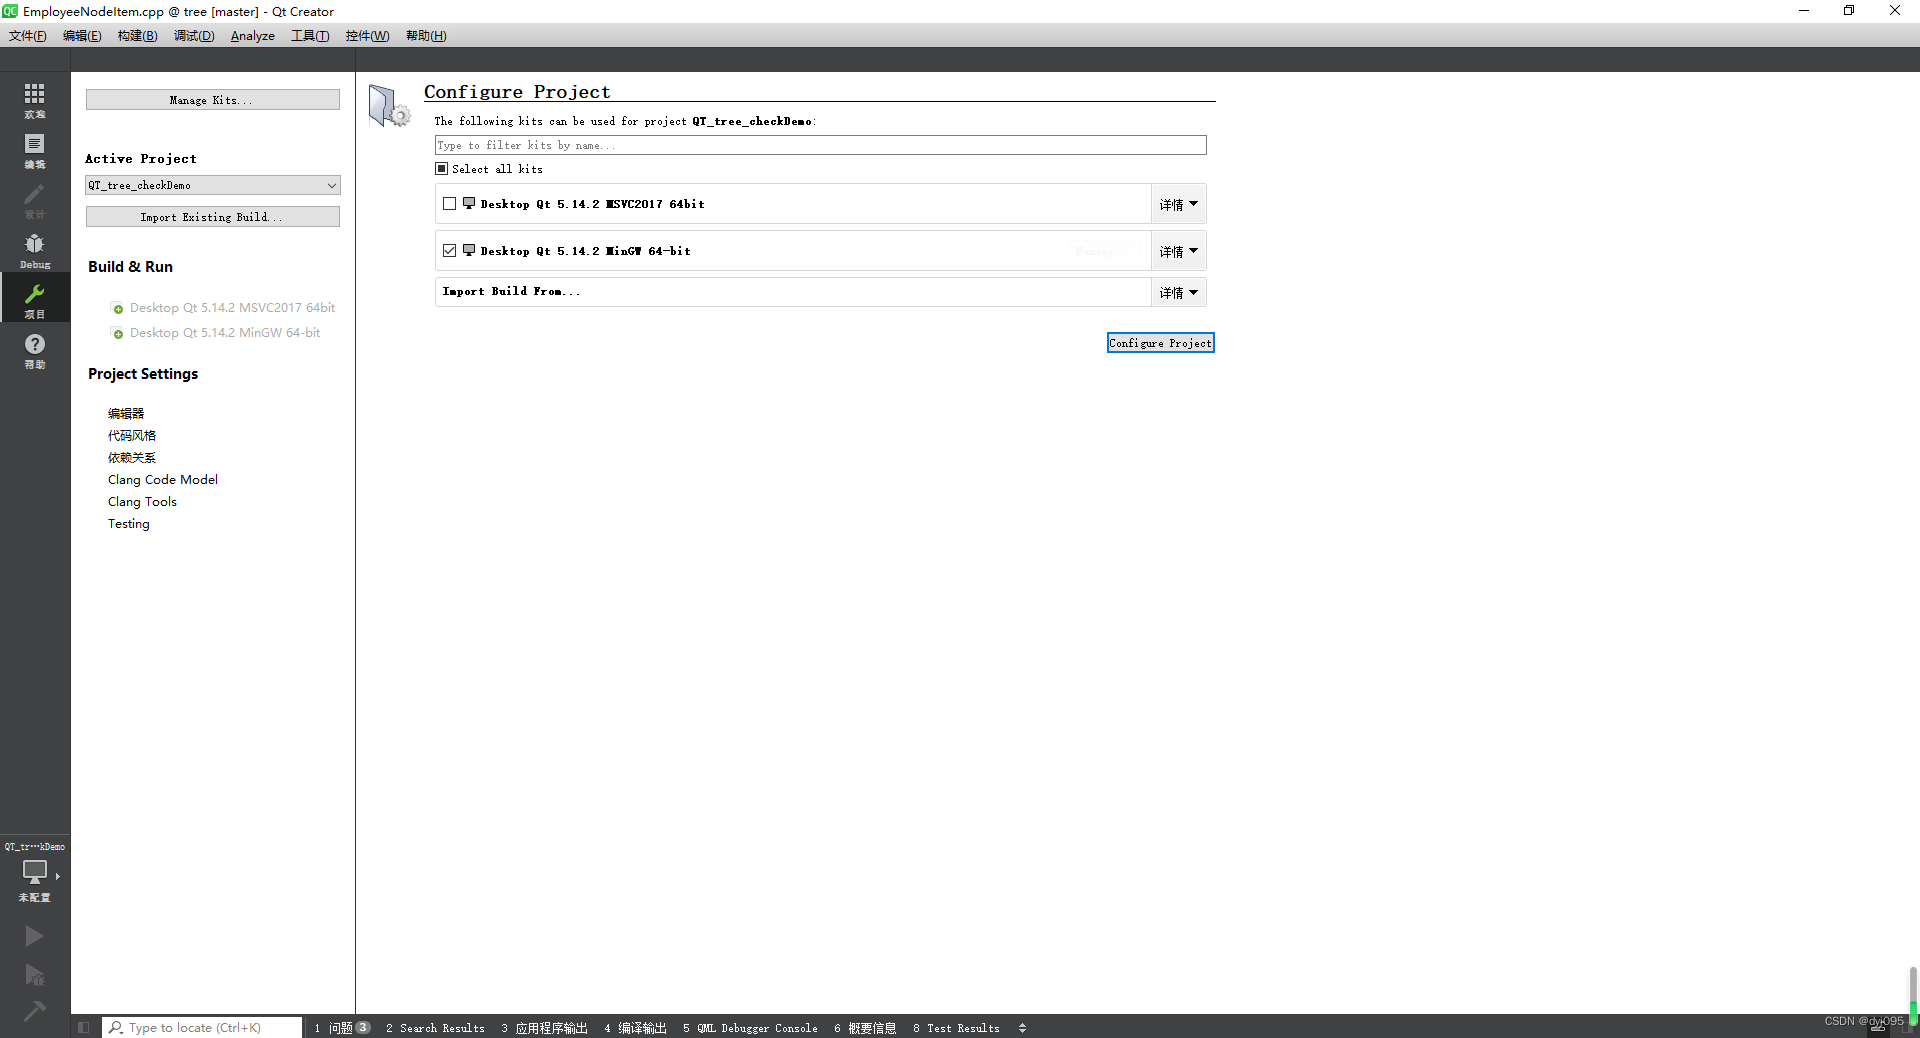
2.3、运行
2.4、实现
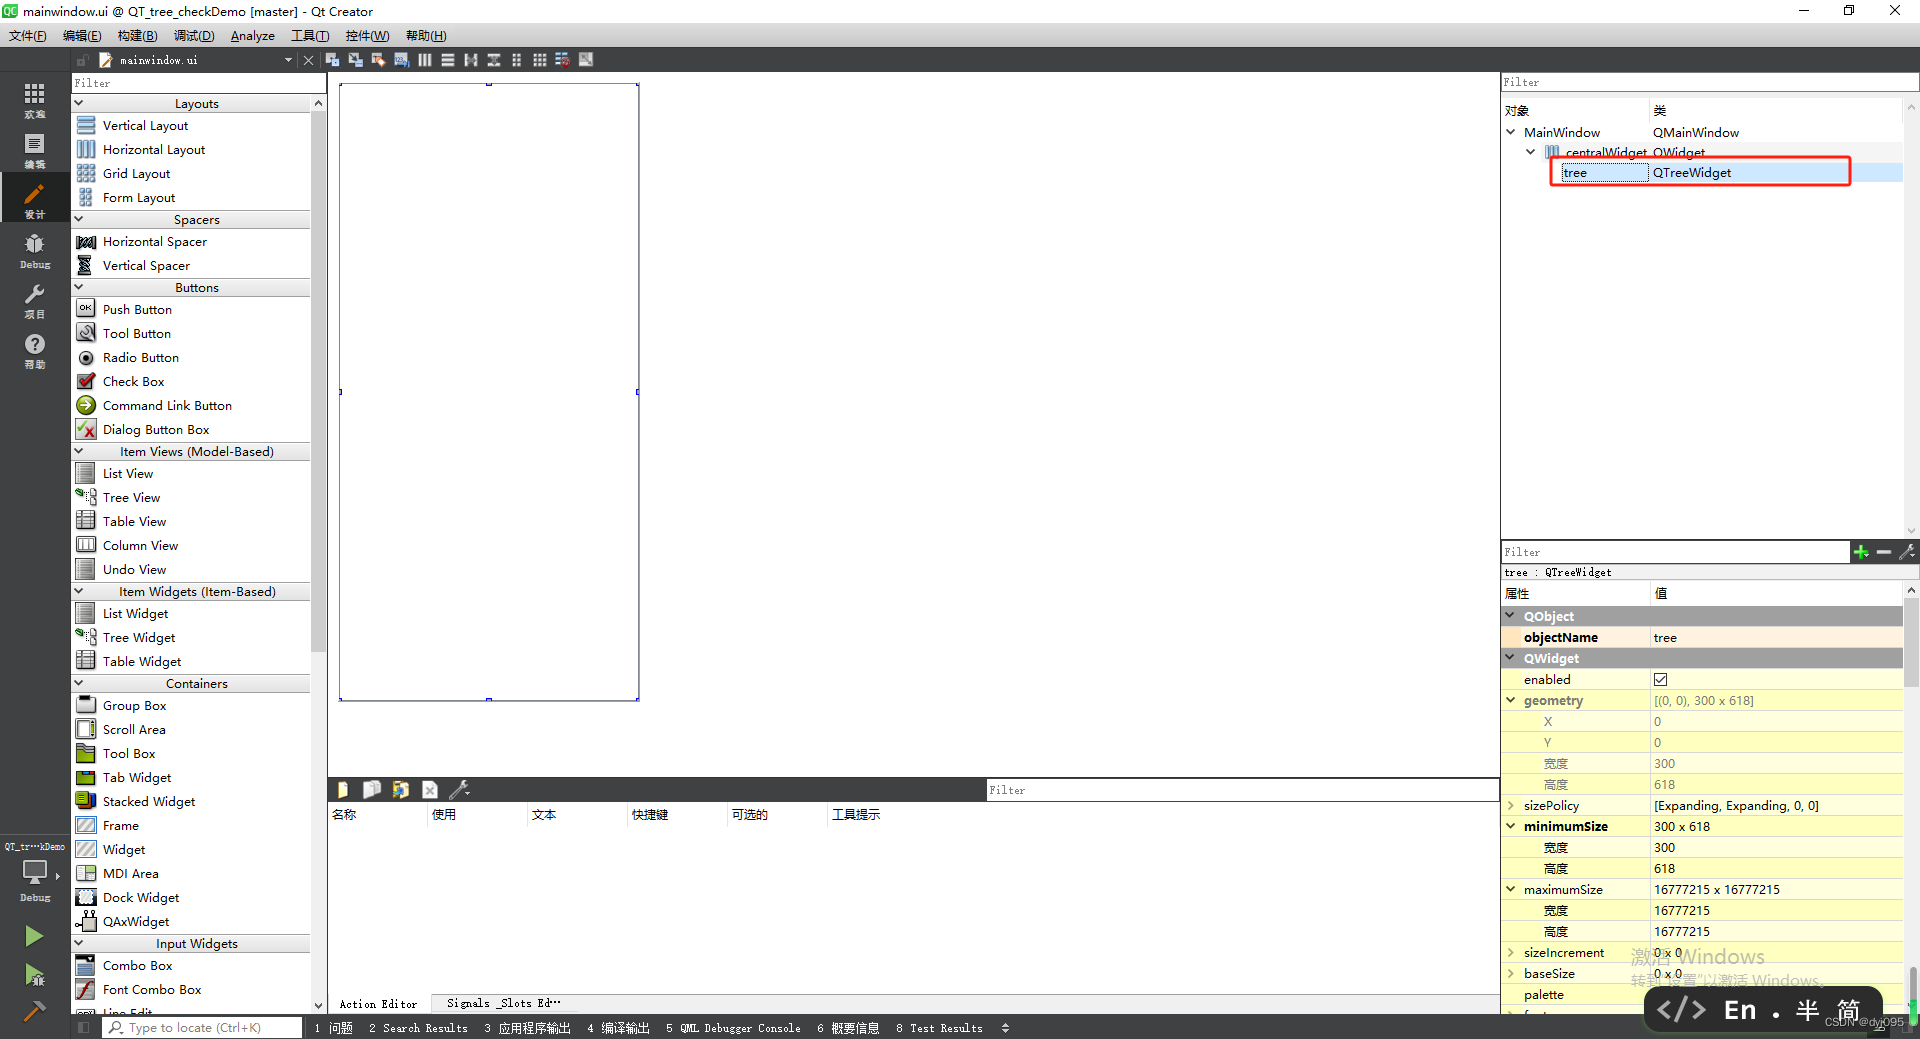
1)、主画面部局
在画面添加QTreeWidget控件
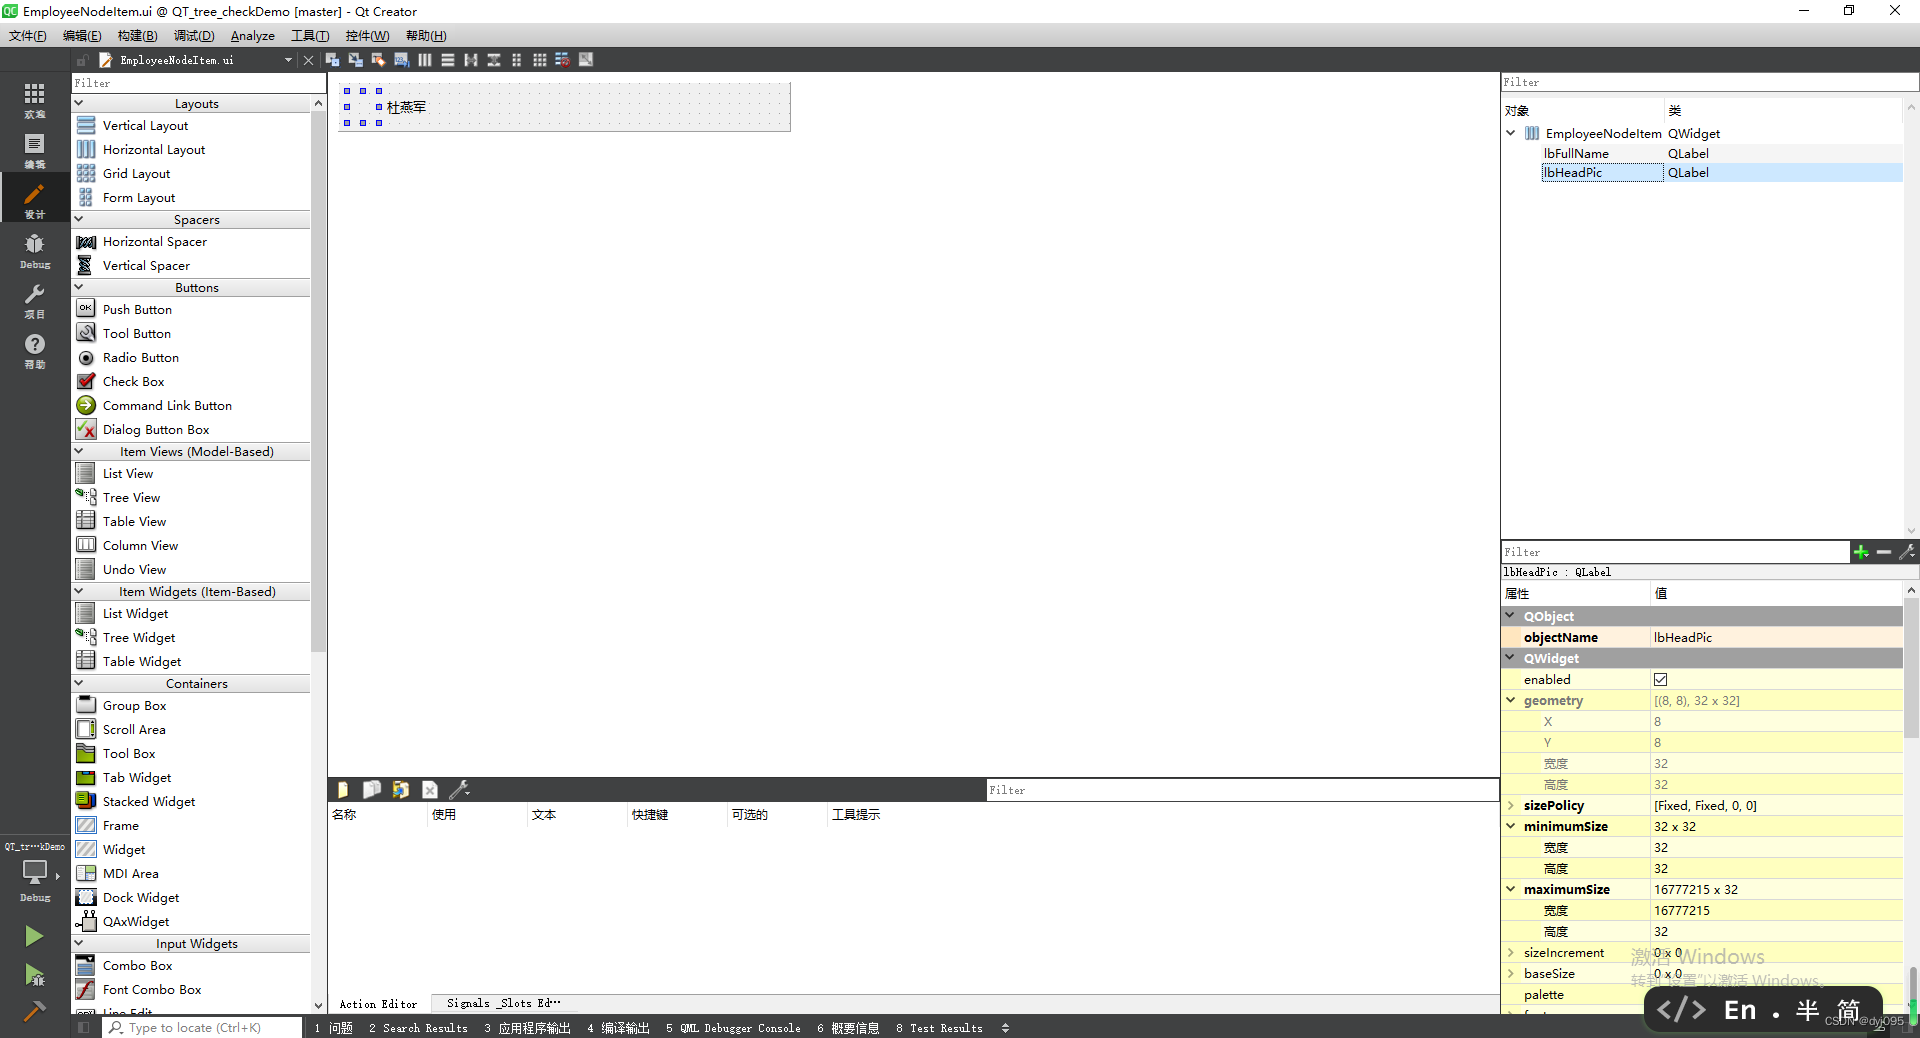
2)、人员节点部局
整体部局采用横向部局,依次是头像和姓名
3)、main.cpp
#include "mainwindow.h"
#include <QApplication>int main(int argc, char *argv[])
{QApplication a(argc, argv);MainWindow w;w.show();return a.exec();
}
4)、MainWindow类
使QTreeWidget显示复选框主要是下面代码起的作用
QTreeWidgetItem *pRootDeptItem = new QTreeWidgetItem();
pRootDeptItem->setChildIndicatorPolicy(QTreeWidgetItem::ShowIndicator);
//设置Data用于区分,Item是分组节点还是子节点,0代表分组节点,1代表子节点
pRootDeptItem->setData(0, Qt::UserRole, 0);
pRootDeptItem->setFlags(Qt::ItemIsUserCheckable | Qt::ItemIsEnabled | Qt::ItemIsSelectable);
pRootDeptItem->setCheckState(1, Qt::Unchecked);
resources.qrc
MainWindow.css
#tree{outline:0px;
}
#tree
{border-style:none;
}#tree::item
{color:rgba(255, 255, 255, 0);
}#tree::item:selected:active
{background-color: rgba(135, 206, 250, 153);
}#tree::item:selected:!active, QTreeView::item:hover
{background-color: rgba(135, 206, 250, 50);
}
#tree::indicator{width: 16px;height: 16px;
}
#tree::indicator:checked{image: url(:/tree/Resources/ckChecked_normal.png);
}
#tree::indicator:unchecked{image: url(:/tree/Resources/ckUncheck_normal.png);
}
#tree::indicator:indeterminate{image: url(:/tree/Resources/ckChecked_unable.png);
}
mainwindow.h
#ifndef MAINWINDOW_H
#define MAINWINDOW_H#include <QMainWindow>
#include <QTreeWidgetItem>namespace Ui {
class MainWindow;
}class MainWindow : public QMainWindow
{Q_OBJECTpublic:MainWindow(QWidget *parent = 0);~MainWindow();void init();void updateParentItem(QTreeWidgetItem* item);void setParentPartiallyChecked(QTreeWidgetItem *itm);QTreeWidgetItem* addChildNode(QTreeWidgetItem *parent, int index, QString namePre);QTreeWidgetItem* addChildEmpNode(QTreeWidgetItem *parent, int index);public slots://申明信号与槽,当树形控件的子选项被改变时执行void treeItemChanged(QTreeWidgetItem* item , int column);void onItemExpanded(QTreeWidgetItem * item);void onItemCollapsed(QTreeWidgetItem * item);void onItemClicked(QTreeWidgetItem * item, int column);private:void loadStyleSheet();
private:Ui::MainWindow *ui;
};#endif // MAINWINDOW_H
mainwindow.cpp
#include "mainwindow.h"
#include "ui_mainwindow.h"
#include "DepartNodeItem.h"
#include "EmployeeNodeItem.h"#include <QFile>
#include <QDebug>MainWindow::MainWindow(QWidget *parent) :QMainWindow(parent),ui(new Ui::MainWindow)
{ui->setupUi(this);loadStyleSheet();init();connect(ui->tree, SIGNAL(itemChanged(QTreeWidgetItem*,int)), this, SLOT(treeItemChanged(QTreeWidgetItem*,int)));
}MainWindow::~MainWindow()
{delete ui;
}void MainWindow::init()
{ui->tree->setHeaderHidden(true);// 1.创建表格ui->tree->setColumnCount(2);// 2.拿到表头QHeaderView *head = ui->tree->header();// 3.设置不能拉伸的列的宽度,设置哪一列能拉伸head->setSectionResizeMode(0,QHeaderView::Stretch);head->setSectionResizeMode(1, QHeaderView::Fixed);ui->tree->setColumnWidth(1, 30);// 4.(最重要的一步)去掉默认的拉伸最后列属性head->setStretchLastSection(false);//展开和收缩时信号,以达到变更我三角图片;connect(ui->tree, SIGNAL(itemClicked(QTreeWidgetItem *, int)), this, SLOT(onItemClicked(QTreeWidgetItem *, int)));connect(ui->tree, SIGNAL(itemExpanded(QTreeWidgetItem *)), this, SLOT(onItemExpanded(QTreeWidgetItem *)));connect(ui->tree, SIGNAL(itemCollapsed(QTreeWidgetItem *)), this, SLOT(onItemCollapsed(QTreeWidgetItem *)));for(int i = 0; i < 10; i++){// 一级部门节点QTreeWidgetItem *pRootDeptItem = new QTreeWidgetItem();pRootDeptItem->setChildIndicatorPolicy(QTreeWidgetItem::ShowIndicator);//设置Data用于区分,Item是分组节点还是子节点,0代表分组节点,1代表子节点pRootDeptItem->setData(0, Qt::UserRole, 0);pRootDeptItem->setFlags(Qt::ItemIsUserCheckable | Qt::ItemIsEnabled | Qt::ItemIsSelectable);pRootDeptItem->setCheckState(1, Qt::Unchecked);DepartNodeItem *pItemName = new DepartNodeItem(ui->tree);pItemName->setLevel(0);int nMyFriendNum = 6;QString qsGroupName = QString("一级部门%3 [%1/%2]").arg(0).arg(nMyFriendNum).arg(i);pItemName->setText(qsGroupName);//插入分组节点ui->tree->addTopLevelItem(pRootDeptItem);ui->tree->setItemWidget(pRootDeptItem, 0, pItemName);for(int j = 0; j < 5; j++){//addChildEmpNode(pRootDeptItem, j);}for(int j = 0; j < 5; j++){QString name = QString("二级部门%1").arg(j);QTreeWidgetItem *childItem = addChildNode(pRootDeptItem, i * 10 + j,name);for(int g = 0; g < 5; g++){addChildEmpNode(childItem, g);}}}
}QTreeWidgetItem* MainWindow::addChildNode(QTreeWidgetItem *parent, int index, QString namePre)
{QTreeWidgetItem *pDeptItem = new QTreeWidgetItem();pDeptItem->setChildIndicatorPolicy(QTreeWidgetItem::ShowIndicator);//设置Data用于区分,Item是分组节点还是子节点,0代表分组节点,1代表子节点pDeptItem->setData(0, Qt::UserRole, 0);DepartNodeItem *pItemName = new DepartNodeItem(ui->tree);pDeptItem->setFlags(Qt::ItemIsUserCheckable | Qt::ItemIsEnabled | Qt::ItemIsSelectable);pDeptItem->setCheckState(1, Qt::Unchecked);int level = 0;DepartNodeItem *departNode = dynamic_cast<DepartNodeItem*>(ui->tree->itemWidget(parent, 0));if (departNode) {level = departNode->getLevel();level ++;}pItemName->setLevel(level);int nMyFriendNum = 6;QString qsGroupName = QString("%4%3 [%1/%2]").arg(0).arg(nMyFriendNum).arg(index).arg(namePre);pItemName->setText(qsGroupName);//擦入分组节点parent->addChild(pDeptItem);ui->tree->setItemWidget(pDeptItem, 0, pItemName);return pDeptItem;
}void MainWindow::updateParentItem(QTreeWidgetItem *item)
{QTreeWidgetItem *parent = item->parent();if(parent == NULL){return ;}int selectedCount = 0;int childCount = parent->childCount();//判断有多少个子项被选中for(int i=0; i<childCount; i++) {QTreeWidgetItem* childItem = parent->child(i);if(childItem->checkState(1) == Qt::Checked) {selectedCount++;}}if(selectedCount <= 0)  //如果没有子项被选中,父项设置为未选中状态{parent->setCheckState(1,Qt::Unchecked);}else if(selectedCount>0 && selectedCount<childCount)    //如果有部分子项被选中,父项设置为部分选中状态,即用灰色显示{parent->setCheckState(1,Qt::PartiallyChecked);// 重点:针对半选中状态的设置需要单独调用setParentPartiallyChecked后返回,否则上级节点的状态及当前节点的下级第一个节点的状态会不正确setParentPartiallyChecked(parent);return;}else if(selectedCount == childCount)    //如果子项全部被选中,父项则设置为选中状态{parent->setCheckState(1,Qt::Checked);}updateParentItem(parent);
}void MainWindow::setParentPartiallyChecked(QTreeWidgetItem *itm)
{QTreeWidgetItem *parent = itm->parent();if(parent) {parent->setCheckState(1,Qt::PartiallyChecked);setParentPartiallyChecked(parent);}
}void MainWindow::treeItemChanged(QTreeWidgetItem *item, int column)
{if(Qt::Checked == item->checkState(1)){int count = item->childCount(); //返回子项的个数if(count >0) {for(int i=0; i<count; i++) {item->child(i)->setCheckState(1,Qt::Checked);}} else {updateParentItem(item);}} else if(Qt::Unchecked == item->checkState(1)) {int count = item->childCount();if(count > 0) {for(int i=0; i<count; i++) {item->child(i)->setCheckState(1,Qt::Unchecked);}} else {updateParentItem(item);}}
}
void MainWindow::onItemExpanded(QTreeWidgetItem * item)
{bool bIsChild = item->data(0, Qt::UserRole).toBool();if (!bIsChild) {DepartNodeItem *departNode = dynamic_cast<DepartNodeItem*>(ui->tree->itemWidget(item, 0));if (departNode) {departNode->setExpanded(true);}}}void MainWindow::onItemCollapsed(QTreeWidgetItem * item)
{bool bIsChild = item->data(0, Qt::UserRole).toBool();if (!bIsChild) {DepartNodeItem *departNode = dynamic_cast<DepartNodeItem*>(ui->tree->itemWidget(item, 0));if (departNode) {departNode->setExpanded(false);}}
}void MainWindow::onItemClicked(QTreeWidgetItem * item, int column)
{if (column == 0) {bool bIsChild = item->data(0, Qt::UserRole).toBool();if (!bIsChild){item->setExpanded(!item->isExpanded());}}
}void MainWindow::loadStyleSheet()
{QFile file(":/tree/Resources/QSS/MainWindow.css");file.open(QFile::ReadOnly);if (file.isOpen()){this->setStyleSheet("");QString qsstyleSheet = QString(file.readAll());this->setStyleSheet(qsstyleSheet);}file.close();
}QTreeWidgetItem *MainWindow::addChildEmpNode(QTreeWidgetItem *parent, int index)
{QTreeWidgetItem *pDeptItem = new QTreeWidgetItem();//设置Data用于区分,Item是分组节点还是子节点,0代表分组节点,1代表子节点pDeptItem->setData(0, Qt::UserRole, 1);pDeptItem->setFlags(Qt::ItemIsUserCheckable | Qt::ItemIsEnabled | Qt::ItemIsSelectable);pDeptItem->setCheckState(1, Qt::Unchecked);int level = 0;DepartNodeItem *departNode = dynamic_cast<DepartNodeItem*>(ui->tree->itemWidget(parent, 0));if (departNode) {level = departNode->getLevel();level ++;}EmployeeNodeItem *pItemName = new EmployeeNodeItem(ui->tree);pItemName->setLevel(level);// 加载本地文件,需要修改成本地的路径pItemName->setHeadPath(QString("D:/work/Qt/workspace/QT_tree_checkDemo/images/pic/%1.jpg").arg(index));QString qfullName = QString("人员%1").arg(index);pItemName->setFullName(qfullName);//擦入分组节点parent->addChild(pDeptItem);ui->tree->setItemWidget(pDeptItem, 0, pItemName);return pDeptItem;
}
5)、DepartNodeItem类
DepartNodeItem.h
#ifndef DEPARTNODEITEM_H
#define DEPARTNODEITEM_H#include <QLabel>
#include <QPaintEvent>
#include <QPropertyAnimation>#define INDENTATION 20class DepartNodeItem : public QLabel
{Q_OBJECTQ_PROPERTY(int rotation READ rotation WRITE setRotation)
public:DepartNodeItem(QWidget *parent = 0);~DepartNodeItem();void setText(const QString& title);void setExpanded(bool expand);int getIndentation();void setLevel(int level);int getLevel();QString getName();private:int rotation();void setRotation(int rotation);private:void paintEvent(QPaintEvent *event);private:QPropertyAnimation *m_animation;QString m_name;QString m_id;int m_rotation;int m_indentation;int m_level;
};#endif // DEPARTNODEITEM_H
DepartNodeItem.cpp
#include "DepartNodeItem.h"#include <QPainter>
#include <QDebug>DepartNodeItem::DepartNodeItem(QWidget *parent): QLabel(parent),m_rotation(0),m_level(0),m_indentation(0)
{setFixedHeight(32);setSizePolicy(QSizePolicy::Expanding, QSizePolicy::Fixed);m_animation = new QPropertyAnimation(this, "rotation");m_animation->setDuration(50);m_animation->setEasingCurve(QEasingCurve::InQuad);
}
DepartNodeItem::~DepartNodeItem()
{m_animation = NULL;delete m_animation;
}void DepartNodeItem::setText(const QString &title)
{m_name = title;update();
}void DepartNodeItem::setExpanded(bool expand)
{if (expand) {m_animation->setEndValue(90);} else {m_animation->setEndValue(0);}m_animation->start();
}int DepartNodeItem::getIndentation()
{return this->m_indentation;
}void DepartNodeItem::setLevel(int level)
{this->m_level = level;this->m_indentation = this->m_level * INDENTATION;
}int DepartNodeItem::getLevel()
{return this->m_level;
}QString DepartNodeItem::getName()
{return this->m_name;
}int DepartNodeItem::rotation()
{return m_rotation;
}void DepartNodeItem::setRotation(int rotation)
{m_rotation = rotation;update();
}void DepartNodeItem::paintEvent(QPaintEvent *event)
{QPainter painter(this);{painter.setRenderHint(QPainter::TextAntialiasing, true);QFont font;font.setPointSize(10);painter.setFont(font);int txtX = m_indentation + 24;painter.drawText(txtX, 0, this->width() - txtX, this->height(), Qt::AlignLeft | Qt::AlignVCenter, m_name);}{painter.setRenderHint(QPainter::SmoothPixmapTransform, true);painter.save();QPixmap pixmap(":/tree/Resources/arrow.png");QPixmap tmpPixmap(pixmap.size());tmpPixmap.fill(Qt::transparent);QPainter p(&tmpPixmap);p.setRenderHint(QPainter::SmoothPixmapTransform, true);// 旋转m_rotation角度p.translate(pixmap.width() /2, pixmap.height() /2);p.rotate(m_rotation);p.drawPixmap(0 - pixmap.width() /2, 0 - pixmap.height() / 2,pixmap);painter.drawPixmap(m_indentation+6, (this->height() - pixmap.height()) / 2, tmpPixmap);painter.restore();}QLabel::paintEvent(event);
}
6)、EmployeeNodeItem类
EmployeeNodeItem.h
#ifndef EMPLOYEENODEITEM_H
#define EMPLOYEENODEITEM_H#include <QWidget>
#include <QPaintEvent>
#include <QPixmap>
#include <QSize>#define INDENTATION 20
#define HEAD_LABEL_WIDTH 32namespace Ui {
class EmployeeNodeItem;
}class EmployeeNodeItem : public QWidget
{Q_OBJECTpublic:EmployeeNodeItem(QWidget *parent = 0);~EmployeeNodeItem();public:void setFullName(const QString& fullName);void setHeadPixmap(const QPixmap& headPath);void setHeadPath(const QString& headPath);QSize getHeadLabelSize() const;int getIndentation();int getLevel();void setLevel(int level);QString getFullName();private:void initControl();QPixmap getRoundImage(const QPixmap &src, QPixmap& mask, QSize masksize);private:void paintEvent(QPaintEvent *event);
private:Ui::EmployeeNodeItem *ui;int m_indentation;int m_level;int m_headLabelWidth;QString m_fullName;
};#endif // EMPLOYEENODEITEM_H
EmployeeNodeItem.cpp
#include "EmployeeNodeItem.h"
#include "ui_EmployeeNodeItem.h"#include <QDebug>
#include <QPainter>EmployeeNodeItem::EmployeeNodeItem(QWidget *parent) :QWidget(parent),ui(new Ui::EmployeeNodeItem),m_headLabelWidth(0),m_level(0),m_indentation(0),m_fullName("")
{ui->setupUi(this);initControl();
}EmployeeNodeItem::~EmployeeNodeItem()
{delete ui;
}void EmployeeNodeItem::setFullName(const QString &fullName)
{m_fullName = fullName;ui->lbFullName->setText(fullName);
}void EmployeeNodeItem::setHeadPixmap(const QPixmap &headPath)
{ui->lbHeadPic->setPixmap(headPath);
}void EmployeeNodeItem::setHeadPath(const QString &headPath)
{/*ui->lbHeadPic->setScaledContents(true);QString style = ui->lbHeadPic->styleSheet();style.append("image:url(").append(headPath).append(");");qDebug() << style;ui->lbHeadPic->setStyleSheet(style);*/// 方式3.加载QPixmapQPixmap pixmap1;pixmap1.load(headPath);QPixmap pixmap2;pixmap2.load(":/tree/Resources//head_mask.png");//qDebug() << "m_level:" << m_level << "  m_indentation:" << m_indentation << " m_headLabelWidth:" << m_headLabelWidth << "  " << HEAD_LABEL_WIDTH;QPixmap roundPic = this->getRoundImage(pixmap1, pixmap2, QSize(m_headLabelWidth,HEAD_LABEL_WIDTH));this->setHeadPixmap(roundPic);
}QSize EmployeeNodeItem::getHeadLabelSize() const
{return ui->lbHeadPic->size();
}int EmployeeNodeItem::getIndentation()
{return this->m_indentation;}int EmployeeNodeItem::getLevel()
{return this->m_level;
}void EmployeeNodeItem::setLevel(int level)
{this->m_level = level;this->m_indentation = this->m_level * INDENTATION;this->m_headLabelWidth = this->m_indentation + HEAD_LABEL_WIDTH;ui->lbHeadPic->setMinimumWidth(m_indentation);
}QString EmployeeNodeItem::getFullName()
{return m_fullName;
}void EmployeeNodeItem::initControl()
{}QPixmap EmployeeNodeItem::getRoundImage(const QPixmap &src, QPixmap &mask, QSize masksize)
{if (masksize == QSize(0, 0)){masksize = mask.size();}else{mask = mask.scaled(masksize, Qt::KeepAspectRatio, Qt::SmoothTransformation);}QImage resultImage(masksize, QImage::Format_ARGB32_Premultiplied);QPainter painter(&resultImage);painter.setCompositionMode(QPainter::CompositionMode_Source);painter.fillRect(resultImage.rect(), Qt::transparent);painter.setCompositionMode(QPainter::CompositionMode_SourceOver);painter.drawPixmap(m_indentation, 0, mask);painter.setCompositionMode(QPainter::CompositionMode_SourceIn);painter.drawPixmap(m_indentation, 0, src.scaled(masksize, Qt::KeepAspectRatio, Qt::SmoothTransformation));painter.end();return QPixmap::fromImage(resultImage);
}void EmployeeNodeItem::paintEvent(QPaintEvent *event)
{QWidget::paintEvent(event);
}
这篇关于基于QTreeWidget实现带Checkbox的多级组织结构选择树的文章就介绍到这儿,希望我们推荐的文章对编程师们有所帮助!


