本文主要是介绍Kubernetes实战(十三)-使用kube-bench检测Kubernetes集群安全,希望对大家解决编程问题提供一定的参考价值,需要的开发者们随着小编来一起学习吧!
1 概述
在当今云原生应用的开发中,Kubernetes已经成为标准,然而,随着其使用的普及,也带来了安全问题的挑战。本文将介绍如何使用kube-bench工具来评估和增强Kubernetes集群的安全性。
2 CIS (Center for Internet Security)简介
CIS(Center for Internet Security)是一家致力于网络安全的非营利组织。它提供一系列针对各种操作系统和应用程序的基线安全标准,这些标准被广泛认可,是防止网络攻击的有效手段。
CIS基准是由美国计算机互联网安全中心(Center for Internet Security,简称CIS)制定的一系列全球公认的最佳实践标准,用于保护系统和数据免受威胁。这些基准包括了各种技术平台和系统的配置指南,例如操作系统、网络设备、移动设备、服务器应用等。
CIS基准提供了详细的步骤来保护特定系统,每个步骤都有清晰的说明和建议。此外,它还提供了用于评估系统是否符合CIS基准的自动化工具。遵循CIS基准能帮助组织降低安全风险并增强合规性。
在Kubernetes环境中,CIS Kubernetes基准就是一套针对Kubernetes的安全配置最佳实践。例如,CIS Kubernetes基准会涵盖如何配置kubelet,如何限制API服务器上的权限等内容。
CIS官网为:https://www.cisecurity.org/,CIS的Kubernetes Benchmark文件下载方法如下:
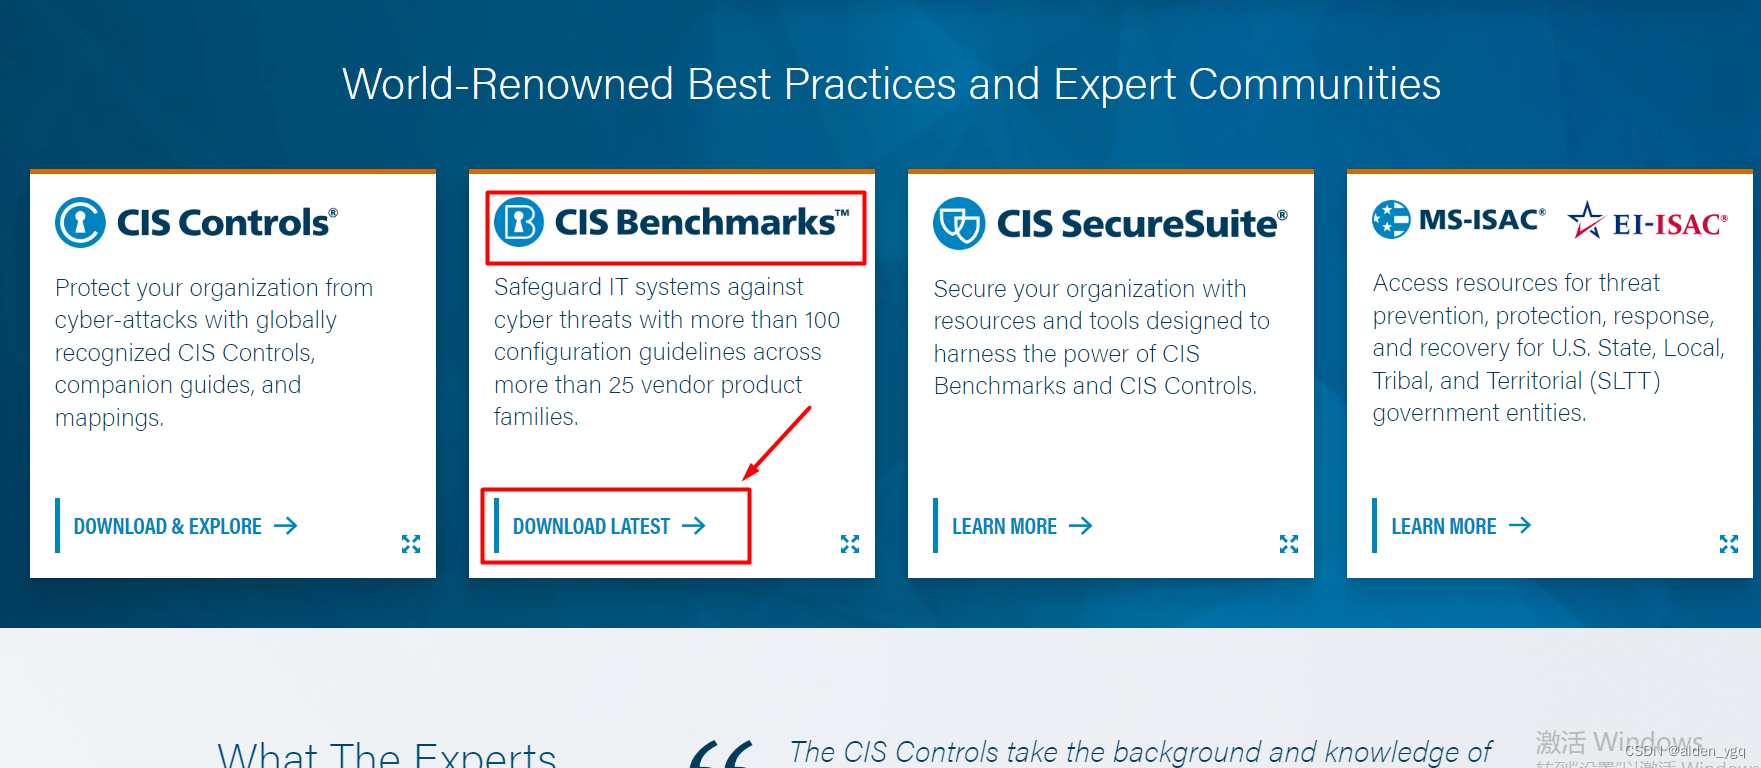
进入CIS(Center for Internet Security)官网。

找到CIS Benchmarks,点击DOWNLOAD LATEST。
 我们需要的是kubernetes的benchmarks,找到Kubernetes,点击DOWNLOAD THE BENCHMARK。

填写信息,就可以免费下载kubernetes的Benchmark PDF文件了。

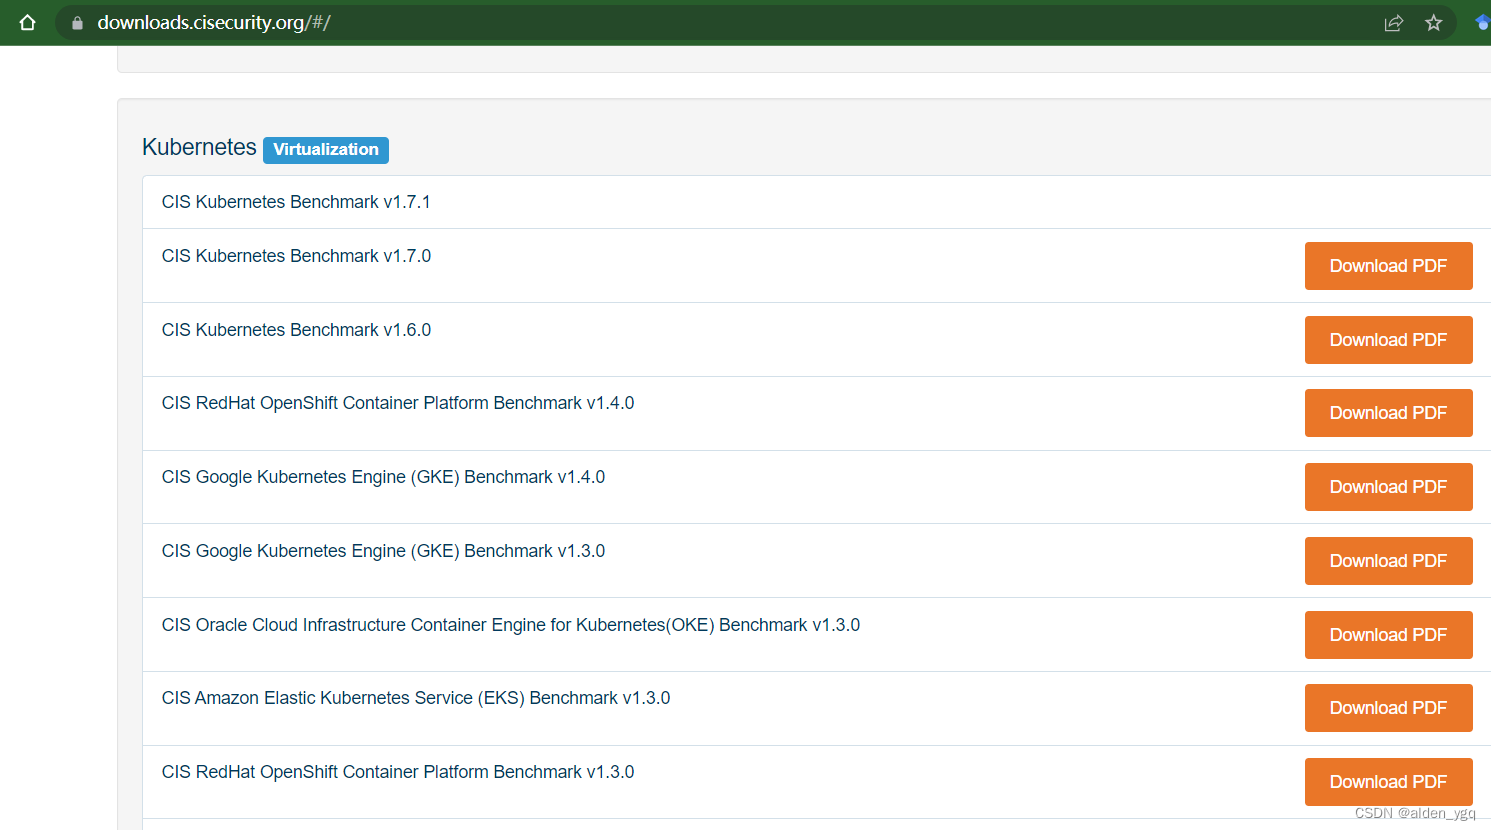
下载之后得到的文件为:CIS_Kubernetes_Benchmark_v1.6.0.pdf。
或者直接去https://downloads.cisecurity.org/#/下载,找到kubernetes,选择合适的版本下载即可。
3 什么是Kube-Bench?
Kube-Bench是一个开源的Go语言工具,用于自动化检查Kubernetes集群是否符合CIS Kubernetes基准。这些基准包括一系列关于Kubernetes配置和部署安全性的建议和最佳实践。
Kube-Bench执行了一系列针对Kubernetes组件(如kube-apiserver、etcd、kube-scheduler、kube-controller-manager等)的测试,来检查它们是否按照CIS基准的推荐进行了配置。测试结果会被分类为PASS、FAIL或WARN,以清晰明了地显示哪些地方需要改进。
Kube-Bench是在运行时检查Kubernetes环境的工具,它并不会修改系统。你可以定期运行kube-bench来审计你的Kubernetes环境,确保其保持在最佳的安全状态。
kube-bench在GitHub的网址为:GitHub - aquasecurity/kube-bench: Checks whether Kubernetes is deployed according to security best practices as defined in the CIS Kubernetes Benchmark
可在 Tags · aquasecurity/kube-bench · GitHub 下载kube-bench工具。
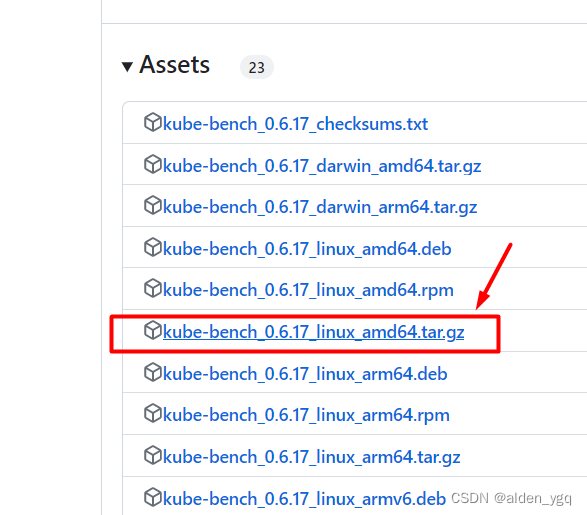
选择版本,点击Downloads。

下载kube-bench_0.6.17_linux_amd64.tar.gz。
4 使用kube-bench检测不安全的设置
4.1 手动设置不安全的参数
按照CIS_Kubernetes_Benchmark文件设置kubernetes集群安全有点麻烦,我们使用工具kube-bench检测kubernetes集群安全。
创建备份目录。
$ mkdir /bak把/etc/kubernetes/manifests/下的文件备份,后面要修改配置文件,如果修改错误之后可以复原。
$ cd /etc/kubernetes/manifests/
$ ls
etcd.yaml  kube-apiserver.yaml  kube-controller-manager.yaml  kube-scheduler.yaml
#cp -a: 递归复制,复制的数据会保留原有数据的时间戳等信息(具体:时间戳+所有权+复制连结文件属性而非档案本身)
#cp -r: 递归复制,复制的数据会使用新的时间戳等信息
$ cp -a * /bak/
现在文件就备份好了。
$ ls /bak/
etcd.yaml  kube-apiserver.yaml  kube-controller-manager.yaml  kube-scheduler.yaml
我们把etcd.yaml文件里的client-cert-auth=true改为client-cert-auth=false。
$ pwd
/etc/kubernetes/manifests$ ls
etcd.yaml  kube-apiserver.yaml  kube-controller-manager.yaml  kube-scheduler.yaml$ vim etcd.yaml
#修改--client-cert-auth=false后保存退出$ grep client-cert-auth etcd.yaml- --client-cert-auth=false- --peer-client-cert-auth=true
我们把authorization-mode授权模式改为AlwaysAllow。
$ vim kube-apiserver.yaml
修改 --authorization-mode=AlwaysAllow$ grep authorization-mode kube-apiserver.yaml # - --authorization-mode=Node,RBAC- --authorization-mode=AlwaysAllow
重启kubelet使配置生效。
$ systemctl restart kubelet$ systemctl status kubelet
● kubelet.service - kubelet: The Kubernetes Node AgentLoaded: loaded (/lib/systemd/system/kubelet.service; enabled; vendor preset: enabled)Drop-In: /etc/systemd/system/kubelet.service.d└─10-kubeadm.confActive: active (running) since Sun 2022-04-17 16:14:24 CST; 9s agoDocs: https://kubernetes.io/docs/home/Main PID: 49107 (kubelet)Tasks: 16 (limit: 3295)CGroup: /system.slice/kubelet.service
4.2 安装kube-bench
kube-bench我们已经下载好了,没有下载的可以去这个网站下载:https://github.com/aquasecurity/kube-bench/tags 。
$ ls
kube-bench_0.6.17_linux_amd64.tar.gz
解压kube-bench_0.6.7_linux_amd64.tar.gz之后得到cfg和kube-bench。
$ tar xf kube-bench_0.6.7_linux_amd64.tar.gz $ ls
cfg  kube-bench  kube-bench_0.6.7_linux_amd64.tar.gz
进入 cfg目录,cfg/config.yaml包含了master包含哪些组件,配置文件放在哪里,需要去哪里读取配置文件等等,如果k8s的某些配置文件自定义放到了某个目录,修改config.yaml里的相应目录就行。
$ ls cfg/
ack-1.0  aks-1.0  cis-1.20  cis-1.5  cis-1.6  config.yaml  eks-1.0.1  gke-1.0  gke-1.2.0  rh-0.7  rh-1.0$ cd cfg/cis-1.6/#etcd.yaml文件记录了需要检测etcd的信息
$ ls
config.yaml  controlplane.yaml  etcd.yaml  master.yaml  node.yaml  policies.yaml
4.3 kube-bench检测etcd组件
kube-bench V0.31版本执行方法为:./kube-bench ,./kube-bench master(检测master设置) ,./kube-bench node(检测worker设置),但是新版本kube-bench不能这样执行。
$ cd$ ./kube-bench node
Error: unknown command "node" for "./kube-bench"
Run './kube-bench --help' for usage.
unknown command "node" for "./kube-bench"
执行新版本kube-bench需要指定配置目录,检测语法为:./kube-bench --config-dir 配置目录 --config 配置文件 run --targets=需要检测的组件。
$ pwd
/root$ ls
cfg  kube-bench  kube-bench_0.6.7_linux_amd64.tar.gz #--targets=检测的组件就是cfg/cis-1.6/目录下的那些组件
$ ls cfg/cis-1.6/
config.yaml  controlplane.yaml  etcd.yaml  master.yaml  node.yaml  policies.yaml
我们现在使用kube-bench开始检测etcd组件,可以看到etcd组件有6个PASS,1个FAIL。
$ pwd
/root$ ls
cfg  kube-bench  kube-bench_0.6.7_linux_amd64.tar.gz  $ ./kube-bench --config-dir `pwd`/cfg --config `pwd`/cfg/config.yaml run --targets=etcd
Warning: Kubernetes version was not auto-detected because kubectl could not connect to the Kubernetes server. This may be because the kubeconfig information is missing or has credentials that do not match the server. Assuming default version 1.18
Warning: Kubernetes version was not auto-detected because kubectl could not connect to the Kubernetes server. This may be because the kubeconfig information is missing or has credentials that do not match the server. Assuming default version 1.18
[INFO] 2 Etcd Node Configuration
[INFO] 2 Etcd Node Configuration Files
[PASS] 2.1 Ensure that the --cert-file and --key-file arguments are set as appropriate (Automated)
[FAIL] 2.2 Ensure that the --client-cert-auth argument is set to true (Automated)
[PASS] 2.3 Ensure that the --auto-tls argument is not set to true (Automated)
[PASS] 2.4 Ensure that the --peer-cert-file and --peer-key-file arguments are set as appropriate (Automated)
[PASS] 2.5 Ensure that the --peer-client-cert-auth argument is set to true (Automated)
[PASS] 2.6 Ensure that the --peer-auto-tls argument is not set to true (Automated)
[PASS] 2.7 Ensure that a unique Certificate Authority is used for etcd (Manual)== Remediations etcd ==
2.2 Edit the etcd pod specification file /etc/kubernetes/manifests/etcd.yaml on the master
node and set the below parameter.
--client-cert-auth="true"== Summary etcd ==
6 checks PASS
1 checks FAIL
0 checks WARN
0 checks INFO== Summary total ==
6 checks PASS
1 checks FAIL
0 checks WARN
0 checks INFO
根据kube-bench的报错信息:“[FAIL] 2.2 Ensure that the --client-cert-auth argument is set to true (Automated)”,表明--client-cert-auth参数应该设置为true。
Remediations etcd告诉我们解决的办法,按照提示修改/etc/kubernetes/manifests/etcd.yaml的--client-cert-auth参数。
$ vim /etc/kubernetes/manifests/etcd.yaml
# 修改--client-cert-auth=true。
$ grep client-cert-auth /etc/kubernetes/manifests/etcd.yaml- --client-cert-auth=true- --peer-client-cert-auth=true
重启kubelet让参数生效。
$ systemctl restart kubelet$ kubectl get node
NAME           STATUS   ROLES                  AGE   VERSION
ops-master-1   Ready    control-plane,master   24h   v1.21.9
ops-worker-1   Ready    <none>                 24h   v1.21.9
ops-worker-2   Ready    <none>                 24h   v1.21.9
使用kube-bench重新检测etcd组件,现在etcd组件就全是PASS状态了,etcd没有安全隐患了。
$ ./kube-bench --config-dir `pwd`/cfg --config `pwd`/cfg/config.yaml run --targets=etcd
[INFO] 2 Etcd Node Configuration
[INFO] 2 Etcd Node Configuration Files
[PASS] 2.1 Ensure that the --cert-file and --key-file arguments are set as appropriate (Automated)
[PASS] 2.2 Ensure that the --client-cert-auth argument is set to true (Automated)
[PASS] 2.3 Ensure that the --auto-tls argument is not set to true (Automated)
[PASS] 2.4 Ensure that the --peer-cert-file and --peer-key-file arguments are set as appropriate (Automated)
[PASS] 2.5 Ensure that the --peer-client-cert-auth argument is set to true (Automated)
[PASS] 2.6 Ensure that the --peer-auto-tls argument is not set to true (Automated)
[PASS] 2.7 Ensure that a unique Certificate Authority is used for etcd (Manual)== Summary etcd ==
7 checks PASS
0 checks FAIL
0 checks WARN
0 checks INFO== Summary total ==
7 checks PASS
0 checks FAIL
0 checks WARN
0 checks INFO
4.4 kube-bench检测master节点
现在检测master节点,master节点参数很多,输出信息太多了,我把PASS的信息删除了。
可以看到master节点有39个PASS,14个FAIL,11个WARN。
$ ./kube-bench --config-dir `pwd`/cfg --config `pwd`/cfg/config.yaml run --targets=master
[INFO] 1 Master Node Security Configuration
[INFO] 1.1 Master Node Configuration Files
[PASS] 1.1.1 Ensure that the API server pod specification file permissions are set to 644 or more restrictive (Automated)
[PASS] 1.1.2 Ensure that the API server pod specification file ownership is set to root:root (Automated)
[PASS] 1.1.3 Ensure that the controller manager pod specification file permissions are set to 644 or more restrictive (Automated)
[PASS] 1.1.4 Ensure that the controller manager pod specification file ownership is set to root:root (Automated)
[PASS] 1.1.5 Ensure that the scheduler pod specification file permissions are set to 644 or more restrictive (Automated)
[PASS] 1.1.6 Ensure that the scheduler pod specification file ownership is set to root:root (Automated)
[PASS] 1.1.7 Ensure that the etcd pod specification file permissions are set to 644 or more restrictive (Automated)
[PASS] 1.1.8 Ensure that the etcd pod specification file ownership is set to root:root (Automated)
[WARN] 1.1.9 Ensure that the Container Network Interface file permissions are set to 644 or more restrictive (Manual)
[WARN] 1.1.10 Ensure that the Container Network Interface file ownership is set to root:root (Manual)
[PASS] 1.1.11 Ensure that the etcd data directory permissions are set to 700 or more restrictive (Automated)
[FAIL] 1.1.12 Ensure that the etcd data directory ownership is set to etcd:etcd (Automated)
[PASS] 1.1.13 Ensure that the admin.conf file permissions are set to 644 or more restrictive (Automated)
[PASS] 1.1.14 Ensure that the admin.conf file ownership is set to root:root (Automated)
[PASS] 1.1.15 Ensure that the scheduler.conf file permissions are set to 644 or more restrictive (Automated)
[PASS] 1.1.16 Ensure that the scheduler.conf file ownership is set to root:root (Automated)
[PASS] 1.1.17 Ensure that the controller-manager.conf file permissions are set to 644 or more restrictive (Automated)
[PASS] 1.1.18 Ensure that the controller-manager.conf file ownership is set to root:root (Automated)
[PASS] 1.1.19 Ensure that the Kubernetes PKI directory and file ownership is set to root:root (Automated)
[PASS] 1.1.20 Ensure that the Kubernetes PKI certificate file permissions are set to 644 or more restrictive (Manual)
[PASS] 1.1.21 Ensure that the Kubernetes PKI key file permissions are set to 600 (Manual)
[INFO] 1.2 API Server
[WARN] 1.2.1 Ensure that the --anonymous-auth argument is set to false (Manual)
[PASS] 1.2.2 Ensure that the --token-auth-file parameter is not set (Automated)
[PASS] 1.2.3 Ensure that the --kubelet-https argument is set to true (Automated)
[PASS] 1.2.4 Ensure that the --kubelet-client-certificate and --kubelet-client-key arguments are set as appropriate (Automated)
[FAIL] 1.2.5 Ensure that the --kubelet-certificate-authority argument is set as appropriate (Automated)
[FAIL] 1.2.6 Ensure that the --authorization-mode argument is not set to AlwaysAllow (Automated)
[FAIL] 1.2.7 Ensure that the --authorization-mode argument includes Node (Automated)
[FAIL] 1.2.8 Ensure that the --authorization-mode argument includes RBAC (Automated)
[WARN] 1.2.9 Ensure that the admission control plugin EventRateLimit is set (Manual)
[PASS] 1.2.10 Ensure that the admission control plugin AlwaysAdmit is not set (Automated)
[WARN] 1.2.11 Ensure that the admission control plugin AlwaysPullImages is set (Manual)
[WARN] 1.2.12 Ensure that the admission control plugin SecurityContextDeny is set if PodSecurityPolicy is not used (Manual)
[PASS] 1.2.13 Ensure that the admission control plugin ServiceAccount is set (Automated)
[PASS] 1.2.14 Ensure that the admission control plugin NamespaceLifecycle is set (Automated)
[FAIL] 1.2.15 Ensure that the admission control plugin PodSecurityPolicy is set (Automated)
[PASS] 1.2.16 Ensure that the admission control plugin NodeRestriction is set (Automated)
[PASS] 1.2.17 Ensure that the --insecure-bind-address argument is not set (Automated)
[PASS] 1.2.18 Ensure that the --insecure-port argument is set to 0 (Automated)
[PASS] 1.2.19 Ensure that the --secure-port argument is not set to 0 (Automated)
[FAIL] 1.2.20 Ensure that the --profiling argument is set to false (Automated)
[FAIL] 1.2.21 Ensure that the --audit-log-path argument is set (Automated)
[FAIL] 1.2.22 Ensure that the --audit-log-maxage argument is set to 30 or as appropriate (Automated)
[FAIL] 1.2.23 Ensure that the --audit-log-maxbackup argument is set to 10 or as appropriate (Automated)
[FAIL] 1.2.24 Ensure that the --audit-log-maxsize argument is set to 100 or as appropriate (Automated)
[WARN] 1.2.25 Ensure that the --request-timeout argument is set as appropriate (Manual)
[PASS] 1.2.26 Ensure that the --service-account-lookup argument is set to true (Automated)
[PASS] 1.2.27 Ensure that the --service-account-key-file argument is set as appropriate (Automated)
[PASS] 1.2.28 Ensure that the --etcd-certfile and --etcd-keyfile arguments are set as appropriate (Automated)
[PASS] 1.2.29 Ensure that the --tls-cert-file and --tls-private-key-file arguments are set as appropriate (Automated)
[PASS] 1.2.30 Ensure that the --client-ca-file argument is set as appropriate (Automated)
[PASS] 1.2.31 Ensure that the --etcd-cafile argument is set as appropriate (Automated)
[WARN] 1.2.32 Ensure that the --encryption-provider-config argument is set as appropriate (Manual)
[WARN] 1.2.33 Ensure that encryption providers are appropriately configured (Manual)
[WARN] 1.2.34 Ensure that the API Server only makes use of Strong Cryptographic Ciphers (Manual)
[INFO] 1.3 Controller Manager
[WARN] 1.3.1 Ensure that the --terminated-pod-gc-threshold argument is set as appropriate (Manual)
[FAIL] 1.3.2 Ensure that the --profiling argument is set to false (Automated)
[PASS] 1.3.3 Ensure that the --use-service-account-credentials argument is set to true (Automated)
[PASS] 1.3.4 Ensure that the --service-account-private-key-file argument is set as appropriate (Automated)
[PASS] 1.3.5 Ensure that the --root-ca-file argument is set as appropriate (Automated)
[PASS] 1.3.6 Ensure that the RotateKubeletServerCertificate argument is set to true (Automated)
[PASS] 1.3.7 Ensure that the --bind-address argument is set to 127.0.0.1 (Automated)
[INFO] 1.4 Scheduler
[FAIL] 1.4.1 Ensure that the --profiling argument is set to false (Automated)
[PASS] 1.4.2 Ensure that the --bind-address argument is set to 127.0.0.1 (Automated)== Remediations master ==
1.1.9 Run the below command (based on the file location on your system) on the master node.
For example,
chmod 644 <path/to/cni/files>1.1.10 Run the below command (based on the file location on your system) on the master node.
For example,
chown root:root <path/to/cni/files>1.1.12 On the etcd server node, get the etcd data directory, passed as an argument --data-dir,
from the below command:
ps -ef | grep etcd
Run the below command (based on the etcd data directory found above).
For example, chown etcd:etcd /var/lib/etcd1.2.1 Edit the API server pod specification file /etc/kubernetes/manifests/kube-apiserver.yaml
on the master node and set the below parameter.
--anonymous-auth=false1.2.5 Follow the Kubernetes documentation and setup the TLS connection between
the apiserver and kubelets. Then, edit the API server pod specification file
/etc/kubernetes/manifests/kube-apiserver.yaml on the master node and set the
--kubelet-certificate-authority parameter to the path to the cert file for the certificate authority.
--kubelet-certificate-authority=<ca-string>1.2.6 Edit the API server pod specification file /etc/kubernetes/manifests/kube-apiserver.yaml
on the master node and set the --authorization-mode parameter to values other than AlwaysAllow.
One such example could be as below.
--authorization-mode=RBAC1.2.7 Edit the API server pod specification file /etc/kubernetes/manifests/kube-apiserver.yaml
on the master node and set the --authorization-mode parameter to a value that includes Node.
--authorization-mode=Node,RBAC1.2.8 Edit the API server pod specification file /etc/kubernetes/manifests/kube-apiserver.yaml
on the master node and set the --authorization-mode parameter to a value that includes RBAC,
for example:
--authorization-mode=Node,RBAC1.2.9 Follow the Kubernetes documentation and set the desired limits in a configuration file.
Then, edit the API server pod specification file /etc/kubernetes/manifests/kube-apiserver.yaml
and set the below parameters.
--enable-admission-plugins=...,EventRateLimit,...
--admission-control-config-file=<path/to/configuration/file>1.2.11 Edit the API server pod specification file /etc/kubernetes/manifests/kube-apiserver.yaml
on the master node and set the --enable-admission-plugins parameter to include
AlwaysPullImages.
--enable-admission-plugins=...,AlwaysPullImages,...1.2.12 Edit the API server pod specification file /etc/kubernetes/manifests/kube-apiserver.yaml
on the master node and set the --enable-admission-plugins parameter to include
SecurityContextDeny, unless PodSecurityPolicy is already in place.
--enable-admission-plugins=...,SecurityContextDeny,...1.2.15 Follow the documentation and create Pod Security Policy objects as per your environment.
Then, edit the API server pod specification file /etc/kubernetes/manifests/kube-apiserver.yaml
on the master node and set the --enable-admission-plugins parameter to a
value that includes PodSecurityPolicy:
--enable-admission-plugins=...,PodSecurityPolicy,...
Then restart the API Server.1.2.20 Edit the API server pod specification file /etc/kubernetes/manifests/kube-apiserver.yaml
on the master node and set the below parameter.
--profiling=false1.2.21 Edit the API server pod specification file /etc/kubernetes/manifests/kube-apiserver.yaml
on the master node and set the --audit-log-path parameter to a suitable path and
file where you would like audit logs to be written, for example:
--audit-log-path=/var/log/apiserver/audit.log1.2.22 Edit the API server pod specification file /etc/kubernetes/manifests/kube-apiserver.yaml
on the master node and set the --audit-log-maxage parameter to 30 or as an appropriate number of days:
--audit-log-maxage=301.2.23 Edit the API server pod specification file /etc/kubernetes/manifests/kube-apiserver.yaml
on the master node and set the --audit-log-maxbackup parameter to 10 or to an appropriate
value.
--audit-log-maxbackup=101.2.24 Edit the API server pod specification file /etc/kubernetes/manifests/kube-apiserver.yaml
on the master node and set the --audit-log-maxsize parameter to an appropriate size in MB.
For example, to set it as 100 MB:
--audit-log-maxsize=1001.2.25 Edit the API server pod specification file /etc/kubernetes/manifests/kube-apiserver.yaml
and set the below parameter as appropriate and if needed.
For example,
--request-timeout=300s1.2.32 Follow the Kubernetes documentation and configure a EncryptionConfig file.
Then, edit the API server pod specification file /etc/kubernetes/manifests/kube-apiserver.yaml
on the master node and set the --encryption-provider-config parameter to the path of that file: --encryption-provider-config=</path/to/EncryptionConfig/File>1.2.33 Follow the Kubernetes documentation and configure a EncryptionConfig file.
In this file, choose aescbc, kms or secretbox as the encryption provider.1.2.34 Edit the API server pod specification file /etc/kubernetes/manifests/kube-apiserver.yaml
on the master node and set the below parameter.
--tls-cipher-suites=TLS_ECDHE_ECDSA_WITH_AES_128_GCM_SHA256,TLS_ECDHE_RSA_WITH_AES_128_GCM
_SHA256,TLS_ECDHE_ECDSA_WITH_CHACHA20_POLY1305,TLS_ECDHE_RSA_WITH_AES_256_GCM
_SHA384,TLS_ECDHE_RSA_WITH_CHACHA20_POLY1305,TLS_ECDHE_ECDSA_WITH_AES_256_GCM
_SHA3841.3.1 Edit the Controller Manager pod specification file /etc/kubernetes/manifests/kube-controller-manager.yaml
on the master node and set the --terminated-pod-gc-threshold to an appropriate threshold,
for example:
--terminated-pod-gc-threshold=101.3.2 Edit the Controller Manager pod specification file /etc/kubernetes/manifests/kube-controller-manager.yaml
on the master node and set the below parameter.
--profiling=false1.4.1 Edit the Scheduler pod specification file /etc/kubernetes/manifests/kube-scheduler.yaml file
on the master node and set the below parameter.
--profiling=false== Summary master ==
40 checks PASS
13 checks FAIL
11 checks WARN
0 checks INFO== Summary total ==
40 checks PASS
13 checks FAIL
11 checks WARN
0 checks INFO
查看1.2.6的报错信息:“1.2.6 Ensure that the --authorization-mode argument is not set to AlwaysAllow (Automated)“,表示-authorization-mode不应该设置为AlwaysAllow,应该设置为--authorization-mode=Node,RBAC,按照提示修改:
$ vim /etc/kubernetes/manifests/kube-apiserver.yaml
修改参数:--authorization-mode=Node,RBAC
$ grep authorization-mode /etc/kubernetes/manifests/kube-apiserver.yaml- --authorization-mode=Node,RBAC
1.2.20的报错信息为:“[FAIL] 1.2.20 Ensure that the --profiling argument is set to false (Automated) “,表示--profiling参数应该设置为false。
根据提示信息:”1.2.20 Edit the API server pod specification file /etc/kubernetes/manifests/kube-apiserver.yaml
on the master node and set the below parameter. --profiling=false“。修改参数。
$ vim /etc/kubernetes/manifests/kube-apiserver.yaml
新增参数:--profiling=false
$ grep profiling /etc/kubernetes/manifests/kube-apiserver.yaml- --profiling=false
重启kubelet使配置生效。
$ systemctl restart kubelet
$ kubectl get node
NAME           STATUS   ROLES                  AGE   VERSION
ops-master-1   Ready    control-plane,master   24h   v1.21.9
ops-worker-1   Ready    <none>                 24h   v1.21.9
ops-worker-2   Ready    <none>                 24h   v1.21.9
使用kube-bench重新检测master节点,现在pass变多了,FAIL变少了。
$ ./kube-bench --config-dir `pwd`/cfg --config `pwd`/cfg/config.yaml run --targets=master
[INFO] 1 Master Node Security Configuration
[INFO] 1.1 Master Node Configuration Files
[PASS] 1.1.1 Ensure that the API server pod specification file permissions are set to 644 or more restrictive (Automated)
[PASS] 1.1.2 Ensure that the API server pod specification file ownership is set to root:root (Automated)
[PASS] 1.1.3 Ensure that the controller manager pod specification file permissions are set to 644 or more restrictive (Automated)
[PASS] 1.1.4 Ensure that the controller manager pod specification file ownership is set to root:root (Automated)
[PASS] 1.1.5 Ensure that the scheduler pod specification file permissions are set to 644 or more restrictive (Automated)
[PASS] 1.1.6 Ensure that the scheduler pod specification file ownership is set to root:root (Automated)
[PASS] 1.1.7 Ensure that the etcd pod specification file permissions are set to 644 or more restrictive (Automated)
[PASS] 1.1.8 Ensure that the etcd pod specification file ownership is set to root:root (Automated)
[WARN] 1.1.9 Ensure that the Container Network Interface file permissions are set to 644 or more restrictive (Manual)
[WARN] 1.1.10 Ensure that the Container Network Interface file ownership is set to root:root (Manual)
[PASS] 1.1.11 Ensure that the etcd data directory permissions are set to 700 or more restrictive (Automated)
[FAIL] 1.1.12 Ensure that the etcd data directory ownership is set to etcd:etcd (Automated)
[PASS] 1.1.13 Ensure that the admin.conf file permissions are set to 644 or more restrictive (Automated)
[PASS] 1.1.14 Ensure that the admin.conf file ownership is set to root:root (Automated)
[PASS] 1.1.15 Ensure that the scheduler.conf file permissions are set to 644 or more restrictive (Automated)
[PASS] 1.1.16 Ensure that the scheduler.conf file ownership is set to root:root (Automated)
[PASS] 1.1.17 Ensure that the controller-manager.conf file permissions are set to 644 or more restrictive (Automated)
[PASS] 1.1.18 Ensure that the controller-manager.conf file ownership is set to root:root (Automated)
[PASS] 1.1.19 Ensure that the Kubernetes PKI directory and file ownership is set to root:root (Automated)
[PASS] 1.1.20 Ensure that the Kubernetes PKI certificate file permissions are set to 644 or more restrictive (Manual)
[PASS] 1.1.21 Ensure that the Kubernetes PKI key file permissions are set to 600 (Manual)
[INFO] 1.2 API Server
[WARN] 1.2.1 Ensure that the --anonymous-auth argument is set to false (Manual)
[PASS] 1.2.2 Ensure that the --token-auth-file parameter is not set (Automated)
[PASS] 1.2.3 Ensure that the --kubelet-https argument is set to true (Automated)
[PASS] 1.2.4 Ensure that the --kubelet-client-certificate and --kubelet-client-key arguments are set as appropriate (Automated)
[FAIL] 1.2.5 Ensure that the --kubelet-certificate-authority argument is set as appropriate (Automated)
[PASS] 1.2.6 Ensure that the --authorization-mode argument is not set to AlwaysAllow (Automated)
[PASS] 1.2.7 Ensure that the --authorization-mode argument includes Node (Automated)
[PASS] 1.2.8 Ensure that the --authorization-mode argument includes RBAC (Automated)
[WARN] 1.2.9 Ensure that the admission control plugin EventRateLimit is set (Manual)
[PASS] 1.2.10 Ensure that the admission control plugin AlwaysAdmit is not set (Automated)
[WARN] 1.2.11 Ensure that the admission control plugin AlwaysPullImages is set (Manual)
[WARN] 1.2.12 Ensure that the admission control plugin SecurityContextDeny is set if PodSecurityPolicy is not used (Manual)
[PASS] 1.2.13 Ensure that the admission control plugin ServiceAccount is set (Automated)
[PASS] 1.2.14 Ensure that the admission control plugin NamespaceLifecycle is set (Automated)
[FAIL] 1.2.15 Ensure that the admission control plugin PodSecurityPolicy is set (Automated)
[PASS] 1.2.16 Ensure that the admission control plugin NodeRestriction is set (Automated)
[PASS] 1.2.17 Ensure that the --insecure-bind-address argument is not set (Automated)
[PASS] 1.2.18 Ensure that the --insecure-port argument is set to 0 (Automated)
[PASS] 1.2.19 Ensure that the --secure-port argument is not set to 0 (Automated)
[PASS] 1.2.20 Ensure that the --profiling argument is set to false (Automated)
[FAIL] 1.2.21 Ensure that the --audit-log-path argument is set (Automated)
[FAIL] 1.2.22 Ensure that the --audit-log-maxage argument is set to 30 or as appropriate (Automated)
[FAIL] 1.2.23 Ensure that the --audit-log-maxbackup argument is set to 10 or as appropriate (Automated)
[FAIL] 1.2.24 Ensure that the --audit-log-maxsize argument is set to 100 or as appropriate (Automated)
[WARN] 1.2.25 Ensure that the --request-timeout argument is set as appropriate (Manual)
[PASS] 1.2.26 Ensure that the --service-account-lookup argument is set to true (Automated)
[PASS] 1.2.27 Ensure that the --service-account-key-file argument is set as appropriate (Automated)
[PASS] 1.2.28 Ensure that the --etcd-certfile and --etcd-keyfile arguments are set as appropriate (Automated)
[PASS] 1.2.29 Ensure that the --tls-cert-file and --tls-private-key-file arguments are set as appropriate (Automated)
[PASS] 1.2.30 Ensure that the --client-ca-file argument is set as appropriate (Automated)
[PASS] 1.2.31 Ensure that the --etcd-cafile argument is set as appropriate (Automated)
[WARN] 1.2.32 Ensure that the --encryption-provider-config argument is set as appropriate (Manual)
[WARN] 1.2.33 Ensure that encryption providers are appropriately configured (Manual)
[WARN] 1.2.34 Ensure that the API Server only makes use of Strong Cryptographic Ciphers (Manual)
[INFO] 1.3 Controller Manager
[WARN] 1.3.1 Ensure that the --terminated-pod-gc-threshold argument is set as appropriate (Manual)
[FAIL] 1.3.2 Ensure that the --profiling argument is set to false (Automated)
[PASS] 1.3.3 Ensure that the --use-service-account-credentials argument is set to true (Automated)
[PASS] 1.3.4 Ensure that the --service-account-private-key-file argument is set as appropriate (Automated)
[PASS] 1.3.5 Ensure that the --root-ca-file argument is set as appropriate (Automated)
[PASS] 1.3.6 Ensure that the RotateKubeletServerCertificate argument is set to true (Automated)
[PASS] 1.3.7 Ensure that the --bind-address argument is set to 127.0.0.1 (Automated)
[INFO] 1.4 Scheduler
[FAIL] 1.4.1 Ensure that the --profiling argument is set to false (Automated)
[PASS] 1.4.2 Ensure that the --bind-address argument is set to 127.0.0.1 (Automated)== Remediations master ==
1.1.9 Run the below command (based on the file location on your system) on the master node.
For example,
chmod 644 <path/to/cni/files>1.1.10 Run the below command (based on the file location on your system) on the master node.
For example,
chown root:root <path/to/cni/files>1.1.12 On the etcd server node, get the etcd data directory, passed as an argument --data-dir,
from the below command:
ps -ef | grep etcd
Run the below command (based on the etcd data directory found above).
For example, chown etcd:etcd /var/lib/etcd1.2.1 Edit the API server pod specification file /etc/kubernetes/manifests/kube-apiserver.yaml
on the master node and set the below parameter.
--anonymous-auth=false1.2.5 Follow the Kubernetes documentation and setup the TLS connection between
the apiserver and kubelets. Then, edit the API server pod specification file
/etc/kubernetes/manifests/kube-apiserver.yaml on the master node and set the
--kubelet-certificate-authority parameter to the path to the cert file for the certificate authority.
--kubelet-certificate-authority=<ca-string>1.2.9 Follow the Kubernetes documentation and set the desired limits in a configuration file.
Then, edit the API server pod specification file /etc/kubernetes/manifests/kube-apiserver.yaml
and set the below parameters.
--enable-admission-plugins=...,EventRateLimit,...
--admission-control-config-file=<path/to/configuration/file>1.2.11 Edit the API server pod specification file /etc/kubernetes/manifests/kube-apiserver.yaml
on the master node and set the --enable-admission-plugins parameter to include
AlwaysPullImages.
--enable-admission-plugins=...,AlwaysPullImages,...1.2.12 Edit the API server pod specification file /etc/kubernetes/manifests/kube-apiserver.yaml
on the master node and set the --enable-admission-plugins parameter to include
SecurityContextDeny, unless PodSecurityPolicy is already in place.
--enable-admission-plugins=...,SecurityContextDeny,...1.2.15 Follow the documentation and create Pod Security Policy objects as per your environment.
Then, edit the API server pod specification file /etc/kubernetes/manifests/kube-apiserver.yaml
on the master node and set the --enable-admission-plugins parameter to a
value that includes PodSecurityPolicy:
--enable-admission-plugins=...,PodSecurityPolicy,...
Then restart the API Server.1.2.21 Edit the API server pod specification file /etc/kubernetes/manifests/kube-apiserver.yaml
on the master node and set the --audit-log-path parameter to a suitable path and
file where you would like audit logs to be written, for example:
--audit-log-path=/var/log/apiserver/audit.log1.2.22 Edit the API server pod specification file /etc/kubernetes/manifests/kube-apiserver.yaml
on the master node and set the --audit-log-maxage parameter to 30 or as an appropriate number of days:
--audit-log-maxage=301.2.23 Edit the API server pod specification file /etc/kubernetes/manifests/kube-apiserver.yaml
on the master node and set the --audit-log-maxbackup parameter to 10 or to an appropriate
value.
--audit-log-maxbackup=101.2.24 Edit the API server pod specification file /etc/kubernetes/manifests/kube-apiserver.yaml
on the master node and set the --audit-log-maxsize parameter to an appropriate size in MB.
For example, to set it as 100 MB:
--audit-log-maxsize=1001.2.25 Edit the API server pod specification file /etc/kubernetes/manifests/kube-apiserver.yaml
and set the below parameter as appropriate and if needed.
For example,
--request-timeout=300s1.2.32 Follow the Kubernetes documentation and configure a EncryptionConfig file.
Then, edit the API server pod specification file /etc/kubernetes/manifests/kube-apiserver.yaml
on the master node and set the --encryption-provider-config parameter to the path of that file: --encryption-provider-config=</path/to/EncryptionConfig/File>1.2.33 Follow the Kubernetes documentation and configure a EncryptionConfig file.
In this file, choose aescbc, kms or secretbox as the encryption provider.1.2.34 Edit the API server pod specification file /etc/kubernetes/manifests/kube-apiserver.yaml
on the master node and set the below parameter.
--tls-cipher-suites=TLS_ECDHE_ECDSA_WITH_AES_128_GCM_SHA256,TLS_ECDHE_RSA_WITH_AES_128_GCM
_SHA256,TLS_ECDHE_ECDSA_WITH_CHACHA20_POLY1305,TLS_ECDHE_RSA_WITH_AES_256_GCM
_SHA384,TLS_ECDHE_RSA_WITH_CHACHA20_POLY1305,TLS_ECDHE_ECDSA_WITH_AES_256_GCM
_SHA3841.3.1 Edit the Controller Manager pod specification file /etc/kubernetes/manifests/kube-controller-manager.yaml
on the master node and set the --terminated-pod-gc-threshold to an appropriate threshold,
for example:
--terminated-pod-gc-threshold=101.3.2 Edit the Controller Manager pod specification file /etc/kubernetes/manifests/kube-controller-manager.yaml
on the master node and set the below parameter.
--profiling=false1.4.1 Edit the Scheduler pod specification file /etc/kubernetes/manifests/kube-scheduler.yaml file
on the master node and set the below parameter.
--profiling=false== Summary master ==
44 checks PASS
9 checks FAIL
11 checks WARN
0 checks INFO== Summary total ==
44 checks PASS
9 checks FAIL
11 checks WARN
0 checks INFO
4.5 kube-bench检测worker节点
把kube-bench安装包拷贝到kubernetes集群的worker节点。
$ scp kube-bench_0.6.7_linux_amd64.tar.gz 10.220.43.204:/home解压。
$ tar -xvf kube-bench_0.6.17_linux_amd64.tar.gz
$ ls
cfg  kube-bench
使用kube-bench检测kubernetes集群的worker节点,可以看到19个PASS,1个FAIL,3个WARN。
$ ./kube-bench --config-dir `pwd`/cfg --config `pwd`/cfg/config.yaml run --targets=node
[INFO] 4 Worker Node Security Configuration
[INFO] 4.1 Worker Node Configuration Files
[PASS] 4.1.1 Ensure that the kubelet service file permissions are set to 644 or more restrictive (Automated)
[PASS] 4.1.2 Ensure that the kubelet service file ownership is set to root:root (Automated)
[PASS] 4.1.3 If proxy kubeconfig file exists ensure permissions are set to 644 or more restrictive (Manual)
[PASS] 4.1.4 Ensure that the proxy kubeconfig file ownership is set to root:root (Manual)
[PASS] 4.1.5 Ensure that the --kubeconfig kubelet.conf file permissions are set to 644 or more restrictive (Automated)
[PASS] 4.1.6 Ensure that the --kubeconfig kubelet.conf file ownership is set to root:root (Manual)
[PASS] 4.1.7 Ensure that the certificate authorities file permissions are set to 644 or more restrictive (Manual)
[PASS] 4.1.8 Ensure that the client certificate authorities file ownership is set to root:root (Manual)
[PASS] 4.1.9 Ensure that the kubelet --config configuration file has permissions set to 644 or more restrictive (Automated)
[PASS] 4.1.10 Ensure that the kubelet --config configuration file ownership is set to root:root (Automated)
[INFO] 4.2 Kubelet
[PASS] 4.2.1 Ensure that the anonymous-auth argument is set to false (Automated)
[PASS] 4.2.2 Ensure that the --authorization-mode argument is not set to AlwaysAllow (Automated)
[PASS] 4.2.3 Ensure that the --client-ca-file argument is set as appropriate (Automated)
[PASS] 4.2.4 Ensure that the --read-only-port argument is set to 0 (Manual)
[PASS] 4.2.5 Ensure that the --streaming-connection-idle-timeout argument is not set to 0 (Manual)
[FAIL] 4.2.6 Ensure that the --protect-kernel-defaults argument is set to true (Automated)
[PASS] 4.2.7 Ensure that the --make-iptables-util-chains argument is set to true (Automated)
[PASS] 4.2.8 Ensure that the --hostname-override argument is not set (Manual)
[WARN] 4.2.9 Ensure that the --event-qps argument is set to 0 or a level which ensures appropriate event capture (Manual)
[WARN] 4.2.10 Ensure that the --tls-cert-file and --tls-private-key-file arguments are set as appropriate (Manual)
[PASS] 4.2.11 Ensure that the --rotate-certificates argument is not set to false (Manual)
[PASS] 4.2.12 Verify that the RotateKubeletServerCertificate argument is set to true (Manual)
[WARN] 4.2.13 Ensure that the Kubelet only makes use of Strong Cryptographic Ciphers (Manual)== Remediations node ==
4.2.6 If using a Kubelet config file, edit the file to set protectKernelDefaults: true.
If using command line arguments, edit the kubelet service file
/lib/systemd/system/kubelet.service on each worker node and
set the below parameter in KUBELET_SYSTEM_PODS_ARGS variable.
--protect-kernel-defaults=true
Based on your system, restart the kubelet service. For example:
systemctl daemon-reload
systemctl restart kubelet.service4.2.9 If using a Kubelet config file, edit the file to set eventRecordQPS: to an appropriate level.
If using command line arguments, edit the kubelet service file
/lib/systemd/system/kubelet.service on each worker node and
set the below parameter in KUBELET_SYSTEM_PODS_ARGS variable.
Based on your system, restart the kubelet service. For example:
systemctl daemon-reload
systemctl restart kubelet.service4.2.10 If using a Kubelet config file, edit the file to set tlsCertFile to the location
of the certificate file to use to identify this Kubelet, and tlsPrivateKeyFile
to the location of the corresponding private key file.
If using command line arguments, edit the kubelet service file
/lib/systemd/system/kubelet.service on each worker node and
set the below parameters in KUBELET_CERTIFICATE_ARGS variable.
--tls-cert-file=<path/to/tls-certificate-file>
--tls-private-key-file=<path/to/tls-key-file>
Based on your system, restart the kubelet service. For example:
systemctl daemon-reload
systemctl restart kubelet.service4.2.13 If using a Kubelet config file, edit the file to set TLSCipherSuites: to
TLS_ECDHE_ECDSA_WITH_AES_128_GCM_SHA256,TLS_ECDHE_RSA_WITH_AES_128_GCM_SHA256,TLS_ECDHE_ECDSA_WITH_CHACHA20_POLY1305,TLS_ECDHE_RSA_WITH_AES_256_GCM_SHA384,TLS_ECDHE_RSA_WITH_CHACHA20_POLY1305,TLS_ECDHE_ECDSA_WITH_AES_256_GCM_SHA384,TLS_RSA_WITH_AES_256_GCM_SHA384,TLS_RSA_WITH_AES_128_GCM_SHA256
or to a subset of these values.
If using executable arguments, edit the kubelet service file
/lib/systemd/system/kubelet.service on each worker node and
set the --tls-cipher-suites parameter as follows, or to a subset of these values.
--tls-cipher-suites=TLS_ECDHE_ECDSA_WITH_AES_128_GCM_SHA256,TLS_ECDHE_RSA_WITH_AES_128_GCM_SHA256,TLS_ECDHE_ECDSA_WITH_CHACHA20_POLY1305,TLS_ECDHE_RSA_WITH_AES_256_GCM_SHA384,TLS_ECDHE_RSA_WITH_CHACHA20_POLY1305,TLS_ECDHE_ECDSA_WITH_AES_256_GCM_SHA384,TLS_RSA_WITH_AES_256_GCM_SHA384,TLS_RSA_WITH_AES_128_GCM_SHA256
Based on your system, restart the kubelet service. For example:
systemctl daemon-reload
systemctl restart kubelet.service== Summary node ==
19 checks PASS
1 checks FAIL
3 checks WARN
0 checks INFO== Summary total ==
19 checks PASS
1 checks FAIL
3 checks WARN
0 checks INFO
根据提示可修复worker节点的安全风险。
5 总结
kube-bench是一款强大的工具,它可以帮助我们发现哪些Kubernetes配置没有遵循CIS的最佳实践,从而改正这些问题,增强我们的Kubernetes集群的安全性。虽然kube-bench不能捕获所有可能的安全问题,但它至少可以帮助我们消除最常见的一些安全漏洞。
kube-bench只是一个检查工具,它不能自动修复发现的问题。它提供的是关于哪些配置可能需要您的注意的信息。对于任何可能的配置更改,都需要由具备相应知识的管理员审慎决定并手动实施。
这篇关于Kubernetes实战(十三)-使用kube-bench检测Kubernetes集群安全的文章就介绍到这儿,希望我们推荐的文章对编程师们有所帮助!


