本文主要是介绍极狐GitLab 与 Flux 集成实现 GitOps,希望对大家解决编程问题提供一定的参考价值,需要的开发者们随着小编来一起学习吧!
目录
flux 和 GitOps
极狐GitLab 与 flux 的集成
flux 命令行安装
极狐GitLab + flux = GitOps
GitOps Demo
写在最后
flux 和 GitOps
众所周知,weaveworks 公司在 2017 年提出了 GitOps 这个概念,而 flux 是 weaveworks 开源的一款对 Kubernetes 上的应用实现持续交付的工具,2019 年 7 月 15日 被 CNCF 接受,现在处于孵化阶段。
关于 GitOps 的更多详细内容可以查看本公众号过往的文章:
-
云原生时代,你还不懂GitOps?
-
让 KAS 给 GitOps 插上腾飞的翅膀
-
极狐GitLab 和 ArgoCD 的集成实践
简而言之:flux 是实现 GitOps 的一款开源工具。
极狐GitLab 与 flux 的集成
flux 的使用是通过 flux 命令行来实现的。先进行 flux 命令行的安装。
flux 命令行安装
flux CLI 的安装可以参考官方文档。本文以 macOS 为例,使用下面的命令即可安装成功:
$ brew install fluxcd/tap/flux查看 flux 的版本,确认安装是否成功:
$ flux -v
flux version 0.17.2
极狐GitLab + flux = GitOps
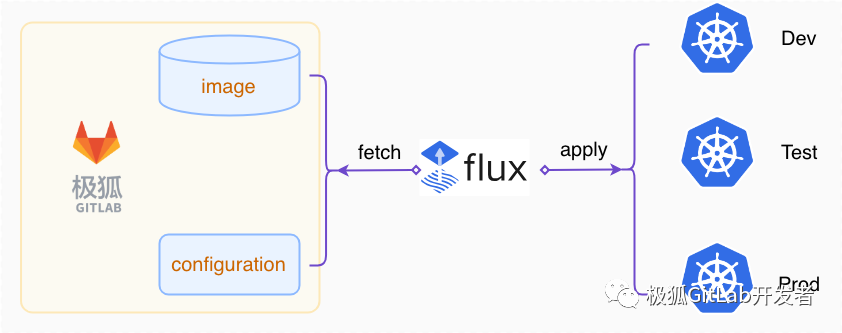
极狐GitLab 与 flux 能够很好的集成,从而实现 GitOps workflow。其核心原理是:极狐GitLab 作为单一可信源,当 极狐GitLab 仓库有变更时,变更会自动同步至 Kubernetes 集群侧。示意图如下。
可以用 flux bootstrap 命令来创建一个 GitOps workflow。flux bootstrap 命令有很多参数,详细的使用可以用 flux bootstrap -h 来查看。在执行 bootstrap 命令之前,可以先用 flux check --pre 来做一个安装前的检查,确保目标 Kubernetes 集群的版本能够满足 flux 的要求。
$ flux check --pre
► checking prerequisites
✔ kubectl 1.21.2 >=1.18.0-0
✔ Kubernetes 1.20.6-tke.3 >=1.16.0-0
✔ prerequisites checks passed
可以看到目标集群以及 kubectl 符合要求。
下面用 flux bootstrap 来创建一个基于极狐GitLab 的 GitOps workflow。使用命令如下:
$ flux bootstrap gitlab \--hostname gitlab.cn \--interval 30s \--owner xiaomage \--private \--repository flux-gitops \--path jihu其中参数的具体含义为:
-
bootstrap gitlab:表明是基于 GitLab 仓库来进行 bootstrap 操作
-
hostname:指定 GitLab 的 hostname,默认是 gitlab.com,对于极狐GitLab Saas 服务来讲是 gitlab.cn
-
interval:仓库的同步时间,默认是 1min
-
owner:极狐GitLab 的用户名或者某个 Group
-
private:如果设置为 true 则 bootstrap 过程中创建的仓库是私有仓库(默认是 true)
-
repository:极狐GitLab 的仓库名称
-
path:相对于极狐GitLab 仓库根路径的相对路径
然后将获取的 token 注入为环境变量:
$ export GITLAB_TOKEN=YOUR-JiHu-GitLab-Token然后执行上述的 flux bootstrap 命令。可以看到整个 bootstrap 过程:
► connecting to https://gitlab.cn
► cloning branch "main" from Git repository "https://gitlab.cn/xiaomage/flux-gitops.git"
✔ cloned repository
► generating component manifests
✔ generated component manifests
✔ committed sync manifests to "main" ("53f2232c92ad8769dc796d2e38995ee156fcf33b")
► pushing component manifests to "https://gitlab.cn/xiaomage/flux-gitops.git"
► installing components in "flux-system" namespace
✔ installed components
✔ reconciled components
► determining if source secret "flux-system/flux-system" exists
► generating source secret
✔ public key: ssh-rsa AAAAB3NzaC1yc2EAAAADAQABAAABAQCyDKHJ3QDk+UVJS8zYe0cFIqz3KNUDAFlKXf0NaGH/gwYW1L2XxFKfzJAQydc+DGBGnrEGFB3d21mUpaXkxrFsCEYOxPuh277jvVZsgBOCsWwXkbUCAAsogUJyNfUWvEdUZYYrZ//84o0QbPylnnoUw9Y5lvC8BcArZ13kGeRvxwDbcweGho3nBPa1JP+nq0+X+/2QT+5gor9uQsa8x4c8eOYApOlefGQ9nbhZdM/kfzLVU9yCTjkKPcu6iaAzWIE1JXt+90lMmL4CzqwNjN231hu6H1ZOpdW/mtTYY8Zp9Qx/0duSjtfTQsJUqDNS5CA/nQ2Y9VfaLeTI06cI44kb
✔ configured deploy key "flux-system-main-flux-system-./jihu" for "https://gitlab.cn/xiaomage/flux-gitops"
► applying source secret "flux-system/flux-system"
✔ reconciled source secret
► generating sync manifests
✔ generated sync manifests
✔ committed sync manifests to "main" ("28df0fae5bc6327cbcaf2884a775110cb937f78b")
► pushing sync manifests to "https://gitlab.cn/xiaomage/flux-gitops.git"
► applying sync manifests
✔ reconciled sync configuration
◎ waiting for Kustomization "flux-system/flux-system" to be reconciled
✗ context deadline exceeded
► confirming components are healthy
✔ helm-controller: deployment ready
✔ kustomize-controller: deployment ready
✔ notification-controller: deployment ready
✔ source-controller: deployment ready
✔ all components are healthy
整个过程,大概有如下几个操作:
-
在极狐GitLab 上创建名为 flux-gitops 的仓库(由 bootstrap 时的 repository 参数指定);
-
自动创建包含 GitOps toolkit components 的 manifest 文件(gotk-components.yaml);
-
根据上述生成的 manifest 文件创建 GitOps toolkit components;
-
生成并添加 Deploy key;
-
自动创建包含 GitOps toolkit sync 信息的 manifest 文件(gotk-sync.yaml);
-
检查 GitOps toolkit 相关 components 的健康状态
可以在极狐GitLab 上面查看 bootstrap 过程中创建的仓库,其目录结构为:
.
└── jihu└── flux-system├── gotk-components.yaml├── gotk-sync.yaml└── kustomization.yaml2 directories, 3 files
jihu 为 bootstrap 时由 path 指定的参数。
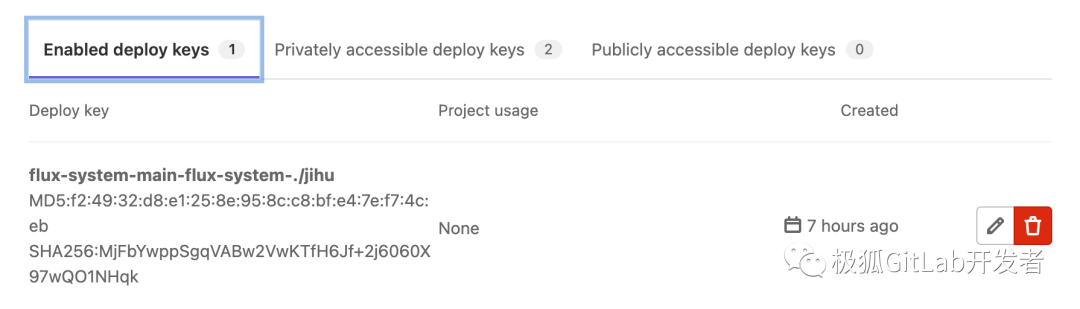
添加的 Deploy key 可以在 flux-gitops 仓库的 Settings --> Repository --> Deploy keys 查看:
查看 GitOps toolkit components 的状态:
$ kubectl -n flux-system get pods
NAME                                       READY   STATUS    RESTARTS   AGE
helm-controller-5dfb499dfb-fpjgh           1/1     Running   0          7h45m
kustomize-controller-5458d94d5c-x4cjs      1/1     Running   0          7h45m
notification-controller-5b5dd6d7d9-z96xc   1/1     Running   0          7h45m
source-controller-cbcbbc677-r2ptp          1/1     Running   0          7h45m
而且可以查看 source-controller 组件的 log:
$ kubectl -n flux-system logs -f source-controller-cbcbbc677-r2ptp
{"level":"info","ts":"2021-09-26T13:37:59.418Z","logger":"controller.gitrepository","msg":"Reconciliation finished in 730.754068ms, next run in 30s","reconciler group":"source.toolkit.fluxcd.io","reconciler kind":"GitRepository","name":"flux-system","namespace":"flux-system"}
可以看到通过 Reconciliation 进行 sync 的同步间隔为 bootstrap 时指定的 30s。此时,说明 GitOps workflow 机制已经运行起来了:flux 已经在监听 flux-gitops 仓库的状态了,一旦有变更就会自动进行同步。
接下来做一个 GitOps workflow 的 Demo。
GitOps Demo
此时 flux 的组件已经在监听极狐GitLab 仓库 flux-gitops 了,一旦这个仓库下面有任何变更,就会把变更自动同步至 Kubernetes 集群侧。为了触发 GitOps workflow 并进行验证,在 flux-gitops 仓库中添加一个 manifest 文件,此时仓库的目录结构变为:
.
├── flux-system
│   ├── gotk-components.yaml
│   ├── gotk-sync.yaml
│   └── kustomization.yaml
└── jihu-gitlab└── manifest.yaml2 directories, 4 files
manifest.yaml 文件中包含创建 namespace、deployment、service、secret等资源所需的内容。
然后提交代码至极狐GitLab 仓库。然后可以看到多了一个名为 flux-gitops 的 namespace:
$ kubectl get ns
flux-gitops        Active   1s
查看此 namespace 下面的 pod:
$ kubectl -n flux-gitops get pods
NAME                      READY   STATUS    RESTARTS   AGE
deploy-796886df9b-62jmd   1/1     Running   0          13s
再进一步,将 manifest.yaml 中 deployment 的 replicas 设置为 2,观察 flux-gitops namespace 下面的pod 变化:
$ kubectl -n flux-gitops get pods -w
NAME                      READY   STATUS    RESTARTS   AGE
deploy-796886df9b-62jmd   1/1     Running   0          11h
deploy-796886df9b-s9v87   0/1     Pending   0          0s
deploy-796886df9b-s9v87   0/1     Pending   0          0s
deploy-796886df9b-s9v87   0/1     Pending   0          0s
deploy-796886df9b-s9v87   0/1     Pending   0          0s
deploy-796886df9b-s9v87   0/1     ContainerCreating   0          0s
deploy-796886df9b-s9v87   0/1     ContainerCreating   0          1s
deploy-796886df9b-s9v87   1/1     Running             0          3s$ kubectl -n flux-gitops get pods
NAME                      READY   STATUS    RESTARTS   AGE
deploy-796886df9b-62jmd   1/1     Running   0          11h
deploy-796886df9b-s9v87   1/1     Running   0          7s
可以看到 pod 的副本数变成了两个。整个过程可以查看 kustomize-controller 的 log,能够看到如下关于 sync 的内容:
$ kubectl -n flux-system logs -f kustomize-controller-5458d94d5c-x4cjs
{"level":"info","ts":"2021-09-27T01:11:08.155Z","logger":"controller.kustomization","msg":"Kustomization applied in 1.829340287s","reconciler group":"kustomize.toolkit.fluxcd.io","reconciler kind":"Kustomization","name":"flux-system","namespace":"flux-system","output":{"clusterrole.rbac.authorization.k8s.io/crd-controller-flux-system":"configured","clusterrolebinding.rbac.authorization.k8s.io/cluster-reconciler-flux-system":"configured","clusterrolebinding.rbac.authorization.k8s.io/crd-controller-flux-system":"configured","customresourcedefinition.apiextensions.k8s.io/alerts.notification.toolkit.fluxcd.io":"configured","customresourcedefinition.apiextensions.k8s.io/buckets.source.toolkit.fluxcd.io":"configured","customresourcedefinition.apiextensions.k8s.io/gitrepositories.source.toolkit.fluxcd.io":"configured","customresourcedefinition.apiextensions.k8s.io/helmcharts.source.toolkit.fluxcd.io":"configured","customresourcedefinition.apiextensions.k8s.io/helmreleases.helm.toolkit.fluxcd.io":"configured","customresourcedefinition.apiextensions.k8s.io/helmrepositories.source.toolkit.fluxcd.io":"configured","customresourcedefinition.apiextensions.k8s.io/kustomizations.kustomize.toolkit.fluxcd.io":"configured","customresourcedefinition.apiextensions.k8s.io/providers.notification.toolkit.fluxcd.io":"configured","customresourcedefinition.apiextensions.k8s.io/receivers.notification.toolkit.fluxcd.io":"configured","deployment.apps/deploy":"configured","deployment.apps/helm-controller":"configured","deployment.apps/kustomize-controller":"configured","deployment.apps/notification-controller":"configured","deployment.apps/source-controller":"configured","gitrepository.source.toolkit.fluxcd.io/flux-system":"configured","kustomization.kustomize.toolkit.fluxcd.io/flux-system":"configured","namespace/flux-gitops":"configured","namespace/flux-system":"configured","networkpolicy.networking.k8s.io/allow-egress":"configured","networkpolicy.networking.k8s.io/allow-scraping":"configured","networkpolicy.networking.k8s.io/allow-webhooks":"configured","secret/jihu-gitlab-cr":"configured","secret/secret-env":"configured","service/notification-controller":"configured","service/source-controller":"configured","service/svc":"configured","service/webhook-receiver":"configured","serviceaccount/helm-controller":"configured","serviceaccount/kustomize-controller":"configured","serviceaccount/notification-controller":"configured","serviceaccount/source-controller":"configured"}}
{"level":"info","ts":"2021-09-27T01:11:08.436Z","logger":"controller.kustomization","msg":"Reconciliation finished in 3.900295254s, next run in 10m0s","reconciler group":"kustomize.toolkit.fluxcd.io","reconciler kind":"Kustomization","name":"flux-system","namespace":"flux-system","revision":"main/9f09f2a078c7f13287df1ed694df7deb45cfb5ed"}
可以看到变更被捕获且进行了同步。也即意味着实现了 GitOps workflow。
写在最后
GitOps 被认为是云原生应用程序和基础设施部署与管理的新模式。极狐GitLab 在 13.x 版本中陆续引入了 Kubernetes Agent 来支持 GitOps workflow。而且每个版本都在不断的迭代和完善。不同于使用 ArgoCD 和 Flux 的是:极狐GitLab 的 GitOps 能力是原生的,不需要额外去安装和管理类似 ArgoCD 和 Flux 这样的第三方软件,减少了维护成本。
关于极狐GitLab 对于 GitOps workflow 的支持,可以查看公众号文章让 KAS 给 GitOps 插上腾飞的翅膀。
这篇关于极狐GitLab 与 Flux 集成实现 GitOps的文章就介绍到这儿,希望我们推荐的文章对编程师们有所帮助!


