本文主要是介绍Android系统中使用Cunit测试C/C++接口,希望对大家解决编程问题提供一定的参考价值,需要的开发者们随着小编来一起学习吧!
Android系统中使用Cunit测试C/C++接口
Cunit是C/C++语言的单元测试框架,但常用于Windows和Linux开发中。
Android系统中经常有jni、so库、hal service等都是C/C++实现,本文讲解如何将Cunit嵌入Android中,用于测试一些C/C++ api。
Cunit简介
Cunit是很早的C/C++接口测试框架,官网如下:
https://cunit.sourceforge.net/contact.html
测试模式有4种:
| 模式 | 介绍 |
|---|---|
| Basic | 最常用的,结果输出到标准输出(stdout) |
| Automated | 生成完XML文件之后,然后再将CUnit-List.dtd、CUnit-List.xsl、CUnit-Run.dtd、CUnit-Run.xsl(这几个文件在CUnit的源码包可以找到)和XML文件放到同一级目录,再用IE浏览器打开,就可以看到漂亮的界面了。 |
| Console | 比较灵活,可以选择只执行其中某一个测试用例。 |
| Curses | 跟Console类似,只不过是以Curses窗口的方式展示。 |
| 模式 | 平台 | 结果输出方式 | 使用的接口函数 |
|---|---|---|---|
| Basic | 所有 | 标准输出 | #include “CUnit/Basic.h” CU_basic_set_mode(CU_BRM_VERBOSE); CU_basic_run_tests(); |
| Automated | 所有 | xml文件 | #include “CUnit/Automated.h” CU_list_tests_to_file(); CU_automated_run_tests(); |
| Console | 所有 | 交互式控制台 | #include “CUnit/Console.h” CU_console_run_tests(); |
| Curses | Linux/Unix | 交互式curses窗口 | #include “CUnit/CUCurses.h” CU_curses_run_tests(); |
这4种模式最终的测试效果如下:
https://cunit.sourceforge.net/screenshots.html
| 模式 | 测试结果呈现 |
|---|---|
| Basic | https://cunit.sourceforge.net/ss_basic.html |
| Automated | https://cunit.sourceforge.net/ss_automated.html |
| Console | https://cunit.sourceforge.net/ss_console.html |
| Curses | https://cunit.sourceforge.net/ss_curses.html |
具体的使用文档可以参考如下:
https://cunit.sourceforge.net/documentation.html
https://cunit.sourceforge.net/doc/index.html
中文文档:
https://blog.csdn.net/iuices/article/details/115280751
测试demo:
https://cunit.sourceforge.net/example.html
源码下载:
https://sourceforge.net/projects/cunit/
交流论坛:
https://sourceforge.net/p/cunit/discussion/
在Android中使用
编译
libcunit_android库的编译文件Android.bp:
cc_library_shared {name: "libcunit_android",local_include_dirs: ["CUnit/Headers","CUnit/Sources/Test",],srcs: ["CUnit/Sources/Framework/TestRun.c","CUnit/Sources/Framework/TestDB.c","CUnit/Sources/Framework/Util.c","CUnit/Sources/Framework/CUError.c","CUnit/Sources/Framework/MyMem.c","CUnit/Sources/Console/Console.c","CUnit/Sources/Basic/Basic.c","CUnit/Sources/Test/test_cunit.c","CUnit/Sources/Automated/Automated.c",],cflags: ["-DMEMTRACE","-DCUNIT_BUILD_TESTS","-DCUNIT_DO_NOT_DEFINE_UNLESS_BUILDING_TESTS",],host_ldlibs: ["-llog"],
}cc_binary {name: "test_cunit_android",local_include_dirs: ["CUnit/Headers","CUnit/Sources/Test",],srcs: ["CUnit/Sources/Test/test_cunit.c"],cflags: ["-DCUNIT_BUILD_TESTS","-DCUNIT_DO_NOT_DEFINE_UNLESS_BUILDING_TESTS",],shared_libs: ["libcunit_android"],}
libcunit_android_test的编译Android.bp
cc_binary {name: "libcunit_android_test",include_dirs: [".","./libcunit_android/CUnit/Headers/",],srcs: ["main.c","test.c","testcase.c",],shared_libs: ["libcunit_android"],}
如何调用框架
main.c
#include <stdio.h>
#include <stdlib.h>
#include <string.h>
#include <assert.h>
#include "Basic.h"
#include "Automated.h"extern void AddTests(void);int main(int argc, char* argv[])
{CU_BasicRunMode mode = CU_BRM_VERBOSE;CU_ErrorAction error_action = CUEA_IGNORE;int i;//标准库输出 无缓冲:不使用缓冲。每个 I/O 操作都被即时写入。buffer 和 size 参数被忽略。setvbuf(stdout, NULL, _IONBF, 0);for (i=1 ; i<argc ; i++) {if (!strcmp("-i", *argv)) {//错误发生时继续执行(默认)error_action = CUEA_IGNORE;}else if (!strcmp("-f", *argv)) {//错误发生时应系统停止error_action = CUEA_FAIL;}else if (!strcmp("-A", *argv)) {//错误发生时系统应退出(EXIT)error_action = CUEA_ABORT;}else if (!strcmp("-s", *argv)) {//只会输出错误信息mode = CU_BRM_SILENT;}else if (!strcmp("-n", *argv)) {//结果会输出基本信息,包括失败以及测试运行的总体状况mode = CU_BRM_NORMAL;}else if (!strcmp("-v", *argv)) {//输出测试运行的详细信息mode = CU_BRM_VERBOSE;}else if (!strcmp("-e",*argv)) {return 0;}else {printf("\nUsage:BasicTest [options]\n\n""Options:-i ignore framework errors [default].\n"" -f fail on framework error.\n"" -A abort on framework error.\n\n"" -s silent mode - no output to screen.\n"" -n normal mode - standard output to screen.\n"" -v verbose mode - max output to screen [default].\n\n"" -e print expected test results and exit.\n"" -h print this message and exit.\n\n");return 0;}
}//CU_initialize_registry  registry初始化//用户在调用任何其他CUnit函数之前调用本函数,如果不这样做可能会导致系统崩溃。
if (CU_initialize_registry()) {printf("\nInitialization of Test Registry failed.");
}else {AddTests();//CU_basic_set_mode()设置运行模式CU_basic_set_mode(mode);//CU_set_error_action设置错误发生时,系统的行为CU_set_error_action(error_action);//CU_basic_run_tests  运行Tests  Basic Mode   基本扩展编程方式  非交互式printf("\nTests completed with return value %d.\n",CU_basic_run_tests());//使用console控制交互界面的函数入口 //CU_console_run_tests();/***使用自动产生XML文件的模式********/CU_set_output_filename("E:\\xml_test\\main");CU_list_tests_to_file();CU_automated_run_tests();/***********************************/// registry释放CU_cleanup_registry();}return 0;
}
testcase.c
#include <stdio.h>
#include <stdlib.h>
#include <assert.h>
#include "CUnit.h"
#include <Automated.h>
#include <TestDB.h>
/**//*---- functions to be tested ------*/
extern int maxi(int i , int j);/**//*---- test cases ------------------*/
void testIQJ(void)
{//断言相等比较CU_ASSERT_EQUAL(maxi(1,1),1);CU_ASSERT_EQUAL(maxi(0,-0),0);
}
void testIGJ(void)
{CU_ASSERT_EQUAL(maxi(2,1),2);CU_ASSERT_EQUAL(maxi(0,-1),0);CU_ASSERT_EQUAL(maxi(-1,-2),-1);
}
void testILJ(void)
{CU_ASSERT_EQUAL(maxi(1,2),2);CU_ASSERT_EQUAL(maxi(-1,0),0);CU_ASSERT_EQUAL(maxi(-2,-1),-1);
}
CU_TestInfo testcases[] = {{"Testing i equals j:",testIQJ},{"Testing i greater than j:",testIGJ},{"Testing i less than j:", testILJ},CU_TEST_INFO_NULL
};
/**//*---- test suites ------------------*/
int suite_success_init(void)
{ return 0; }
int suite_success_clean(void)
{ return 0; }//需要运行的test case
CU_SuiteInfo suites[] = {{"Testing the function maxi:",suite_success_init,suite_success_clean, NULL, NULL,testcases},CU_SUITE_INFO_NULL
};
/*cunit运行环境设置*/
void AddTests(void)
{//1.CU_get_registry  CU_register_suites其他一些关于注册的内部函数,主要用于内部和测试的目的assert(NULL != CU_get_registry());assert(!CU_is_test_running());//注册suitesif(CUE_SUCCESS != CU_register_suites(suites)){fprintf(stderr, "Register suites failed - %s ", CU_get_error_msg());exit(EXIT_FAILURE);}
}
test.c
/**
*file:test.c
**/
int maxi(int i,int j)
{return i>j?i:j;
}
修改Cunit框架
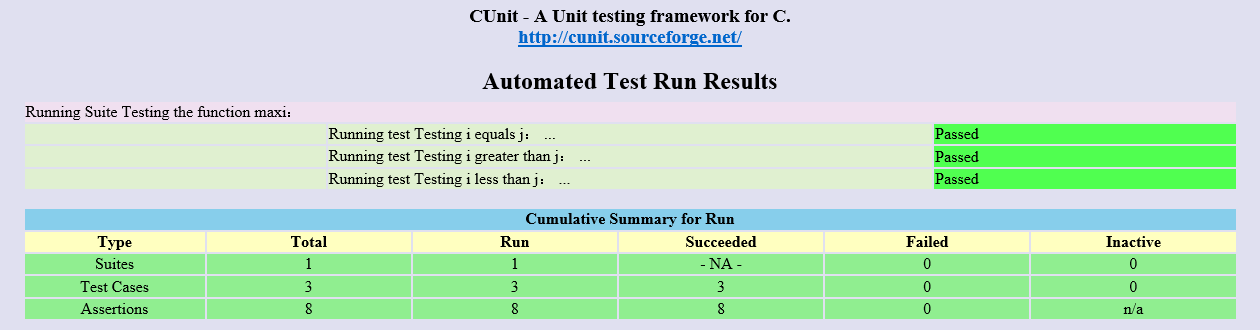
当前Result列表如下:
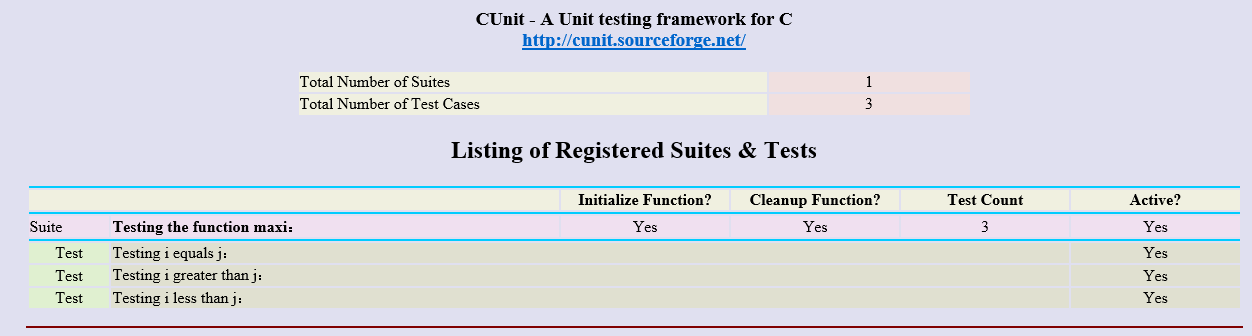
当前List列表如下:
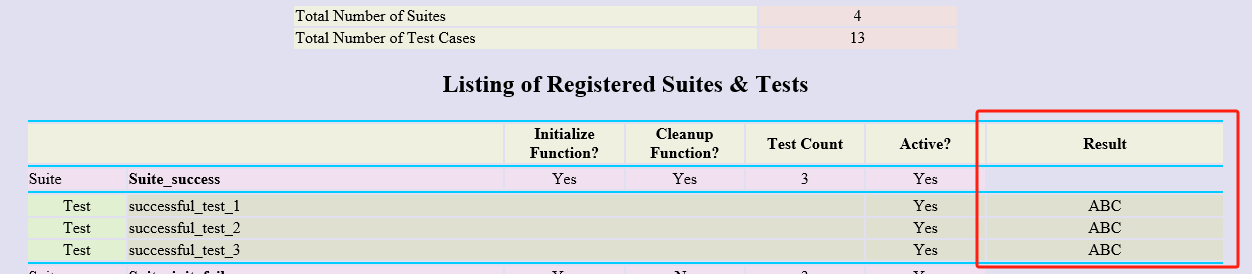
新增一个需求:
需要在测试结果的列表中,添加一列专门用于记录测试的值。
比如,需要记录每个api接口的property或者value值。
【四步走】
- 首先,添加一个成员到类中:
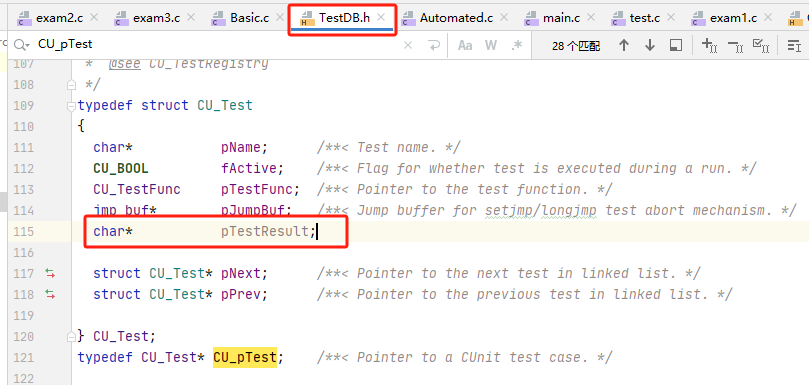
-
在解析属性的时候,记录到xml文件中:
-
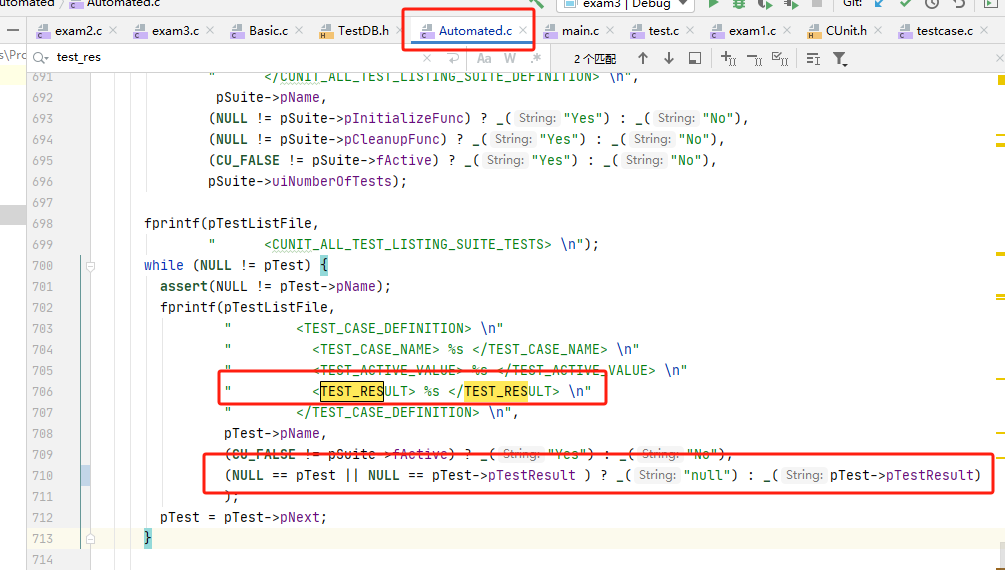
在对应的xml解析文件中修改为如下:
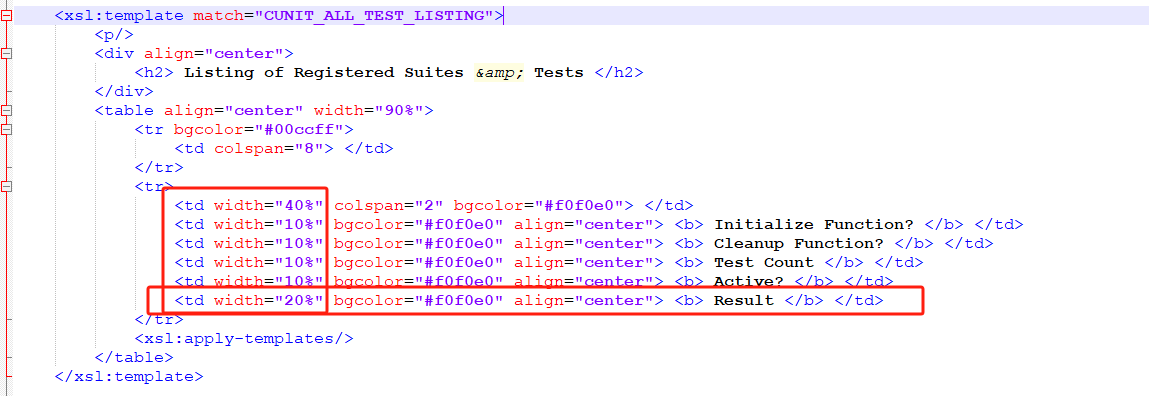
-
在每个对应的test case中,将对应的字符串保存到结构体:

最终的效果如下:
源码下载
https://github.com/KingofHubGit/CTest
这篇关于Android系统中使用Cunit测试C/C++接口的文章就介绍到这儿,希望我们推荐的文章对编程师们有所帮助!


