本文主要是介绍BEVFusion复现 (Ubuntu RTX3090),希望对大家解决编程问题提供一定的参考价值,需要的开发者们随着小编来一起学习吧!
- https://github.com/ADLab-AutoDrive/BEVFusion
1.环境安装
我的机器是RTX3090,CUDA11.1
-
1.创建虚拟环境
conda create -n bevfusion python=3.8.3
-
2.安装PyTorch 和 torchvision
pip install torch==1.8.0+cu111 torchvision==0.9.0+cu111 torchaudio==0.8.0 -f https://download.pytorch.org/whl/torch_stable.html- 因为RTX3090适配CUDA11以上的版本,更适合Pytorch1.8.0及以上,(BEVFusion要求CUDA 9.2,Pytorch=1.3.1,不能完全按照github上的),Pytorch1.9以上的又不适配要求的mmcv和mmdet版本,所以这么完全是按照RTX3090安装环境
-
3.安装MMCV
- 方法1:
- 下载地址:https://download.openmmlab.com/mmcv/dist/cu111/torch1.8.0/index.html
- cuda版本不一样,把地址中
cu111改了就行
下载mmcv_full-1.4.0-cp38-cp38-manylinux1_x86_64.whl
- cuda版本不一样,把地址中
pip install mmcv_full-1.4.0-cp38-cp38-manylinux1_x86_64.whl
- 下载地址:https://download.openmmlab.com/mmcv/dist/cu111/torch1.8.0/index.html
- 方法2:
pip install -U openmim -i https://pypi.tuna.tsinghua.edu.cn/simplemim install mmcv-full==1.6.0 -i https://pypi.tuna.tsinghua.edu.cn/simple
我是方法1成功的
- 方法1:
-
4.安装mmdet
在代码中mmdetection-2.11.0文件中编译安装,不需要去下载了cd mmdetection-2.11.0pip install -r requirements/build.txtpip install -v -e .
如果遇到
error: legacy-install-failure× Encountered error while trying to install package.
╰─> mmpycocotools说明安装pip install -r requirements/build.txt时安装的Cython版本太高了,降低版本即可:pip install Cython==0.29.36,然后再次pip install -v -e .
-
5.安装MMDetection3D
先回到BEVFusion主目录cd ..git clone https://github.com/open-mmlab/mmdetection3d.gitcd mmdetection3dpip install -v -e .
-
6.编译BEVFusion环境
cd ..python setup.py develop
-
bug1:
Installed /home/ywj/work/anaconda3/envs/bevfusion/lib/python3.8/site-packages/networkx-2.2-py3.8.egg
error: networkx 2.2 is installed but networkx>=2.8 is required by {'scikit-image'}
pip install scikit-image==0.19.3
- bug2:
Installed /home/ywj/work/anaconda3/envs/bevfusion/lib/python3.8/site-packages/llvmlite-0.31.0-py3.8-linux-x86_64.egg
error: numpy 1.19.5 is installed but numpy>=1.20.3; python_version < "3.10" is required by {'pandas'}
pip install pandas==1.4.4
- bug3:
RuntimeError: radix_sort: failed on 1st step: cudaErrorInvalidDevice: invalid device ordinal(BEVFusion)
原因:torch版本不对
解决办法:显卡是3090,最后安装的是python==3.7,pytorch=1.9.0,cuda=11.1
- 其他安装包不兼容的问题:
直接按照提示安装低版本的就行
2.数据准备
- nuScenes:
python tools/create_data.py nuscenes --root-path ./data/nuscenes --out-dir ./data/nuscenes --extra-tag nuscenes
可能出现bug :说明MMCV版本没装对,装的是cuda10.1的版本,重新安装
ImportError: libcudart.so.10.1: cannot open shared object file: No such file or directory
3. 训练
3.1. Unimage
- 配置
- 数据下载:https://www.nuscenes.org/nuimages#download(建议用迅雷)
- 获取标签代码:https://github.com/open-mmlab/mmdetection3d/tree/1.0/configs/nuimages
- 在mmdetection3d目录下执行
python -u tools/dataset_converters/nuimage_converter.py --data-root /home/ywj/work/data/unimages --version v1.0-train v1.0-val v1.0-mini --out-dir /home/ywj/work/data/unimages/annotations/ --nproc 16
- 在mmdetection3d目录下执行
- 权重下载:
- mask_rcnn_cbv2_swin_tiny_patch4_window7_mstrain_480-800_adamw_3x_coco.pth:https://github.com/VDIGPKU/CBNetV2/blob/main/model_zoo.md
- swin_tiny_patch4_window7_224_22k.pth:
https://github.com/SwinTransformer/storage/releases/download/v1.0.0/swin_tiny_patch4_window7_224.pth
- 标签解读
- json解释:https://github.com/nutonomy/nuscenes-devkit/blob/master/docs/schema_nuimages.md
- attribute.json
- 属性是实例的属性,可以在类别保持不变的情况下更改。例如:停放/停止/移动的车辆,以及自行车是否有人骑车。nuImages 中的属性是 nuScenes 中属性的超集。
- attribute.json
attribute {"token":                   <str> -- Unique record identifier."name":                    <str> -- Attribute name."description":             <str> -- Attribute description.
}
- calibrated_sensor.json
- 定义在特定车辆上校准的特定摄像机。所有外部参数都是相对于自我车身框架给出的。与 nuScenes 相反,所有相机图像都会扭曲且未经校正。
calibrated_sensor {"token":                   <str> -- Unique record identifier."sensor_token":            <str> -- Foreign key pointing to the sensor type."translation":             <float> [3] -- Coordinate system origin in meters: x, y, z."rotation":                <float> [4] -- Coordinate system orientation as quaternion: w, x, y, z."camera_intrinsic":        <float> [3, 3] -- Intrinsic camera calibration. Empty for sensors that are not cameras."camera_distortion":       <float> [5 or 6] -- Camera calibration parameters [k1, k2, p1, p2, k3, k4]. We use the 5 parameter camera convention of the CalTech camera calibration toolbox, that is also used in OpenCV. Only for fish-eye lenses in CAM_BACK do we use the 6th parameter (k4).
}
- 对象类别的分类(例如车辆、人类)。子类别由句点界定(例如human.pedestrian.adult)。nuImages 中的
类别与 nuScenes 中的类别相同(不包含 litarseg),再加上flat.driveable_surface.
category {"token":                   <str> -- Unique record identifier."name":                    <str> -- Category name. Subcategories indicated by period."description":             <str> -- Category description.
}
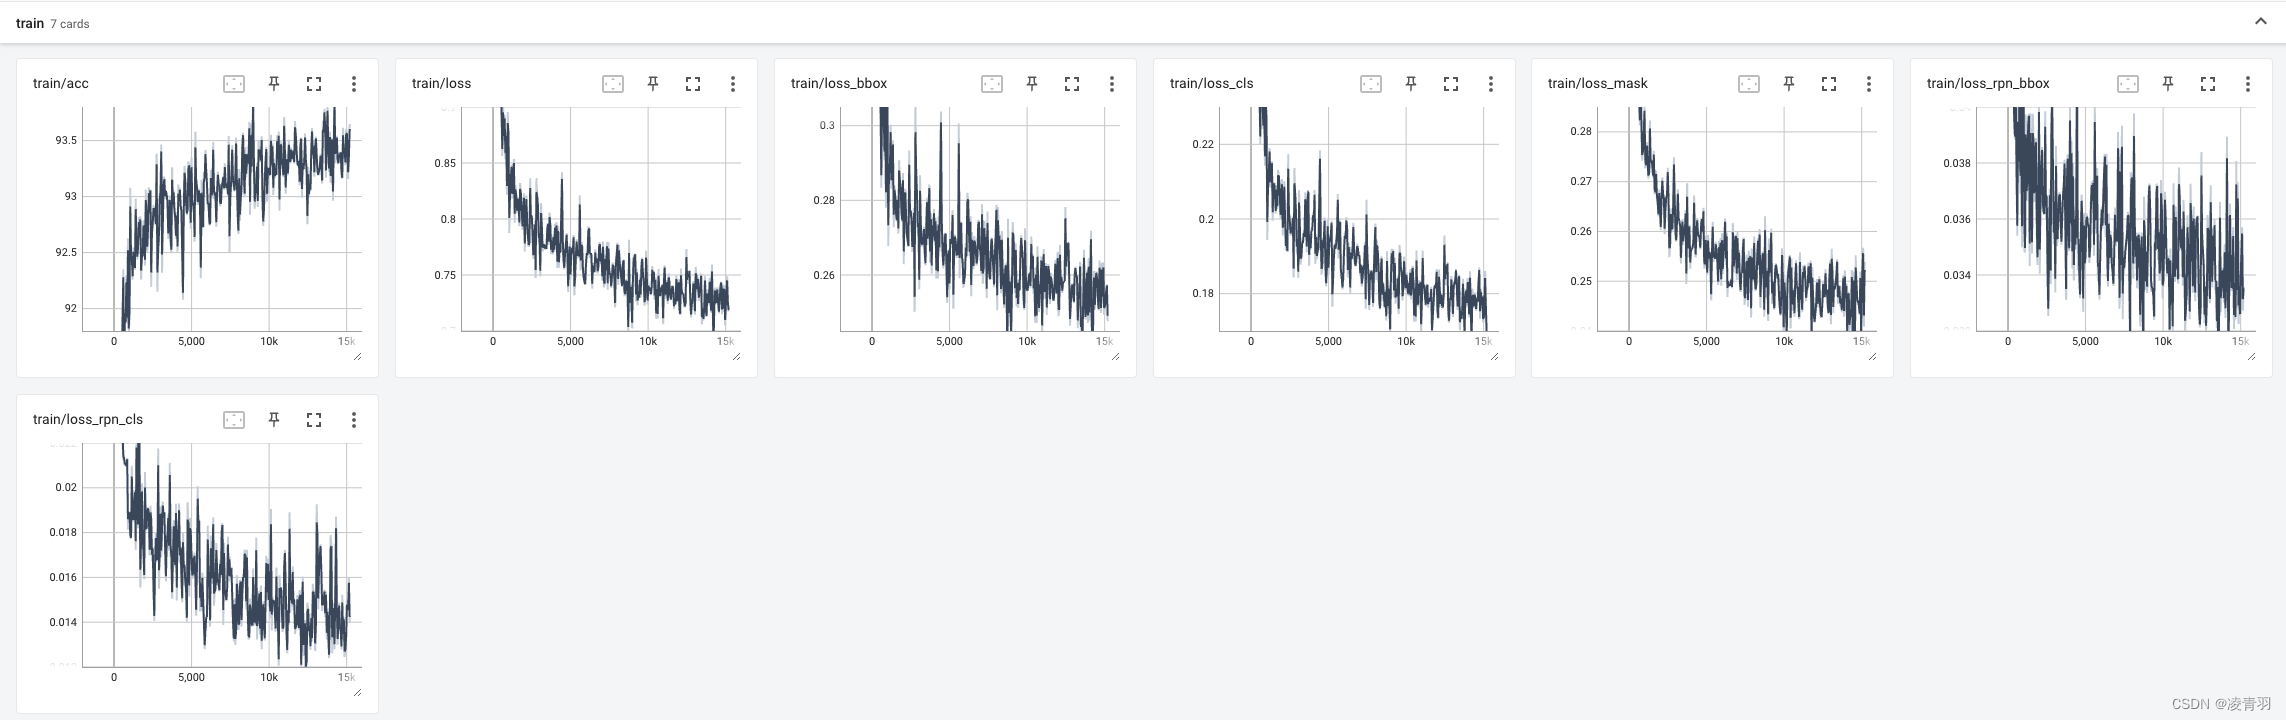
- 实验结果
- 训练速度:4卡3090 约4h/1epoch(samples_per_gpu=2),一共需要3d/36epoch
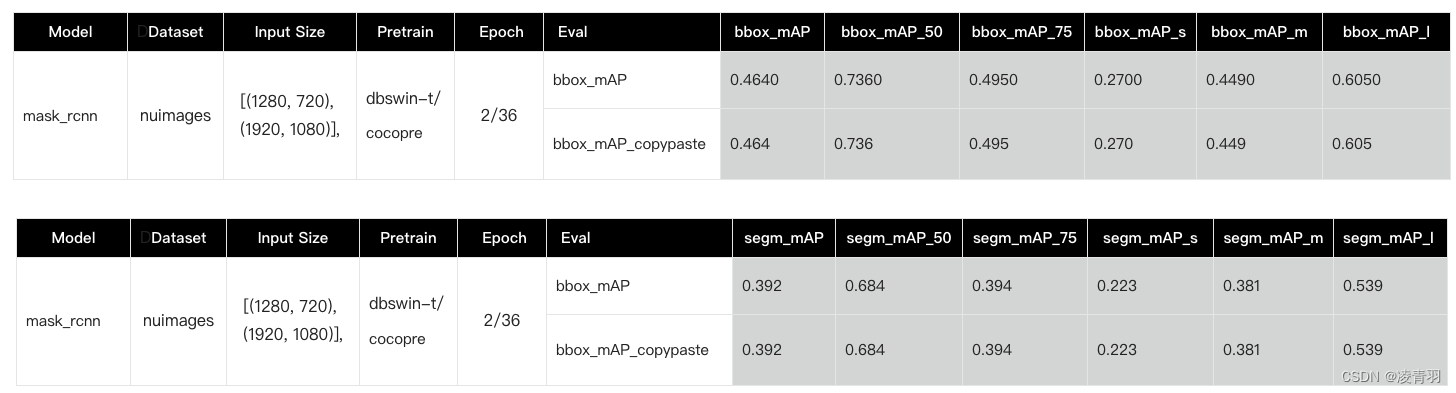

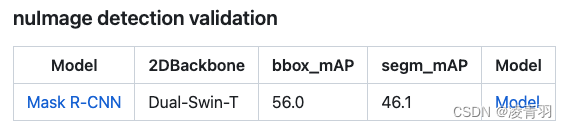
- epoch36 paper结果:
3.2. bevf_pp_cam
- 训练速度:4卡3090 约4h/1epoch(samples_per_gpu=1)
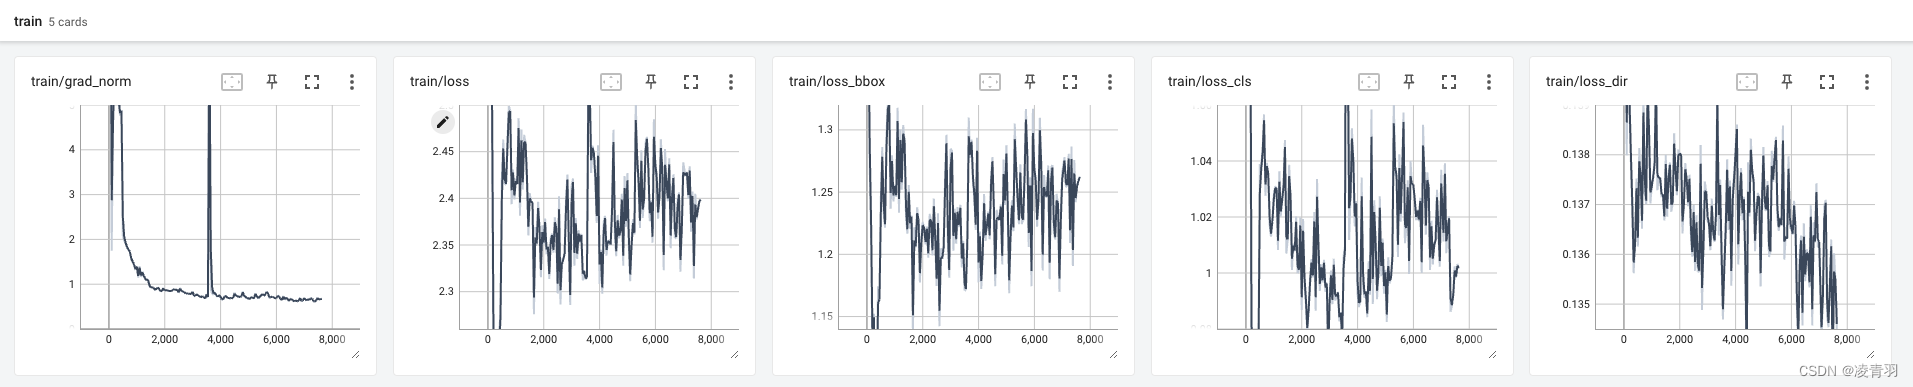
- loss下降曲线很差,估计有batch太小的原因
这篇关于BEVFusion复现 (Ubuntu RTX3090)的文章就介绍到这儿,希望我们推荐的文章对编程师们有所帮助!


