本文主要是介绍目标检测算法改进系列之添加变核卷积AKConv模块,希望对大家解决编程问题提供一定的参考价值,需要的开发者们随着小编来一起学习吧!
AKConv变核卷积
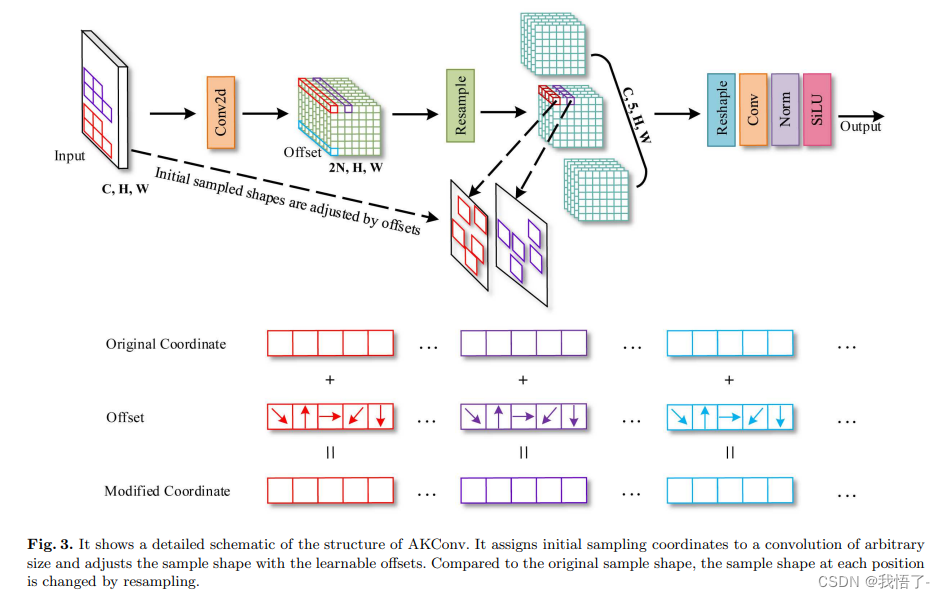
KConv的主要思想:AKConv(可变核卷积)主要提供一种灵活的卷积机制,允许卷积核具有任意数量的参数和采样形状。这种方法突破了传统卷积局限于固定局部窗口和固定采样形状的限制,从而使得卷积操作能够更加精准地适应不同数据集和不同位置的目标。
AKConv的改进点:
(1)灵活的卷积核设计:AKConv允许卷积核具有任意数量的参数,这使得其可以根据实际需求调整大小和形状,从而更有效地适应目标的变化。
(2)初始采样坐标算法:针对不同大小的卷积核,AKConv提出了一种新的算法来生成初始采样坐标,这进一步增强了其在处理各种尺寸目标时的灵活性。
(3)适应性采样位置调整:为适应目标的不同变化,AKConv通过获得的偏移量调整不规则卷积核的采样位置,从而提高了特征提取的准确性。
(4)减少模型参数和计算开销:AKConv支持线性增减卷积参数的数量,有助于在硬件环境中优化性能,尤其适合于轻量级模型的应用。
原文地址:AKConv: Convolutional Kernel with Arbitrary Sampled Shapes and Arbitrary Number of Parameters
改进实现过程
AKConv定义
import torch.nn as nn
import torch
from einops import rearrange
import mathclass AKConv(nn.Module):def __init__(self, inc, outc, num_param, stride=1, bias=None):super(AKConv, self).__init__()self.num_param = num_paramself.stride = strideself.conv = nn.Sequential(nn.Conv2d(inc, outc, kernel_size=(num_param, 1), stride=(num_param, 1), bias=bias),nn.BatchNorm2d(outc),nn.SiLU())  # the conv adds the BN and SiLU to compare original Conv in YOLOv5.self.p_conv = nn.Conv2d(inc, 2 * num_param, kernel_size=3, padding=1, stride=stride)nn.init.constant_(self.p_conv.weight, 0)self.p_conv.register_full_backward_hook(self._set_lr)@staticmethoddef _set_lr(module, grad_input, grad_output):grad_input = (grad_input[i] * 0.1 for i in range(len(grad_input)))grad_output = (grad_output[i] * 0.1 for i in range(len(grad_output)))def forward(self, x):# N is num_param.offset = self.p_conv(x)dtype = offset.data.type()N = offset.size(1) // 2# (b, 2N, h, w)p = self._get_p(offset, dtype)# (b, h, w, 2N)p = p.contiguous().permute(0, 2, 3, 1)q_lt = p.detach().floor()q_rb = q_lt + 1q_lt = torch.cat([torch.clamp(q_lt[..., :N], 0, x.size(2) - 1), torch.clamp(q_lt[..., N:], 0, x.size(3) - 1)],dim=-1).long()q_rb = torch.cat([torch.clamp(q_rb[..., :N], 0, x.size(2) - 1), torch.clamp(q_rb[..., N:], 0, x.size(3) - 1)],dim=-1).long()q_lb = torch.cat([q_lt[..., :N], q_rb[..., N:]], dim=-1)q_rt = torch.cat([q_rb[..., :N], q_lt[..., N:]], dim=-1)# clip pp = torch.cat([torch.clamp(p[..., :N], 0, x.size(2) - 1), torch.clamp(p[..., N:], 0, x.size(3) - 1)], dim=-1)# bilinear kernel (b, h, w, N)g_lt = (1 + (q_lt[..., :N].type_as(p) - p[..., :N])) * (1 + (q_lt[..., N:].type_as(p) - p[..., N:]))g_rb = (1 - (q_rb[..., :N].type_as(p) - p[..., :N])) * (1 - (q_rb[..., N:].type_as(p) - p[..., N:]))g_lb = (1 + (q_lb[..., :N].type_as(p) - p[..., :N])) * (1 - (q_lb[..., N:].type_as(p) - p[..., N:]))g_rt = (1 - (q_rt[..., :N].type_as(p) - p[..., :N])) * (1 + (q_rt[..., N:].type_as(p) - p[..., N:]))# resampling the features based on the modified coordinates.x_q_lt = self._get_x_q(x, q_lt, N)x_q_rb = self._get_x_q(x, q_rb, N)x_q_lb = self._get_x_q(x, q_lb, N)x_q_rt = self._get_x_q(x, q_rt, N)# bilinearx_offset = g_lt.unsqueeze(dim=1) * x_q_lt + \g_rb.unsqueeze(dim=1) * x_q_rb + \g_lb.unsqueeze(dim=1) * x_q_lb + \g_rt.unsqueeze(dim=1) * x_q_rtx_offset = self._reshape_x_offset(x_offset, self.num_param)out = self.conv(x_offset)return out# generating the inital sampled shapes for the AKConv with different sizes.def _get_p_n(self, N, dtype):base_int = round(math.sqrt(self.num_param))row_number = self.num_param // base_intmod_number = self.num_param % base_intp_n_x, p_n_y = torch.meshgrid(torch.arange(0, row_number),torch.arange(0, base_int), indexing='xy')p_n_x = torch.flatten(p_n_x)p_n_y = torch.flatten(p_n_y)if mod_number > 0:mod_p_n_x, mod_p_n_y = torch.meshgrid(torch.arange(row_number, row_number + 1),torch.arange(0, mod_number),indexing='xy')mod_p_n_x = torch.flatten(mod_p_n_x)mod_p_n_y = torch.flatten(mod_p_n_y)p_n_x, p_n_y = torch.cat((p_n_x, mod_p_n_x)), torch.cat((p_n_y, mod_p_n_y))p_n = torch.cat([p_n_x, p_n_y], 0)p_n = p_n.view(1, 2 * N, 1, 1).type(dtype)return p_n# no zero-paddingdef _get_p_0(self, h, w, N, dtype):p_0_x, p_0_y = torch.meshgrid(torch.arange(0, h * self.stride, self.stride),torch.arange(0, w * self.stride, self.stride),indexing='xy')p_0_x = torch.flatten(p_0_x).view(1, 1, h, w).repeat(1, N, 1, 1)p_0_y = torch.flatten(p_0_y).view(1, 1, h, w).repeat(1, N, 1, 1)p_0 = torch.cat([p_0_x, p_0_y], 1).type(dtype)return p_0def _get_p(self, offset, dtype):N, h, w = offset.size(1) // 2, offset.size(2), offset.size(3)# (1, 2N, 1, 1)p_n = self._get_p_n(N, dtype)# (1, 2N, h, w)p_0 = self._get_p_0(h, w, N, dtype)p = p_0 + p_n + offsetreturn pdef _get_x_q(self, x, q, N):b, h, w, _ = q.size()padded_w = x.size(3)c = x.size(1)# (b, c, h*w)x = x.contiguous().view(b, c, -1)# (b, h, w, N)index = q[..., :N] * padded_w + q[..., N:]  # offset_x*w + offset_y# (b, c, h*w*N)index = index.contiguous().unsqueeze(dim=1).expand(-1, c, -1, -1, -1).contiguous().view(b, c, -1)# 根据实际情况调整index = index.clamp(min=0, max=x.shape[-1] - 1)x_offset = x.gather(dim=-1, index=index).contiguous().view(b, c, h, w, N)return x_offset#  Stacking resampled features in the row direction.@staticmethoddef _reshape_x_offset(x_offset, num_param):b, c, h, w, n = x_offset.size()# using Conv3d# x_offset = x_offset.permute(0,1,4,2,3), then Conv3d(c,c_out, kernel_size =(num_param,1,1),stride=(num_param,1,1),bias= False)# using 1 × 1 Conv# x_offset = x_offset.permute(0,1,4,2,3), then, x_offset.view(b,c×num_param,h,w)  finally, Conv2d(c×num_param,c_out, kernel_size =1,stride=1,bias= False)# using the column conv as follow, then, Conv2d(inc, outc, kernel_size=(num_param, 1), stride=(num_param, 1), bias=bias)x_offset = rearrange(x_offset, 'b c h w n -> b c (h n) w')return x_offset
添加过程
添加教程这里不再重复介绍、因为专栏内容有许多,添加过程又需要截特别图片会导致文章大家读者也不通顺如果你已经会添加注意力机制了,可以跳过本章节,如果你还不会,大家可以看我下面的文章,里面详细的介绍了其他卷积模块的添加方法,可以参考一下,大致都是添加到C2f、Bottleneck、Ncek、DetectHead部分。
目标检测算法改进系列之添加SCConv空间和通道重构卷积
配置文件
# Ultralytics YOLO 🚀, AGPL-3.0 license
# YOLOv8 object detection model with P3-P5 outputs. For Usage examples see https://docs.ultralytics.com/tasks/detect# Parameters
nc: 80  # number of classes
scales: # model compound scaling constants, i.e. 'model=yolov8n.yaml' will call yolov8.yaml with scale 'n'# [depth, width, max_channels]n: [0.33, 0.25, 1024]  # YOLOv8n summary: 225 layers,  3157200 parameters,  3157184 gradients,   8.9 GFLOPss: [0.33, 0.50, 1024]  # YOLOv8s summary: 225 layers, 11166560 parameters, 11166544 gradients,  28.8 GFLOPsm: [0.67, 0.75, 768]   # YOLOv8m summary: 295 layers, 25902640 parameters, 25902624 gradients,  79.3 GFLOPsl: [1.00, 1.00, 512]   # YOLOv8l summary: 365 layers, 43691520 parameters, 43691504 gradients, 165.7 GFLOPsx: [1.00, 1.25, 512]   # YOLOv8x summary: 365 layers, 68229648 parameters, 68229632 gradients, 258.5 GFLOPs# YOLOv8.0n backbone
backbone:# [from, repeats, module, args]- [-1, 1, Conv, [64, 3, 2]]  # 0-P1/2- [-1, 1, AKConv, [128, 3, 2]]  # 1-P2/4- [-1, 3, C2f, [128, True]]- [-1, 1, AKConv, [256, 3, 2]]  # 3-P3/8- [-1, 6, C2f, [256, True]]- [-1, 1, AKConv, [512, 3, 2]]  # 5-P4/16- [-1, 6, C2f, [512, True]]- [-1, 1, AKConv, [1024, 3, 2]]  # 7-P5/32- [-1, 3, C2f, [1024, True]]- [-1, 1, SPPF, [1024, 5]]  # 9# YOLOv8.0n head
head:- [-1, 1, nn.Upsample, [None, 2, 'nearest']]- [[-1, 6], 1, Concat, [1]]  # cat backbone P4- [-1, 3, C2f, [512]]  # 12- [-1, 1, nn.Upsample, [None, 2, 'nearest']]- [[-1, 4], 1, Concat, [1]]  # cat backbone P3- [-1, 3, C2f, [256]]  # 15 (P3/8-small)- [-1, 1, AKConv, [256, 3, 2]]- [[-1, 12], 1, Concat, [1]]  # cat head P4- [-1, 3, C2f, [512]]  # 18 (P4/16-medium)- [-1, 1, AKConv, [512, 3, 2]]- [[-1, 9], 1, Concat, [1]]  # cat head P5- [-1, 3, C2f, [1024]]  # 21 (P5/32-large)- [[15, 18, 21], 1, Detect, [nc]]  # Detect(P3, P4, P5)
这篇关于目标检测算法改进系列之添加变核卷积AKConv模块的文章就介绍到这儿,希望我们推荐的文章对编程师们有所帮助!


